Table of Contents >> Show >> Hide
- What Is a Cascade Waterfall Braid?
- Why This Braid Is So Popular
- What You Need Before You Start
- How to Prep Your Hair for a Better Waterfall Braid
- How to Make a Cascade Waterfall Braid Step-by-Step
- Step 1: Brush and Part Your Hair
- Step 2: Take a Front Section and Divide It Into Three Strands
- Step 3: Start Like a Regular Three-Strand Braid
- Step 4: Create the First “Waterfall” Drop
- Step 5: Replace the Dropped Strand With New Hair
- Step 6: Repeat the Pattern Across the Head
- Step 7: Secure the End
- Step 8: Loosen and Finish the Style
- Common Waterfall Braid Mistakes and How to Fix Them
- Best Hair Types and Lengths for a Waterfall Braid
- Pretty Variations to Try
- When to Wear a Cascade Waterfall Braid
- Final Thoughts
- Real-Life Experiences With Learning a Cascade Waterfall Braid
- SEO Tags
A cascade waterfall braid is one of those hairstyles that looks like it took a stylist, a ring light, and a suspicious amount of free time. In reality, it is much more doable than it looks. Once you understand the pattern, this romantic braided style becomes a repeatable, beginner-friendly technique you can wear to brunch, prom, weddings, work, date night, or even on an ordinary Tuesday when your ponytail has emotionally given up.
The secret is simple: you braid across the head while intentionally letting one strand “fall” each round, which creates that soft, cascading effect. Think of it as a French braid that decided to loosen up and become prettier. The result is elegant but not stiff, polished but not fussy, and detailed without looking like you spent your whole life in front of a mirror.
In this step-by-step guide, you will learn exactly how to make a cascade waterfall braid, what tools you need, how to avoid common mistakes, and how to adapt the look for different hair types and lengths. If you have ever looked at a waterfall braid and thought, “That is beautiful, but my fingers are not licensed for that,” this tutorial is for you.
What Is a Cascade Waterfall Braid?
A cascade waterfall braid is a variation of the classic waterfall braid. It uses a French-braid-inspired technique, but instead of pulling every strand into the braid, you intentionally drop one piece each time and replace it with a new section of hair. That falling strand creates the “waterfall” look, while the braid itself acts like a delicate ribbon laid across your head.
The style works especially well on medium to long hair because the dropped pieces show up more clearly. It also looks gorgeous on wavy or curled hair because texture makes the cascading strands stand out. Straight hair can absolutely wear it too, but adding a little grip or bend often helps the braid look fuller and stay put.
Why This Braid Is So Popular
There is a reason the waterfall braid keeps showing up in tutorials, wedding mood boards, and “easy but impressive” hairstyle roundups. It checks a lot of boxes at once.
- It keeps hair off your face without forcing you into a full updo.
- It looks detailed and intricate, even when the technique is fairly simple.
- It can be soft and boho, sleek and polished, or formal and bridal.
- It works beautifully as a half-up hairstyle.
- It pairs well with curls, waves, straight hair, flowers, clips, and ribbons.
In other words, it is the overachiever of braided hairstyles.
What You Need Before You Start
You do not need a salon cart full of products to make a waterfall braid. A few basics will do the job.
- Brush or wide-tooth comb
- Tail comb for neat sectioning
- Small clear elastic
- Bobby pins
- Texture spray, dry shampoo, or light styling spray for grip
- Optional: curling iron or wand for loose waves
- Optional: light hairspray or finishing spray
How to Prep Your Hair for a Better Waterfall Braid
Preparation matters more than people think. A waterfall braid is easier when the hair has a little texture and grip. If your hair is freshly washed and super silky, it may slip through your fingers like it is trying to escape the assignment.
For many people, second-day hair works beautifully because it holds shape better. If your hair is clean and soft, add a bit of texture spray or dry shampoo through the roots and mid-lengths. Brush it through so the product is evenly distributed. This helps the sections stay separated and gives the braid a fuller look.
If you want a more romantic finish, curl your hair loosely before braiding. Soft waves make the dropped strands look more obvious and give the finished style that dreamy, floating effect. If you prefer a cleaner, sleeker braid, keep the hair straight and smooth flyaways with a light cream or serum.
How to Make a Cascade Waterfall Braid Step-by-Step
Step 1: Brush and Part Your Hair
Start by brushing your hair thoroughly from roots to ends. Any knots will make sectioning harder and may turn your pretty braid into a small personal crisis.
Choose your part. A deep side part tends to make the waterfall braid look extra dramatic and face-framing, but a center part works too. Once your part is set, decide where the braid will begin. Most people start near the hairline on one side of the head and braid horizontally toward the back.
Step 2: Take a Front Section and Divide It Into Three Strands
Near your part, pick up a section of hair about 1 to 2 inches wide. Divide it into three equal strands:
- Top strand: closest to the crown
- Middle strand: in the center
- Bottom strand: closest to the face or ear
Hold the strands firmly but not so tightly that your fingers start negotiating overtime pay.
Step 3: Start Like a Regular Three-Strand Braid
Begin with one regular braid cycle to anchor the style.
- Cross the top strand over the middle strand.
- Then cross the bottom strand over the new middle strand.
At this point, you have the basic braid structure in place.
Step 4: Create the First “Waterfall” Drop
Now the signature move begins.
- Add a small piece of hair from the top of the head into the top strand, just like you would in a French braid.
- Cross that top strand over the middle.
- Now let the bottom strand go completely. Do not bring it back into the braid. Just drop it and let it hang.
That dropped piece becomes your first waterfall strand.
Step 5: Replace the Dropped Strand With New Hair
This is the part that makes the pattern click.
Right behind the dropped strand, pick up a new section of loose hair from underneath. This becomes your new bottom strand. Cross this new bottom strand over the middle strand.
Congratulations. You have completed your first full waterfall sequence.
Step 6: Repeat the Pattern Across the Head
Continue using the same pattern all the way across:
- Add hair to the top strand.
- Cross it over the middle.
- Drop the bottom strand.
- Pick up a new bottom strand from underneath.
- Cross that new bottom strand over the middle.
Repeat slowly and evenly. Focus on keeping the braid in a fairly straight horizontal line across your head. If you angle downward too much, the braid can start slipping toward the back instead of giving you that graceful, floating band.
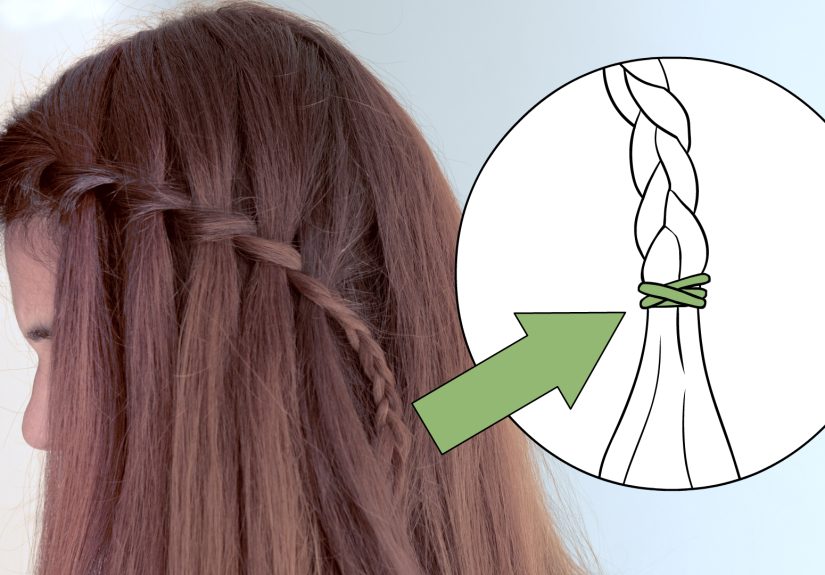
Step 7: Secure the End
Once you reach the back of your head or the point where you want the braid to stop, finish with a small regular three-strand braid for an inch or two, then secure it with a clear elastic. If your hair is thick or slippery, use a bobby pin or two to anchor the end discreetly under the top layer of hair.
You can leave it as one side braid, pin it into the hair, or connect it to a matching braid from the other side for a half-up waterfall braid.
Step 8: Loosen and Finish the Style
For a softer, fuller look, gently tug at the outer edges of the braid. This technique, often called “pancaking,” makes the braid appear wider and more romantic. Be gentle. You want airy, not accidental collapse.
Finish with a light mist of hairspray to hold the shape and smooth flyaways. If desired, curl the loose ends or touch up a few face-framing pieces. Done right, the finished look should feel effortless, even though your hands absolutely know they worked for it.
Common Waterfall Braid Mistakes and How to Fix Them
The Braid Looks Flat
Add texture before you start, and gently loosen the braid at the end. Fine hair especially benefits from dry shampoo, texturizing spray, or soft waves before braiding.
The Strands Keep Slipping
Your hair may be too silky or freshly washed. Use a bit more grip product, work with smaller sections, and keep your fingers close to the scalp while braiding.
The Pattern Gets Confusing Midway
Remember the shortcut: top strand gets more hair, bottom strand gets dropped and replaced. If you can remember that sentence, you can recover even if your hands momentarily lose the plot.
The Braid Looks Too Tight
Relax your grip slightly and use slightly larger sections. A waterfall braid should look soft and flowing, not like it is bracing for impact.
The Braid Disappears Into Thick Hair
Make the braid larger and more visible. On dense hair, tiny sections can get visually lost. A chunkier braid usually balances thick hair better.
Best Hair Types and Lengths for a Waterfall Braid
This style is flexible, but a few adjustments help depending on your hair.
Fine Hair
Use volumizing or texturizing products before braiding. Keep sections modest so the braid does not look too thin, and loosen it slightly for fullness.
Thick Hair
Use larger sections and make sure you secure the braid well with elastics and pins. Thick hair can create a stunning waterfall effect, but it needs a bit more control.
Wavy Hair
This is almost the dream scenario. Natural waves make the dropped strands look more visible and romantic.
Curly Hair
Yes, you can absolutely do it. Decide whether you want to preserve your natural texture or stretch it slightly for easier sectioning. Finger-detangling and working with defined sections help a lot.
Short Hair
A full waterfall braid may be trickier on shorter cuts, but an accent waterfall braid near the front can still look beautiful. Keep expectations realistic and choose a smaller, side-focused version.
Pretty Variations to Try
- Half-up waterfall braid: The classic version, perfect for everyday wear and events.
- Double waterfall braid: Add a second braid below the first for more detail.
- Curled waterfall braid: Loose curls make the cascade pop beautifully.
- Boho waterfall braid: Loosen the braid and pull out face-framing pieces.
- Bridal waterfall braid: Add baby’s breath, pearls, or decorative pins.
- Crown-inspired waterfall braid: Continue the braid around more of the head for a halo effect.
When to Wear a Cascade Waterfall Braid
One reason this hairstyle keeps winning is that it can shift moods depending on how you finish it. Sleek and tidy feels polished for work or dinner. Loose and textured feels boho and casual. Add curls and accessories, and suddenly it is wedding-guest material. It is ideal for:
- Date nights
- School dances and prom
- Bridesmaids or bridal hair
- Baby showers and brunches
- Holiday parties
- Photoshoots or content days
- Any day you want compliments from strangers in checkout lines
Final Thoughts
Learning how to make a cascade waterfall braid step-by-step is really about learning one repeating pattern and trusting your hands to improve with practice. The first attempt may feel slow. The second may feel better. By the third or fourth try, you will probably wonder why this hairstyle ever seemed intimidating in the first place.
The beauty of a waterfall braid is that it looks intricate without requiring advanced hairstyling talent. A little prep, a little patience, and a few well-placed bobby pins go a long way. Once you get comfortable with the basics, you can customize it for your hair type, your texture, and your vibe. Soft and romantic, neat and polished, or messy in a very intentional “I woke up magical” way, this braid earns its place in any hairstyle rotation.
Real-Life Experiences With Learning a Cascade Waterfall Braid
The first time most people try a cascade waterfall braid, there is usually a moment of confusion that feels oddly personal. You start off confident, three sections in hand, mirror ready, shoulders squared like a true braid warrior. Then one strand falls, another appears, your fingers hesitate, and suddenly you are bargaining with your own hair. This is normal. In fact, it is practically part of the learning process.
A very common beginner experience is realizing that the style looks much easier when someone else is doing it on video than when you are doing it on your own head. Watching a tutorial and braiding on yourself are two completely different sports. Depth perception changes, your arms get tired, and your fingers occasionally forget basic logic. The good news is that waterfall braids improve dramatically with muscle memory. Even one or two practice sessions can make a big difference.
Another real-world lesson people discover quickly is that hair texture changes everything. On very silky hair, the sections can slide apart so easily that the braid seems determined to retire early. On textured, wavy, or slightly dirty hair, the braid often behaves much better. That is why so many people end up loving this style on second-day hair. It is not laziness. It is strategy with a side of dry shampoo.
Many people also notice that their first braid looks too tight. This happens because beginners usually focus so hard on controlling the sections that they accidentally make the braid stiff. Once you get more comfortable, your hands loosen, the braid softens, and the finished look becomes much prettier. That is also the moment when you discover the magic of gently pulling the braid wider at the end. Suddenly, the style goes from “I tried” to “I absolutely planned this.”
There is also something satisfying about how customizable the waterfall braid becomes over time. At first, the goal is simply to finish the braid without losing the pattern. Later, people start experimenting with curls, double braids, half-up styles, decorative pins, and messier boho versions. The braid grows with your confidence. What begins as a step-by-step challenge often becomes a go-to hairstyle for events, photos, and those days when you want your hair to look a little extra without doing the absolute most.
Perhaps the most relatable experience of all is getting compliments on a waterfall braid after feeling unsure while making it. Someone will say, “Wow, your hair looks amazing,” and you will briefly consider confessing that your left arm went numb and one bobby pin is carrying the entire operation. But that is part of the charm. A cascade waterfall braid has a wonderful way of looking elegant and effortless, even when the road to that elegance involved a mirror, a pep talk, and a few dramatic sighs.


