Table of Contents >> Show >> Hide
- Why Flip Flops Make Surprisingly Great Wall Art
- Supplies: Dollar Store Basics + Optional Upgrades
- Plan Your Beachy Wall Hanging Design
- Step-by-Step: Build the Wall Hanging
- Pro Tips for a Polished Finish (So It Looks Like Decor, Not a Science Project)
- Three Easy Variations (Same Idea, Different Personality)
- Where to Hang It (and Make It Look Like It Belongs There)
- FAQ
- Final Thoughts
- Extra: Real-Life Crafting Notes & Beachy Wall Hanging Experiences (The Honest Part)
If your home is craving a little “I totally live five steps from the ocean” energy (even if you’re actually five steps from a parking lot), a beachy wall hanging is the quickest way to fake it ‘til you make it. And yesthis one starts with dollar store flip flops. Not the fancy kind with memory foam and emotional support arches. The simple, lightweight ones that basically exist to say, “I’m here for a good time, not a long time.”
This DIY turns a few pairs of budget flip flops into coastal wall decor that looks playful, colorful, and intentionally handmade (not “I found this in a box labeled ‘random stuff’ at 1:00 a.m.”). You’ll learn a sturdy construction method, the best ways to decorate without making a gluey mess, and how to customize the look from bright and tropical to calm, neutral, and beach-house chic.
Why Flip Flops Make Surprisingly Great Wall Art
Flip flops are basically the craft-world version of a blank canvasexcept they’re already shaped like summer. Their foam bodies are lightweight, easy to paint, and simple to embellish with ribbon, twine, faux flowers, shells, beads, or even tiny wooden letters. Plus, the straps create built-in “frames” for decorations or mini signs, which is convenient because nobody wants to engineer a wall hanging using trigonometry.
Even better: flip flops naturally lend themselves to repetition (the secret sauce of decor that looks “designed”). A set of 5–9 flip flops arranged in a neat row or staggered lengths reads like a curated displayespecially when you keep a consistent color palette.
Supplies: Dollar Store Basics + Optional Upgrades
Dollar store supply list (the “I’m thrifty and proud” version)
- 3–5 pairs of dollar store flip flops (same size looks tidier)
- Jute twine or nautical rope (or ribbon if you want extra color)
- Hot glue gun + glue sticks
- A wooden paint stick, dowel, or small sign plank (for the top bar)
- Craft scissors or a utility blade (adult help recommended for blades)
- Acrylic paint or spray paint (optional, but helpful for a cohesive look)
- Embellishments: seashells, faux greenery, silk flowers, beads, buttons, or stickers
- Command strips or a nail/hook to hang it up
Optional upgrades (when you want it to last longer than a popsicle in July)
- Strong craft adhesive for a long-lasting bond (especially on foam, plastic straps, and heavier embellishments)
- Clear sealer (matte or satin) if it’s going in a humid bathroom or covered porch
- Sandpaper (fine grit) to lightly rough slick surfaces before gluing
- Mini zip ties (great for “hidden strength” on the back)
Plan Your Beachy Wall Hanging Design
Pick a layout that matches your vibe
Before you glue anything, decide how you want the finished piece to hang. Here are three crowd-pleasers:
- Classic garland: flip flops hang in a straight line, evenly spaced.
- Staggered lengths: flip flops hang at different heights for a breezy “wind chime” feel.
- Cluster centerpiece: 3 flip flops in the middle, 1–2 on each side, plus a little sign in the center.
Choose a color palette (this is where it stops looking “random”)
The easiest way to make dollar store materials look intentional is to limit your palette. Try one of these:
- Coastal calm: white + tan + sea-glass green
- Tropical punch: coral + turquoise + sunshine yellow
- Beach house neutral: sand + driftwood gray + navy
- Mermaid moment: teal + lavender + pearl accents
Decide your “message,” if you want one
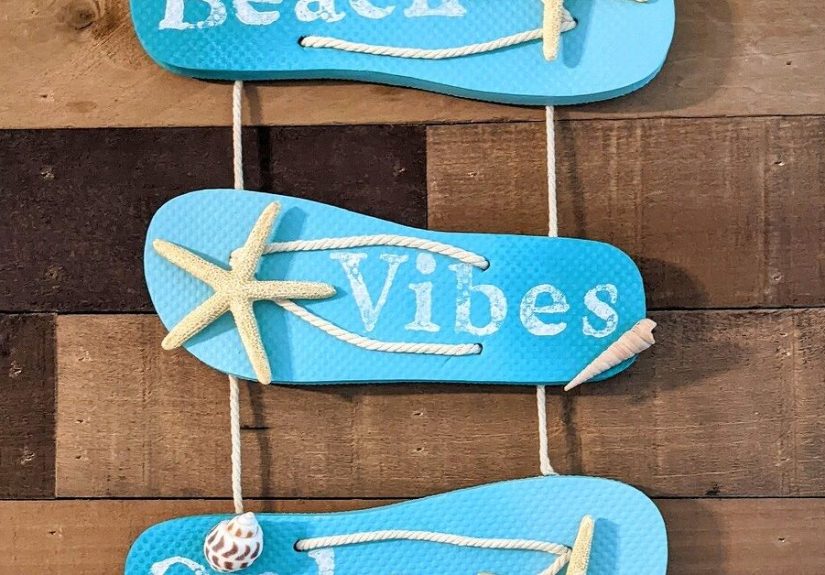
Not required, but fun: add mini letters or a tiny sign that says “BEACH,” “SALT AIR,” “VACAY MODE,” or the timeless classic, “Welcome (to my home where sand is basically a personality trait).”
Step-by-Step: Build the Wall Hanging
Step 1: Prep the flip flops
- Clean them. Wipe the foam and straps with a damp cloth. If they feel slick, a tiny bit of dish soap helps, then let them dry.
- Remove the straps (optional). If you want a flatter surface for decorating, gently pull the plugs through the bottom. If you like the flip flop look, keep straps on and decorate around them.
- Trim and tidy. Snip any plastic nubs on the underside if they’ll interfere with hanging flat.
- Lightly rough glossy areas (optional). A quick scuff where glue will go can help adhesives grip better.
Step 2: Make the top “hanger bar”
Your top bar is what keeps the whole project from turning into a floppy noodle situation. A wooden paint stick works great because it’s lightweight and already straight.
- Paint or wrap the bar with twine/rope if you want a beachy finish.
- Add a hanging loop: tie twine at both ends of the bar and knot it into a loop at the top. (Pro tip: keep the loop long enough so it clears bulky hooks.)
Step 3: Cut and attach your hanging cords
Decide how many flip flops you’re using, then cut twine lengths. For a staggered look, cut a mix of short, medium, and long pieces. A good starter set for five flip flops is: 12″, 14″, 16″, 14″, 12″ (plus a little extra for knots).
- Measure spacing across the bar (even spacing looks clean).
- Tie each cord to the bar using a double knot. If you want a neater look, wrap the knot area with a small dab of glue and a final twine wrap.
Step 4: Attach flip flops to the cords (sturdy method)
This is the part where many DIYs go wrong: the flip flops spin, slide, or slowly drift into a sad diagonal line. The fix is two-point attachment.
- Mark two glue points on the back of each flip flop (left and right side near the top). Two points keep it from twisting like a tiny foam weather vane.
- Hot glue to position. Use hot glue to tack the cords in place quickly so nothing shifts while you work.
- Reinforce for durability. Add a stronger adhesive over/around the cord contact points if you have it, especially if your wall hanging will live in humidity (bathroom) or heat (covered porch).
- Optional hidden support: On the back, add a small strip of felt, ribbon, or a scrap of twine over the cord end, then glue it down. It acts like a “patch” that keeps cords from pulling loose.
Step 5: Decorate like you mean it (without overdoing it)
Now the fun part: making it look beachy instead of “my kid’s craft bin exploded.” A few easy, high-impact ideas:
- Shell cluster: glue 3–5 shells in a small group near the toe area.
- Starfish accent: one starfish centered on a flip flop is instantly coastal.
- Twine wrap: wrap the straps with twine or ribbon for texture.
- Mini florals: small silk flowers in white or coral add a cheerful pop.
- Beach words: add tiny wooden letters: “SEA,” “SAND,” “SUN,” “OH SHORE.”
Keep the weight balanced. If you glue a heavy shell cluster to one flip flop, give its neighbor a similar “visual weight” (like a ribbon bow or a smaller shell grouping) so the whole piece feels intentional.
Step 6: Level it, finish it, hang it
- Hold the top bar up and check if the flip flops hang evenly. Adjust knots if one looks too low.
- Add any final details: a bow at the top, beads on the cords, or a small sign in the center.
- Let glue cure fully before hanging (especially if you used a stronger adhesive for reinforcement).
- Hang it on a hook, nail, or strong removable stripthen step back and admire your “beach house” energy.
Pro Tips for a Polished Finish (So It Looks Like Decor, Not a Science Project)
- Repeat one “signature detail.” For example: every flip flop gets one tiny shell + one bead. Repetition makes it look designed.
- Hide glue strings. After hot glue sets, snip stray strings with scissors. Tiny detail, big difference.
- Use texture, not clutter. Twine, raffia, and neutral ribbon add coastal texture without looking busy.
- Seal if needed. If it’s going in a steamy bathroom or a covered outdoor space, a clear sealer helps protect paint and keep embellishments looking fresh.
- Don’t fight gravity. Two-point attachment and even spacing prevent the dreaded “everything is leaning left” look.
Three Easy Variations (Same Idea, Different Personality)
1) The “Beach Please” sign version
Add a small wooden plaque or cut a rectangle from foam board, paint it, and write a phrase in permanent marker or vinyl letters. Hang it in the center with flip flops on both sides.
2) The driftwood-and-shell upgrade
Swap the paint stick for a piece of driftwood (or faux driftwood from the craft aisle). Add a few strings of shells or beads between flip flops for a soft “beach wind chime” feel.
3) The ombré sunset set
Paint flip flops in a gradient: coral to peach to pale yellow. Add tiny white dots for “sea foam,” and finish with a small rope bow at the top. It’s cheerful, modern, and screams summer without actually screaming (unlike some seagulls).
Where to Hang It (and Make It Look Like It Belongs There)
A beachy wall hanging works best where you want a relaxed mood:
- Entryway: pair it with a woven basket, a small plant, or a tray for keys.
- Bathroom: perfect for coastal decorjust seal it if the room gets steamy.
- Covered porch: keep it out of direct rain and sun for the longest life.
- Kid’s room: make it bright and playful with tropical colors and big bows.
FAQ
How many flip flops do I need?
For a compact wall hanging: 3–5 pairs is usually enough. For a wider statement piece: 6–9 pairs. Keeping them the same size helps your spacing look clean.
What’s the best glue for flip flop crafts?
Hot glue is great for quick positioning, but for long-term durabilityespecially on foam, straps, and heavier decorationsreinforcing with a stronger craft adhesive can help. Let everything cure fully before hanging.
Can I hang this outside?
You can, but “outside” is a spectrum. A covered porch = usually fine. Direct rain and harsh sun = your wall hanging may fade or loosen faster. Use outdoor-safe paint and a clear sealer if it’s going outside.
Is this a good craft for kids?
Kids can absolutely help with painting, arranging, and decorating. Adults should handle hot glue, strong adhesives, and cutting tools.
Final Thoughts
A Dollar Store flip flop craft doesn’t have to look cheap. With a little planning, a consistent color palette, and a sturdy hanging method, you can create a beachy wall hanging that feels playful, polished, and totally you. Plus, every time you see it, your brain will whisper: “I deserve a vacation.” Which is just good mental health, honestly.
Extra: Real-Life Crafting Notes & Beachy Wall Hanging Experiences (The Honest Part)
The first time I tried making a flip flop wall hanging, I did what many of us do when faced with a glue gun: I believed hot glue could solve all problems, including gravity, humidity, and my tendency to “eyeball measurements.” Spoiler: it can’t. Hot glue is amazing for speed, but if your flip flops are foam and your embellishments have any weight (shell clusters, wooden letters, chunky bows), hot glue alone can start to loosen over timeespecially if the piece hangs somewhere warm or steamy.
The second lesson was all about twisting. A single cord attachment point seems logical until your flip flop starts spinning like it’s trying to win a tiny Olympic medal for interpretive dance. The fix is simple: attach each flip flop at two points so it hangs flat and stays facing forward. It’s one of those small “why didn’t I do this earlier?” moves that instantly makes the project feel more professional. The bonus is that it also helps the whole wall hanging look more uniform, which matters a lot when your materials are bright and playful.
Then there’s the spacing issueaka the moment you realize knots have feelings and will not sit exactly where you tell them. The easiest way to avoid a wonky finished piece is to measure and mark the top bar first. Even if you’re going for a relaxed coastal vibe, your eyes still like consistency. I started using a simple pattern (short, medium, long, medium, short) so the center becomes the focal point. It’s a quick trick that makes the arrangement look intentional rather than “I ran out of twine and panicked.”
Decorating was another learning curve. The temptation is to use every beachy thing you own: shells, starfish, faux pearls, raffia, ribbon, glitter, and possibly a tiny plastic dolphin you found in a drawer. But the most “high-end” looking versions usually repeat just one or two details across all the flip flopslike a shell cluster on each one, or twine-wrapped straps plus one small accent. When you repeat a detail, the whole piece reads like a set. When you mix ten different themes, it reads like a souvenir shop exploded.
The best surprise? This project is ridiculously customizable. I made one in soft neutrals for a bathroom, and it looked calm and beach-house pretty. Then I made another with bright tropical colors for a summer party backdrop, and it looked like instant vacation energy. I’ve also seen people turn the same concept into holiday decor (yes, festive flip flops are a thing) just by changing the colors and adding themed accents. Once you get the structure rightsolid top bar, balanced cords, secure attachmentyou can remix the style any time you want.
So if your first attempt isn’t perfect, don’t worry. Coastal style is basically built on the idea that things can be a little weathered, a little quirky, and still look fantastic. And if anyone asks where you bought it, you can smile and say, “Oh, this? It’s custom.” Because it is.


