Table of Contents >> Show >> Hide
- Why a Stepping-Stone Path Is a Great DIY Project
- Plan Before You Dig
- Tools and Materials You’ll Likely Need
- How To Lay a Stepping-Stone Path (Step by Step)
- Common Mistakes to Avoid
- Design Ideas to Make the Path Look Finished
- Simple Example: A Backyard Garden Path
- Maintenance Tips for a Long-Lasting Path
- Final Thoughts
- Real-World Experiences and Lessons People Commonly Report (Extra 500+ Words)
If your yard has that one muddy shortcut everyone uses anyway (you know, the one that magically appears between the back door and the grill), a stepping-stone path is one of the smartest upgrades you can make. It adds charm, protects your lawn, and makes your landscape feel intentional instead of “we definitely meant to wear a groove into the grass.”
The good news: laying a stepping-stone path is very DIY-friendly. The even better news: when done right, it looks custom, lasts longer, drains better, and doesn’t wobble like a bad restaurant table. In this guide, you’ll learn how to plan, prep, lay, level, and finish a stepping-stone path with practical tips that help it hold up through weather, foot traffic, and real life.
Why a Stepping-Stone Path Is a Great DIY Project
A stepping-stone path sits in the sweet spot between landscaping and hardscaping. It gives you a polished look without the complexity of pouring concrete or building a full paver walkway. It also works well in informal garden settings, curved routes, and areas where you want water to infiltrate between stones instead of running off like a mini river.
It’s especially useful for:
- Garden paths between beds
- Routes from a patio to a shed or gate
- High-traffic lawn shortcuts
- Decorative paths through mulch or gravel areas
- Softening the look of a more formal landscape
Plan Before You Dig
1) Choose the Path Route
Start by walking the area and noticing where people naturally step. That “desire path” is often the best path. If the route is practical, use it. If it sends guests through your tomato patch, adjust accordingly.
Think about purpose:
- Utility path: Straighter, faster, more direct
- Garden path: Curvier, slower, more scenic
- Main walkway: Wider and more stable, with cleaner edges
2) Think About Drainage and Slope
Water is the quiet troublemaker in outdoor projects. If your path is near your house, make sure it does not encourage water toward the foundation. Even individual stones should be set so water sheds away from structures, and nearby hard surfaces should slope away from the home.
Also look for low spots where water pools after rain. If the area stays soggy, consider raising the path slightly, improving drainage, or using a deeper compacted base in trouble spots.
3) Pick Your Stone Type
You can use natural flagstone, cut stone, or concrete stepping stones. All can work well. The best choice depends on your style, budget, and how formal you want the path to look.
- Natural flagstone: Organic shape, rustic feel, lots of character
- Concrete stepping stones: Affordable, consistent sizes, easier spacing
- Large flat pavers: Cleaner look, great for modern yards
Choose stones that are flat, stable, and thick enough for outdoor traffic. Avoid polished surfaces that can get slippery when wet.
4) Test the Spacing With Your Actual Stride
This is the step people skip, then regret. Lay the stones on top of the ground first and walk the path normally. Don’t do a runway strut. Don’t do tiny “I’m testing tile” steps. Walk like you actually live there.
Spacing affects how the path feels:
- Closer spacing slows movement and feels more relaxed
- Wider spacing speeds movement but can feel awkward if overdone
- If you’ll roll a wheelbarrow or garden cart across it, keep gaps tighter and surfaces more even
Tools and Materials You’ll Likely Need
- Stepping stones or flat pavers
- Shovel and/or garden spade
- Hand trowel
- Rubber mallet
- Level (torpedo level is handy)
- Mason’s line, stakes, or a garden hose for layout
- Builder’s sand / bedding sand (and/or stone dust depending on method)
- Tamper (hand tamper or plate compactor for larger paths)
- Wheelbarrow or cart
- Work gloves, boots, and knee pads
- Optional: landscape fabric, edging, gravel, joint filler, stepable plants
Safety note: Before digging, call 811 to have underground utilities marked. It’s a fast step that can prevent an expensive and dangerous surprise.
How To Lay a Stepping-Stone Path (Step by Step)
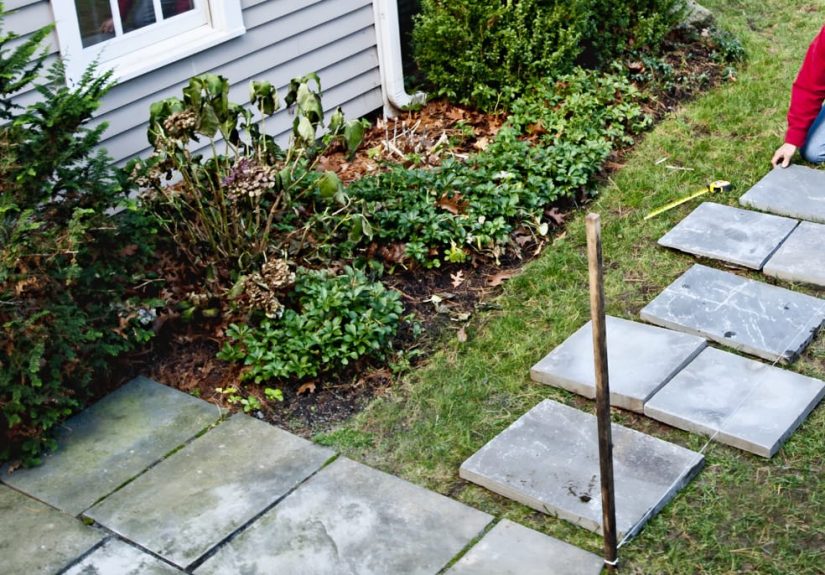
Step 1: Lay Out the Stones on the Ground
Place the stones where you want them and adjust until the path feels natural. For irregular stones, rotate pieces until the overall rhythm looks balanced. If the path curves, use a garden hose to visualize the route first.
Pro tip: Stand back and check sightlines from different angles (back door, patio, sidewalk). A path can walk well but still look oddly cramped from the house if one section pinches too tightly.
Step 2: Trace Each Stone
Once you like the layout, trace around each stone with a spade, knife, or trowel. This gives you an exact outline for excavation and helps you reinstall each piece where it belongs.
If your stones are numbered in your head only, this is your moment to upgrade to reality: mark the underside with chalk or set them beside their holes in order.
Step 3: Remove Sod and Excavate
Lift each stone and remove grass, roots, and soil inside the outline. The depth depends on your stone thickness and the base material you’re using. For many stepping-stone installations, you’ll dig deep enough for the stone plus a bedding layer (often sand or stone dust).
Aim for a flat bottom in each recess. Uneven holes create rocking stones, and rocking stones create ankle drama.
If you’re building a more formal path (or working in a soggy area), you may excavate the full path area and build a deeper base using compacted paver base/gravel plus leveling sand. That takes more work but increases stability.
Step 4: Add the Base Material
For simple garden stepping-stone paths, many DIYers use a sand base or stone dust in each recess. Add enough material so the stone will sit at the right height when set.
Base options:
- Bedding sand: Easy to adjust and level
- Stone dust / fines: Compacts well and supports the stone
- Crushed stone + sand (for wetter or higher-traffic areas): Better drainage and strength
Tamp or press the base flat. For larger path areas, compacting the base makes a noticeable difference in long-term performance.
Step 5: Set the Stone and Level It
Place the stone into the prepared recess and press it into the base. Use a rubber mallet to tap it down gently. Check for level and stability.
There are three things to check here:
- No wobble: The stone should feel solid underfoot
- Comfortable height: Usually flush with the surrounding grade (or just slightly proud, depending on the finish and mowing needs)
- Slight pitch for drainage: Especially near structures, angle the stone subtly so water doesn’t sit on top
If the stone rocks, lift it, adjust the base, and try again. This part takes patience, but it’s where the “looks nice” path becomes the “wow, that feels professional” path.
Step 6: Repeat and Continuously Check the Walk
Install the rest of the stones one by one, checking each for level and walking comfort. After every few stones, walk the path at normal speed. If one step feels too long or too short, fix it now. Your future self (carrying groceries in the rain) will appreciate it.
Step 7: Fill the Gaps and Finish the Edges
Once all stones are set, fill around and between them. Your filler affects both appearance and maintenance.
Common options:
- Sand: Clean look, easy to top off
- Decorative gravel: Good drainage, nice contrast
- Soil + stepable plants: Softens the path and blends it into the landscape
- Mulch (for informal beds): Budget-friendly, but replenishment needed
If using sand, sweep it into gaps and lightly mist to help it settle. Refill as needed. If planting between stones, choose low-growing plants that can handle at least some foot traffic and match your light/moisture conditions.
Common Mistakes to Avoid
Placing Stones Directly on Grass and Calling It “Done”
Yes, you can drop stones on the lawn. No, they won’t stay level for long. They tend to wobble, sink unevenly, and become annoying to mow around.
Ignoring Drainage
If water heads toward your house, your path has become part of the problem. Always check slope and avoid trapping water near foundations or low spots.
Over-Wide Spacing
What looks stylish in a photo may feel like a lunge in real life. Test spacing with the shortest regular user in your household, not the person with the longest stride.
Skipping Compaction in Weak Soil
Loose or recently disturbed soil settles. If your yard has soft fill, take extra time with compaction and consider a stronger base. This is boring advice, but it prevents the “mystery dip” that appears three months later.
Using the Wrong Plants Between Stones
Many groundcovers look beautiful but don’t tolerate heavy foot traffic. Choose plants marketed as stepable or foot-traffic tolerant, and make sure they fit your climate and sun exposure.
Design Ideas to Make the Path Look Finished
- Plant low edging: dwarf grasses, lavender, or compact perennials along the sides
- Add path lighting: solar or low-voltage lights for safety and atmosphere
- Mix stone sizes: creates a more natural, less “cookie-cutter” look
- Use contrasting filler: dark gravel with light stone (or vice versa) adds visual definition
- Repeat materials nearby: match stone color to your patio, retaining wall, or garden border for a cohesive design
Simple Example: A Backyard Garden Path
Let’s say you’re connecting a patio to a raised vegetable bed. The path curves around a small tree, crosses a lawn section that gets muddy, and is used daily during growing season.
A smart setup might be:
- Large flat concrete or natural stones for stable footing
- Tighter spacing for carrying tools and watering cans
- Slightly deeper base in the muddy zone
- Gravel or sand filler near the wet area for better drainage
- Stepable thyme or sedum in sunnier, drier sections
This kind of mixed approach keeps the path practical while still looking like part of the garden instead of a last-minute fix.
Maintenance Tips for a Long-Lasting Path
- Recheck level after the first few heavy rains
- Top off sand or gravel filler as it settles
- Pull weeds early before roots spread under stones
- Trim groundcovers so they don’t hide stone edges
- Reset any stone that starts to rock (don’t wait for it to get worse)
- Clean algae or moss from slick surfaces in shady spots
A stepping-stone path doesn’t require much maintenance, but a little yearly touch-up keeps it safe and good-looking.
Final Thoughts
Learning how to lay a stepping-stone path is one of those projects that pays off immediately. You get cleaner shoes, less lawn damage, and a yard that looks more intentional. The key is simple: plan the route, test the spacing, prep the base, and take your time leveling each stone.
Do that, and your path won’t just look good on day oneit’ll still feel solid after seasons of rain, heat, and backyard traffic. And every time someone says, “Wow, this looks great,” you can nod modestly while pretending you totally didn’t spend 20 minutes leveling one stubborn stone. (We all do it.)
Real-World Experiences and Lessons People Commonly Report (Extra 500+ Words)
One of the most common experiences homeowners share after installing a stepping-stone path is this: the project seems deceptively simple at first, and then the leveling phase teaches patience. Many people assume the hard part will be digging, but the real craft is in getting each stone to sit firmly without rocking. The typical story goes something like this: the first stone takes five minutes, the second takes fifteen, and the third takes thirty because now the standards are higher. That’s actually a good sign. It means the installer has started noticing how the path feels underfoot, not just how it looks from the patio door.
Another frequent experience is discovering how important stride testing is. A path can look perfectly spaced when you’re standing still, but feel awkward when you walk it carrying a basket, a watering can, or a bag of potting mix. People often report going back and shifting several stones after a “test walk,” especially on curved paths. This is normal and worth doing. The path is a functional feature, not just yard art. A small spacing adjustment early can make the route feel natural for years.
Homeowners also learn quickly that soil conditions matter more than expected. In firm, well-drained soil, a simple sand or stone-dust setup may perform beautifully. In softer or recently disturbed areas, stones can settle unevenly after the first heavy rain. Many DIYers say their biggest lesson was not “I used the wrong stone,” but “I should have compacted the base more” or “I should have improved drainage in that one soggy spot.” The good news is that stepping-stone paths are forgiving. Individual stones can be lifted, re-leveled, and reset without rebuilding the whole thing.
There’s also a design lesson people mention after living with the path for a few months: edge treatment changes everything. A path laid through plain grass can already look great, but adding low plants, gravel borders, or subtle lighting often makes it feel complete. Even simple improvementslike trimming grass tightly around the stones or filling gaps more neatlycan upgrade the look from “DIY project” to “intentional landscape feature.”
People who plant between stones often report mixed results at first, and that’s normal too. Some plants thrive, others get crushed, and some spread far more enthusiastically than expected. The best outcomes usually come from matching plants to site conditions (sun, moisture, foot traffic) instead of choosing only by appearance. In other words, the cutest plant tag does not always equal the happiest path.
Finally, many homeowners say the most satisfying part of the project is how often it gets used. A stepping-stone path changes movement patterns immediately. Kids follow it. Guests notice it. You use the yard more because the route is cleaner and easier. That’s the real win. Beyond curb appeal, the path becomes part of daily lifequietly solving muddy shoes, worn grass, and awkward shortcuts while making the landscape feel more welcoming. Not bad for a weekend project and a pile of stones.


