Table of Contents >> Show >> Hide
- Before You Start: Make Sure Shingles Are Right for Your Shed
- Tools and Materials You Will Need
- Safety Comes First, Because Gravity Never Takes a Day Off
- Step 1: Remove Old Roofing and Inspect the Roof Deck
- Step 2: Install the Eave Drip Edge
- Step 3: Add Leak Barrier if Your Roof or Climate Calls for It
- Step 4: Install the Underlayment
- Step 5: Install the Rake Drip Edge
- Step 6: Snap Chalk Lines for Straight Courses
- Step 7: Install the Starter Strip
- Step 8: Lay the First Course of Shingles
- Step 9: Continue Up the Roof, Staggering the Joints
- Step 10: Handle Flashing Around Walls, Vents, and Roof Intersections
- Step 11: Install Ridge Cap Shingles
- Step 12: Final Inspection and Cleanup
- Common Mistakes to Avoid
- How Many Shingles Do You Need for a Shed?
- Should You DIY or Hire a Pro?
- Practical Experience and Real-World Lessons From Installing Shed Roof Shingles
- Conclusion
If your shed roof is currently wearing bare plywood like it is a summer outfit, it is time for an upgrade. Installing roof shingles on a shed is one of those projects that looks intimidating from the ground, but becomes much more manageable once you understand the order of the layers. The secret is not brute strength, mysterious contractor wizardry, or owning seven nail guns. It is simply doing each step in the right sequence and resisting the urge to “eyeball it.” Roofing is not the place for chaos.
A properly shingled shed roof helps protect your tools, lawn gear, holiday decorations, and that random box of cords you swear you will organize one day. Asphalt shingles are popular because they are affordable, durable, widely available, and fairly forgiving for careful DIYers. They also look more finished than many budget shed coverings, which is nice if your shed is visible from the patio and you do not want it looking like a temporary science experiment.
In this guide, you will learn how to install roof shingles on your shed step by step, including how to prep the deck, add drip edge, install underlayment, lay starter strips, shingle the field, flash tricky areas, and finish the ridge. You will also learn the common mistakes that cause leaks, curling, and general roof-related heartbreak.
Before You Start: Make Sure Shingles Are Right for Your Shed
Not every shed roof is a great match for asphalt shingles. The first thing to check is the roof slope. Most asphalt shingles are installed on roofs with a slope of 2:12 or greater, and roofs between 2:12 and less than 4:12 usually require special low-slope underlayment methods. If your shed roof is flatter than that, shingles are usually not the best choice. In that case, look at a low-slope roofing product instead of trying to convince standard shingles to do a job they were not hired for.
You should also confirm three practical details before opening a single bundle:
- The roof deck is sound, dry, and securely fastened.
- Your local building code allows the roofing method you plan to use.
- The shingle manufacturer’s instructions match your shed’s slope and climate.
That last one matters more than many DIYers expect. Roof shingles are not all installed exactly the same way. Exposure, starter-strip details, nail placement, and low-slope requirements can vary by brand and product line. Think of the bundle wrapper instructions as the roof’s official rulebook, not optional reading material for people who enjoy tiny print.
Tools and Materials You Will Need
Gather everything before you climb up. Repeated trips up and down a ladder are a great way to waste time and test your patience.
Basic Tools
- Extension ladder
- Hammer or roofing nailer
- Utility knife with hook blades
- Chalk line
- Tape measure
- Flat pry bar
- Caulk gun
- Tin snips for flashing
- Broom or leaf blower
- Safety glasses and work gloves
Roofing Materials
- Asphalt shingles
- Starter strip shingles or starter material
- Underlayment or roofing felt
- Leak barrier for eaves or vulnerable areas if needed
- Drip edge flashing
- Roofing nails
- Ridge cap shingles
- Step flashing or vent flashing if your shed roof has penetrations or sidewalls
- Roofing cement for small sealing tasks where allowed by the manufacturer
Safety Comes First, Because Gravity Never Takes a Day Off
Even a small shed can be dangerous to roof. Set your ladder on stable, level ground and keep the area at the top and bottom clear. Maintain three points of contact when climbing, and do not carry armfuls of tools while going up the ladder. Use a tool belt, bucket, or rope system instead. If the roof is wet, icy, or windy, postpone the project. Your shingles can wait. Your ankles would prefer that they do.
Step 1: Remove Old Roofing and Inspect the Roof Deck
If the shed already has old shingles, roofing felt, or rolled roofing, strip everything down to the bare deck. Pull all remaining nails and sweep the surface clean. A clean deck makes the next layers lie flat, and flat is exactly what you want. Roofing materials are not fond of lumps, splinters, or hidden fasteners poking upward like tiny sabotage devices.
Inspect the roof decking carefully. Replace any rotten, soft, delaminated, or water-damaged panels. Refasten loose sheathing so the deck feels solid underfoot. New shingles installed over bad decking may look fine for a minute, but that minute ends the first time heat, rain, and movement get involved.
Step 2: Install the Eave Drip Edge
The drip edge is the thin metal flashing that helps direct water off the roof and away from the fascia. Start at the eaves, which are the lower horizontal edges of the shed roof. Align the drip edge so it extends properly over the edge, then fasten it with roofing nails according to the product instructions.
If you need multiple pieces, overlap them neatly. Keep the line straight. A crooked drip edge will not ruin the roof, but it will stare at you forever.
Step 3: Add Leak Barrier if Your Roof or Climate Calls for It
If your shed is in a snowy region, a windy rain zone, or has a lower slope, install a self-adhered leak barrier at the eaves and other vulnerable areas as required. On some low-slope shed roofs, you may need more extensive protection. Smooth the membrane carefully to avoid wrinkles and bubbles, and overlap seams the way the manufacturer specifies.
This layer is one of those things you rarely admire once the roof is finished, but you will deeply appreciate it when nasty weather tries to turn your shed into a damp storage cave.
Step 4: Install the Underlayment
Next comes the underlayment, which goes over the deck and under the shingles. Begin at the bottom of the roof and work upward in overlapping courses. This layering matters because the goal is to shed water downhill, not give it creative opportunities.
Keep the underlayment tight, straight, and free of wrinkles. Fasten it with the recommended cap nails or other approved fasteners. On standard-slope roofs, one layer is often used according to the product instructions. On low-slope roofs, the overlap or layering requirement is usually more aggressive. In other words, the flatter the roof, the less you should improvise.
Step 5: Install the Rake Drip Edge
Once the underlayment is in place, install drip edge flashing along the rake edges, which are the sloped sides of a gable roof. This order is important. At the eaves, the drip edge is typically installed before the main underlayment. At the rakes, the drip edge usually goes on after the underlayment. That arrangement helps manage water the way the system is designed to work.
Step 6: Snap Chalk Lines for Straight Courses
Before you start laying shingles, snap horizontal chalk lines to guide your courses and keep the reveal consistent. You can also snap vertical lines to help with alignment and staggering. This step may feel fussy, but it is much easier to spend five extra minutes with a chalk line than to spend two hours explaining why your shingles are wandering uphill like they got lost.
Step 7: Install the Starter Strip
The starter strip is not just a bonus shingle. It performs an important job at the roof edge by helping seal the first course and protecting against water intrusion and wind uplift. Install starter shingles along the eaves, and on many roofs along the rakes as well, according to the shingle system you are using.
Most manufacturers call for a slight overhang at the eaves and rakes, often in the range of about 1/4 inch to 3/4 inch, but always follow your specific product instructions. Many systems also require trimming the first starter piece so the joints are offset from the shingles above. That little detail helps keep seams from stacking directly on top of each other, which is a classic way to invite leaks.
Step 8: Lay the First Course of Shingles
Now the fun begins. Start at the bottom edge of the roof on one side and lay the first full course directly over the starter strip. Align each shingle carefully with your chalk lines. Butt shingles together neatly without forcing them too tight or leaving obvious gaps.
Nail each shingle according to the manufacturer’s nail line and fastening pattern. Four nails per shingle is common for standard conditions, while six nails may be required in high-wind areas or by certain products and codes. Nails should be driven flush, not overdriven and not left proud. A nail that cuts into the mat or sits too high can cause performance problems later.
Step 9: Continue Up the Roof, Staggering the Joints
As you move to the second course and beyond, offset the shingles so the joints do not line up with the joints below. The exact offset depends on the type of shingle. This is one reason it is smart to keep the bundle instructions nearby instead of buried under a pile of wrappers and misplaced confidence.
Work from the bottom up and from one side across the roof. Keep checking alignment every few rows. Small errors multiply quickly on a roof. What looks like “close enough” on row two can turn into “why is the whole thing drifting sideways?” by row eight.
Step 10: Handle Flashing Around Walls, Vents, and Roof Intersections
If your shed roof meets a sidewall or includes a vent, use the proper flashing pieces. At sidewalls, step flashing should be woven with each course so water is directed back onto the shingles, not behind them. Around penetrations, install the proper boot or metal flashing and shingle around it according to the flashing design.
Do not rely on blobs of sealant to replace flashing. Sealant is a helper, not a miracle worker. Good flashing does the heavy lifting; sealant just supports the system.
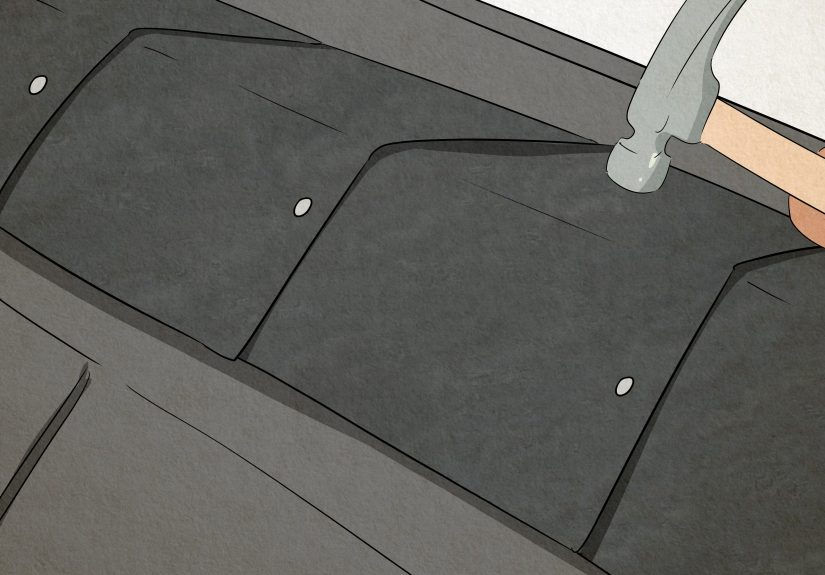
Step 11: Install Ridge Cap Shingles
Once both roof planes are covered, finish the ridge with ridge cap shingles. These are designed to bend over the peak and shed water over the top of the last field courses. Start at the end opposite the prevailing wind when practical, overlapping each cap as you go. Use longer nails if required so they penetrate through the layered material into the deck properly.
The last cap is usually the one place where some nail heads remain exposed, so seal them as directed by the manufacturer.
Step 12: Final Inspection and Cleanup
Before declaring victory, inspect the roof carefully. Check for crooked courses, exposed nails where they should not be, unsealed edges, poor cuts, and missed flashing details. Clean debris from the roof and the ground, especially loose nails. A magnetic sweeper is your friend here unless you enjoy surprise tire repairs.
Common Mistakes to Avoid
- Using shingles on too-flat a roof: Below the minimum slope, leaks become much more likely.
- Skipping the starter strip: This weakens edge protection and wind resistance.
- Installing layers in the wrong order: Drip edge, leak barrier, underlayment, and shingles must work together.
- Nailing outside the nail zone: Bad nailing is one of the fastest ways to shorten roof life.
- Ignoring flashing details: Most roof leaks begin at transitions, not in the middle of a perfect shingle field.
- Failing to recheck straightness: Roof lines should look crisp, not like they were installed during an earthquake.
How Many Shingles Do You Need for a Shed?
Measure each roof plane by multiplying length by width, then add the two sides together for total square footage. Divide by 100 to calculate roofing squares. Most asphalt shingles are sold in bundles, and many common products need about three bundles per square, though that varies by brand and style. Add extra material for ridge caps, starter strips, waste, and cuts. For a simple gable shed, adding 10 percent extra is usually a smart move. It is cheaper to have one extra bundle than to stop mid-project and play “find a matching dye lot.”
Should You DIY or Hire a Pro?
If your shed is small, the roof is simple, and you are comfortable with careful layout work, this can be a solid DIY project. A basic shed roof is much more forgiving than a complex house roof with valleys, dormers, chimneys, and a dramatic desire to humble homeowners.
That said, hire a pro if the roof is steep, unusually high, structurally questionable, or full of penetrations and tie-ins. Roofing rewards precision, and water is ruthlessly talented at finding weak spots.
Practical Experience and Real-World Lessons From Installing Shed Roof Shingles
One of the biggest real-world lessons from installing roof shingles on a shed is that prep work affects everything. Many first-time DIYers assume the visible part of the job starts when the shingles come out of the bundle. In reality, the job starts when you inspect the deck and make it flat, dry, and clean. A slightly warped panel, a line of old nail heads, or a wrinkle in the underlayment can keep telegraphing upward through the finished roof. That does not always cause immediate leaks, but it often creates a roof that looks uneven and ages faster than it should.
Another common experience is underestimating how much layout matters. On paper, installing shingles sounds repetitive: lay a row, nail a row, repeat until snacks are deserved. But a shed roof can go visibly crooked very quickly if the first course is off or the stagger pattern drifts. Experienced installers check their alignment constantly. They do not trust “pretty close.” They trust chalk lines and measurements. That habit saves time because correcting a small issue early is easy, while correcting a large issue near the ridge is a full-blown personality test.
Many homeowners also learn that weather changes the pace of the project. Shingles, underlayment, and self-adhered membranes all behave differently depending on temperature, sun exposure, and wind. A calm, dry day makes the work smoother and safer. A gusty day turns every sheet of underlayment into a giant uncooperative kite. A hot day softens materials and makes them easier to cut, but it also makes the roof surface hotter and more tiring to work on. Good planning often matters as much as skill.
There is also a strong practical case for buying a complete roofing system instead of mixing random leftovers from three brands and a mysterious garage shelf. Using compatible shingles, starter strips, underlayment, and accessories usually makes installation clearer and performance more predictable. It also simplifies the instructions, which is useful when you are halfway through the job and trying to remember whether the next detail belongs under, over, or alongside the previous layer.
Perhaps the most valuable experience-based lesson is this: most shed roof problems start at the edges, joints, and penetrations, not in the middle of the field shingles. DIYers often focus on the visible rows because they look like the “real roofing,” but the drip edge, starter strip, flashing, and ridge treatment do the quiet work that keeps water out. When those details are installed well, the whole shed feels tighter, drier, and more finished. When they are rushed, the roof may still look acceptable from ten feet away, but it will be much more vulnerable when wind-driven rain shows up and starts asking difficult questions.
Conclusion
Learning how to install roof shingles on your shed is really about understanding a system. The deck supports everything, the drip edge manages runoff, the underlayment adds backup protection, the starter strip secures the edge, and the shingles shed water course by course until the ridge caps finish the job. Get the order right, follow the manufacturer’s instructions, and take your time with the layout. That is how you end up with a shed roof that looks sharp, resists weather, and does not turn every storm into a suspense film.