Table of Contents >> Show >> Hide
- What a Window Well Actually Does
- Before You Start: Check Code, Size, and Site Conditions
- Tools and Materials You Will Need
- How to Install a Window Well Step by Step
- Step 1: Measure the window and choose the correct well
- Step 2: Mark the area and call before you dig
- Step 3: Excavate the opening
- Step 4: Add drainage before you install the well
- Step 5: Test-fit the window well
- Step 6: Mark and predrill the mounting holes
- Step 7: Seal the contact points
- Step 8: Anchor the well to the foundation
- Step 9: Backfill with gravel and soil
- Step 10: Install a ladder or cover if needed
- Common Window Well Installation Mistakes to Avoid
- Should You Install a Window Well Cover?
- Maintenance After Installation
- What Homeowners Learn From Real Window Well Projects
- Final Thoughts
If your basement window sits below ground level, a window well is not some fancy optional accessory. It is the thing standing between your window and a muddy, leaf-filled, rain-soaked mess. Done right, a window well helps protect the window, lets in more natural light, improves drainage, and, in some cases, provides a safe emergency exit. Done wrong, it becomes a tiny swimming pool with commitment issues.
This guide walks you through how to install a window well step by step, whether you are replacing an old rusted unit or installing a new one for a basement project. You will learn how to measure correctly, prepare the opening, manage drainage, anchor the well, backfill it, and avoid the classic mistakes that turn a weekend project into a long conversation with a waterproofing contractor.
What a Window Well Actually Does
A window well is a curved or straight barrier installed around a below-grade basement window. Its main job is to hold back soil and create open space around the window. That space matters for several reasons. First, it prevents dirt from pressing directly against the glass and frame. Second, it allows light and fresh air into the basement. Third, if the window is an egress window, the well creates the room needed for someone to escape in an emergency.
Window wells also play a major role in moisture control. If rainwater collects around a below-grade window with nowhere to go, it can seep through the frame, enter the basement, and ruin your day with the efficiency of a tax bill. A proper installation includes drainage and grading so water moves away instead of settling in.
Before You Start: Check Code, Size, and Site Conditions
Before you grab a shovel and attack the yard like you are digging for pirate treasure, slow down and check your local code requirements. Rules vary by location, but if the window serves as an emergency escape and rescue opening, the well usually needs to meet minimum size requirements. In many jurisdictions following modern residential code standards, the well should provide at least 9 square feet of floor area with a minimum horizontal projection and width of 36 inches. If the well depth exceeds 44 inches, a permanently mounted ladder or steps is typically required.
Also confirm that your window itself meets egress requirements if that is the goal. Common baseline standards include a minimum opening width of 20 inches, a minimum opening height of 24 inches, a net clear opening of 5.7 square feet, and a sill height no more than 44 inches above the interior floor. If your project involves a bedroom or finished living area in the basement, this part is not negotiable. Safety and code compliance should be doing the driving here, not vibes.
Questions to answer before installation
- Is this a standard window well or an egress window well?
- Does your area require a permit?
- Will the well need a drain connection to the footing drain or another approved drainage system?
- Is the soil heavy clay, sandy, or rocky?
- Will you need a cover, ladder, or both?
Tools and Materials You Will Need
- Window well sized for your window and foundation depth
- Tape measure
- Shovel or trenching shovel
- Level
- Gravel or coarse aggregate
- Drain pipe or connection materials if required
- Hammer drill with masonry bit
- Masonry anchors or fasteners recommended by the manufacturer
- Exterior-grade silicone sealant
- Work gloves and eye protection
- Ladder attachment if required for deeper egress wells
- Window well cover if desired
Material matters too. Galvanized steel is common, affordable, and strong. Plastic or composite wells resist rust and may be easier to handle. Modular systems are useful when foundation height varies. The right choice depends on your soil, your budget, and whether you want something purely functional or something that does not look like an industrial pie crust stuck to your house.
How to Install a Window Well Step by Step
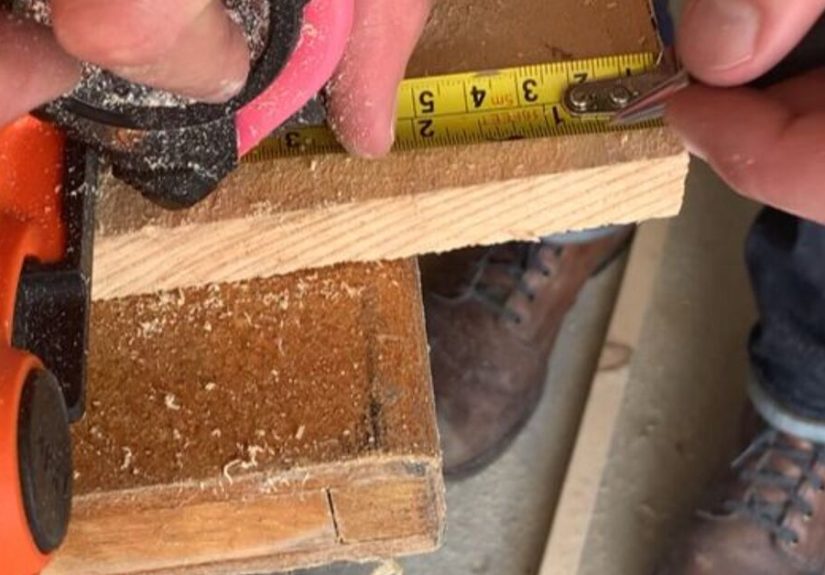
Step 1: Measure the window and choose the correct well
Measure the width of the window opening and the depth from finished grade down to the bottom of the excavation area. Choose a well that is wide enough to center on the window and deep enough for the site. If it is an egress application, do not “eyeball it” and hope for the best. Use the manufacturer’s sizing chart and compare it with local code rules.
Step 2: Mark the area and call before you dig
Outline the footprint of the well on the ground with marking paint or stakes. Add enough room around the perimeter for excavation and adjustment. Before digging, contact your local utility locating service. Striking a buried line will turn your home improvement story into neighborhood entertainment.
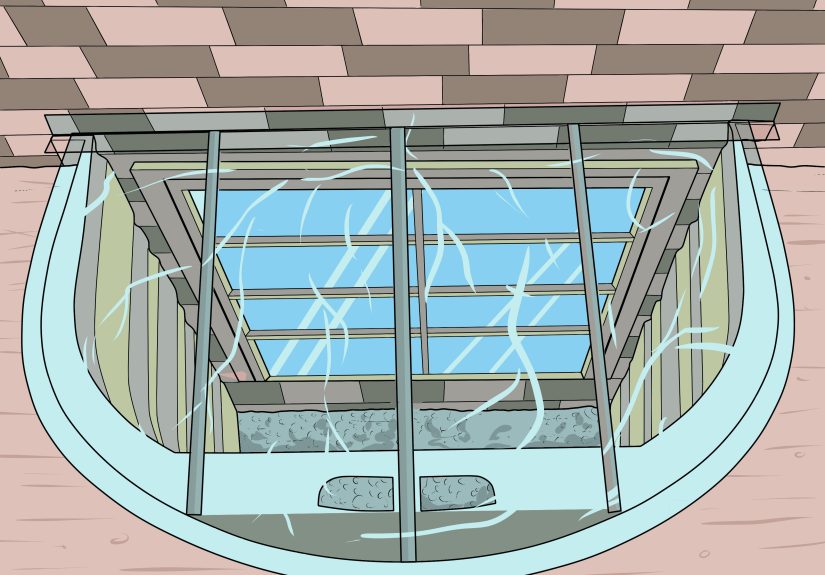
Step 3: Excavate the opening
Dig out the soil where the well will sit. Follow the shape of the unit and excavate deep enough so the well can rest on a stable base. Many installations require a bed of gravel beneath the well. Keep the future window sill several inches above the gravel level, and plan for the top edge of the well to sit about 2 to 3 inches above finished grade. That extra height helps keep runoff, mulch, and drifting soil from sneaking in.
If you are installing an egress well, make sure the excavation creates the required clear floor area. This is not the time to get stingy with space. People escaping in an emergency should not have to fold themselves like a lawn chair.
Step 4: Add drainage before you install the well
This is the step many people rush, and it is also the step that often determines whether your basement stays dry. If your site is prone to water collection, install a drain connection from the bottom of the well to the footing drain or another approved drainage path. In some setups, the base is filled with coarse aggregate to promote drainage. If you skip drainage where it is needed, the well can fill with water and force moisture against the window frame.
As a practical rule, if you have ever seen standing water near the foundation, have clay-heavy soil, or are working on an egress window in a rainy climate, take drainage seriously. It is not the glamorous part of the project, but neither is mopping a basement at midnight.
Step 5: Test-fit the window well
Place the well in the excavation and check the fit. Make sure it sits flush against the foundation, is centered on the window, and is level from side to side and front to back. Adjust the gravel or soil as needed. A good test-fit saves headaches later when you are drilling into masonry and wondering why the well suddenly looks crooked from every angle except denial.
Step 6: Mark and predrill the mounting holes
With the well in its final position, mark the mounting hole locations on the foundation. Remove the well and predrill the holes using a hammer drill and the correct masonry bit. Always follow the window well manufacturer’s instructions for anchor type, hole diameter, spacing, and fastener placement.
Step 7: Seal the contact points
Apply a generous bead of exterior-grade silicone sealant where the flanges of the well will meet the foundation. This helps reduce water intrusion at the contact points. It is not a replacement for drainage, but it is an important secondary line of defense.
Step 8: Anchor the well to the foundation
Set the well back into place, align the holes, and fasten it securely to the foundation using the recommended anchors. Tighten the hardware evenly so the flanges sit snugly against the wall without warping the unit. Check again that the well remains centered and level.
Step 9: Backfill with gravel and soil
Backfill around the outside of the well carefully. Many manufacturers recommend stone or gravel around and behind the well to support drainage and reduce pressure from freeze-thaw movement. Do not dump heavy soil against the well all at once like you are burying evidence. Add material gradually and compact lightly in lifts as needed. Keep final grade sloping away from the foundation so surface water does not run toward the well.
Step 10: Install a ladder or cover if needed
If the well depth exceeds 44 inches, install a code-compliant ladder or steps. The ladder must not interfere with the window’s full opening. If you are adding a cover, make sure it fits properly and does not compromise emergency escape. For egress setups, covers should be removable or releasable from the inside without tools. That way the cover protects the opening from debris and accidental falls without becoming a trap.
Common Window Well Installation Mistakes to Avoid
- Choosing the wrong size: A small well may fit the window visually but fail for drainage or egress clearance.
- Ignoring drainage: This is the fastest route to a wet basement.
- Setting the top edge too low: If the well sits flush with grade, runoff can pour in.
- Skipping sealant: Water loves tiny gaps more than homeowners do.
- Backfilling with heavy pressure: Aggressive backfill can distort the well or stress the fasteners.
- Forgetting maintenance: Even a perfect installation can clog with leaves, dirt, and mulch over time.
Should You Install a Window Well Cover?
In many cases, yes. A cover helps keep out leaves, dirt, pests, snow, and random debris that seems to appear from another dimension. It can also reduce the chance of someone stepping into the well accidentally. For non-egress wells, covers are a smart upgrade. For egress wells, choose a cover designed for emergency release. A heavy cover that cannot be opened quickly from inside defeats the purpose of the egress window.
Maintenance After Installation
Once your window well is installed, check it a few times a year. Remove leaves, sticks, and weeds. Inspect the fasteners, look for rust or cracking, and confirm that the gravel bed is still draining well. After a major storm, take a quick look to make sure water is not pooling. Most window well failures do not begin with dramatic collapse. They begin quietly, with a little debris, a little standing water, and a homeowner saying, “I’ll deal with that later.” Later usually arrives wearing muddy boots.
What Homeowners Learn From Real Window Well Projects
One of the most common experiences homeowners report after installing a window well is that the digging takes longer than expected. On paper, the job looks simple: dig a hole, attach a well, toss in some gravel, victory snack. In real life, the soil may be packed hard near the foundation, roots may show up uninvited, and that one stubborn rock suddenly behaves like it pays property taxes. The lesson is simple: build extra time into the project and do not schedule it for the same afternoon you planned to “also repaint the garage” or “finally organize the shed.” That is how home improvement optimism gets humbled.
Another common takeaway is that drainage is the real hero of the entire installation. Many people start out focusing on the well itself, which makes sense because it is the part you can see. But after the first big rain, they realize the unseen parts matter more. A properly drained well stays functional and boring, which is exactly what you want. A poorly drained well becomes memorable in all the wrong ways. Homeowners who have dealt with water leaking around a basement window often say the same thing afterward: they wish they had taken grading, downspout extensions, and drain connections more seriously from the start.
There is also a strong “measure twice, dig once” lesson that shows up again and again. People sometimes buy a window well based on the width of the window alone, only to discover that depth, projection, foundation height, and egress clearance all matter. That mistake can be expensive. Returning a bulky window well is not like returning a shirt. It is more like negotiating with a giant metal taco that does not fit in your car anymore. Homeowners who plan carefully usually end up with cleaner installs, straighter alignment, and less frustration when it is time to anchor the unit.
Many DIYers also learn that finishing details make the project look professional. A well can be solidly installed and still look rough if the grading is uneven, the backfill is sloppy, or the cover does not fit. On the other hand, a well with tidy gravel, clean caulk lines, centered placement, and smooth soil contouring looks intentional and polished. The difference is not always skill. Often, it is patience. The homeowners happiest with the finished result are usually the ones who slowed down near the end instead of sprinting toward cleanup.
There is a seasonal lesson too. Installing a window well during dry weather is much easier than trying to work around wet soil and surprise storms. People who tackle the project in a rainy stretch often discover that muddy excavation walls cave in more easily and the work area becomes harder to keep level. Dry conditions make measuring, drilling, and backfilling more predictable. If you have flexibility, choose a stretch of stable weather and give yourself enough daylight to finish properly.
Finally, experienced homeowners often come away with a new respect for the line between DIY and professional work. Installing a basic, non-egress window well can be manageable for a confident DIYer. But if the project involves cutting foundation walls, dealing with chronic water problems, meeting strict egress requirements, or tying into a complicated drainage system, calling a professional can be the smartest move. Not every project needs a hero. Sometimes it just needs someone with the right tools, the right permit knowledge, and less interest in learning masonry the hard way.
Final Thoughts
Installing a window well is one of those projects that rewards careful planning more than brute force. Choose the right size, handle drainage correctly, anchor the well securely, and finish the grading so water moves away from the house. If your basement window serves as an egress opening, double-check every measurement and keep safety front and center. A well-installed window well protects your home, brightens the basement, and can even add peace of mind. That is a lot of value from one curved piece of metal or composite sitting quietly beside your foundation.
In other words, give the project the attention it deserves now, and your future self may never have to meet a shop vacuum full of rainwater in the basement. That is what we call a win.