Table of Contents >> Show >> Hide
- Why Picture Frame Wire Is Worth Using
- What You Need Before You Start
- Step 1: Pick the Right Wire and Hardware
- Step 2: Mark Where the D-Rings Should Go
- Step 3: Install the D-Rings
- Step 4: Cut the Wire to Length
- Step 5: Attach the First Side of the Wire
- Step 6: Attach the Second Side and Set the Tension
- Step 7: Add Bumper Pads
- How to Check Whether the Wire Is Installed Correctly
- Common Mistakes to Avoid
- How to Hang the Frame Once the Wire Is Installed
- Best Uses for Picture Frame Wire
- Real-World Experiences: What People Usually Learn the Hard Way
- Final Thoughts
- SEO Tags
Installing a picture frame wire sounds like one of those tiny home tasks that should take five minutes and exactly zero brain cells. Then suddenly you are standing over a frame, holding a screwdriver in one hand, a suspiciously sharp piece of wire in the other, and wondering how this turned into a trust exercise. The good news: it is actually simple once you know the right steps.
If you install picture hanging wire correctly, your frame will sit straighter, hang more securely, and look cleaner on the wall. If you install it badly, the frame may tilt, the wire may peek over the top like an uninvited guest, or the whole thing may end up on the floor. Not ideal for your art, your wall, or your mood.
This guide walks you through exactly how to install a picture frame wire the easy way, from choosing the right hardware to fastening the wire with the proper amount of tension. You will also learn the most common mistakes people make, how to avoid them, and how to get a more professional-looking result without turning your kitchen table into a framing workshop.
Why Picture Frame Wire Is Worth Using
Picture frame wire is popular for a reason. It makes a frame easier to hang, easier to adjust, and easier to level than some other hanging methods. It is especially useful for medium and larger frames because the wire gives you a little flexibility when you place the frame on a hook or pair of hooks.
Wire also keeps the hanging hardware hidden behind the frame, which is great if you want your artwork to look polished instead of like it was hung during a caffeine shortage. When paired with D-rings and properly rated wall hardware, it creates a secure setup that works for framed photos, art prints, mirrors, and canvas pieces with wooden stretcher bars.
That said, not every frame needs wire. Very small or lightweight frames often work fine with a sawtooth hanger. But if the frame is bigger, heavier, or a little awkward, picture wire is usually the smarter choice.
What You Need Before You Start
- Picture hanging wire rated for more than your frame’s weight
- Two D-rings or strap hangers with screws
- Screwdriver or drill/driver
- Tape measure or ruler
- Pencil
- Wire cutters or strong scissors made for wire
- Needle-nose pliers
- Awl, pin, or drill bit for pilot holes
- Soft towel or blanket to protect the frame face
- Bumper pads for the lower back corners of the frame
Before you buy anything, check the frame’s approximate weight. Then choose wire, D-rings, and wall hangers that are rated above that number. This is not the moment for optimism. If your frame weighs 12 pounds, do not buy hardware rated for 12 pounds and call it a day. Give yourself a safety cushion.
Step 1: Pick the Right Wire and Hardware
Match the hardware to the frame
The first rule of installing picture frame wire is simple: the wire is only as trustworthy as the hardware holding it. Use two D-rings on opposite sides of the frame, not one lonely center screw eye trying to do the work of an entire team.
For lightweight frames, small D-rings may be enough. For heavier pieces, step up to stronger one-hole or two-hole D-rings and heavier-gauge wire. If the frame is especially heavy, bulky, or valuable, choose heavy-duty hanging hardware and matching wall anchors or hooks. In some cases, a cleat system may be better than wire, but for most standard wood frames, D-rings plus wire is the classic setup.
Choose wire with a comfortable weight rating
Do not pick the thinnest wire on the rack because it looks cute and cooperative. Picture wire should be rated well above the actual weight of the frame. A little extra capacity gives you a safer installation and less stress on the frame hardware over time.
Also pay attention to material. Braided steel or stainless steel picture wire is common and dependable. Vinyl-coated wire can be easier on the hands, which is nice if you prefer your DIY session without surprise stabbings.
Step 2: Mark Where the D-Rings Should Go
Lay the frame face down on a soft towel or blanket so you do not scratch the front. Measure the frame height, then mark the D-ring placement on both sides, usually about one-third to one-fourth of the way down from the top. This placement helps the frame hang level and keeps it from tipping forward too much.
Make sure both marks are exactly the same distance from the top edge. If one side is even slightly off, your frame can hang crooked before it ever touches the wall. That is a deeply annoying problem because it looks like the wall is wrong, the frame is wrong, and reality is wrong, when really it is just your measuring.
On many wood frames, the D-rings should angle slightly upward, around 45 degrees. The goal is to create a stable path for the wire while keeping the top of the wire low enough that it will not show above the frame when hung.
Step 3: Install the D-Rings
Once your marks are in place, create shallow pilot holes. On softer wood, an awl or sturdy pin may be enough. On hardwood, a drill is the better move. Pilot holes make installation easier and reduce the risk of splitting the frame or stripping the screws.
Place each D-ring over its mark and fasten it securely with the screws provided. Tighten the screws until the hardware is firm, but do not overdo it. If you crank down like you are trying to install a ship anchor, you can damage the wood or the screw head.
Give each D-ring a small tug once installed. It should feel solid, not wobbly. If anything shifts, fix it now. This is your best chance to prevent a dramatic “why is my artwork on the floor?” moment later.
Step 4: Cut the Wire to Length
There is no single magic number for wire length because frames vary, but a good rule is to cut a piece that is roughly twice the frame width for standard installations. For larger or heavier frames, giving yourself extra length can make threading and wrapping easier.
You need enough wire to pass through each D-ring, wrap it securely, and still leave a slight amount of slack in the center. Too little wire turns the job into finger gymnastics. Too much wire creates a metal spaghetti situation on the back of the frame.
Cut the wire cleanly with wire cutters. Frayed ends can be annoying to work with and excellent at finding your skin with terrifying accuracy.
Step 5: Attach the First Side of the Wire
Thread one end of the wire through the first D-ring. Leave about 3 to 5 inches of extra wire at the tail end so you can secure it properly. Then loop the short end around the longer section, knot it, and twist the remaining tail around the standing wire several times.
This part matters more than people think. Do not just twist the wire and hope for the best. A proper knot-and-twist connection is more secure and far less likely to loosen over time.
Use pliers to snug up the twists neatly. You want the wrap to look tidy and feel firm, not like a metal bird’s nest made during a power outage.
Step 6: Attach the Second Side and Set the Tension
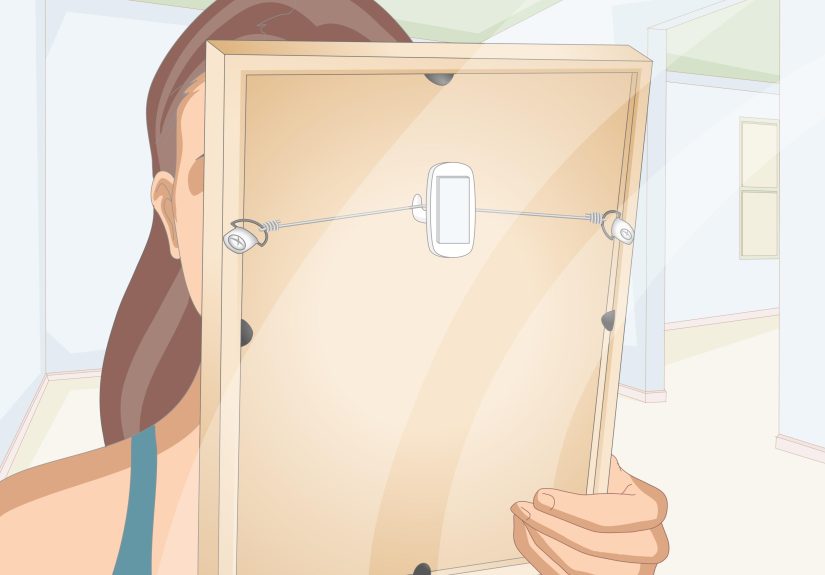
Pull the wire across the back of the frame to the second D-ring. Thread it through, then pull the wire upward at the center to check where the top of the arc lands. Ideally, when the wire is pulled taut, it should stop a little below the top edge of the frame so it stays hidden once the frame is hanging.
This is the balancing act: if the wire is too loose, the frame may hang lower than expected and lean awkwardly away from the wall. If it is too tight, you put extra stress on the hardware and make hanging less forgiving. What you want is a slight, controlled slack in the middle.
Once the tension looks right, knot and twist the second side the same way you did the first. Trim the excess wire, but do not cut it so close that the wrap can slip. Neat and secure wins every time.
Step 7: Add Bumper Pads
This small step makes a big difference. Stick felt or silicone bumper pads on the lower back corners of the frame. These help protect the wall, reduce scuffing, and keep the frame from shifting as easily.
Without bumper pads, a frame can rub the wall, tilt more than it should, and leave little marks that make you wonder whether your art has secretly been doing cardio at night.
How to Check Whether the Wire Is Installed Correctly
Before hanging the frame, do a quick test. Lift it gently by the wire from the center. The hardware should stay firm, the wire should not slip, and nothing should creak, bend, or look offended.
Then look at the top edge of the frame while the wire is pulled upward. If the wire peeks above the top edge, it is too loose or the D-rings are too low. If the frame feels stiff and the wire barely moves, it may be too tight. Adjust now while the frame is still on the table and your patience is still mostly intact.
Common Mistakes to Avoid
Installing the D-rings too low
If the D-rings sit too far down the frame, the wire can show above the top when hung, and the frame may tilt forward more than you want.
Using hardware with no safety margin
Weight ratings are not decorative suggestions. Use wire, D-rings, and wall hangers rated above the frame’s actual weight.
Skipping pilot holes
Pilot holes make the job easier and help protect the frame, especially with hardwood.
Twisting without knotting
Wire that is only twisted can loosen over time. Always secure it with a proper knot-and-twist method.
Forgetting the wall hardware
A beautifully wired frame still needs the right hook, anchor, or stud placement on the wall. The wire is only half the story.
How to Hang the Frame Once the Wire Is Installed
After the wire is attached, measure the distance from the top of the frame to the wire when the wire is pulled taut at its highest hanging point. That measurement tells you where the wall hook needs to go relative to the final position of the frame.
For larger frames, two wall hooks can improve stability and reduce tilting. If you are hanging something heavy, anchoring into studs is best whenever possible. If studs are not in the right place, use wall hardware rated for both the wall type and the frame weight.
Once hung, place a level on top of the frame and make small adjustments. Then stand back a few feet. If it looks straight up close but weird from across the room, trust the across-the-room view. Walls, ceilings, and furniture can all play visual tricks.
Best Uses for Picture Frame Wire
- Framed art prints and posters
- Medium to large photo frames
- Canvas art with wood stretcher bars
- Decorative mirrors with wood backs
- Gallery walls where easy adjustment matters
If the piece is extremely heavy, unusually valuable, or oversized, consider whether a more rigid hanging method would be better. Wire is versatile, but there is no shame in choosing the stronger option when needed.
Real-World Experiences: What People Usually Learn the Hard Way
Most people do not remember the first frame they hung because it was elegant and technically flawless. They remember it because it leaned forward like it was eavesdropping on the room, or because the wire somehow appeared above the frame even though that seemed physically impossible five minutes earlier.
A very common experience is installing the D-rings too low. It feels harmless in the moment. You think, “Close enough.” Then the frame goes up, the wire rises, and there it is, visible above the top edge like a tiny silver mustache. Suddenly the whole thing looks less like finished wall decor and more like a science project. Moving the rings higher usually fixes the issue, but most people only learn that after hanging the frame once, taking it down, sighing dramatically, and starting over.
Another frequent lesson is about wire tension. Beginners often go too loose because they are afraid of stressing the frame. The result is a frame that hangs lower than expected and tilts away from the wall. Other people do the exact opposite and pull the wire so tight it could probably tune a guitar. That can make the hardware work harder than necessary and leave almost no forgiveness when you try to hang the piece. The sweet spot is in the middle: firm, secure, and just slack enough to work properly.
Then there is the pilot-hole experience. Plenty of DIYers skip pilot holes on wooden frames because the screws look small and harmless. Sometimes that works. Sometimes the screw resists, the screwdriver slips, and the back of the frame gets a nice new scar. On hardwood frames, pilot holes are not overkill. They are the difference between a clean install and a repair project you absolutely did not schedule.
People also underestimate how much better a frame behaves with bumper pads. Without them, the bottom corners can scuff the wall and the frame may slide around every time someone closes a door with enthusiasm. With them, the frame sits a little more neatly and feels more intentional. Tiny detail, big payoff.
One more real-life truth: the wall itself often causes more trouble than the wire. You can install the wire perfectly and still get a crooked result if the hook is in the wrong place, the anchors are not right for the wall type, or the frame is hung by eye when the room itself is full of visual distractions. A sofa that is not centered, a ceiling that is slightly off, or a row of shelves that is not quite level can all mess with your sense of what looks straight.
The people who get the best results usually are not the ones with special talent. They are the ones who slow down, measure twice, use rated hardware, and test the frame before it goes on the wall. In other words, they let patience do the heavy lifting. Very rude of patience to be right again, but there we are.
Final Thoughts
Installing picture frame wire is one of those home tasks that feels minor until you do it correctly and realize how much better everything looks. A secure wire setup makes hanging easier, keeps hardware hidden, and gives your frame a cleaner, more professional finish.
The key steps are simple: choose hardware rated above the frame’s weight, place the D-rings about one-third to one-fourth down from the top, use pilot holes when needed, knot and twist the wire securely, and leave just enough slack to keep the wire hidden while still making the frame easy to hang. Add bumper pads, use the right wall hardware, and your picture should stay put instead of plotting its escape.
In short, this is not a difficult job. It just rewards accuracy over speed. Measure carefully, wire neatly, and your frame will hang like it belongs there instead of like it lost an argument with gravity.


