Table of Contents >> Show >> Hide
- How Do You Know When Onions Are Ready to Harvest?
- Step 1: Stop Watering as the Onion Tops Fall Over
- Step 2: Choose a Dry, Sunny Harvest Day
- Step 3: Loosen the Soil Around the Bulbs
- Step 4: Lift the Onions Gently
- Step 5: Sort the Onions Immediately
- Step 6: Cure the Onions Properly
- Step 7: Protect Onions During Curing
- Step 8: Trim the Tops and Roots After Curing
- Step 9: Store Onions in a Cool, Dry, Ventilated Place
- Step 10: Use the Right Onions First
- Common Onion Harvesting Mistakes to Avoid
- How to Harvest Green Onions
- How to Harvest Onions from Containers
- How Weather Affects Onion Harvest
- Extra Experience: What Harvesting Onions Teaches You After a Few Seasons
- Conclusion
- SEO Tags
Harvesting onions sounds simple until you are standing in the garden with a basket, a trowel, and a suspicious-looking row of floppy green tops. Are they ready? Should you pull them now? Should you wait until every leaf looks like it has dramatically retired from public life? Good news: onions are more communicative than they seem. They tell you when they are ready through their tops, necks, skins, and overall “please get me out of here” appearance.
Learning how to harvest onions properly is the difference between a basket of firm, flavorful bulbs and a sad storage bin full of soft, sprouting, or moldy onions. The process is not difficult, but timing matters. So does gentle handling, curing, trimming, and choosing the right storage spot. Whether you grew yellow onions, red onions, white onions, sweet onions, or a small backyard patch of “I hope these survive,” this guide walks you through the full process in 10 clear steps.
Below, you will learn when onions are ready to harvest, how to lift them without bruising the bulbs, how to cure onions for storage, and how to keep them fresh for as long as possible. Your future soups, stir-fries, burgers, omelets, and emergency late-night grilled cheese sandwiches will thank you.
How Do You Know When Onions Are Ready to Harvest?
Bulb onions are usually ready to harvest when the tops begin to yellow, dry, and fall over. In many gardens, the classic sign is when about half to two-thirds of the onion tops have naturally collapsed. This does not mean the plant is dead in a tragic garden soap opera. It means the bulb is mature, the neck is drying, and the onion is moving toward storage mode.
For onions you plan to eat fresh, you can harvest earlier. Green onions and young bulb onions are flexible. If you want scallions, pull them when the tops are about pencil-thick or when they reach a useful size. If you want storage onions, be more patient. Let the bulb develop papery outer skins and a tighter neck before harvesting.
Signs of Mature Storage Onions
Look for these signs before harvesting onions for long-term storage:
- The tops have fallen over naturally.
- The leaves are yellowing or browning.
- The necks feel soft at first, then begin to tighten and dry.
- The outer skins look papery.
- The bulbs have reached the expected size for the variety.
- The weather is dry enough for harvesting and curing.
If the bulbs are still actively growing, with thick green tops standing straight like tiny garden soldiers, wait a little longer unless you need fresh onions right away.
Step 1: Stop Watering as the Onion Tops Fall Over
The first step in harvesting onions happens before you touch a garden fork. When onion tops begin to fall over, reduce or stop watering. Too much moisture near harvest time can delay curing and increase the risk of rot. Onions want steady moisture while they are growing, but once they mature, they prefer a drier finish.
Think of it like laundry. You would not store a damp towel in a closed cabinet and expect a happy ending. Onions are similar. Dry soil helps the outer skins firm up and makes the curing process easier after harvest.
What If It Rains Before Harvest?
If rain is in the forecast, harvest mature onions before a long wet spell when possible. If the soil is already wet, wait until it dries enough to dig without caking the bulbs in mud. Wet onions can still be cured, but they need extra airflow and attention.
Step 2: Choose a Dry, Sunny Harvest Day
The best time to harvest onions is on a dry day when the soil is not soggy. Morning is often ideal because you can lift the onions, shake off loose soil, and let them rest briefly in the garden if the weather is warm and dry. Avoid harvesting during heavy rain, immediately after irrigation, or when the garden is muddy.
Dry weather helps prevent soil from sticking to the bulbs. It also reduces the chance of fungal problems during curing. If your onions are ready but storms are coming, do not wait for perfection. Harvest them, move them to a covered curing area, and give them plenty of airflow.
Step 3: Loosen the Soil Around the Bulbs
Do not yank storage onions straight from hard soil unless the ground is loose and sandy. Pulling too aggressively can tear the stems, bruise the bulbs, or leave part of the onion underground. Instead, use a garden fork, hand fork, or small spade to loosen the soil beside the row.
Insert the tool several inches away from the bulbs to avoid stabbing them. Then gently lift from underneath. The goal is to break the soil’s grip, not perform onion surgery. Damaged onions do not store well, so treat them like eggs with layers and attitude.
Tool Tips for Harvesting Onions
- Use a garden fork for larger beds.
- Use a hand fork for raised beds or containers.
- Avoid slicing into the bulb with a shovel.
- Work slowly in compacted soil.
- Keep harvested onions out of rough buckets or metal carts that may bruise them.
Step 4: Lift the Onions Gently
Once the soil is loose, lift the onions by hand. Hold near the base of the leaves and ease the bulb upward. If the tops break off, do not panic. That onion is still edible, but it should be used sooner because a broken neck can invite moisture and disease.
After lifting, gently shake off loose soil. Do not wash the onions if you plan to store them. Washing adds moisture, and moisture is the villain in nearly every onion storage story. If clumps of soil stick to the bulbs, let them dry first and brush them off later.
Step 5: Sort the Onions Immediately
Sorting onions at harvest saves headaches later. Separate perfect storage candidates from onions that are bruised, cut, soft, thick-necked, or damaged by insects. The best storage onions are firm, dry, and uninjured.
Damaged onions are not failures. They are dinner. Use them first in soups, sauces, roasted vegetable trays, or caramelized onion projects that make the kitchen smell like you have your life together.
Storage Onions vs. Use-Now Onions
Place onions into two groups:
- Store later: firm bulbs with dry skins and no bruises, cuts, or soft spots.
- Use soon: onions with broken tops, thick necks, cuts, sunscald, insect damage, or soft areas.
Sweet onions often have higher water content and thinner skins, so they usually do not store as long as stronger, pungent storage varieties. Enjoy sweet onions fresh and save the tougher storage types for winter meals.
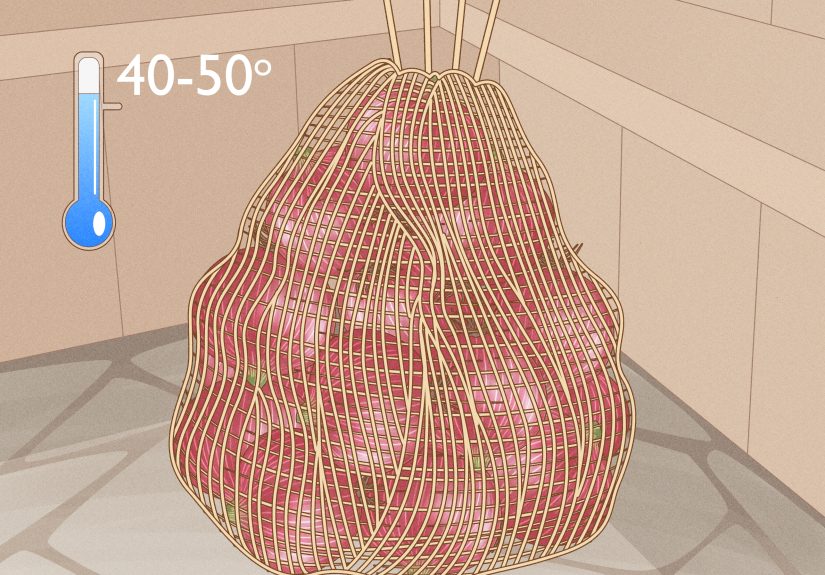
Step 6: Cure the Onions Properly
Curing is the drying process that prepares onions for storage. It helps dry the neck, outer skins, and roots so the bulb is less likely to rot. This step is essential if you want onions to keep for weeks or months.
To cure onions, spread them in a single layer in a warm, dry, well-ventilated place. A garage, shed, covered porch, greenhouse bench, or airy barn can work. If the weather is dry and sunny, some gardeners cure onions outdoors for a few days, then move them under cover. If rain threatens, bring them inside immediately.
Avoid piling onions in a deep basket while they cure. Piles trap moisture, and trapped moisture invites rot. Give every onion breathing room. In other words, onions need personal space too.
How Long Should Onions Cure?
Most onions need about one to four weeks to cure, depending on humidity, temperature, airflow, and bulb size. They are ready for storage when the necks are tight and dry, the outer skins are papery, and the roots feel dry and wiry.
Step 7: Protect Onions During Curing
While onions cure, protect them from rain, heavy dew, direct moisture, and extreme heat. Good airflow is more important than a fancy setup. You can lay onions on screens, racks, newspaper, cardboard, or mesh trays. Turn them occasionally if one side is not drying well.
Do not cure onions in a closed plastic bin. Plastic traps moisture and can turn a beautiful harvest into a science experiment nobody asked for. Also avoid curing onions in a damp basement unless you have strong ventilation and low humidity.
Good Curing Locations
- A covered porch with airflow
- A garage with open windows
- A shed with fans or vents
- A greenhouse shelf during dry weather
- A wire rack in a warm, airy room
Step 8: Trim the Tops and Roots After Curing
Wait until onions are fully cured before trimming. Once the tops are completely dry, cut them about one inch above the bulb. Trim the roots close to the base, but do not cut into the onion itself.
If you want to braid onions, leave the tops attached and braid them after they have dried enough to be flexible but before they become too brittle. Braided onions look charming, save space, and make your kitchen feel slightly more like a countryside cooking show.
Whether you braid or trim, the key is to avoid opening the neck of the onion. A tight, dry neck helps prevent moisture and pathogens from entering the bulb during storage.
Step 9: Store Onions in a Cool, Dry, Ventilated Place
After curing, store onions in a cool, dry, dark place with good airflow. Mesh bags, slatted crates, shallow baskets, or hanging braids work well. Avoid sealed plastic bags because they trap humidity.
Do not store onions with potatoes. Potatoes release moisture, and onions prefer dry conditions. Together they can encourage spoilage faster than either crop deserves. Keep onions away from sunlight too, since light and warmth can encourage sprouting.
Best Storage Containers for Onions
- Mesh produce bags
- Wire baskets
- Slatted wooden crates
- Paper bags with ventilation holes
- Onion braids hung in a dry place
Check stored onions every couple of weeks. Remove any bulbs that are soft, sprouting, moldy, or strongly smelly. One bad onion can spoil nearby bulbs, and yes, that is both gardening advice and a useful life metaphor.
Step 10: Use the Right Onions First
Not all onions store equally. Thick-necked onions, damaged bulbs, and sweet onions should be used first. Firm, fully cured, pungent storage onions usually last longer. Labeling varieties at harvest can help you learn which onions perform best in your garden and kitchen.
If you notice onions starting to sprout, use them soon. A small sprout does not automatically make an onion unsafe, but the bulb may become softer and less flavorful over time. Cut away any green shoots if they are tough or bitter, and discard onions that are mushy, moldy, or foul-smelling.
Common Onion Harvesting Mistakes to Avoid
Harvesting Too Early
Early onions can be delicious, but they may not store well. If you want storage onions, wait until the tops fall over and the skins begin to dry.
Leaving Mature Onions in Wet Soil
Once onions mature, wet soil can increase the risk of rot. If the crop is ready and rainy weather is coming, harvest and cure under cover.
Washing Before Storage
Do not wash onions before curing or storage. Brush off dry soil instead. Save washing for right before cooking.
Skipping the Curing Step
Freshly harvested onions may look ready for the pantry, but curing is what helps them last. Skipping this step can shorten storage life dramatically.
Storing Onions in Plastic
Plastic bags trap moisture. Choose breathable storage that allows air to move around the bulbs.
How to Harvest Green Onions
Green onions, also called scallions, are harvested differently from mature bulb onions. You can pull the entire plant when the tops are around six to eight inches tall, or you can cut the greens and let the plant continue growing if the variety allows. For the freshest flavor, harvest green onions shortly before using them.
After harvesting, rinse green onions, pat them dry, and store them in the refrigerator. They are best used quickly in salads, tacos, soups, omelets, fried rice, and anything that needs a crisp oniony sparkle.
How to Harvest Onions from Containers
Container-grown onions follow the same maturity signs as garden-grown onions. Watch for falling tops, drying leaves, and papery skins. Because containers dry out faster than garden beds, check moisture carefully during the growing season. Near harvest, reduce watering to help the bulbs mature.
To harvest, loosen the potting mix around the bulbs with your fingers or a hand fork. Lift gently, sort, cure, and store just as you would with onions grown in the ground. If the bulbs are small, they are still useful. Small homegrown onions can be roasted whole, pickled, grilled, or tossed into stews.
How Weather Affects Onion Harvest
Weather plays a major role in onion harvest success. Hot, dry weather can speed curing, while humid or rainy weather slows it down. In dry climates, onions may cure well outdoors. In humid regions, indoor curing with fans and good ventilation may be safer.
If frost is approaching and your onions are mature, harvest them. Light cold may not destroy bulbs immediately, but freezing can damage onion tissue and reduce storage quality. When in doubt, harvest mature onions before severe weather turns your garden into a freezer aisle.
Extra Experience: What Harvesting Onions Teaches You After a Few Seasons
The first time you harvest onions, you may expect a dramatic moment: golden bulbs rising from the soil, sunlight catching the papery skins, perhaps a small orchestra playing near the compost pile. In reality, the first lesson is usually patience. Onions do not care about your schedule. They mature when they mature, and they announce it by flopping over in the least glamorous way possible.
One useful experience is learning to watch the whole row instead of one plant. A single onion may fall over early because it was stressed, shaded, damaged, or simply feeling theatrical. But when half or more of the row begins to fall, yellow, and dry, the crop is giving a stronger signal. That is when you start checking bulb size, neck softness, and weather forecasts.
Another lesson is that curing space matters more than most beginners expect. A gardener may grow a beautiful onion crop and then lose part of it by piling bulbs in a basket in a damp corner. Onions need air. Screens, racks, and shallow layers make a big difference. Even a basic box fan in a garage can help when humidity is high. The goal is not to cook the onions; it is to dry the skins and necks slowly and evenly.
Handling also becomes a habit. At first, it is tempting to knock dirt off onions by tapping bulbs together. Do not do that. Bruises may not show immediately, but they can become soft spots in storage. A better approach is to lift gently, shake lightly, let soil dry, and brush it away later. The quieter method wins.
You also learn that every onion has a job. Perfect onions go into storage. Thick-necked onions go into the “use soon” pile. Tiny onions become roasted side dishes. Damaged onions become soup, stock, salsa, or caramelized onions. Nothing needs to feel wasted. A small onion harvest can still be a kitchen victory if you sort it well.
Gardeners often discover that variety choice affects storage as much as harvest technique. Sweet onions are wonderful on sandwiches and burgers, but many do not keep as long. Stronger storage onions may make you cry harder when sliced, but they often last longer in the pantry. After one or two seasons, keeping notes becomes surprisingly helpful. Write down planting date, harvest date, variety, weather, bulb size, and storage performance. Future you will appreciate the data, even if present you thinks, “I will definitely remember.” You will not. Garden memory is mostly vibes and seed packets.
Finally, harvesting onions teaches respect for simple food. Pulling a row of onions from the soil makes you notice how much time sits inside one everyday ingredient. Each bulb represents months of watering, weeding, thinning, waiting, and hoping the neighborhood rabbits have other plans. When those onions later sizzle in a pan, they taste a little better because you know their story. That is the real reward of learning how to harvest onions correctly: better storage, better flavor, and the quiet satisfaction of turning dirt, patience, and sunshine into dinner.
Conclusion
Knowing how to harvest onions is not complicated, but it does require timing and care. Wait for the tops to fall, choose a dry day, loosen the soil, lift gently, cure thoroughly, and store onions in a cool, dry, ventilated place. The more carefully you handle onions at harvest, the longer they can reward you in the kitchen.
Whether you are growing a few container onions or a full garden row, the same rule applies: dry onions are happy onions. Give them airflow, protect them from moisture, and check them regularly. Do that, and your harvest can keep adding flavor to meals long after the garden season ends.