Table of Contents >> Show >> Hide
- Before You Start: What “No Running Water” Actually Means
- Quick Supply Checklist (So You Don’t End Up Using a Pasta Pot)
- How a Toilet Flush Works (The 30-Second Version)
- Method 1: The Bucket-Dump Bowl Flush (Fast, Simple, Classic)
- Method 2: Refill the Tank and Flush Normally (Less Splash, More Familiar)
- Method 3: The Siphon-Hose Flush (Back-Friendly and Surprisingly Elegant)
- Where to Get Flushing Water When the Tap’s Dry
- Don’ts That Save You From a Gross Surprise
- FAQ: Quick Answers When You’re Busy (and Let’s Be Honest, You Are)
- Conclusion: Pick Your Method, Keep It Simple
- Real-World Experiences (500-ish Words): What You Learn When the Water’s Off
Nothing makes you feel more like a pioneer than walking into the bathroom, pressing the handle, and hearing… absolutely nothing. If your water is off due to a main break, storm, frozen pipes, or a well pump that quit when the power went out, you’re not doomed to a day of “creative” coping.
The good news: most standard toilets can still be flushed without running water. You just need a little water from somewhere elseand the right technique so you don’t accidentally create a bathroom science fair project. Below are three simple, low-drama methods, plus practical safety tips and a real-world “been there, bucketed that” experience section at the end.
Before You Start: What “No Running Water” Actually Means
“No running water” usually falls into one of these buckets (pun fully intended):
- Municipal water outage: City water is temporarily off for repairs or an emergency.
- Well water + no power: Your well pump needs electricity, so no power often means no water.
- Frozen/burst pipes: Water is shut off to prevent damage (or because damage already happened).
If you have a typical gravity-flush toilet (the common kind with a tank on the back), you may still have one normal flush left using the water already in the tank. After that, the toilet won’t refill but you can keep flushing manually by adding water to the bowl or tank.
If you have a pump-assisted or pressure-assisted toilet, your situation can be different. Some models may not flush well (or at all) during a power outage once their stored pressure is gone, so plan on using a manual method and testing gently.
Quick Supply Checklist (So You Don’t End Up Using a Pasta Pot)
Round up a few basics before you start:
- A bucket (ideally 2–5 gallons) or a large pitcher
- Water source (bathtub, stored jugs, water heater, rain barrel, etc.)
- Rubber gloves (optional, but your future self will thank you)
- A small cup or measuring container (helpful for “just enough” water)
- Flashlight/headlamp if the outage includes no power
- Trash bags and disinfecting wipes for cleanup
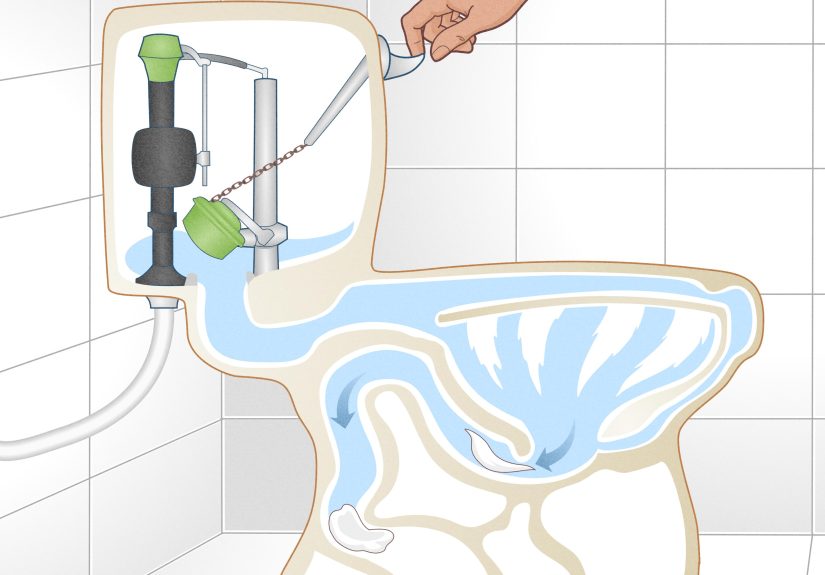
How a Toilet Flush Works (The 30-Second Version)
Your toilet bowl connects to a curved “trapway” that holds water to block sewer gases. A flush normally dumps a tankful of water into the bowl quickly, which kicks off a siphon effect and pulls waste down the drain. Translation: it’s not magicit’s speed + volume.
That’s why slow dribbles don’t do much, but a fast pour can trigger a full flush. Keep that in mind for Method #1.
Method 1: The Bucket-Dump Bowl Flush (Fast, Simple, Classic)
This is the “I just need this toilet to do toilet things” method. You pour water directly into the bowl fast enough to trigger the siphon and flush.
Best for
- Most standard gravity toilets
- Quick flushing when the tank won’t refill
- Situations where you have a bucket and at least 1–2 gallons of water
How much water do you need?
Many modern toilets will flush with about 1–2 gallons when poured correctly. Older toilets may need moresometimes 3–5 gallons.
Step-by-step
- Check the bowl level. If the bowl is unusually full (possible clog), don’t add water yet.
- Pour smart, not scared. Start pouring a little to avoid splash, then quickly dump the rest in a steady, confident stream.
- Aim for the center of the bowl water, but pour close to the surface to minimize splashing.
- Let it finish. The siphon should pull everything down. If it only “half-flushes,” try again with a slightly faster pour or a bit more water.
Pro tips to keep it tidy
- Pour along the side of the bowl first, then increase speed. This helps reduce splash and still builds enough force for the siphon.
- If the bowl looks like it’s thinking about overflowing, stop. That’s your toilet politely saying, “I’m clogged, not thirsty.”
Method 2: Refill the Tank and Flush Normally (Less Splash, More Familiar)
If you prefer a “normal-looking” flush, this method mimics what the supply line normally does. You manually refill the tank, then flush with the handle.
Best for
- Households with kids/guests who don’t want to learn a new technique mid-crisis
- People who hate bowl-splash surprises
- Toilets that respond better when the tank releases water the usual way
Step-by-step
- Remove the tank lid and set it somewhere safe (porcelain is not known for forgiving gravity).
- Pour water into the tank up to the normal water line (often marked). Don’t overfill.
- Flush with the handle as usual.
- Repeat as needed, refilling the tank each time.
Extra useful trick: refill the bowl, too
Some toilets rely on the tank’s overflow tube to help refill the bowl. If your bowl water ends up low after a manual flush, you can pour a little water into the tank’s overflow tube (the vertical tube in the tank) to restore the bowl’s “trap seal.” This helps keep sewer smells where they belong: not in your bathroom.
Water-saving move
Ready.gov notes the idea of placing a one-gallon jug in the tank to reduce water per flush during drought conditions. Different scenario, same lesson: your tank volume matters. During an outage, refilling only what you need can help stretch your stored water.
Method 3: The Siphon-Hose Flush (Back-Friendly and Surprisingly Elegant)
Hate lifting heavy buckets? Have a bathtub full of stored water? This method uses a hose (or any flexible tubing) to move water from a higher container to the bowl. Gravity does the hauling; you just direct traffic.
Best for
- Anyone who can’t comfortably lift 2–5 gallons repeatedly
- Using a bathtub, large cooler, or rain barrel as the water source
- Longer outages where you want an easy routine
What you need
- A clean garden hose, siphon hose, or sturdy tubing
- A water source positioned higher than the toilet bowl (bathtub works well)
- Basic comfort with the idea of “starting” a siphon (don’t worryit’s not a PhD)
Step-by-step
- Place one end of the hose in your water source (bathtub, bucket, etc.).
- Prime the hose so it’s filled with water (some hoses have hand pumps; otherwise, you can fill it in the tub first).
- Put the other end into the toilet bowl.
- Start the flow and let 1–2 gallons move quickly into the bowl to trigger the siphon flush.
- Stop the flow once the toilet flushes (pinch the hose, lift the bowl end, or shut a valve if your siphon setup has one).
This method is especially handy when you’ve stored water in a tub ahead of timea common preparedness recommendation from utilities and emergency guidance.
Where to Get Flushing Water When the Tap’s Dry
Your toilet doesn’t need drinking-quality water to flush. It needs “not full of rocks” water. Here are practical, commonly recommended sources:
1) Bathtub water (the MVP of short-term outages)
If you know an outage is coming, fill the tub. Multiple U.S. utilities explicitly recommend bathtub storage for non-potable uses like flushing.
2) Water heater water (non-potable backup)
Some city guidance notes you can draw water from your water heater for non-drinking needs in a pinch. Use caution: follow safe shutoff steps for gas/electric heaters and let hot water cool before using.
3) Rain barrel, melted snow, or collected water
For flushing, these are often fine as long as you strain out debris. Avoid water with lots of sediment that could damage internal parts or leave gritty residue.
4) “Boil water advisory” water (usually OK for toilets)
During many boil-water advisories, agencies commonly note that tap water can still be used for tasks like flushing toiletsbecause the concern is ingestion, not toilet use. Always follow your local notice type (boil vs. do-not-use).
Don’ts That Save You From a Gross Surprise
- Don’t keep “test flushing” when the tank is empty. One handle flush with no refill just leaves you with less water where you need it.
- Don’t pour if you suspect a clog. If the bowl is high, treat it like an “add water later” situation.
- Don’t use scalding water. Hot water can crack porcelain or soften wax seals over time. Lukewarm is safer.
- Don’t waste precious clean water if you can use gray water (like leftover sink rinse water) for flushing.
- Don’t panic-buy a new toilet. Manual flushing techniques work for most setups and can get you through an outage.
FAQ: Quick Answers When You’re Busy (and Let’s Be Honest, You Are)
How many times can you flush without running water?
If your toilet tank is full when the outage begins, you typically get at least one flush. After that, you can flush as many times as you have manual water availableusing any of the methods above.
How much water should I plan per flush?
Start with 1–2 gallons for many modern toilets. If you have an older toilet, you may need more to trigger a strong siphon.
Can I use “questionable” water to flush?
Often yesbecause you’re not drinking it. Even during certain water advisories, flushing is commonly allowed while drinking/cooking requires alternatives. Always follow your local guidance.
What if I truly have zero extra water?
If there’s no usable water at all, you may need a temporary no-flush plan (like lining the bowl with bags and using absorbent material) until water service returns. Some public health agencies provide guidance for this scenario.
Conclusion: Pick Your Method, Keep It Simple
When there’s no running water, your toilet isn’t “broken”it’s just under-supplied. For most homes, the solution is straightforward:
- Method 1: Dump 1–2 gallons into the bowl fast to trigger a siphon flush.
- Method 2: Refill the tank manually and flush like normal.
- Method 3: Use a siphon hose to move water from a tub or container without heavy lifting.
Add a little preparednesslike storing emergency water and keeping a bucket handyand future outages become annoying, not apocalyptic.
Real-World Experiences (500-ish Words): What You Learn When the Water’s Off
The first time I dealt with a water outage, I learned two things immediately: (1) the human body does not care about city maintenance schedules, and (2) the phrase “I’ll just hold it” has a surprisingly short shelf life.
It started with that innocent little text alert: “Water service will be temporarily interrupted.” No big deal, I thought. I filled a couple of drinking bottles and moved on. Hours later, reality knockedright when I discovered I had used my one “free” flush earlier to test whether the water was really off. (Spoiler: it was.)
That’s when the bucket method became my unexpected household hero. I grabbed a 5-gallon bucket, filled it from the bathtub (which I had not filled in advance, because I was living in the fantasy world where outages last 12 minutes), and tried to pour it into the bowl like I was gently watering a houseplant. Nothing happened. The toilet just stared back at me, unimpressed.
Attempt #2 was faster, like I meant it. Boomperfect flush. That was the “aha” moment: toilets respond to confidence. A timid drizzle won’t trigger the siphon. A quick, steady pour will.
During a longer outage later on, I upgraded to the “refill the tank” method because I got tired of the occasional splash and the weirdly athletic stance required to dump water accurately at 6 a.m. Filling the tank felt more civilizedlike I was maintaining standards in the face of adversity. Also, it made it easier for guests, because you can simply say, “Use the toilet normally, then refill the tank with this pitcher.” People love instructions that feel familiar.
The most practical improvement, though, was the siphon-hose setup. A neighbor showed me how to siphon from a bathtub using a length of tubing. It was basically plumbing’s version of a lazy river. No lifting, no sloshing, and I could control the flow with a simple pinch. That turned a stressful situation into a manageable routine: bathroom, siphon, flush, done.
A few small lessons stuck with me:
- Store water with a purpose. A bathtub or a couple of buckets can keep you functional for hygiene and toilets, even if you’re conserving drinking water.
- Respect clogs. If the bowl is high, don’t “add more water and hope.” That’s how you earn a cleanup job you never applied for.
- Keep it simple. A bucket, a pitcher, and a plan beat frantic improvisation every time.
The funniest part is how quickly this becomes normal. Day one: “How will we survive?” Day two: “Hand me the flush bucket, please.” Day three: you’re casually giving a tutorial like you’re hosting a home improvement showexcept the sponsor is your own common sense.


