Table of Contents >> Show >> Hide
- What Is Rubbing Alcohol, Exactly?
- Before You Start: The Fast Safety Checklist
- How to Clean with Rubbing Alcohol: 10 Steps
- Step 1: Pick the right bottle for the job
- Step 2: Clear the area and remove loose dirt first
- Step 3: Ventilate like you mean it
- Step 4: Patch-test any questionable surface
- Step 5: Apply rubbing alcohol to the cloth, not directly to the item
- Step 6: Wipe high-touch hard surfaces using steady, overlapping strokes
- Step 7: Let the surface stay wet briefly when disinfecting
- Step 8: Use extra care on electronics and screens
- Step 9: Buff dry and inspect the finish
- Step 10: Finish safely and store it properly
- Best Places to Use Rubbing Alcohol
- What You Should Not Clean with Rubbing Alcohol
- Common Mistakes That Make Cleaning with Alcohol Less Effective
- Final Thoughts
- Experience and Practical Lessons from Cleaning with Rubbing Alcohol
- SEO Tags
If rubbing alcohol had a résumé, it would be annoyingly impressive. It dries fast, cuts through grime, helps sanitize many hard surfaces, and tackles sticky messes like a pro who never asks for a coffee break. But it is not a magical “spray it on everything” potion. Use it the right way, and it is a smart, affordable cleaner. Use it the wrong way, and you can damage finishes, irritate your lungs, or create a safety problem faster than you can say, “Why does my table look weird now?”
This guide walks you through exactly how to clean with rubbing alcohol in 10 practical steps. Along the way, you will learn where isopropyl alcohol works best, where it should stay in the cabinet, and how to get that clean, streak-free finish people usually only brag about in commercials. Whether you are wiping down high-touch surfaces, cleaning your keyboard, removing sticky label goo from a jar, or trying to make your bathroom fixtures look less “crime scene of toothpaste,” this method keeps things simple and effective.
What Is Rubbing Alcohol, Exactly?
Rubbing alcohol is usually isopropyl alcohol diluted with water, commonly sold in concentrations like 70% or 91%. For routine household cleaning and disinfecting, 70% is the number you will see most often in public-health and manufacturer guidance. It is commonly used on many hard, nonporous surfaces and on some electronics when the manufacturer says it is acceptable. The big catch: rubbing alcohol is flammable, evaporates quickly, and can damage delicate materials such as painted finishes, some plastics, waxed wood, shellac, leather, and certain stone surfaces.
That means the goal is not to use more product. The goal is to use it more intelligently.
Before You Start: The Fast Safety Checklist
- Open a window or turn on ventilation.
- Keep rubbing alcohol away from flames, sparks, cigarettes, hot tools, and stovetops.
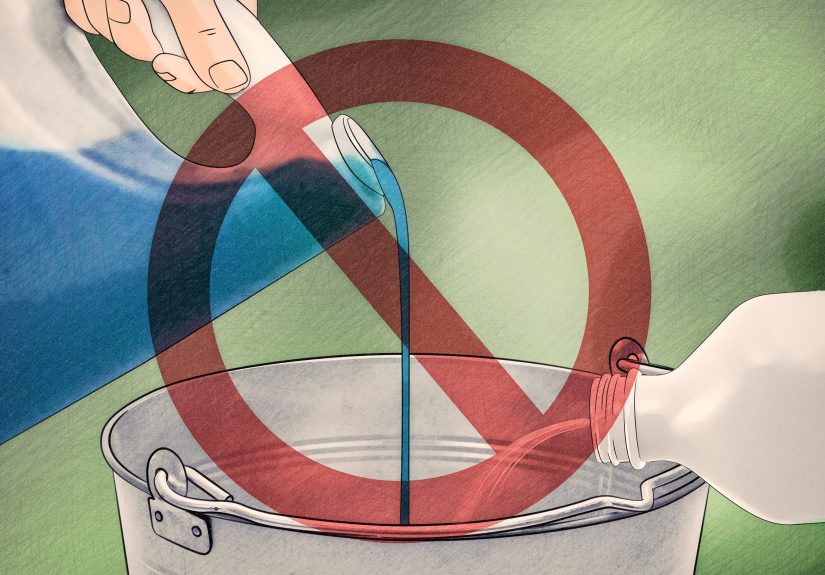
- Never mix rubbing alcohol with bleach or other cleaners.
- Do a patch test on any surface you are unsure about.
- Use a microfiber cloth, cotton pad, or paper towel instead of flooding surfaces.
- Keep the bottle away from children and pets.
How to Clean with Rubbing Alcohol: 10 Steps
Step 1: Pick the right bottle for the job
Start by reading the label. Most people reach for the nearest bottle and hope for the best, which is a bold strategy for both sports and cleaning. For general disinfecting, choose rubbing alcohol that is at least 70% isopropyl alcohol. If you are cleaning electronics, screens, or gadgets, check the manufacturer’s care instructions first. Some brands allow 70% isopropyl alcohol on exterior surfaces, while others want a very lightly dampened cloth instead of direct contact.
Example: A phone case, remote control, doorknob, or stainless steel refrigerator handle may be fair game. A waxed wood side table or a painted cabinet door is not the place to experiment.
Step 2: Clear the area and remove loose dirt first
Rubbing alcohol works better when you are not asking it to bulldoze through crumbs, dust, pet hair, and mystery kitchen grit. Wipe loose debris away with a dry microfiber cloth, or use soap and water first if the surface is visibly dirty. This matters because cleaning and disinfecting are not the same thing. If grease or grime is still sitting there, the alcohol is trying to work through a tiny traffic jam.
For counters, faucets, appliance handles, and bathroom fixtures, start with a quick basic wipe. For keyboards, unplug the device and shake out loose debris before doing anything else.
Step 3: Ventilate like you mean it
Open windows. Turn on the exhaust fan. Give the room a little air circulation. Rubbing alcohol fumes can be irritating in a closed space, especially if you are cleaning a bathroom, a car interior, or a small office nook where the air moves about as quickly as a sleepy turtle. Good ventilation also helps the surface dry evenly and keeps the whole process from feeling like you cleaned your house inside a chemistry set.
If you are cleaning a small device at your desk, you probably do not need industrial-level airflow. But in tighter spaces, fresh air is nonnegotiable.
Step 4: Patch-test any questionable surface
If the item has paint, lacquer, shellac, a glossy finish, leather, acrylic, or natural stone, test a tiny hidden area first. Wait a few minutes and look for dulling, discoloration, tackiness, or streaking. This one step saves a ridiculous amount of regret.
Patch testing is especially important for furniture, decorative trays, acrylic organizers, faux-leather desk pads, finished wood, and custom cabinetry. On the other hand, glass, many metals, and many sealed hard plastics tend to be easier candidates, though you should still proceed with a light hand.
Step 5: Apply rubbing alcohol to the cloth, not directly to the item
This is one of the easiest upgrades you can make. Instead of spraying or pouring rubbing alcohol straight onto the surface, dampen a microfiber cloth, cotton pad, or paper towel with it. You want the cloth moist, not dripping like it just lost an argument with a rainstorm.
This method gives you more control, reduces waste, and lowers the chance of liquid slipping into ports, seams, speaker openings, or the edges of a countertop. It is especially important for electronics such as phones, keyboards, mice, remotes, and tablets. Direct spraying is how a quick clean turns into a repair bill.
Step 6: Wipe high-touch hard surfaces using steady, overlapping strokes
Now do the actual cleaning. Wipe using smooth, overlapping strokes so you cover the whole area. Focus on the spots that collect fingerprints, oils, and germs: light switches, handles, faucet levers, toilet flush buttons, refrigerator pulls, remote controls, and desk accessories.
On stainless steel, rubbing alcohol can help cut fingerprints and leave a polished finish. On mirrors and glass, it helps reduce streaks because it evaporates quickly. On sticky residue from labels or tape, it can loosen the mess so you can rub it away without scraping the life out of the surface.
If you hit a stubborn greasy patch on a cabinet pull or appliance handle, hold the dampened cloth there for a few seconds before wiping again. That little pause often does more than aggressive scrubbing.
Step 7: Let the surface stay wet briefly when disinfecting
If your goal is disinfecting rather than just removing smudges, do not wipe it dry immediately. Many disinfecting products need a short contact time to work well. With rubbing alcohol, that usually means allowing the surface to remain visibly wet for a little while before it air-dries. The exact timing depends on the product label and the surface, so let the label win the argument.
This is the step people skip because they are in a hurry. Then they wonder why the process feels more decorative than effective. If you are cleaning a frequently touched hard surface during cold and flu season, that brief wet time matters.
Step 8: Use extra care on electronics and screens
Electronics are where rubbing alcohol can be brilliant or chaotic, depending on your patience level. Turn the device off, unplug it, and use a soft lint-free cloth that is only lightly dampened. Wipe the outer surfaces gently. Avoid charging ports, speaker grills, microphone holes, and seams.
Some major manufacturers allow 70% isopropyl alcohol on the exterior of phones, tablets, keyboards, and similar devices, but the guidance is still brand-specific. Translation: your phone is not a cast-iron skillet. Be gentle. No soaking, no spraying directly, no “just one extra squirt for good luck.”
For a keyboard, wipe the keys and top surface. For a mouse, focus on the buttons and palm area. For a phone case, remove the case first, then clean both parts separately and let them dry fully before putting everything back together.
Step 9: Buff dry and inspect the finish
Once the surface has air-dried or sat long enough, buff it with a clean dry microfiber cloth if needed. This is especially helpful on mirrors, chrome, stainless steel, and glossy plastic. Buffing removes faint streaks and gives you that satisfying “I totally have my life together” shine, even if there is still unfolded laundry staring at you from across the room.
Take ten extra seconds to inspect the result. If the surface looks cloudy, stop and do not keep layering on more alcohol. Cloudiness can mean residue, overapplication, or a surface that simply does not love alcohol-based cleaning. When in doubt, switch to a gentler cleaner appropriate for that material.
Step 10: Finish safely and store it properly
When you are done, toss single-use materials, wash reusable cloths as directed, and wash your hands. Make sure the bottle cap is tightly closed and store rubbing alcohol away from heat, flame, and direct sunlight. Do not leave it sitting beside a stove, near a candle, or in a roasting-hot car unless you enjoy living like a caution label.
If you cleaned something used for food prep, follow up according to the surface manufacturer’s care instructions. And if you ever feel tempted to mix rubbing alcohol with bleach, ammonia, or another cleaner because you think it might “work harder,” congratulations: you have reached the exact point where you should stop immediately and not do that.
Best Places to Use Rubbing Alcohol
- Doorknobs and handles
- Light switches
- Remote controls
- Phone cases and some device exteriors
- Keyboards and computer mice
- Glass and mirrors
- Chrome and stainless steel fixtures
- Sticky residue on glass or metal
- Bathroom faucets and soap dispensers
- Small hard tools or grooming accessories, when appropriate
What You Should Not Clean with Rubbing Alcohol
- Finished or painted wood
- Shellacked or lacquered surfaces
- Leather
- Acrylic and some plastics
- Natural stone such as some marble or granite surfaces unless the manufacturer says it is safe
- Delicate screens without manufacturer approval
- Anything near open flame or heat sources
Common Mistakes That Make Cleaning with Alcohol Less Effective
The first mistake is using it on a dirty surface and expecting the dirt to respectfully disappear. The second is applying too much product. The third is treating every material in your home as if it has the same tolerance as a stainless steel sink. Other common mistakes include spraying electronics directly, skipping ventilation, wiping a disinfecting surface dry too fast, and forgetting that rubbing alcohol is a cleaner with real chemical properties, not just a household sidekick that exists to rescue permanent marker from your life choices.
Final Thoughts
Rubbing alcohol is one of the handiest cleaning supplies in a modern home when you use it with a little strategy. It is fast, effective on many hard surfaces, and especially useful for greasy fingerprints, sticky residue, glass, metal, and high-touch items. The winning formula is simple: choose the right concentration, clean dirt first, ventilate the room, apply it to a cloth, patch-test delicate materials, and let the product do the work without turning your cleaning routine into a chemistry experiment.
In other words, rubbing alcohol is not the hero of every cleaning story, but for the right surfaces, it absolutely deserves top billing.
Experience and Practical Lessons from Cleaning with Rubbing Alcohol
One of the most useful things people learn after cleaning with rubbing alcohol for a while is that it rewards restraint. The first time many people use it, they assume more product means more cleaning power. Then they discover that a lightly dampened cloth does a better job than a soaked one. That is especially true on metal fixtures, glass, and electronics. A tiny amount goes a long way, and when you stop overapplying it, you also stop chasing streaks around the room like they are part of your cardio routine.
Another common experience is how good rubbing alcohol is at making “small gross things” less gross. Think about the handle on the fridge, the remote control everyone touches, the keyboard that has quietly collected fingerprints, snack dust, and evidence of lunch. These are not glamorous cleaning tasks, but they are the ones that make a room feel fresher almost immediately. People often notice that after wiping those high-touch areas, the whole space seems cleaner, even if they have not deep-cleaned the floors or organized the closet that has been judging them since last spring.
There is also a learning curve with surfaces. Most people have one story about using rubbing alcohol somewhere they should not have. Maybe it dulled a finish, streaked a decorative tray, or made a painted spot look tired. That experience usually teaches the patch-test lesson permanently. Once you have seen one finish react badly, you become much more disciplined. You start testing first, reading labels, and checking device instructions instead of assuming every surface is fair game. Oddly enough, that caution makes cleaning faster in the long run because you spend less time fixing avoidable mistakes.
Many people also appreciate how rubbing alcohol fits into real life. It is useful when you want a quick reset instead of a full Saturday deep clean. You can wipe down the bathroom faucet, toilet handle, light switch, and doorknob in just a few minutes. You can freshen your desk setup before starting work. You can remove sticker residue from a jar you want to reuse. Those little wins add up. Cleaning feels less like an all-day project and more like a series of manageable tasks that actually fit into a normal week.
Finally, the biggest practical lesson is that rubbing alcohol works best when you think of it as a specialist, not a universal cleaner. It shines on the right surfaces, in the right amount, with the right technique. That mindset keeps expectations realistic and results consistently good. Instead of trying to clean the entire house with one bottle and a prayer, experienced users learn to bring it in where it truly helps: glass, metal, high-touch surfaces, electronics approved by the manufacturer, and stubborn sticky residue. Once you use it that way, rubbing alcohol stops being a random item in the cabinet and becomes one of the most reliable tools in your cleaning lineup.