Table of Contents >> Show >> Hide
- Why an A-Frame Ladder Shelf Works So Well
- Project Snapshot: Skill, Cost, Time
- Tools and Materials
- Step-by-Step: How to Build a DIY A-Frame Ladder Shelf
- Step 1: Plan your angle and footprint
- Step 2: Cut the legs and matching angles
- Step 3: Build the two side assemblies
- Step 4: Mark shelf locations carefully
- Step 5: Cut shelves to final size
- Step 6: Attach shelves from the bottom up
- Step 7: Keep the unit square and add stability
- Step 8: Fill, sand, and prep for finish
- Step 9: Paint or stain for a furniture-grade look
- Step 10: Place, anchor, and style
- Design and Styling Ideas for a High-End Look
- Common Mistakes and How to Avoid Them
- Durability Tips for Long-Term Performance
- Final Thoughts
- Extended Experience Notes: Real-World DIY Lessons (500+ Words)
If your room feels one throw pillow away from total chaos, an A-frame ladder shelf is your new best friend.
It gives you vertical storage without the visual heaviness of a bulky cabinet, and it can look anything from modern
minimalist to cozy farmhouse depending on your finish and styling choices. In other words: it’s a practical storage
project that still gets compliments.
This guide walks you through how to build a ladder shelf from scratch with a sturdy structure,
clean proportions, and a finish that looks intentionalnot “I panicked and used whatever paint was in the garage.”
You’ll get a clear materials list, cut strategy, assembly sequence, sanding and finishing tips, safety guidance,
styling ideas, and troubleshooting. Whether you’re new to woodworking or already have a favorite drill bit,
this DIY storage project is very doable in a weekend.
We’ll also keep things realistic: no magical one-tool fantasy. Just solid steps, smart shortcuts, and pro-level details
that make your final shelf look like it came from a boutique home store at three times the price.
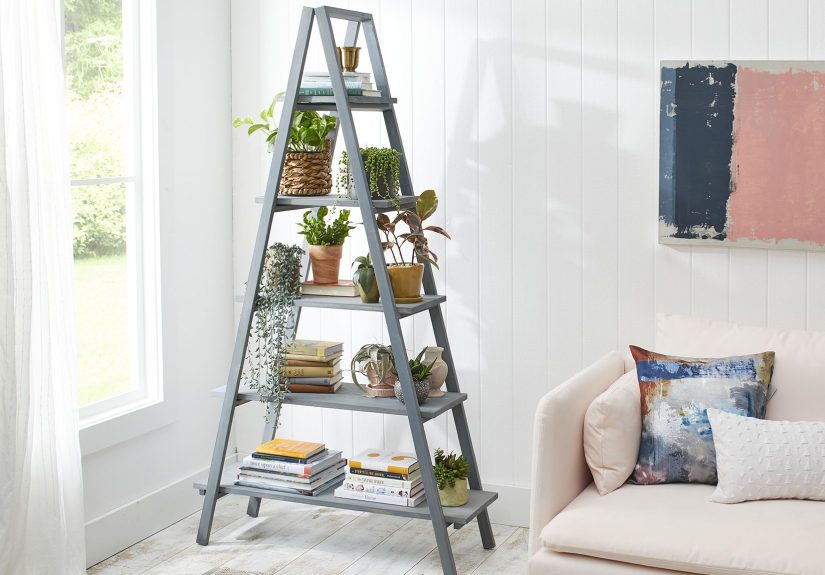
Why an A-Frame Ladder Shelf Works So Well
A-frame designs are popular because they solve two problems at once: storage and style.
You get open shelves for books, baskets, plants, and decor, while the angled frame creates visual movement that makes
a wall feel less flat. Compared with a boxy bookshelf, a ladder shelf feels lighter and works especially well in smaller rooms.
What makes this design practical
- Small footprint: Great for apartments, home offices, entryways, and bedrooms.
- Vertical storage: Uses wall height efficiently.
- Flexible shelf depth: Deeper shelves at the bottom, shallower at the top keeps it balanced and useful.
- Custom finish: Paint it bold, stain it natural, or go two-tone for a designer look.
- Beginner-friendly joinery: Screws, glue, and simple angle cuts can get you a strong result.
Project Snapshot: Skill, Cost, Time
- Skill level: Beginner to intermediate
- Build time: 1 day for assembly + drying/curing time for finish
- Estimated cost: Budget-friendly (varies by wood species and finish)
- Best use cases: Living room display shelf, bathroom ladder shelf, plant stand, office organizer, entryway storage
Tools and Materials
Tools
- Tape measure
- Speed square (or combination square)
- Miter saw or circular saw with guide/jig
- Drill/driver
- Countersink bit
- Clamps (at least 2; 4 is better)
- Level
- Orbital sander (or sanding block)
- Stud finder (for final wall anchoring)
- Paint brush/roller or staining rags
Materials
- 1×2 or 1×3 boards for frame rails and supports
- 1×10, 1×12, or 3/4-inch plywood boards for shelves
- Wood screws (use correct length for your stock)
- Wood glue
- Wood filler
- Sandpaper (coarse, medium, fine progression)
- Primer + paint or wood stain + clear topcoat
- Anti-tip furniture straps or wall anchoring hardware
- Optional: pocket-hole jig and pocket-hole screws
Recommended dimensions (example build)
| Part | Qty | Suggested Size |
|---|---|---|
| Front legs | 2 | 72 in |
| Rear legs | 2 | 72 in |
| Top spreader or hinge connection | 1 set | Match frame width |
| Bottom shelf | 1 | 30 in x 12 in |
| Middle shelf | 1 | 26 in x 10 in |
| Upper-middle shelf | 1 | 22 in x 8 in |
| Top shelf | 1 | 18 in x 6 in |
Tip: Cut your shelves after a dry-fit of the frame so your final widths match the real-world spacing, not
the optimistic numbers from your first sketch.
Step-by-Step: How to Build a DIY A-Frame Ladder Shelf
Step 1: Plan your angle and footprint
Decide your final height, width, and lean. A classic look is slightly wider at the base with a gentle taper toward the top.
Mark your cuts clearly and label each board before you start. This sounds basic, but it prevents the legendary DIY mistake:
cutting the “left leg” twice and wondering why your shelf now has an emotional support board.
Step 2: Cut the legs and matching angles
Cut all four legs first. If you’re creating a leaning-style ladder profile, angle the top ends so they sit cleanly and make
matching bottom cuts so the legs rest flat on the floor. A useful trick is to cut one leg, then trace that angle onto the
others so all four pieces match perfectly.
Step 3: Build the two side assemblies
Lay two legs on a flat surface and connect them with cross supports according to your shelf positions. Repeat for the second side.
Use clamps, predrill pilot holes, then drive screws. If you’re using pocket holes, choose screw type by material:
coarse thread generally works best for softwoods and sheet goods.
Step 4: Mark shelf locations carefully
Stand both side assemblies and mark shelf positions from bottom to top. Keep spacing practical for what you’ll store.
For example, décor-heavy shelves can be tighter, while baskets or taller books need more height. Use a square and level here.
Uneven shelf lines are surprisingly visible once the shelf is styled.
Step 5: Cut shelves to final size
Cut shelves so they narrow as they go up the frame. A circular saw with a straightedge jig is excellent for clean, repeatable cuts,
especially with plywood. Label each shelf from bottom to top as you go.
Step 6: Attach shelves from the bottom up
Begin with the bottom shelf and work upward. Clamp each shelf in place, confirm it is level, predrill, then fasten with screws.
Countersink screw heads so you can fill for a clean finish. Glue plus mechanical fasteners makes shelves stiffer and quieter over time.
Step 7: Keep the unit square and add stability
Check diagonals during assembly to keep everything square. If needed, add a discreet back brace or strap for extra rigidity.
If your floor is uneven, adjustable feet or tiny shims can make a huge difference in wobble control.
Step 8: Fill, sand, and prep for finish
Fill countersunk screw holes and any minor gaps. Once dry, sand in stages: start coarse enough to flatten imperfections, then move
to medium and fine grits. Sand with the grain. Vacuum dust, then wipe with a tack cloth before finishing.
Step 9: Paint or stain for a furniture-grade look
For paint: prime first, then apply two thin coats, sanding lightly between coats if needed.
For stain: test on scrap first, condition blotch-prone wood if needed, stain evenly, then seal with a clear protective finish.
Stain adds color; topcoat adds durability. You want both.
Step 10: Place, anchor, and style
Move the finished shelf into place, verify it sits flat, then anchor it to the wall with anti-tip hardware.
This is not optional if you have kids, pets, or high-traffic spaces. Once secure, style your shelves with a mix of books,
closed storage bins, plants, ceramics, and negative space so it looks curated instead of crowded.
Design and Styling Ideas for a High-End Look
1) Use the “heavy-low, light-high” rule
Put heavier items (books, baskets) on lower shelves and lighter decor higher up. It looks balanced and improves stability.
2) Mix textures, not just colors
Pair wood, ceramic, woven baskets, matte metal, and greenery. Texture contrast makes even neutral palettes feel intentional.
3) Keep breathing room
Leave 20–30% of each shelf visually open. If every inch is filled, the shelf reads as storage overload rather than stylish DIY storage.
4) Choose one accent color
If your room already has a color story, echo one accent tone on the shelf for cohesion.
If not, wood + black + white is a foolproof trio.
5) Add functional organizers
Closed bins hide clutter. Tray organizers corral small items. A small lamp can turn your ladder shelf into a mini focal point.
Common Mistakes and How to Avoid Them
Mistake: Not checking lumber for straightness
Crooked boards create twist and wobble fast. Sight down each board at the store and reject anything banana-shaped.
Mistake: Skipping pilot holes
This can split narrower pieces, especially near ends. Predrill and use the right screw length for cleaner joints.
Mistake: Trusting “nominal” sizes
Lumber labels (like 1×2 or 1×12) are nominal, not exact. Always measure actual thickness before choosing screws or pocket-hole settings.
Mistake: Rushing finish work
Most “homemade” looking shelves are not a wood problemthey’re a prep problem. Sand progressively, remove dust, and apply thinner coats.
Mistake: No wall anchor
A tall, open shelf can tip if bumped or climbed. Use anti-tip straps anchored into a stud or suitable wall anchor.
Stylish and safe can absolutely coexist.
Durability Tips for Long-Term Performance
- Keep heavier objects on lower shelves.
- Re-tighten screws after the first week of use.
- Avoid overloading a single shelf span.
- Wipe spills promptly, especially on stained wood.
- Use felt pads under feet if placed on hardwood floors.
- Recoat high-touch painted shelves every few years if needed.
Final Thoughts
Building an A-frame ladder shelf is one of those rare DIY wins that checks every box:
practical storage, stylish design, manageable cost, and a satisfying weekend build. The key is not fancy toolsit’s careful
measuring, clean cuts, dry-fitting before final assembly, and patient finishing. If you follow those fundamentals,
you’ll end up with a shelf that looks custom, functions beautifully, and earns the very best compliment in DIY:
“Wait, you made that?”
Extended Experience Notes: Real-World DIY Lessons (500+ Words)
Across real home projects, the experience of building a DIY ladder shelf usually follows a funny pattern:
everyone starts with confidence, panics during layout, regains confidence after dry-fitting, and then becomes surprisingly
emotionally invested in stain color names. Below are common experiences DIYers report and what they teach you before your next build.
Experience 1: The Small Apartment Corner Build
In compact apartments, people often choose ladder shelves because they want storage without visual bulk. The biggest lesson from these builds
is that proportion matters more than raw size. A shelf that is too wide overwhelms the room, while one that is too narrow
looks temporary. Builders who succeed here usually start by taping the footprint on the floor and wall before cutting any wood.
They also find that open storage needs intentional curation: one basket for hidden clutter, one stack of books, one plant, and one decor object
per shelf zone can look clean and calm. Once this pattern is set, the shelf stops being “extra furniture” and starts acting as architecture.
Experience 2: The Home Office “I Need This Yesterday” Project
Home office builders often want a quick solution for notebooks, tech accessories, reference books, and camera gear.
The most repeated lesson: shelf spacing should follow your real objects, not just aesthetic symmetry.
People who pre-measure their tallest binders, storage boxes, and headphones save hours of rework. Another common discovery is cable chaos.
The clever fix is to dedicate one shelf level to a tray or basket that hides chargers, adapters, and power strips.
Some also add a small lip or tray insert on one shelf for frequently used tools. In these setups, the ladder shelf becomes a vertical command center,
not just a nice background for video calls.
Experience 3: The “I Painted It and Now It Looks Better Than My Couch” Moment
Many builders begin with stain plans and switch to paint after seeing how painted finishes tie into trim, wall color, or existing furniture.
The repeated takeaway is that prep determines finish quality. DIYers who lightly sand between coats and keep dust down get that
smooth, factory-like look. DIYers who rush the process end up with drips, brush ridges, or random texture and spend the next evening
saying things like, “No no, it’s supposed to look rustic.” Another surprisingly useful trick is painting shelves and frame in different sheens
(for example, eggshell on frame, satin on shelves) for subtle depth. It is low effort, high visual payoff.
Experience 4: The Family Room Safety Upgrade
In homes with kids or pets, builders quickly realize that style must include stability. People commonly report this “aha” moment
after they place a heavy basket high up and notice a slight forward pull. The fix is straightforward: wall anchoring and heavier items on lower shelves.
Once anchored, the shelf feels dramatically more secure. Families also find that closed bins on lower levels reduce toy scatter and make cleanup easier.
One practical routine that sticks: each shelf gets a category (books, games, craft supplies, electronics), and if an item does not fit a category,
it doesn’t live there. This turns the ladder shelf into a behavior system, not just a furniture piece.
Experience 5: The “Second Build Is Always Better” Insight
People who build a second ladder shelfoften for another roomconsistently report faster assembly, cleaner lines, and better styling.
Why? Because the first project teaches the non-obvious details: label every cut, predrill everything, dry-fit before fastening, and test finishes on scrap.
The second build also benefits from design confidence. Builders experiment with two-tone color, wider bottom shelves for baskets, or slimmer top shelves
for framed photos. Some add discreet anti-slip pads, others integrate a small plant light, and many switch to a matching pair of ladder shelves
flanking a console or desk. That’s the hidden power of this project: it scales. What starts as one practical shelf often becomes a repeatable,
personalized storage style across the whole home.
If there is one universal takeaway from these experiences, it is this: a great A-frame ladder shelf is less about “advanced woodworking”
and more about good decisions made at the right time. Measure with intent, build in sequence, finish with patience, and style with restraint.
Do that, and your shelf will look polished, work hard, and stay useful long after the excitement of the first assembly is over.