Table of Contents >> Show >> Hide
- What You’ll Learn
- 1) Plan First: Match the Trellis to the Plant (Not the Other Way Around)
- 2) Materials and Tools: A Practical Shopping List
- 3) Build #1: Simple Wooden Grid Trellis (Beginner-Friendly, Looks Great)
- 4) Build #2: Freestanding Garden Trellis (Fence-Style, Very Stable)
- 5) Build #3: Wall-Mounted Wire Trellis (Clean Look, Big Impact)
- 6) Build #4: Cattle Panel Arch Trellis (High Yield, Instant Garden Drama)
- 7) Installation and Anchoring: The Part That Makes Everything Else Possible
- 8) Training and Maintaining Vines (So They Don’t Turn Into a Snarl)
- 9) Common Trellis Mistakes (and How to Avoid Them)
- 10) Quick FAQs
- Conclusion: Build It Once, Enjoy It All Season
- Experience-Based Tips: What DIYers Learn After Building a Trellis (An Extra )
A trellis is basically your garden’s way of saying, “Let’s go vertical.” It turns a floppy vine into a living wall, keeps fruit cleaner, boosts airflow, and makes harvesting feel less like a treasure hunt in a jungle. The best part? You can build a sturdy DIY trellis with ordinary lumber (or wire, or a cattle panel) in a single weekendoften in a single afternoonthen spend the rest of the season pretending you’re a horticultural architect.
This guide walks you through planning, materials, and four proven builds (wood lattice, freestanding fence-style, wall-mounted wire, and cattle panel arch). You’ll also get plant-training tips, common mistakes to avoid, and a big “lessons learned” section at the end so you don’t have to learn everything the hard way.
1) Plan First: Match the Trellis to the Plant (Not the Other Way Around)
Before you cut a single board, ask two questions: How does your plant climb? and How heavy will it get? Those answers determine spacing, materials, and anchoring.
How vines climb: the “grip” decides your design
- Twiners (like pole beans, honeysuckle, some clematis) wrap stems around slender supports. They love thin slats, strings, or wire.
- Tendril climbers (like peas and grapes) grab thin itemswire, twine, nettinglike tiny spring-loaded hands.
- Ramblers (like climbing roses) don’t truly “cling.” They hook and lean. They appreciate lattice they can be tied to.
- Clingers (like some ivies) can attach directly to surfaces. If you’re trellising near a home, a stand-off wire or panel system helps keep plants off siding and improves airflow.
Weight matters (and so does wind)
A trellis holding lightweight peas is basically a friendly suggestion. A trellis holding mature grapes or a loaded cucumber vine is a structural jobespecially when summer storms roll in with their “let’s test your fasteners” attitude. For heavy vines and fruit, use stronger posts and heavier wire, and treat anchoring as the main eventnot a footnote.
A good rule: if the plant can produce fruit you would describe as “arm workout,” build a trellis that looks slightly overbuilt. Your future self will thank you while harvesting instead of re-setting posts.
2) Materials and Tools: A Practical Shopping List
Best materials for a long-lasting garden trellis
- Rot-resistant wood: cedar and redwood are classic. Pressure-treated lumber works well for in-ground posts.
- Exterior fasteners: exterior-grade screws; galvanized or stainless hardware to resist rust.
- Wire options: galvanized welded wire, wire mesh panels, or wire rope for wall-mounted patterns.
- Anchoring: gravel for drainage; quick-set concrete if you want maximum permanence; T-posts for speed and strength.
- Finish: exterior stain, primer/paint, or a wood preservative (optional but helpful).
Tools you’ll likely use
- Measuring tape, pencil/marker, and a level
- Saw (miter saw, circular saw, or handsaw)
- Drill/driver + bits (pilot holes matter outdoors)
- Post-hole digger and shovel (for freestanding posts)
- Staple gun (if attaching wire mesh to a frame)
- Safety gear: eye protection, gloves, and hearing protection if using power tools
Safety note: If you’re digging holes, call your local utility locating service (in the U.S., that’s typically “811”) before you dig. It’s the least glamorous phone call you’ll make all weekand the most important.
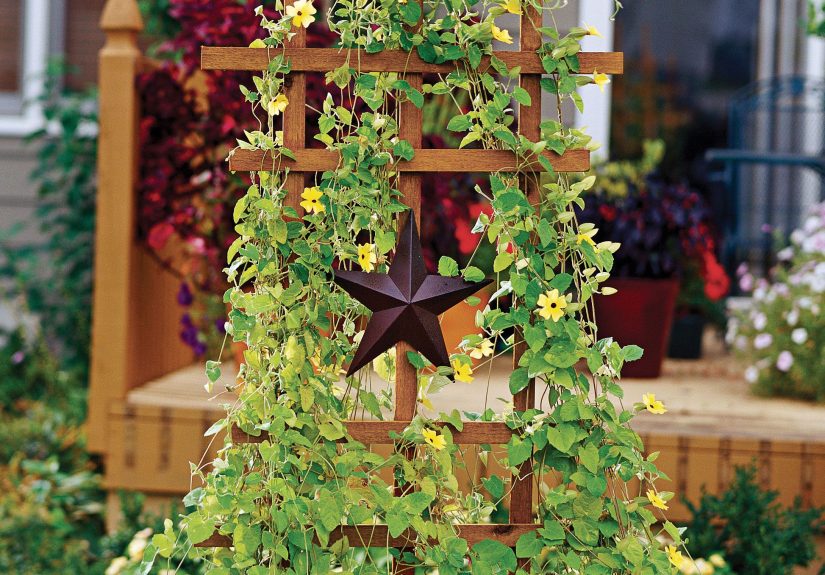
3) Build #1: Simple Wooden Grid Trellis (Beginner-Friendly, Looks Great)
This is the “classic” DIY garden trellis: a wood grid you can lean against a fence, mount near a wall, or stake into the ground. It’s perfect for flowering vines, lighter vegetables, and anyone who wants a clean look without advanced carpentry.
Recommended dimensions (easy and flexible)
- Height: 6 to 8 feet for most backyard uses
- Width: 2 to 4 feet per panel (build multiple panels for longer runs)
- Grid spacing: ~6 inches is a sweet spot for many vines (easy for tendrils, tidy visually)
Materials
- 1×2 cedar strips (or similar) for the grid
- Exterior screws (around 1-1/4-inch is common for 1x material)
- Exterior stain/paint (optional, but recommended)
- Gravel (if setting posts/feet in the ground)
Step-by-step
- Sketch your plan. Decide height/width and spacing. Count boards before you buy them. (This is where budgets are saved and return trips are avoided.)
- Create a layout guide. On a flat surface (driveway, patio), mark parallel lines about 6 inches apart, then add perpendicular lines to form a grid. This keeps everything square without “eyeballing yourself into regret.”
- Cut and dry-fit. Lay your pieces on the guide. Adjust spacing until it looks balanced.
- Pre-drill and screw from the back. Pre-drilling reduces splitting. Screwing from the back hides fasteners so the front looks clean.
- Finish (optional but smart). Stain or paint to protect the wood. If painting, doing it before final assembly can make coverage easierjust expect small touch-ups around screws.
Where this shines: clematis, morning glory, sweet peas, nasturtiums, and lighter edible vines. If you want “living wallpaper,” this is your starting point.
4) Build #2: Freestanding Garden Trellis (Fence-Style, Very Stable)
A freestanding trellis is a great option when you don’t want vines touching a house or fence. It’s also easier to maintain (prune from both sides) and can be placed for ideal sun exposure.
Why it works so well
- No plant contact with siding (less risk of moisture and damage)
- More airflow around foliage
- Easy harvesting and inspection
Basic materials (one 8-foot section)
- Two 4×4 posts (pressure-treated) for the ends
- 1x2s / 2x2s / lath strips for rails and slats (or lattice panel)
- Gravel + quick-set concrete for footings (recommended)
- Exterior-grade screws and/or galvanized nails
Step-by-step
- Mark the line and post spacing. A common approach is an 8-foot span between posts for a single section. For longer runs, repeat in sections rather than attempting one mega-panel.
- Dig post holes. Aim for deep, stable footings. Add gravel at the bottom for drainage before setting posts.
- Set posts plumb. Use a level on two faces, brace the post, then add concrete per bag directions. Let it cure properlyoutdoor projects reward patience.
- Add rails/slats or a lattice infill. Attach horizontal rails, then add evenly spaced slats or staple wire mesh to a framed opening. Keep everything squareplants will highlight crooked lines the way stage lights highlight glitter.
- Cap and finish. Post caps reduce water intrusion and add a finished look. Stain/paint for longevity.
Best uses: cucumbers, beans, peas, flowering vines, and even “I need a soft screen here” landscaping moments.
5) Build #3: Wall-Mounted Wire Trellis (Clean Look, Big Impact)
If you love the “modern garden” vibe, a wall-mounted wire trellis is minimal, strong, and surprisingly elegant. You can run wires in diamonds, squares, or simple horizontals. It’s also great for tight spaces.
Key idea: keep vines off the wall (a little)
Even when mounting to a wall, it’s smart to create some separation so air can move behind foliage and you can inspect/maintain. Many DIYers do this with hooks/anchors and tensioned wire.
Materials
- Eye hooks or screw eyes (or masonry anchors + hooks for brick)
- Galvanized wire rope or sturdy wire (plus ferrules/clamps to terminate ends)
- Optional: a turnbuckle for tensioning
- Drill + appropriate bits for your surface
Step-by-step
- Plan the pattern. Mark hook locations with painter’s tape. Step back and look before drilling. (It’s much easier to move tape than to “move” holes.)
- Install anchors/hooks. For masonry, use the correct anchors and bit. For wood framing, pre-drill to avoid splitting.
- Run and secure wire. Thread wire through hooks, terminate ends with ferrules/clamps, and tension. Keep wires taut so they don’t sag when plants get heavy.
- Plant and train early. Gently wrap young growth onto the wire. A little guidance early saves a lot of untangling later.
Best uses: clematis, jasmine, climbing roses (with ties), and other ornamentals that you want to “draw” across a surface. It’s also a tidy solution for small yards where every vertical inch counts.
6) Build #4: Cattle Panel Arch Trellis (High Yield, Instant Garden Drama)
The cattle panel arch is popular for a reason: it’s strong, affordable, and turns a walkway (or the gap between raised beds) into a productive tunnel. You can grow beans, cucumbers, gourds, and more, and harvest hanging fruit like you’re shopping in a leafy aisle.
Materials
- One cattle panel (often sold in 8- or 16-foot lengths)
- T-posts (typically 4 total for a single arch section)
- Wire, heavy-duty zip ties, or fencing clips to attach panel to posts
- Post driver or heavy mallet
- Gloves (wire edges can be rude)
Step-by-step (simple arch)
- Place your posts. Set two posts on each side of the path/bed. Keep them aligned so the arch isn’t twisted.
- Drive posts deep. Deeper is sturdier. For softer soil or raised beds, you’ll want extra depth and/or longer posts.
- Bend the panel into an arch. With help (panels have spring), position it against one side, then walk it over to the other.
- Attach securely at multiple points. Top, middle, and lower attachment points keep the panel from shifting.
- Plant at the base and train. Many climbers will grab on naturally; others may need gentle weaving.
Best uses: pole beans, cucumbers, winter squash (with support slings as needed), flowering climbers, and anyone who wants their garden to look like it belongs in a magazine without paying magazine prices.
7) Installation and Anchoring: The Part That Makes Everything Else Possible
Trellises fail for one main reason: the builder put all their effort into the pretty part and treated the foundation like an optional side quest. For anything taller than about shoulder heightor anything carrying fruitanchoring is the project.
Post depth and spacing
- Go at least 2 feet deep for many in-ground trellis posts, and deeper for tall/heavy structures or in frost-prone areas.
- Use gravel at the bottom of post holes to improve drainage.
- If you’re building a wire/production-style trellis, consider heavier wire gauges and sturdy end posts because wire tension adds constant stress.
Three anchoring approaches (choose your commitment level)
- Post spikes/holders: fast, less digging, great for lighter trellises in suitable soil. Not ideal for big loads.
- Concrete footings: maximum stability for freestanding trellises and windy sites.
- T-posts: quick, strong, and perfect for wire mesh or cattle panelsespecially for vegetable gardens.
Pro tip: If your trellis is tall, add bracing. A diagonal brace is like giving your trellis a backbone. Without it, the first big gust of wind may turn your “garden feature” into “modern art.”
8) Training and Maintaining Vines (So They Don’t Turn Into a Snarl)
Building the trellis is only half the win. The other half is teaching the plant where to gokindly, early, and consistently. Think of it as “gentle choreography,” not “wrestling match.”
Train early, then let the plant do its thing
- Start the trellis before planting when possible. It’s easier on roots and easier on your sanity.
- Use soft ties (plant tape, fabric strips) for anything that doesn’t naturally twine.
- Guide new growth weekly in peak season. Five minutes now prevents thirty minutes later.
Spacing and airflow: vegetable-specific tips
- Cucumbers: Trellising improves airflow, can reduce disease pressure, and can produce straighter fruit. A common spacing recommendation along a trellis is about 10–12 inches between plants (variety and system matter).
- Beans: Many pole beans climb readily; typical backyard trellises often land in the 6–9 foot range depending on the variety and harvest preference.
- Melons/winter squash: Large fruit may need support slings (mesh bags, old fabric, even cut-up T-shirts) to prevent the vine from bearing all the load.
Seasonal maintenance
- Inspect hardware annually; tighten loose screws and re-tension wire as needed.
- Reapply stain/preservative periodically if you want wood to last longer.
- Prune vines so they don’t become too heavy (and so airflow stays decent).
9) Common Trellis Mistakes (and How to Avoid Them)
- Underbuilding the anchor. If posts wobble now, they’ll wobble more when vines and fruit load up. Fix it at the foundation stage, not after the plant is happily mid-climb.
- Using indoor screws outdoors. They rust, snap, and stain your wood. Exterior-rated fasteners exist for a reason.
- Making openings too large (or too small). Big openings can be harder for tendrils to grab; tiny openings can be hard to weave through. Aim for a practical grid that matches how your plant climbs.
- Placing it where you can’t reach it. The best trellis spot is where plants get sun and you can actually harvest without performing yoga on a ladder.
- Forgetting wind. Tall trellises act like sails once leafed out. Brace, anchor, and avoid flimsy connections.
10) Quick FAQs
What’s the easiest trellis to build?
An A-frame or simple grid trellis is usually the easiest. If you want “fast and done,” a basic wood grid panel is hard to beat.
Should I attach a trellis directly to my house?
You can, but consider a stand-off (a little space) so vines don’t press against siding and trap moisture. A freestanding trellis placed a foot or two away can deliver a similar look with easier maintenance.
Do I need concrete?
Not always. For lightweight trellises, spikes/holders or deeply set posts may be enough in stable soil. For tall trellises, windy areas, or heavy crops, concrete is a smart move.
How tall should my trellis be?
Match it to the plant and your harvesting comfort. Many garden trellises land around 6–8 feet, but some vigorous vines can go higher. If the plant can grow 16+ feet, either plan to prune/train or build a taller, more permanent system.
Conclusion: Build It Once, Enjoy It All Season
Learning how to build a trellis is one of those “small project, big payoff” upgrades. It saves space, improves airflow, makes harvest easier, and turns your garden into a vertical showpiece. Start by matching the design to how your plant climbs and how heavy it will get. Choose rot-resistant materials, use exterior fasteners, anchor deeper than you think you need, and train early. Do that, and your trellis won’t just stand there looking prettyit’ll work hard all season long.
Experience-Based Tips: What DIYers Learn After Building a Trellis (An Extra )
If you ask a bunch of gardeners about their first DIY trellis, you’ll hear the same theme: “It looked amazing… right up until July.” Early summer is when vines are cute and polite. Mid-summer is when they become ambitious athletes with a personal vendetta against gravity. That’s why experienced builders tend to plan for the “August version” of the plant, not the “May version.”
One of the most common real-world lessons is that anchoring is everything. People often build a gorgeous lattice panel, stick it in the ground like a decorative sign, and then act shocked when a thunderstorm turns it into a leaning tower of compost. The fix is boring but effective: deeper posts, gravel for drainage, and (when needed) concrete. Most gardeners who rebuild a trellis rebuild the foundation, not the grid. The grid rarely fails first; the ground connection does.
Another frequent “wish I knew” moment: wire and wood move differently over time. Wood swells and shrinks with moisture; wires can loosen under constant tension and temperature changes. DIYers who love wire patterns (diamonds, squares, horizontals) often say the best upgrade they made was adding a simple method to re-tightenwhether that’s a turnbuckle, a re-crimpable end, or just a plan to re-tension once or twice each growing season. It’s not a failure; it’s maintenance. Think of it like tightening a guitar string, but with fewer power ballads.
People also learn quickly that plant training is easier early. When vines are young, you can guide them gently in the right direction. When vines are older, they’ve already made decisions, formed alliances, and possibly started a small government. If you want coverage to look even, the “experienced” approach is to check the trellis once a week during active growth and redirect a few shoots. Five minutes of guidance creates a neat, full trellis; ignoring it for a month creates a single thick vine highway with empty space everywhere else.
Vegetable gardeners often discover a sneaky benefit: vertical growing changes the harvest experience. Cucumbers become easier to spot, straighter, and cleaner. Beans hang where you can actually see them. Even pest and disease monitoring becomes simpler because you can inspect leaves without crawling around on the soil. Many gardeners say their “maintenance time” drops because harvesting and checking plants becomes a quick walk-by instead of a full expedition.
Finally, long-time trellis builders will tell you to build with your future layout in mind. A trellis is a structure, but it’s also a design element. It can frame an entry to a garden bed, create a living privacy screen, or define zones in the yard. DIYers who are happiest with their trellises tend to place them where they solve more than one problem: support the plant, improve access, and make the space look intentional. In other words, the best trellis isn’t just a plant ladderit’s a garden upgrade that pays you back in beauty and convenience all season long.