Table of Contents >> Show >> Hide
- What You Need Before Assembling a BMX Bike
- Step 1: Unbox the BMX Bike Carefully
- Step 2: Identify the Front of the Bike
- Step 3: Install the Front Wheel
- Step 4: Install and Align the Handlebars
- Step 5: Check the Headset
- Step 6: Install the Seat and Seat Post
- Step 7: Install the Pedals Correctly
- Step 8: Install Pegs if Your BMX Includes Them
- Step 9: Set Up the Brakes
- Step 10: Check the Chain Tension
- Step 11: Inflate the Tires
- Step 12: Tighten and Inspect Every Important Bolt
- Step 13: Do a Pre-Ride Safety Test
- Common BMX Assembly Mistakes to Avoid
- Extra Tips for a Better BMX Build
- Real-World Experience: What Assembling a BMX Bike Teaches You
- When to Ask a Professional Bike Mechanic
- Conclusion
- SEO Tags
Opening a BMX bike box feels a little like unboxing a tiny stunt machine with an attitude problem. There is the frame, the bars, the front wheel, pedals, reflectors, maybe pegs, and enough packaging to make you wonder whether the bike was shipped through a thunderstorm inside a washing machine. The good news? Most complete BMX bikes arrive mostly assembled. The not-so-good news? “Mostly assembled” still means you need to install key parts correctly before anyone rides it.
This guide walks you through how to assemble a BMX bike safely, step by step, using clear instructions, practical examples, and a few mechanic-style habits that can save you from annoying rattles, crooked handlebars, squeaky pedals, and the classic “why is the front brake doing jazz hands?” situation. Whether you bought a freestyle BMX, a 20-inch BMX bike, a kids’ BMX, or a beginner street bike, the basic assembly process is similar: unpack carefully, install the front wheel, align the handlebar, fit the saddle, attach the pedals, set up the brakes, inflate the tires, and perform a full safety check.
Before you start, remember this: a BMX bike is small, tough, and simple compared with many geared bikes, but it still needs proper tightening and adjustment. If anything feels confusing, damaged, loose, or suspicious, have a professional bike mechanic inspect it before riding. Pride heals faster than elbows, but neither needs to be tested today.
What You Need Before Assembling a BMX Bike
Most boxed BMX bikes include a basic tool kit, but those tools are usually “good enough,” not “mechanic dream sequence.” If you have better tools, use them. You will usually need a 15 mm pedal wrench or open-end wrench, a 17 mm socket or wrench for axle nuts, 4 mm, 5 mm, and 6 mm Allen keys, a tire pump with a pressure gauge, bicycle grease, a clean rag, and ideally a torque wrench.
A torque wrench is especially helpful because bicycle bolts are not meant to be tightened with heroic energy. Over-tightening can damage threads, crush parts, or make future adjustments miserable. Under-tightening can allow parts to move when riding. If your BMX owner’s manual lists torque values, follow those numbers first. The manual wins every argument.
Prepare Your Workspace
Choose a clean, flat area with enough room to walk around the bike. A garage floor, driveway, patio, or large indoor space works well. Put down cardboard from the box to protect the frame and keep small parts from rolling away. Keep pets, little siblings, and mysterious missing washers away from the assembly zone.
Step 1: Unbox the BMX Bike Carefully
Open the carton from the top and lift the bike out gently. Do not yank the handlebars, brake cables, or front wheel like you are starting a lawn mower. Remove the packaging, zip ties, foam, cardboard protectors, and plastic axle guards. Set aside the small parts box, which may contain pedals, reflectors, pegs, tools, the owner’s manual, and hardware.
Inspect the frame, fork, wheels, brake cables, chain, grips, saddle, and tires. A little scuff from shipping may happen, but cracks, bent fork legs, crushed cable housing, missing axle nuts, or damaged threads are red flags. If anything looks wrong, pause assembly and contact the seller or manufacturer.
Step 2: Identify the Front of the Bike
This sounds obvious until the handlebar is sideways, the fork is turned around, and everyone in the room suddenly becomes a bicycle philosopher. On most BMX bikes, the front brake, if included, should face forward. The fork dropouts point downward, and the handlebar stem should align with the front wheel once installed.
If the fork was turned backward for shipping, rotate it so the brake, if installed, is in front of the fork. Also check tire direction. Some BMX tires have directional tread arrows printed on the sidewall. If your tire has an arrow, it should point forward when the wheel rolls.
Step 3: Install the Front Wheel
Flip the bike carefully upside down or use a bike stand if you have one. Loosen the front axle nuts enough so the axle can slide into the fork dropouts. If your bike includes safety washers or tabbed retainers, make sure they sit properly in the dropout holes or slots. These small parts are not decorative. They help keep the wheel secured in the fork.
Place the front wheel fully into the fork dropouts. Center the wheel between the fork legs. Hand-tighten both axle nuts first, then use a wrench or socket to tighten each side gradually. Alternate sides so the wheel stays centered. Do not tighten one side completely while the other side is loose, or the wheel may sit crooked.
Spin the wheel. It should rotate freely without rubbing the brake pads or fork. If it wobbles badly, touches the brake constantly, or does not sit centered, loosen the axle nuts and realign it.
Step 4: Install and Align the Handlebars
Most modern BMX bikes use a threadless stem with a faceplate that clamps the handlebar. Some entry-level or kids’ BMX bikes may use a quill stem. Always check your manual, because stem styles are different.
For a Threadless BMX Stem
Position the handlebar in the stem with the grips level and the crossbar roughly parallel to the fork. The brake lever, if installed, should be comfortable to reach. Place the stem faceplate over the bar and start all bolts by hand. Tighten the bolts in a cross pattern: top left, bottom right, top right, bottom left. This keeps the faceplate gap even.
Next, stand over the front wheel and align the handlebar with the tire. The bar should be straight, not leaning like it has a secret. Tighten the stem bolts evenly according to the manufacturer’s recommendation. Check that the top cap is snug enough to remove headset play but not so tight that the steering feels stiff.
For a Quill Stem
Insert the stem into the fork steerer past the minimum insertion mark. That mark must disappear inside the frame. Align the stem with the front wheel, then tighten the stem bolt. If the minimum insertion line is visible, stop and lower the stem. Riding with a quill stem too high can be dangerous.
Step 5: Check the Headset
The headset is the bearing system that lets the fork and handlebar turn smoothly. To check it, hold the front brake and rock the bike forward and backward. If you feel a knock or clicking at the front of the frame, the headset may be loose. Lift the front wheel and turn the handlebar side to side. If steering feels crunchy, tight, or notchy, it needs adjustment.
For a threadless setup, headset adjustment usually involves loosening the stem side bolts, gently tightening the top cap, then retightening the stem. The goal is smooth steering with no play. Do not crank the top cap like you are sealing a submarine hatch. It is for bearing preload, not structural clamping.
Step 6: Install the Seat and Seat Post
Apply a thin layer of grease to the seat post if it is metal and the frame allows it. Slide the seat post into the seat tube past the minimum insertion mark. Set the saddle height. BMX saddles are often lower than mountain bike or road bike saddles because riders need room to move. For beginners, set it high enough to sit comfortably while learning, but low enough that it does not get in the way.
Align the saddle with the top tube, then tighten the seat clamp. If the saddle tilts wildly upward or downward, adjust the seat hardware. A slightly nose-up or level position is common on many BMX bikes, but comfort and control matter most.
Step 7: Install the Pedals Correctly
Pedals are where many first-time bike builders accidentally create a small metal tragedy. The right pedal and left pedal thread in opposite directions. The right pedal usually has a standard thread and tightens clockwise. The left pedal is reverse-threaded and tightens counterclockwise. Pedals are often marked “R” and “L” near the axle.
Apply a small amount of grease to each pedal thread. Start threading each pedal by hand. If it does not turn smoothly, stop. Do not force it. Cross-threading a crank arm can ruin your day and your wallet. Once the pedal is threaded correctly by hand, tighten it with a pedal wrench or 15 mm wrench.
Step 8: Install Pegs if Your BMX Includes Them
Some freestyle BMX bikes include axle pegs. Pegs usually slide over the axle before the axle nut is tightened. Make sure there is enough axle thread engaged after the peg is installed. If the axle nut barely catches the thread, the setup is not secure.
Pegs may also affect wheel centering, brake clearance, and axle nut access. Tighten everything evenly and check that the wheel spins freely. For a first assembly, it is perfectly fine to build the bike without pegs, confirm everything works, and install pegs later with help if needed.
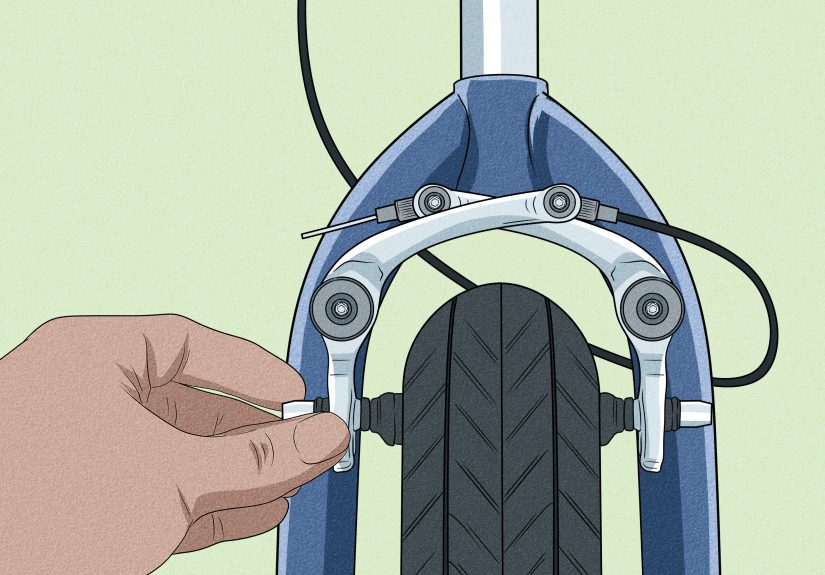
Step 9: Set Up the Brakes
Many BMX bikes use a rear U-brake, a front caliper brake, a linear-pull brake, or a gyro/detangler system that allows the bars to spin without twisting the brake cable. Brake setup varies, so follow your manual closely. Still, the basic principles are simple: the brake pads should hit the rim squarely, both sides should move evenly, and the lever should feel firm before it reaches the grip.
Look at the brake pads. They should contact the metal rim, not the tire. If a brake pad rubs the tire, it can damage the sidewall. If it sits too low, braking power will be weak. Squeeze the brake lever and watch the pads. They should move toward the rim at about the same time.
If the lever pulls all the way to the grip, the cable may be too loose. If the wheel barely spins because the pads rub constantly, the cable may be too tight or the brake arms may need centering. Small adjustments make a big difference. Brakes are not the place for guesswork. If you cannot get a strong, even brake feel, visit a bike shop before riding.
Step 10: Check the Chain Tension
BMX bikes are usually single-speed, which means chain tension matters. A chain that is too loose may slap around or come off. A chain that is too tight can bind, wear parts quickly, and make pedaling feel rough. A small amount of vertical movement is normal.
Spin the cranks backward slowly. The chain should move smoothly without tight spots. If the rear wheel was pre-installed, chain tension may already be set. If you loosened the rear axle, make sure the wheel is straight in the frame before tightening both rear axle nuts.
Step 11: Inflate the Tires
Check the tire sidewall for the recommended pressure range. BMX tire pressures vary depending on tire size, rider weight, surface, and riding style. Use a pump with a gauge rather than the ancient thumb-squeeze method, which is about as scientific as asking a sandwich for legal advice.
Inflate both tires evenly. Make sure the tire bead sits correctly around the rim. If the tire bulges or dips in one area, release air and reseat it before inflating again. Never exceed the maximum pressure printed on the tire.
Step 12: Tighten and Inspect Every Important Bolt
Go through the bike slowly from front to back. Check the front axle nuts, rear axle nuts, stem bolts, handlebar faceplate bolts, seat clamp, crank bolts, pedals, brake mounting bolts, cable anchor bolts, and peg hardware if installed. Use the torque values from your manual when available.
This final bolt check is not glamorous, but neither is discovering a loose handlebar while rolling down the sidewalk. A good BMX assembly is not about tightening everything as hard as possible. It is about tightening the right parts the right amount.
Step 13: Do a Pre-Ride Safety Test
Before the first ride, perform a quick safety test. Lift the bike a few inches and gently bounce it. Listen for rattles. Squeeze the brakes firmly. Turn the handlebar left and right. Spin both wheels. Push down on the pedals. Sit on the saddle and check that it does not twist. Stand over the bike and make sure the handlebar is straight.
Then do a slow test ride in a flat, open area away from traffic. Ride gently, brake gently, turn gently, and listen. If something clicks, shifts, rubs, or feels strange, stop and inspect it. The first ride is not the time to prove anything. It is the time to make sure the bike behaves like a bike, not a shopping cart with ambition.
Common BMX Assembly Mistakes to Avoid
Installing the Pedals on the Wrong Side
This is the classic mistake. Right pedal on the right crank. Left pedal on the left crank. Start by hand, use grease, and never force the threads.
Leaving the Handlebar Crooked
If the handlebar is not aligned with the front wheel, steering will feel awkward. Stand over the wheel, sight down the stem, and make small adjustments before fully tightening.
Ignoring Brake Pad Position
Brake pads should contact the rim cleanly. Pads that touch the tire can damage it. Pads that sit too low may miss the best braking surface.
Over-Tightening Bolts
More force does not always mean more safety. Use a torque wrench when possible, especially on stem, handlebar, and brake hardware.
Skipping the Final Safety Check
Even if the bike looks finished, inspect it before riding. Assembly is not complete when the last bolt turns. It is complete when the bike passes a careful check.
Extra Tips for a Better BMX Build
Take photos during unboxing if you are new to bike assembly. Photos help you remember how cables were routed and where small parts came from. Keep the owner’s manual nearby, not buried under bubble wrap. If your BMX has a gyro, study the cable routing before adjusting anything. Gyro systems can be simple once understood, but confusing when approached with pure confidence and zero information.
Use grease on threaded metal parts such as pedals and some axle hardware, unless your manual says otherwise. Grease helps prevent seizing and makes future maintenance easier. Wipe away extra grease so it does not collect dirt.
After the first few rides, inspect the bike again. New cables can settle, bolts can bed in, and parts may need a small adjustment. This is normal. A follow-up check is one of the easiest ways to keep a BMX bike feeling solid.
Real-World Experience: What Assembling a BMX Bike Teaches You
The first time you assemble a BMX bike, the process may feel more complicated than expected. The box makes it look simple: front wheel, handlebar, pedals, done. In real life, the small details matter. A pedal that starts crooked, a brake pad that sits a few millimeters too high, or a handlebar that is barely off-center can turn a “finished” bike into a confusing first ride.
One useful habit is to slow down during the first ten minutes. Most assembly mistakes happen early, when people are excited and trying to get the bike rolling as quickly as possible. The smarter approach is to unpack everything, identify each part, read the manual once, then start. That sounds boring, but it is much faster than undoing a mistake later. Bicycle parts are very polite when installed correctly and very dramatic when forced.
Another lesson is that hand-threading is your best friend. Pedals, axle nuts, and small bolts should begin by hand whenever possible. If a part does not thread smoothly with your fingers, it probably is not aligned correctly. A wrench gives you extra power, and extra power applied to the wrong angle is how threads get damaged. The best home mechanics are not the strongest; they are the ones who notice resistance before something expensive happens.
Brake setup is also where patience pays off. Many beginners expect brakes to work perfectly the moment the cable is attached. In reality, brake pads may need centering, toe-in, cable tension adjustment, and a few test squeezes. A good brake lever should feel controlled and firm. It should not touch the grip, and the wheel should not drag badly when the lever is released. If the brake uses a gyro, it may take extra time to balance the upper and lower cables. That is normal. Gyros are clever little systems, but they do not reward rushing.
Handlebar alignment is another detail you feel immediately. Even a slightly crooked bar can make the bike feel strange. A helpful trick is to stand in front of the bike with the front wheel between your feet, then line up the stem with the tire. Make small corrections, tighten evenly, and check again. For threadless stems, tightening the faceplate bolts evenly matters too. Uneven gaps can stress the bar or clamp poorly.
Finally, the best experience-based advice is to treat the first ride as a test, not a performance. Roll slowly on a flat surface. Use the brakes several times. Turn in both directions. Listen for rattles. Check whether the saddle moves, the bars slip, or the wheels rub. After five to ten minutes, inspect the bike again. This small routine builds confidence and helps catch problems while they are still easy to fix.
Assembling a BMX bike is not just a way to save a trip to the bike shop. It helps you understand how your bike works. Once you know how the pedals, stem, wheels, brakes, chain, and tires fit together, maintenance becomes less mysterious. You will be better prepared to spot loose parts, describe problems, and keep the bike riding smoothly. Plus, there is a special kind of satisfaction in riding a bike you assembled yourself. It is part machine, part puzzle, and part “yes, I absolutely did tighten that correctly.”
When to Ask a Professional Bike Mechanic
Some assembly jobs should not be guessed. Visit a professional mechanic if the brakes do not work properly, the headset feels loose or rough, the wheel will not sit straight, the crank feels wobbly, the fork appears bent, the frame is damaged, or you are unsure about torque values. Also get help if the bike is for a young rider and you want an extra safety inspection before the first ride.
A bike shop check is usually quick compared with the cost of replacing damaged parts. More importantly, it gives peace of mind. BMX bikes are built to handle tough riding, but only when assembled and maintained correctly.
Conclusion
Learning how to assemble a BMX bike is very doable when you move step by step. Start with a clean workspace, inspect the bike, install the front wheel carefully, align the handlebars, fit the seat, thread the pedals correctly, adjust the brakes, inflate the tires, and finish with a full safety check. The process is not about rushing from box to sidewalk. It is about building a bike that feels solid, stops reliably, steers smoothly, and gives the rider confidence.
Think of BMX assembly like making a great sandwich with bolts: order matters, alignment matters, and nobody wants surprises halfway through. Take your time, use the manual, respect torque recommendations, and test everything before the first real ride. Once the bike is dialed in, you get the reward: a clean, tight BMX ready for everyday cruising, practice sessions, and many future adjustments you will now understand a whole lot better.


