Table of Contents >> Show >> Hide
- Why a whitewash finish works so well on old tables
- What a whitewash finish actually is
- Before you start: know your table
- Tools and materials you will likely need
- How to whitewash an old table step by step
- Step 1: Clean the table thoroughly
- Step 2: Remove or dull the existing finish
- Step 3: Repair obvious damage
- Step 4: Sand smooth and remove dust
- Step 5: Use wood conditioner if needed
- Step 6: Test your whitewash in a hidden area
- Step 7: Apply the whitewash
- Step 8: Let it dry fully
- Step 9: Add a second coat if needed
- Step 10: Protect the finish
- Mistakes that can ruin the look
- Design ideas: how to style a whitewashed table
- Is whitewash the right finish for every old table?
- Real-life experiences with whitewashing old tables
- Final thoughts
Note: Body-only HTML, ready to copy and publish. Unnecessary placeholder elements removed.
An old table does not have to retire with dramatic sighs and a layer of mystery dust. In fact, that scratched-up dining table, tired side table, or seen-better-decades coffee table might be one whitewash finish away from a full-blown glow-up. Whitewashing is one of those rare DIY tricks that feels both stylish and forgiving. It brightens dark wood, softens heavy furniture, and lets the grain show through so the piece still looks like wood instead of a marshmallow wearing a topcoat.
If you love farmhouse, coastal, cottage, Scandinavian, or relaxed modern interiors, a whitewashed table fits right in without begging for attention. It says, “Yes, I’m charming,” but in a calm, effortless voice. Better yet, this finish works beautifully on many older tables because it celebrates imperfections rather than trying to pretend they never happened. A few dings? Character. Slight grain variation? Texture. That one scratch from a long-forgotten science project? Okay, maybe still sand that one down.
In this guide, you will learn what a whitewash finish is, why it works so well on older tables, how to prep your piece properly, which materials you need, how to apply the finish step by step, what mistakes to avoid, and how to protect the final look so your table stays stunning long after the compliments roll in.
Why a whitewash finish works so well on old tables
A whitewash finish is popular for a reason: it makes furniture look lighter, fresher, and more current without erasing all the natural beauty of the wood. Unlike solid paint, whitewash is translucent. You still get texture, grain, and visual warmth, but with a softer, brighter finish that can make an old table feel updated instead of outdated.
This is especially helpful when you are dealing with older furniture that feels visually heavy. Dark stains can make a room look smaller or more formal than you want. Whitewash brings in airiness. It can tone down orange or yellow undertones, soften red wood, and give plain pieces a relaxed, collected-over-time style. It is also incredibly versatile. A light whitewash can feel breezy and modern, while a heavier application can lean rustic, weathered, or vintage.
And here is the real magic trick: whitewash often looks better with a little inconsistency. That means you do not need robotic perfection. This is good news for regular humans and excellent news for anyone whose painting style is best described as “enthusiastically approximate.”
What a whitewash finish actually is
Whitewash is typically a diluted white coating or a semi-transparent white stain applied to wood so the grain still shows through. Think of it as the happy middle ground between bare wood and fully painted furniture. You are not hiding the surface; you are veiling it just enough to soften the tone and highlight the texture underneath.
Whitewash vs. paint
Paint gives you opaque coverage. Whitewash gives you transparency. If you want a crisp, solid white table, paint is the better choice. If you want a more natural, layered look that still reads as wood, whitewash is the winner.
Whitewash vs. pickling
The terms are often used interchangeably in casual DIY conversations. In practice, pickling usually refers to a white or pale stain that settles into the grain, especially on open-grain woods like oak. Whitewash can be made with diluted paint or purchased as a premixed white stain product. The end result is similar: lighter wood with visible grain and a weathered, airy feel.
Whitewash vs. limewash
Limewash is usually associated with masonry surfaces and mineral-based finishes. Whitewash on furniture is more commonly a paint-or-stain-based technique. If you are refinishing an old table, stick with products made for wood unless you truly enjoy DIY chaos.
Before you start: know your table
Not every table starts from the same place, so a little detective work matters. The more you understand the surface, the better the result.
Solid wood tables
These are the best candidates for whitewashing. Oak, ash, pine, and other woods with visible grain tend to respond beautifully. Open-grain woods especially show off the whitewashed effect in a way that feels rich and textured.
Previously stained or sealed wood
You can still whitewash it, but prep matters more. Existing topcoats can block absorption and cause uneven color. You may need to sand back the surface or strip the old finish depending on its condition.
Laminate or faux-wood tables
This is where dreams need adult supervision. You cannot truly stain laminate like real wood. However, you can paint it to mimic a whitewashed look if you use the right prep and primer. If your “wood” table is really laminate, aim for a faux whitewash effect instead of a traditional stain-based finish.
Tools and materials you will likely need
- Cleaner or degreaser
- Lint-free cloths
- Sandpaper in medium and fine grits
- Sanding block or orbital sander
- Tack cloth or vacuum
- Whitewash stain or white water-based paint
- Water for thinning if mixing your own whitewash
- Paintbrush, stain pad, or clean rag
- Optional wood conditioner for blotch-prone woods
- Protective topcoat such as water-based polyurethane or furniture wax
- Drop cloth and gloves
If you are mixing your own finish, test the ratio before committing. Some people prefer a 1:1 mix of water and white water-based paint for moderate coverage. Others go lighter for a whispery finish. The beauty of whitewash is that you can adjust the look to match the personality of the table and the room.
How to whitewash an old table step by step
Step 1: Clean the table thoroughly
This is not glamorous, but it is important. Old tables collect grease, wax, polish residue, and mystery stickiness that no finish should ever have to meet. Wipe everything down well and let it dry completely. If the table has lived in a kitchen, skip the gentle half-hearted wipe and really clean it.
Step 2: Remove or dull the existing finish
If the table is heavily sealed, glossy, or damaged, sanding is essential. Start with a medium grit to cut through the old finish, then move to a finer grit to smooth the surface. If the finish is especially stubborn, stripping may be necessary. The goal is to give the whitewash something to grip and, if using stain, something to soak into.
Step 3: Repair obvious damage
Tighten loose legs, glue separated joints, and fill deep gouges if needed. Small dents and subtle wear can add charm, but structural issues are less “vintage chic” and more “surprise floor event.”
Step 4: Sand smooth and remove dust
Once the old surface is prepped, sand the tabletop and base evenly. Pay extra attention to edges and corners because roughness there will shout louder after the whitewash goes on. Vacuum thoroughly and wipe with a tack cloth. Dust left behind will sabotage your finish like a tiny, powdery villain.
Step 5: Use wood conditioner if needed
Soft woods like pine can absorb stain unevenly and look blotchy. A pre-stain conditioner can help create a more even appearance. This step is not always necessary, but it is smart when you are working with woods known for inconsistent absorption.
Step 6: Test your whitewash in a hidden area
Please do this. Truly. Test on the underside of the tabletop or another inconspicuous spot. Different woods absorb white differently, and the same mixture can look airy on oak but sad and chalky on another surface. Testing lets you tweak the ratio and technique before the visible part becomes your experimental phase.
Step 7: Apply the whitewash
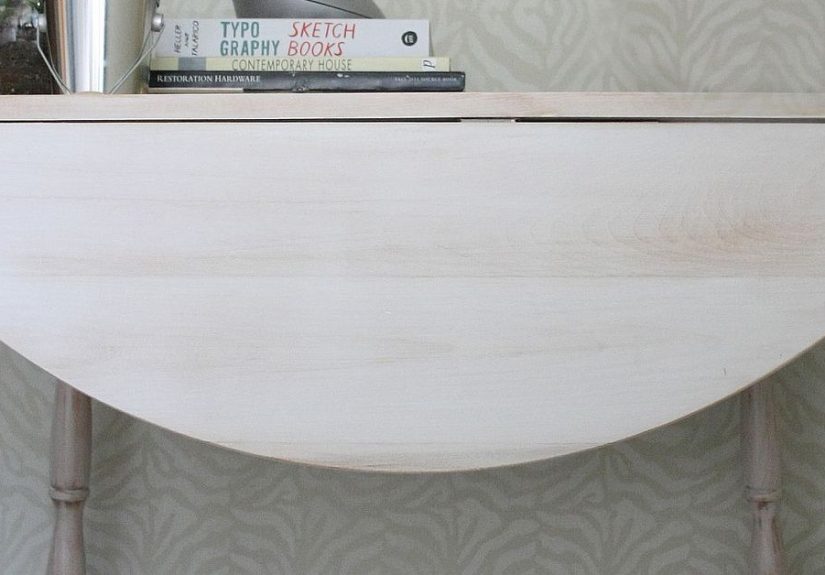
Brush or wipe the whitewash on in the direction of the grain. Work in manageable sections. Let it sit briefly, then wipe off the excess with a clean cloth. The longer it sits, the stronger the effect. If you want a lighter, more natural finish, wipe sooner. If you want more whiteness, leave more product on or apply a second coat after drying.
For a more textured, rustic look, allow extra pigment to remain in the grain and low spots. For a cleaner, Scandinavian-inspired finish, wipe more thoroughly so the result looks soft and refined.
Step 8: Let it dry fully
Do not rush this part just because it already looks fantastic and you want to send photos to everyone you know. Let the finish dry according to the product instructions. Water-based products tend to dry faster, but “dry to the touch” is not the same as “ready for dinner plates and enthusiastic elbows.”
Step 9: Add a second coat if needed
Some tables look perfect after one coat. Others need a little more drama. If you want stronger color without losing the grain, add a second light coat rather than one heavy, gloopy one. Whitewash should look intentional, not as if a gallon of milk had an emotional moment.
Step 10: Protect the finish
Once the look is right, seal it. A clear water-based polyurethane is a good choice for dining and coffee tables because it offers durability without yellowing as much as some other finishes. Wax can create a lovely soft sheen for lower-use pieces, but it is not always the best choice for heavy daily wear. Match the protection level to how the table will actually live in your home, not to your fantasy version of yourself who never spills anything.
Mistakes that can ruin the look
Skipping prep
Whitewash is forgiving, but not magical. Dirt, wax, and glossy finish layers can lead to streaking, poor adhesion, or uneven color.
Not testing first
The color can vary a lot depending on the wood species and the old finish. Always test before you commit.
Leaving too much product on the surface
Whitewash should enhance the grain, not bury it. If excess product dries on top instead of being wiped back properly, the finish can look cloudy or patchy.
Ignoring the base color of the wood
Warm woods may show a creamy or beige undertone under whitewash. Cool-toned whitewash on a very yellow wood can create a result that feels visually confused. Not terrible, just a little identity crisis.
Using the wrong approach on laminate
If the table is laminate, use bonding primer and paint techniques. Traditional stain-based whitewashing will not work the way it does on real wood.
Design ideas: how to style a whitewashed table
Farmhouse
Pair the table with black metal accents, woven baskets, linen runners, and simple ceramic pieces. A whitewashed dining table in a farmhouse space feels relaxed and welcoming without going full barn cosplay.
Coastal
Use soft blues, sandy neutrals, rattan chairs, and natural light. Whitewashed wood is basically coastal design’s favorite handshake.
Scandinavian
Keep it clean and minimal with pale textiles, light woods, matte black details, and uncluttered styling. The grain should be visible, the palette should be calm, and the overall mood should whisper, not yell.
Cottage or vintage
Add curved chairs, floral touches, aged brass, and collected decor. Whitewash works beautifully with pieces that are a little imperfect, which is exactly why older tables look so good with it.
Is whitewash the right finish for every old table?
Not always. If you have a rare antique with significant value, refinishing it could hurt that value. In that case, consult a furniture restoration professional before grabbing sandpaper with confidence and absolutely no pause. Whitewash is best for tables that need a style refresh, not museum-level preservation.
It is also worth considering the room. If your home leans richly traditional with dark woods and formal finishes, a heavily whitewashed table may feel out of place. But if your goal is to lighten the room, modernize a hand-me-down, or create a more casual aesthetic, it is a smart and stylish move.
Real-life experiences with whitewashing old tables
The most interesting thing about whitewashing an old table is how often the project becomes half makeover, half memory lane. People start with a practical goal, like saving money or updating a room, and end up rediscovering a piece they were ready to give up on. That is part of the appeal. A table is not just furniture; it is where coffee lands, homework spreads out, birthdays happen, and someone always leaves a cup without a coaster despite years of warnings.
One common experience is shock at how different the same table can look after proper prep. A dark, orange-toned oak table that felt bulky and dated can suddenly feel breezy and beautiful once the heavy stain is softened with whitewash. It is not unusual for a piece that used to dominate the room to start blending in more gracefully, making the whole space feel brighter. The table does not become invisible. It just stops shouting.
Another frequent lesson is that the wiping stage matters more than people expect. Many first-timers assume the brush does all the work, but the real character often shows up in the wipe-back. Wiping lightly leaves more pigment in the grain and creates a rustic finish. Wiping more thoroughly creates a cleaner, more refined look. That small difference can completely change the mood of the finished table. Same product, same table, totally different personality.
There is also the very relatable moment when someone says, “I almost painted this solid white.” Then they see the grain peeking through the whitewash and realize that the wood itself was the best part all along. That is why whitewashing feels so satisfying. It does not flatten the story of the piece. It edits it. It keeps the good details and calms down the ones that were making the table look tired.
Families often love this finish because it hides wear better than a dark glossy stain. Everyday scratches and minor imperfections tend to blend in rather than stand out. On a heavily used dining table or breakfast nook table, that can be a huge advantage. The finish feels livable. It does not demand perfection. It says, “Go ahead, eat spaghetti here,” which is honestly the kind of emotional support furniture should provide.
People working on inherited tables often mention the emotional side too. A table from grandparents or parents may not match the current decor, but they still want to keep it. Whitewash offers a middle path. It preserves the piece, keeps the grain and age visible, and makes it feel at home in a newer space. That balance between sentimental and stylish is hard to beat.
Of course, not every experience is flawless. Some people go too heavy on the first coat. Others underestimate how much old finish remains on the surface and end up with a patchy result. But even those situations usually become part of the learning curve rather than total disasters. Whitewash is surprisingly recoverable. More sanding, more wiping, or a second adjusted coat can often fix what looked alarming at first. That is one reason it remains such a favorite DIY finish: it leaves room for humans to be human.
In the end, the best experience is usually the simplest one. You step back, look at the finished table, and realize it no longer feels like an obligation sitting in the corner. It feels intentional. Beautiful, even. The room looks lighter, the table looks storied instead of shabby, and suddenly you are eyeing every old wood piece in the house like a reality show host looking for the next contestant.
Final thoughts
If you want a furniture update that feels stylish, approachable, and budget-friendly, whitewashing an old table is hard to beat. It brightens wood, highlights texture, works with many decorating styles, and gives tired furniture a second life without stripping away its character. With good prep, a little patience, and the right protective finish, an old table can go from forgettable to absolutely stunning.
So if you have a worn table with good bones, do not send it to the curb just yet. A whitewash finish might be the easiest way to turn that dusty underachiever into the prettiest hardworking piece in the room.


