Table of Contents >> Show >> Hide
- Why a DIY Upcycled Coffee Table Is Worth the Effort
- What Makes a Good Piece to Upcycle?
- Tools and Supplies You’ll Probably Need
- Step-by-Step: How to Build an Upcycled Coffee Table That Looks Good on Purpose
- Popular DIY Upcycled Coffee Table Ideas
- How to Make It Look Designer, Not Desperate
- Common Mistakes to Avoid
- Budget Benefits of an Upcycled Coffee Table
- Final Thoughts
- Real-Life Experience: What I Learned From Making a DIY Upcycled Coffee Table
If your living room feels like it’s missing something, the answer may not be a $600 designer coffee table with a name like “Minimalist Cloud Form No. 7.” It may be the sad little table, trunk, crate stack, or forgotten bench sitting in a garage, thrift store, or basement, just waiting for a dramatic second act. A DIY upcycled coffee table is one of the smartest home projects you can tackle because it blends style, function, sustainability, and the deeply satisfying thrill of saying, “Thanks, I made it,” whenever someone compliments it.
Upcycling gives old furniture and salvaged materials a fresh purpose instead of sending them to a landfill. It also lets you create something with far more personality than a flat-pack table that arrives with twelve mystery screws and one emotional support Allen wrench. Whether you want a rustic farmhouse look, a clean modern vibe, a vintage conversation piece, or hidden storage for blankets and board games, an upcycled coffee table can deliver all of that without wrecking your budget.
In this guide, you’ll learn how to plan, build, and finish a DIY upcycled coffee table that actually looks intentional, not like it escaped from a curbside pile five minutes ago. We’ll cover the best materials, design ideas, step-by-step instructions, styling tips, and the real-life lessons that make the final piece stronger, prettier, and more useful in everyday living.
Why a DIY Upcycled Coffee Table Is Worth the Effort
A coffee table does more than hold mugs, remotes, and the occasional dramatic stack of books you hope makes you look cultured. It anchors the room. It helps define your seating area. It can add warmth, texture, color, storage, or contrast. When you build one through upcycling, you gain full control over the look, dimensions, and budget.
That matters because the “perfect” coffee table is not one-size-fits-all. A family with kids may want rounded edges and sturdy storage. A small apartment may need a narrow piece that doesn’t interrupt traffic flow. A cozy traditional room may look best with wood tones and vintage details, while a modern space might call for slimmer legs and a simpler shape. Upcycling gives you the freedom to match the piece to the room instead of forcing the room to accommodate whatever was on sale.
There’s also the sustainability angle, which is not just trendy; it’s practical. Reusing solid wood pieces, vintage trunks, old windows, pallets, benches, or leftover tile can reduce waste and stretch materials that still have years of life left in them. In many cases, older furniture is sturdier than cheap new furniture, which makes it a great candidate for a makeover.
What Makes a Good Piece to Upcycle?
Not every castoff deserves a glamorous comeback, but many do. The best starting pieces are structurally solid, made from durable materials, and close enough in size to save you from rebuilding the whole thing from scratch.
Great candidates for an upcycled coffee table include:
- An old wooden side table that can be shortened or widened
- A vintage trunk or storage chest
- A bench with good bones
- Wooden crates or drawers combined into a base
- A retired dining table cut down to coffee-table height
- Pallet wood used for a top or shelf
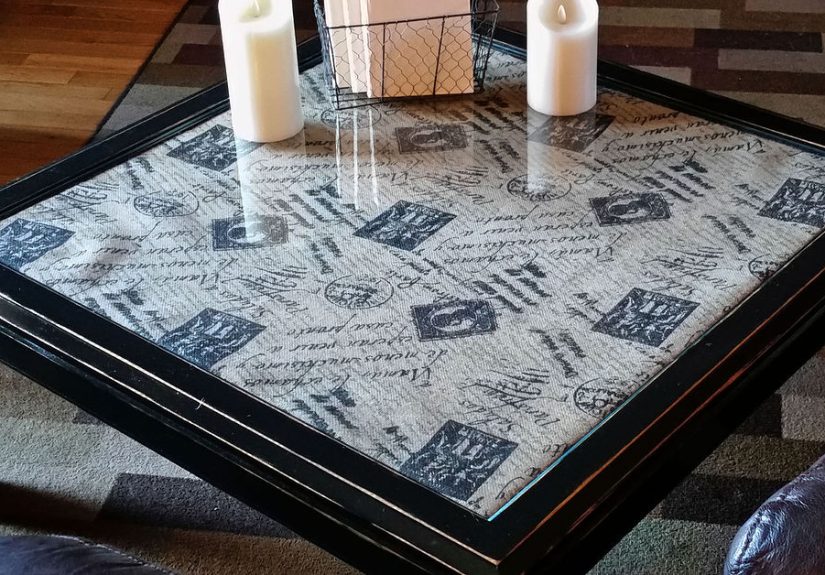
- An old window frame used under glass for a display-style top
- A table with a tired finish but sturdy legs and frame
Look for pieces with wobble-free joints, minimal rot, and surfaces that can be repaired. Scratches, chipped stain, and outdated hardware are no big deal. A cracked frame, severe water damage, or questionable stability is a bigger headache.
Before you buy or rescue a piece, measure your room. A coffee table usually looks best when it relates to the sofa rather than floating around like it lost the rest of the furniture. In many rooms, a coffee table that is about the same height as the seat cushion or slightly lower feels the most comfortable. Length also matters. Too short and it looks awkward; too long and everyone has to sidestep it like it’s a coffee-table obstacle course.
Tools and Supplies You’ll Probably Need
The exact list depends on your design, but most DIY upcycled coffee table projects use a familiar lineup of supplies.
- Tape measure
- Drill and screws
- Sander or sanding block
- Sandpaper in medium and fine grits
- Wood filler
- Primer, paint, stain, or sealer
- Tack cloth or microfiber cloth
- Paintbrushes or foam rollers
- Protective finish such as polyurethane or furniture wax
- Replacement legs, casters, or hardware if needed
- Wood glue and clamps for repairs
If you are working with an older painted piece, take safety seriously. Vintage furniture can be charming, but old finishes are not always polite. If you suspect the paint may be very old, especially from pre-1978 surfaces, use lead-safe precautions and avoid aggressive dust-making shortcuts. Also, if you plan to use pallet wood, choose it carefully. Clean, dry material is your friend; mystery wood with stains, odors, or risky treatment markings is not.
Step-by-Step: How to Build an Upcycled Coffee Table That Looks Good on Purpose
1. Start with a design plan
Resist the urge to start sanding the second you drag the piece into your house. First, decide what you want the finished table to do. Should it provide storage? Add texture? Bring in a darker wood tone? Act as a statement piece? Hide puzzle supplies from your family but still let you pretend you’re organized?
Sketch the table or make a simple checklist. Think about height, width, color, finish, and any add-ons like a lower shelf, hairpin legs, wheels, baskets, or a glass top. This is the step that prevents “cute idea” from turning into “why does my living room now have an accidental pirate chest on caster wheels?”
2. Clean everything before doing anything else
Old furniture collects wax, grime, oil, dust, and a surprisingly emotional amount of mystery residue. Clean the piece thoroughly with mild soap and water or an appropriate degreasing cleaner. Let it dry completely. A clean surface helps you see the real condition of the furniture and makes sanding, painting, and staining far more effective.
3. Repair the structure
Tighten screws, reglue loose joints, replace broken hardware, and fill dents or holes with wood filler. If the tabletop is warped or the base rocks, fix those problems now. A beautiful finish can’t hide a table that does the cha-cha every time someone sets down a mug.
4. Sand for a fresh start
Sanding is where the transformation begins. For painted finishes, lightly sand to dull the surface and improve primer adhesion. For stained wood, sand more thoroughly if you want a new stain to absorb evenly. Many DIYers start with a medium grit and move to a finer grit for a smoother finish. Always remove dust before moving on. Dust is basically glitter’s grumpy cousin: it gets everywhere and ruins everything.
5. Prime, paint, or stain depending on the look you want
Here’s where the project gets personality.
- Paint is perfect for dramatic makeovers, modern color, or a cottage-style piece. Black, warm white, olive, navy, and muted green are especially versatile.
- Stain works well when the wood grain is attractive and you want a warm, natural finish.
- Mixed finishes can be especially effective, such as a stained wood top with painted legs.
Apply thin, even coats. Let each layer dry fully. If the finish feels rough between coats, a light sanding can help create that smoother, more professional result.
6. Add character with updated details
This is where a plain project becomes your project. Swap clunky legs for hairpin legs. Add vintage-style casters to a trunk. Install a lower shelf using reclaimed boards. Use leftover tile to create an inset top. Add a glass surface over a collage of maps, fabric, or wallpaper. Replace boring hardware with antique brass pulls or matte black handles.
Small choices matter. A coffee table is close to eye level when you’re seated, so texture, edge detail, and leg style show up more than you think.
7. Protect the surface
Coffee tables work hard. They host drinks, feet, books, laptops, snack bowls, craft projects, and the occasional dramatic elbow lean during family debates. A protective topcoat helps the table survive real life. Polyurethane is a popular choice for painted or stained tops that need durability. Wax can create a softer, lower-sheen look, but it generally requires more maintenance. Choose a finish that fits how you actually live, not how you imagine living in a magazine spread where nobody spills anything.
Popular DIY Upcycled Coffee Table Ideas
Vintage trunk coffee table
A trunk is one of the easiest and most charming coffee table bases. It already offers shape, storage, and character. Add short legs or casters if needed, clean it thoroughly, and line the inside for hidden blanket storage.
Old table turned modern
An outdated wood table can look surprisingly current with a darker stain, slimmer replacement legs, or a bold coat of paint. This is a great option if you find a solid but unfashionable piece at a thrift store.
Crate coffee table with storage
Wooden crates attached around a center frame can create a table with open cubbies for books, throws, or baskets. It’s practical, affordable, and ideal for casual spaces.
Upcycled bench coffee table
A sturdy bench can make an excellent narrow coffee table, especially in small living rooms. Add a lower shelf, paint the base, or stain the top for contrast.
Tile-top coffee table
If you have leftover tile from another renovation, an old tabletop can become a custom statement piece. This style works especially well in Mediterranean, eclectic, vintage, or earthy modern interiors.
Window-frame display coffee table
Using an old window frame under a glass top can create a display table for photos, postcards, pressed leaves, or small collections. It’s personal, layered, and far more interesting than another forgettable rectangle.
How to Make It Look Designer, Not Desperate
The difference between “upcycled” and “why is that in your living room?” usually comes down to editing. Give the piece one strong idea and commit to it. Don’t combine ten trendy finishes just because you can. A trunk with casters and aged brass hardware? Great. A trunk with neon paint, faux marble contact paper, and stenciled dragonflies? That’s a cry for help.
Keep these style principles in mind:
- Match the scale to the room and sofa
- Repeat a finish already present in the space, like black metal or warm oak
- Use contrast on purpose, not by accident
- Choose one main style direction: rustic, modern, vintage, industrial, coastal, or eclectic
- Leave enough negative space so the room can breathe
Once the table is done, style it lightly. A tray, a small stack of books, a candle, or a plant is usually enough. The goal is “collected and useful,” not “gift shop exploded in the center of the room.”
Common Mistakes to Avoid
Skipping measurements: A beautiful table that blocks the walkway is still a problem.
Ignoring function: If you need storage, build for storage. If you need durability, choose a tough topcoat.
Painting over dirt or gloss: Prep may be boring, but bad prep is the fastest route to peeling paint and regret.
Using unsafe materials: Be careful with old finishes, questionable pallet wood, and damaged pieces that may not be structurally sound.
Overdecorating the result: Your coffee table should support the room, not audition for its own spin-off show.
Budget Benefits of an Upcycled Coffee Table
One of the biggest advantages of a DIY upcycled coffee table is value. Many great base pieces can be found at thrift stores, yard sales, flea markets, online marketplaces, or even from friends eager to reclaim garage space. Instead of paying full retail for a mass-produced table, you can often build a more durable, more personal piece for a fraction of the price.
You also get the flexibility to spend where it matters. Maybe the trunk was cheap, but you splurge on beautiful casters. Maybe the table was free, so you invest in quality paint and a durable topcoat. That kind of control is hard to beat.
Final Thoughts
A DIY upcycled coffee table is one of those rare projects that is practical, creative, budget-friendly, and genuinely fun. It helps you reuse materials, personalize your home, and end up with a piece that feels more meaningful than something pulled off a warehouse shelf. Better yet, it proves that good design does not always start with new materials. Sometimes it starts with an old table, a little imagination, and the stubborn belief that ugly furniture deserves one more chance.
So whether you’re transforming a vintage trunk, repainting a thrifted table, building from salvaged wood, or giving a scuffed old bench a new life, remember this: perfection is not the goal. Character is. A few quirks are part of the charm. As long as your table is sturdy, useful, and easy on the eyes, it has done its job beautifully.
Real-Life Experience: What I Learned From Making a DIY Upcycled Coffee Table
The first time I made a DIY upcycled coffee table, I had exactly three things: optimism, a thrifted table with questionable orange stain, and the confidence of someone who had watched just enough home videos online to become dangerous. The table itself was solid, but it looked like it had spent the last decade in a dim basement thinking about its mistakes. I brought it home because I loved the shape of the legs and because it cost less than takeout for two.
At first, I imagined a quick makeover. Clean it, paint it, style it, done. Naturally, the project had other plans. The cleaning stage alone taught me that old furniture stores more grime than family gossip. Then came sanding, which is the point where many DIY dreams either become reality or become “a piece I drape a throw over when company comes.” I learned pretty fast that prep is not glamorous, but it is everything. The more patient I was while cleaning, repairing, and smoothing the surface, the better every step afterward looked.
I also learned that color decisions are wildly humbling. The paint sample that looked rich and elegant in the store looked slightly moody and slightly like wet pavement in my living room. So I adjusted. I ended up using a softer, warmer tone on the base and a stained wood finish on the top, and that contrast made the piece feel intentional. That was the moment I understood that good DIY isn’t just about copying an idea; it’s about responding to the piece in front of you.
The most useful surprise was how much function matters. Before the makeover, I was mostly thinking about style. But once the table was in place, I realized the lower shelf I almost skipped became the handiest part of the whole design. It held books, a basket, and the remote controls that normally vanish into another dimension. Since then, I always think about the daily life of the furniture before I think about the photo-ready version of it.
There were mistakes, of course. I rushed one coat. I underestimated drying time. I tried styling the finished table with too many decorative objects and accidentally made it look like a small boutique that specialized in candles and indecision. Eventually I pulled things back to a tray, a book stack, and one plant. Much better. The table finally had room to be itself.
What stayed with me most was the feeling the piece brought into the room. Because I had worked on it myself, it felt less like furniture and more like part of the home’s story. I noticed it every day, not because it screamed for attention, but because it fit so naturally. It was useful. It was sturdy. It had personality. And unlike a lot of fast furniture, it felt like it could keep going for years.
That project changed how I see secondhand pieces. Now when I spot a scratched table, a worn bench, or an old trunk, I don’t just see the finish that’s faded or the color that’s wrong. I see shape, storage, material, and potential. I ask whether the bones are good, whether the scale makes sense, and whether a new finish or set of legs could completely shift the mood. More often than not, the answer is yes.
If you’re thinking about making your own DIY upcycled coffee table, my biggest advice is simple: don’t wait for perfect conditions or perfect skill. Start with a solid piece, take prep seriously, and let function guide your choices. You will probably make a few mistakes. You may sand more than expected. You may question your life choices halfway through. Then one day you’ll set a mug on that finished table, step back, and realize you made something useful and beautiful out of something overlooked. That is the magic of upcycling. It is part design, part problem-solving, part rescue mission, and somehow, against all odds, a very good time.


