Table of Contents >> Show >> Hide
- A Quick (Important) Note About Using a Real U.S. Flag
- Plan Your Look: What “American Flag Window Treatment” Can Mean
- Tools and Materials
- DIY Option 1: No-Sew Flag-Inspired Curtain Panels (Beginner-Friendly)
- DIY Option 2: Patriotic Bunting Valance (Classic, Subtle, Etiquette-Friendly)
- DIY Option 3: Stars-and-Stripes Roman Shade (Tailored and Surprisingly Doable)
- How to Hang It: Renter-Friendly and No-Drill Options
- Design Tips: Make It Look Intentional (Not Accidental)
- Common Mistakes (So You Don’t Have to Learn the Hard Way)
- Care and Storage
- Real-World Experiences DIYers Commonly Have (So You Feel Less Alone)
- Conclusion
- SEO Tags
Want your windows to look like they’re ready to host a backyard barbecue, a parade route, and a “proud homeowner” magazine shootall at the same time?
A flag-inspired window treatment can absolutely do that. The trick is doing it in a way that looks polished, hangs correctly, and (this matters to a lot of folks)
respects the American flag.
This guide walks you through three DIY optionsfrom “I don’t even own a sewing machine” to “I like projects with a tiny bit of drama (but not the kind where I
accidentally glue my curtain to the wall).” You’ll get measuring tips designers swear by, renter-friendly hanging methods, and styling ideas so the final result
feels timelessnot like a seasonal costume your window is forced to wear.
A Quick (Important) Note About Using a Real U.S. Flag
The U.S. Flag Code includes guidance that the flag “should never” be used as drapery. In other words: using an actual, official U.S. flag as a curtain is widely
considered disrespectful by traditional etiquette standards. The Flag Code uses advisory language (it’s about customs and respect), but the sentiment is real for
many Americans.
So here’s the respectful, DIY-friendly approach: use flag-inspired materialsfabric prints, bunting, star-and-stripe patterns, or color-blocked
panels in red/white/bluerather than turning an actual flag into window coverings. You’ll get the look you want, avoid an awkward debate at your cookout, and
still end up with a window treatment that actually functions like one.
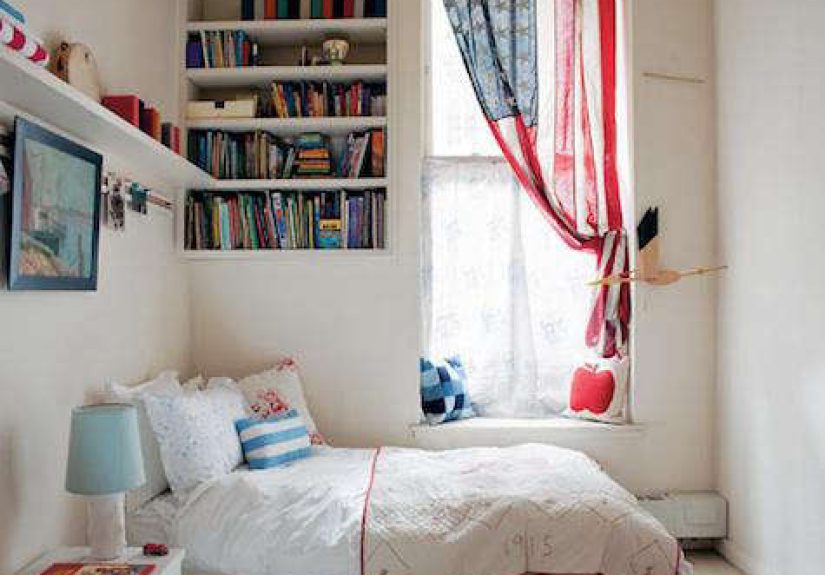
Plan Your Look: What “American Flag Window Treatment” Can Mean
“American flag as a window treatment” doesn’t have to mean “full flag taped over glass like a tired college apartment.” You’ve got options:
- Full curtain panels: dramatic, classic, great for living rooms and bedrooms.
- Café curtains: charming, light-filtering, and perfect for kitchens.
- A valance or bunting top: subtle, festive, and very etiquette-friendly.
- Roman shade: clean lines, tailored look, and surprisingly doable with basic supplies.
Measurements That Make Your Windows Look Expensive
If you only steal one professional trick, steal this: hang curtains higher and wider than the window frame.
It makes windows look larger and ceilings look tallerlike your room just stood up straighter.
- Rod height: often 4–6 inches above the window trim, or closer to the ceiling for extra drama.
- Rod width: extend 8–12 inches beyond each side of the window when possible.
- Fullness: aim for curtain width about 2× the window width for a rich, gathered look.
- Length: most modern styles “kiss” the floor or hover just above it (unless you’re doing café curtains).
Tools and Materials
Pick your project below, then grab what you need. The nice part: most of this can be found at a big-box home store or fabric shop, and you can mix “budget” and
“fancy” without the DIY police showing up.
Basic Supplies (Most Projects)
- Measuring tape
- Iron + ironing board (or a towel on a tableno judgment)
- Fabric scissors or rotary cutter
- Hem tape / iron-on bonding tape
- Patriotic fabric (flag-inspired print, stars, stripes, or red/white/blue solids)
- Curtain rod (standard rod, tension rod, or café rod depending on your plan)
- Optional: blackout lining or light-filtering lining
Hardware Options (Choose One)
- Clip rings: easiest for no-sew panels and adjustable height
- Grommet tape + snap grommets: clean, modern look with minimal sewing
- Rod pocket: classic, simple, best for lighter fabrics
DIY Option 1: No-Sew Flag-Inspired Curtain Panels (Beginner-Friendly)
This is the “I want it to look legit, but I also want to finish today” option. Hem tape does the heavy lifting, and clip rings make the whole thing feel like a
pro installwithout you actually becoming a pro (unless you want to, in which case: respect).
Step 1: Choose Fabric That Behaves
For curtains, medium-weight cotton, cotton-linen blends, or home décor fabric is easiest. Super slippery fabric can make hemming feel like wrestling a polite eel.
If you want privacy or less glare, add a lining panel or choose a thicker fabric.
Step 2: Pre-wash, Dry, and Iron
Fabric can shrink. Curtains that shrink after you hang them become “capri pants for windows.” Pre-wash (if your fabric allows), dry, and iron flat before cutting.
Step 3: Measure and Cut Your Panels
Decide where your rod will sit. Measure from the rod to the floor (or to where you want the curtain to end). Add:
- 4–6 inches for the bottom hem (depending on how substantial you want it)
- 2–4 inches for the top (if using clip rings, you need less; rod pockets need more)
For width, many people use two panels per window. If your window is 36 inches wide, aim for total curtain width around 72 inches for a fuller look.
Step 4: Create No-Sew Hems With Hem Tape
- Fold the side edges in about 1 inch, press, then fold again for a clean double hem.
- Slide hem tape between the folds.
- Iron according to the tape directions, pressing firmly so the adhesive bonds.
- Repeat for the bottom hem (a deeper bottom hem helps curtains hang straight).
Step 5: Hang With Clip Rings (Fastest, Most Forgiving)
Clip rings are the shortcut to “custom drapes” energy. Clip them evenly across the topmore clips = smoother drape. Then hang on your rod and adjust:
if one side looks longer, you can move a clip slightly higher. It’s basically tailoring, but with less sweating.
Optional Upgrade: Add Star-and-Stripe Banding
Want a more “flag” look without using an actual flag? Add a vertical stripe band (red/white) along the leading edge of each panel, or sew/iron-on a star band
across the top like a header. Keep it tasteful: you’re designing a room, not auditioning your window for a marching band.
DIY Option 2: Patriotic Bunting Valance (Classic, Subtle, Etiquette-Friendly)
If you want your home to say “festive” instead of “I live inside a souvenir shop,” bunting is your best friend. It nods to traditional patriotic décor, sits neatly
at the top of the window, and still lets you use neutral curtains or shades underneath.
What You’ll Make
A soft draped valance (swag style) in red, white, and blueusing bunting fabric or your own color-blocked strips.
Step 1: Decide How Wide and Full
Measure the rod width (or the window width plus extra on each side). For a gathered look, plan fabric about 1.5–2× the width you’re covering.
Step 2: Build the Valance (No-Sew Version)
- Cut a long strip of fabric (or three strips to color-block: blue, white, red).
- Hem the edges with hem tape so it looks finished.
- Create a top channel (rod pocket) with a folded hem and hem tape, or attach clip rings.
- Drape it over the rod and use hidden safety pins or small hand stitches (optional) to form soft swags.
Step 3: Style It Like You Meant To
Keep the folds symmetrical. Pair with simple white curtains, woven shades, or a clean blind underneath. The valance does the patriotic talking; everything else is
the calm friend who drives everyone home safely.
DIY Option 3: Stars-and-Stripes Roman Shade (Tailored and Surprisingly Doable)
Roman shades look fancy because they’re structured. The good news: the structure comes from simple dowels (or thin slats), rings, and cord. If you can measure,
iron, and stay patient for about an hour, you can do this.
Best Fabric Strategy
Use a subtle star print for the main shade, then add a bold striped trim along the bottom edge (or vice versa). This gives “flag-inspired” without turning your
window into a literal flag display.
Basic Build Steps
- Measure inside the window frame for an inside-mount shade, or outside for more coverage.
- Cut fabric + lining slightly wider than your finished measurement to allow for hems.
- Hem the sides (hem tape works) and create a top sleeve to attach to a mounting board or mini rod.
- Create fold lines (typically every 8–12 inches) and attach small rings along the fold lines on the back.
- Run cord through rings so the shade lifts evenly.
If this is your first shade, keep it simple: fewer rings, lighter fabric, and a basic lift. You’ll still get that clean, tailored look.
How to Hang It: Renter-Friendly and No-Drill Options
If you can drill, greatinstall a standard rod properly with anchors when needed. If you can’t drill (renters, brick walls, or a deep personal dislike of drywall
dust), try one of these:
Option A: Tension Rod (Fast, Tool-Free)
Perfect for café curtains and lightweight panels. Works best when the window frame has solid, parallel sides for the rod to press against. Add clip rings to make
your fabric slide easily.
Option B: Adhesive Curtain Rod Hooks
Heavy-duty adhesive hooks designed for curtain rods can work well on smooth surfaces. Clean the wall first, follow the product directions carefully, and respect
the weight rating. Translation: don’t hang velvet theater curtains from a hook meant for “light décor.” Your wall will not find it funny.
Option C: No-Drill Curtain Brackets
Some brackets clamp onto trim or use peel-and-stick systems made specifically for rods. These can be a lifesaver for rentals, especially when you want a “real rod”
look without holes.
Design Tips: Make It Look Intentional (Not Accidental)
- Balance bold with calm: pair patriotic panels with neutral walls, natural wood, and simple hardware.
- Layer smart: add a sheer behind your flag-inspired panels for daytime privacy and a softer look.
- Use tiebacks: rope tiebacks or simple bands help keep the fabric off the glass and add a tailored vibe.
- Mind the pattern direction: keep stars upright and stripes levelsmall detail, huge difference.
Common Mistakes (So You Don’t Have to Learn the Hard Way)
1) Curtains That Are Too Short
If they hover awkwardly mid-wall, the whole room feels “unfinished.” Measure carefully and err slightly longer if you’re between standard lengths.
2) Not Enough Width
Skinny panels look like your curtains are rationing fabric. Use enough width for fullnessyour window should look dressed, not mildly inconvenienced.
3) Hanging the Rod Too Low
Rod placement changes everything. Higher makes windows look larger; lower makes them look smaller. Give your room that extra lift.
4) Skipping the Iron
Wrinkles can make even gorgeous fabric look like it just rolled out of a gym bag. Ironing is the difference between “DIY” and “did you just open the package?”
Care and Storage
Wash according to the fabric label, especially before big holidays when your house becomes a photo zone. If your panels will be seasonal, store them folded neatly
in a breathable bag. If sunlight hits the window hard, consider lining to reduce fading over time.
Real-World Experiences DIYers Commonly Have (So You Feel Less Alone)
Let’s talk about what tends to happen in real homeswhere measuring tapes go missing, pets act like curtains are climbing walls, and “quick DIY” turns into
“why is it midnight and I’m still ironing?”
First, almost everyone underestimates how much fabric it takes to make curtains look full. A lot of DIYers start with one panel per window because it seems logical
(window = one curtain, right?). Then the panel goes up and suddenly the window looks like it’s wearing a skinny scarf. The fix is simple: add width. That can mean
two panels, wider panels, or even “secret fullness” by adding an extra strip to the back edge so it gathers better. The funny part is that once you see the fuller
look, you can’t unsee itand you’ll start judging every under-filled curtain you encounter in the wild.
Second, hemming is where confidence goes to be tested. Hem tape is a lifesaver, but it has a personality. It likes clean folds, solid pressing, and patience.
DIYers who rush the ironing step often report a “mysterious hem failure” laterusually right when guests arrive. The best real-life move is doing a practice hem on
a scrap. It feels unnecessary until it saves you from re-hemming the entire bottom edge while muttering, “I’m fine,” like anyone believes that.
Pattern alignment is the third classic surprise. Stars-and-stripes fabric can be unforgiving: if the stars are tilted or the stripes aren’t level, your eye catches
it immediately. Many DIYers learn to “square” the fabric before cuttingmeaning you align the pattern with the grain and trim carefully. A simple trick people use
is to cut one panel, hang it temporarily with clips, and then use it as a visual reference before cutting the second. It’s less “factory perfect” and more “human
perfection,” which is the only kind you can actually achieve without losing your weekend.
Now let’s talk hanging hardware, because renters have stories. Tension rods are beloved because they’re fast and tool-free, but they also have limits. DIYers often
discover that a heavy fabric plus enthusiastic curtain-pulling can cause a slow-motion slide. The practical fix: choose lighter fabric for tension rods, keep the rod
snug, and consider café-length curtains if you want the simplest solution. For adhesive hooks, the most common experience is learning the hard way that wall texture
matters. Smooth surfaces? Usually great. Textured paint? Sometimes you get the “everything looks fine” phase, followed by the 2 a.m. surprise drop that makes you
question your life choices. People who succeed long-term are the ones who clean the surface well, follow the cure time, and stay within weight guidelines.
Finally, the most heartwarming DIY experience: the moment you step back and realize the room feels different. A flag-inspired window treatment can make a space feel
welcoming and celebratory without being loud. DIYers often end up using it beyond July 4ththink Memorial Day through Labor Day, or even year-round in a home office
or sunroombecause it reads as classic Americana when paired with neutrals. And when someone compliments it, you get to say the magic words: “Thanks, I made it.”
That sentence alone is worth at least three ironing sessions.
Conclusion
A DIY American flag-inspired window treatment is one of those rare projects that’s equal parts festive and functional: it upgrades your room, frames your view, and
adds personality without needing a full redesign. The secret is treating “flag style” as a design directionnot a literal instructionby using patriotic colors,
star prints, stripes, and bunting-inspired details. Choose the project that matches your skill level, hang your hardware high and wide, and give yourself permission
to tweak it after it’s up. The best window treatments look like they belongbecause they do.