Table of Contents >> Show >> Hide
- Quick Table of Contents
- Why Camp Chef Cast Iron
- Choosing the Right Pieces
- How to Cook Better in Cast Iron (Without Drama)
- Dutch Oven Briquettes: A Simple Heat System
- Cleaning, Seasoning, and Maintenance
- Troubleshooting: Sticky, Rusty, or Sad
- Practical “Start Here” Meals for Camp Chef Cast Iron
- of Real-World Camp Chef Cast Iron Experiences
- SEO Tags (JSON)
Cast iron is the kind of cookware that feels like it should come with a handshake and a
“welcome to the family” speech. It’s heavy, it’s dependable, and it gets better the more you use itlike a
good friend, or a well-loved hoodie that mysteriously survives every closet cleanout.
If you’ve been eyeing Camp Chef cast iron, you’re probably in one of two camps:
(1) you want cast iron that’s built for real outdoor cooking, or (2) you want cast iron that works at home
but can also roll into a campsite and immediately act like it owns the place. Either way, you’re in the right
skillet-shaped neighborhood.
Quick Table of Contents
- Why Camp Chef Cast Iron
- Choosing the Right Pieces
- How to Cook Better in Cast Iron (Without Drama)
- Dutch Oven Briquettes: A Simple Heat System
- Cleaning, Seasoning, and Maintenance
- Troubleshooting: Sticky, Rusty, or Sad
- Practical “Start Here” Meals
- of Real-World Camp Chef Cast Iron Experiences
- SEO Tags (JSON)
Why Camp Chef Cast Iron
Camp Chef has built a reputation around outdoor cooking systemsstoves, grills, smokers, griddlesand their
cast iron lineup fits that “feed people outside” mindset. The big headline feature you’ll see across their cast
iron is a pre-seasoned surface they call True Seasoned Finish, designed to be
ready to cook right out of the box.
The second “Camp Chef” signature is that many of their pieces feel intentionally designed for the
in-between space: not just “kitchen cookware,” not just “camp gear,” but cookware that can handle a
backyard fire pit, a two-burner camp stove, a charcoal setup, and then still make cornbread at home
like nothing happened.
What that means in real life
-
Less waiting: Pre-seasoning helps you start cooking sooner (instead of performing a full
seasoning ritual before your first pancake). -
Outdoor-friendly designs: Camp-style Dutch ovens often include details that make charcoal
cooking easierlike lids that can hold coals and shapes that manage heat well. -
Cast iron’s superpowers: Great heat retention, even cooking once preheated, and the ability
to go from stovetop to oven (or from camp stove to coals) without blinking.
Choosing the Right Pieces
The “best” Camp Chef cast iron depends on where you’ll cook most. If you’re mostly at home, you’ll prioritize
everyday skillets and maybe a griddle. If you’re camping (especially car camping), the Dutch oven becomes the
star. If you’re doing both, you can build a small, smart kit that covers 90% of meals without needing a trailer.
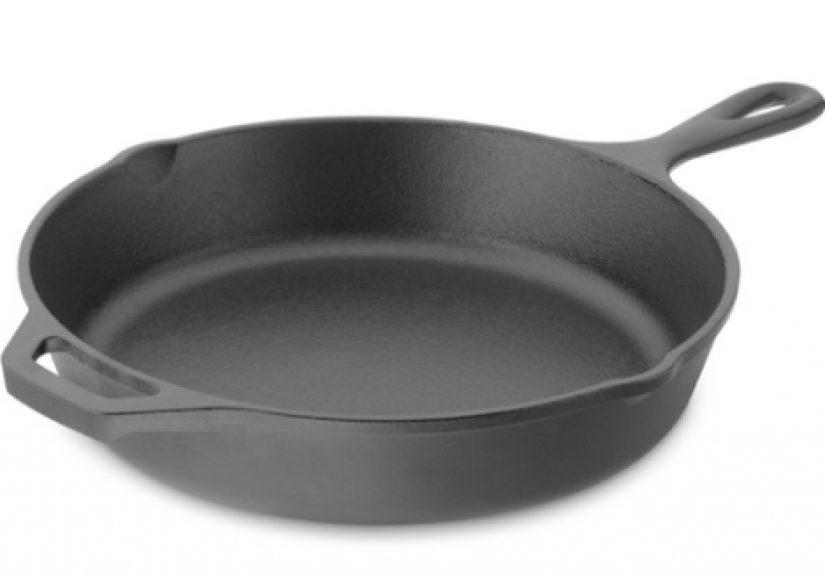
1) Cast iron skillet: the everyday workhorse
A skillet is where cast iron earns its reputation: crispy edges, great sears, and the kind of heat retention that
makes food stay warm long enough for someone to say, “Wait, who wanted ketchup?” and come back without disaster.
- Best for: eggs (once seasoned), burgers, steak, chicken thighs, sautéed veggies, skillet desserts.
- What to look for: a size you’ll actually lift and clean. (Your future self will thank you.)
2) Reversible grill/griddle: breakfast on one side, dinner on the other
A reversible cast iron grill/griddle is a camping cheat code. One side is typically flatter for pancakes,
tortillas, or smash burgers; the other side has raised ridges for grill marks and letting fat drain away.
It’s especially handy if you cook on a camp stove and want more surface area without juggling multiple pans.
3) Dutch oven: the “feed-a-crowd” classic
If cast iron had a crown, the Dutch oven would wear it and then bake bread inside it. Camp-style Dutch ovens
are excellent for braises, stews, chili, pot roast, cobblers, and baked dishes where you want steady, enclosed heat.
Camp Chef’s “Classic” style Dutch ovens are built with charcoal cooking in mind. A typical example is a
12-inch, 6-quart model that’s described as serving a crowd (and weighing about what you’d expect
cast iron to weigh: substantial). Details like a lid designed to hold coals and a notch for a thermometer can make
outdoor cooking more predictable.
One practical note: camp-style Dutch ovens often include legs, which can be fantastic over coals but less convenient
on some indoor setups. If your plan is mostly indoor braising, consider whether you want a camp Dutch oven (legs)
or a flatter-bottom Dutch oven more suited to home ranges.
How to Cook Better in Cast Iron (Without Drama)
Cast iron rewards two habits: preheat and patience. The pan needs time to come
up to temperature, and food needs time to release naturally once it sears. If you rush both, your spatula will
start negotiating for overtime.
Preheating: the nonstick secret nobody wants to wait for
- Start on medium heat more often than high. Cast iron holds heat, so you can overshoot quickly.
- Give it a few minutes, then add oil, then add food.
- If your pan smokes instantly, you’re already in “campfire story” territory.
Acidic foods: not forbidden, just strategic
Tomatoes, wine, vinegar, and citrus can be tougher on newer seasoning layersespecially for long simmers.
Once your seasoning is well-established, cast iron can handle more, but it’s smart to avoid marathon tomato sauces
in a brand-new pan. (Short acidic cooks? Usually fine. Eight-hour sauce session? Maybe wait until the pan has
more seasoning mileage.)
Metal utensils: surprisingly okay
A well-seasoned cast iron surface is tough. Metal spatulas can actually help keep the surface smooth by scraping
away tiny bits of stuck-on food before they become tomorrow’s “mystery texture.”
Dutch Oven Briquettes: A Simple Heat System
The magic of a camp Dutch oven is that you can bake outdoors by putting heat above and below the potlike a
portable oven. The trick is consistency, and charcoal briquettes make that easier because they’re uniform.
A practical starting rule
A widely used baseline is: total briquettes ≈ Dutch oven diameter × 2. For a 12-inch Dutch oven,
that’s roughly 24 briquettes. Then place more heat on top than on the bottom to reduce scorching.
- Light briquettes and wait until they’re ashed over.
-
Arrange heat in rings: a circle under the oven and a circle on the lid’s outer rim.
(Think “donut,” not “volcano.”) - Use more coals on top than bottom: this helps bake evenly and protects the bottom from burning.
- Rotate: every 10–15 minutes, rotate the lid and the pot in opposite directions for even heat.
Weather matters. Wind and cold steal heat. Plan to bring extra briquettes and adjust as needed. Once you’ve done
it a few times, it feels less like math and more like muscle memory.
Cleaning, Seasoning, and Maintenance
Cast iron care is easier than the internet makes it look. You don’t need a sacred chant. You need a simple routine:
clean, dry, oil lightly. The goal is to keep the seasoning layer intact and prevent rust.
Cleaning after cooking: simple steps
- While the pan is warm, wipe out grease and crumbs with a paper towel.
- Rinse with hot water and use a brush or non-metal scrubber for stuck bits.
-
Yes, soap is alloweda small amount of mild dish soap won’t destroy good seasoning.
(Avoid harsh scrubbing that actually removes seasoning.) - Dry immediately with a towel, then heat briefly on a burner to evaporate any hidden moisture.
- Oil lightly: rub on a thin layer of neutral oil, then buff until it looks almost dry.
When to season (or re-season)
If food starts sticking more than usual, or you see dull gray patches, it’s time for a refresh. A reliable method:
apply a very thin coat of oil, buff off excess, then bake the pan upside down in a hot oven.
Repeat a few times for a stronger base layer.
A simple oven-seasoning method (no fuss)
- Wash and dry the pan completely.
- Rub a thin coat of neutral oil over every surface (inside, outside, handle).
- Buff off excess oil thoroughly (too much oil = sticky seasoning).
- Bake upside down at a high temperature (often around the mid-400s °F) for about 30–60 minutes.
- Cool, then repeat 2–4 times if you’re building a stronger seasoning foundation.
Storage: avoid the sneaky rust trap
Moisture is the enemy. One common mistake is storing cast iron with a lid sealed tight, which can trap humidity and
encourage rust. If you store with a lid, consider a paper towel between the lid and pot to allow airflow, and always
store fully dry with a light oil film.
Troubleshooting: Sticky, Rusty, or Sad
Problem: sticky surface
Sticky usually means too much oil in the last seasoning attempt. Fix it by heating the pan to
soften the tacky layer, wiping thoroughly, then re-seasoning with a much thinner coat.
Problem: rust spots
Rust happens. Don’t panic. Scrub rust with a brush or fine steel wool, rinse, dry, then re-season.
Most cast iron is forgivinglike the friend who still answers your text after you ghosted for a month.
Problem: food sticks (especially eggs)
Eggs are the final boss of cast iron. Use a well-seasoned pan, preheat properly, use enough fat, and keep the heat
moderate. If you hear aggressive sizzling the second the egg lands, your pan is probably too hot.
Practical “Start Here” Meals for Camp Chef Cast Iron
If you want your cast iron to love you back quickly, cook foods that build seasoning: anything with a bit of fat,
gentle sautéing, and baked items that don’t demand perfection.
1) Skillet cornbread (camp or home)
- Preheat the skillet while the oven heats.
- Add a little oil or butter, swirl, pour batter.
- Bake until golden with crisp edgesthe cast iron signature.
2) Dutch oven chili
- Brown meat (or sauté veggies), build flavor in the pot.
- Simmer until thick and cozy.
- Serve straight from the Dutch ovencast iron keeps it hot while everyone debates toppings.
3) Smash burgers on a griddle
- Preheat the griddle side thoroughly.
- Smash, salt, and let the crust form before flipping.
- Bonus: toast buns on the side like you planned it that way.
4) Camp Dutch oven cobbler
- Fruit + sugar + a simple batter or biscuit topping.
- Heat from top and bottom, rotate periodically.
- Eat while warm and accept compliments graciously.
of Real-World Camp Chef Cast Iron Experiences
The first time I cooked with a Camp Chef cast iron Dutch oven, I learned the most important outdoor cooking lesson:
the food is only half the projectthe heat management is the other half. I had a simple goal (bake
something hearty), and a simple plan (charcoal briquettes), and I still managed to create a “hot spot”
that tried to turn the bottom layer into a crunchy souvenir. The fix wasn’t complicated. I started arranging
coals in a more even ring, put more briquettes on top than on the bottom, and rotated the lid and pot at regular
intervals. Within one meal, it went from “campfire roulette” to “this tastes like we planned it.”
My favorite part of Camp Chef cast iron is how confident it feels outside. A standard thin pan can
be fussy on camp stoves because the heat output is strong and concentrated; cast iron smooths that out once it’s
properly preheated. I’ve done breakfast on a reversible grill/griddle where one side handled pancakes like a diner
and the other side put grill marks on sausages that looked suspiciously impressive for a campsite.
The biggest improvement came when I stopped chasing high heat. Medium heat and a longer preheat gave me better
browning and fewer “why is this sticking?” moments.
There’s also a certain peace that comes with cast iron’s durability. When you’re cooking outdoors, things get bumped.
Someone reaches across the table for salsa and nudges your pan handle like it’s a lever in a submarine. Cast iron
doesn’t care. It just sits there, holding heat, refusing to be rattled. The only real enemy is moisture. I learned
the hard way that a quick “I’ll clean it later” rinse, followed by a closed lid and a cool night, is a fast track
to surface rust. Now my routine is strict: rinse, brush, dry, and warm it briefly to chase away water you can’t see.
A tiny wipe of oil afterward is like putting the pan to bed with a blanket.
Seasoning stopped feeling intimidating once I treated it like maintenance instead of a ceremony. The key was using
less oil than my instincts wanted. The first time I tried to “protect” the pan with extra oil, it
rewarded me with a sticky finish that grabbed paper towels like Velcro. The next time, I applied oil and then buffed
it like I’d changed my mind. That “almost dry” look is exactly what you want. Over time, cooking did most of the work
anyway: burgers, cornbread, sautéed onions, and anything with a little fat slowly improved the surface.
The most satisfying moment wasn’t a fancy recipe. It was a simple one-pan meal after a long day: browned chicken,
vegetables, and a quick pan sauce made right in the skillet. When the food released cleanly and the pan wiped out
easily afterward, it felt like the cast iron and I had finally agreed on house rules. Camp Chef cast iron isn’t
magicbut it’s close. Give it steady heat, keep it dry, and treat seasoning like a long-term relationship, and it’ll
pay you back with food that tastes like the outdoors (even when you’re just cooking on the patio).