Table of Contents >> Show >> Hide
- What Is an “Aged Cast Iron Strong Boy L Bracket,” Exactly?
- Why Cast Iron? The Material Behind the Mood
- Picking the Right Bracket Size: Where Most Shelves Win or Lose
- Installation That Won’t End in a Shelf Avalanche
- Design Ideas: Where the Aged Cast Iron Look Really Works
- Keeping the Patina, Avoiding the Rust Panic
- Common Mistakes (So You Don’t Learn Them the Loud Way)
- Field Notes: Real-World Experiences With an Aged Cast Iron Strong Boy L Bracket (Extra )
- Conclusion
Some home upgrades whisper. Others clankconfidentlylike a cast iron bracket landing on your workbench with the emotional weight of a Victorian novel.
The Aged Cast Iron Strong Boy L Bracket is firmly in the clank category: a rugged, old-soul corner support that looks like it has stories,
opinions, and a strict policy against flimsy drywall screws.
If you’re hunting for a bracket that can hold shelves (and hold your aesthetic together), you’re in the right place. This guide breaks down what makes the
Strong Boy style so appealing, why aged cast iron looks better the more it “misbehaves,” how to choose the right size and spacing, andmost importantly
how to install it so your shelf doesn’t re-enact a disaster movie at 2:00 a.m.
What Is an “Aged Cast Iron Strong Boy L Bracket,” Exactly?
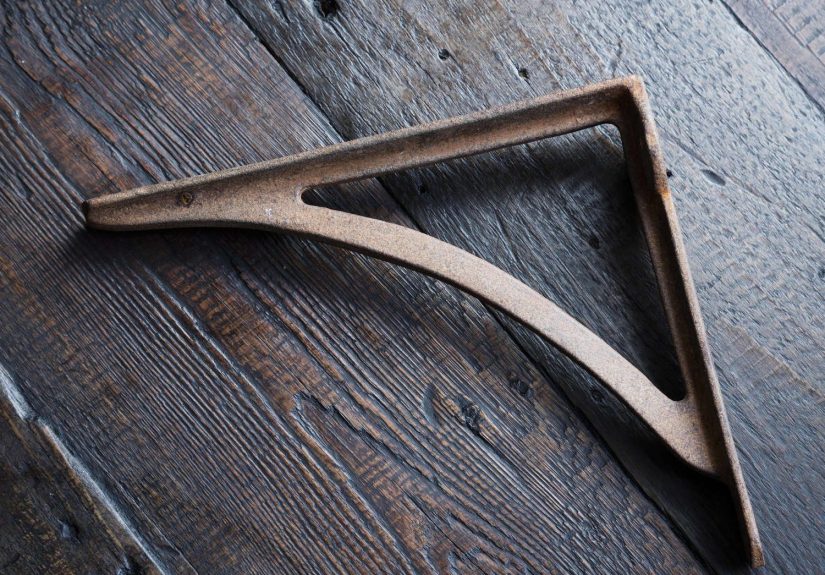
At its core, this bracket is a classic L bracket (also called a corner brace or shelf support) made from cast iron and finished to look
naturally weatheredthink handsome patina, not abandoned toolbox. The “Strong Boy” nickname typically refers to a stout, no-nonsense profile:
thick arms, solid mounting plates, and a silhouette that says, “Yes, I can hold that,” without begging for attention.
Product descriptions for this style often highlight a few defining traits: cast iron construction, an aged finish with natural variation, and practical uses
beyond shelveslike supporting small basins where appropriate. Many versions ship with screws, and because cast metal is, well, cast metal, the patina and
tiny surface quirks can vary from piece to piece. That’s not a flaw; that’s the charm showing off.
Why Cast Iron? The Material Behind the Mood
Cast iron is strongbut it’s strong in a specific way
Cast iron has a reputation for toughness because it’s dense and rigid, and it handles steady, static loads well when properly installed. Where it’s less
lovable is sudden impact and bending. Compared with many steels, cast iron is generally more brittle (it doesn’t like surprise jolts), while steel tends to
be more ductile and forgiving under shock or flex.
Translation for real life: cast iron brackets are excellent for wall-mounted shelving, décor ledges, pantry boards, and similar projects
where the load is predictable. They’re less ideal if your “shelf” is actually a climbing gym for children or a launching pad for pets with Olympic dreams.
The aged finish: patina, “living” surfaces, and why perfection is overrated
The “aged” part matters as much as the “cast iron” part. An aged finish often mimics oxidation, wear, and hand-worked characterwhat some retailers call a
living finish. That can mean subtle color shifts, rub marks, and variations from bracket to bracket. Instead of looking mass-produced, each
one looks like it earned its keep.
The upside of this look is that it’s forgiving. A tiny scratch doesn’t ruin it; it joins the party. The downside is that cast iron can rust if exposed to
moisture without protection, so maintenance isn’t hardbut it is real. (Don’t worry, we’ll cover how to keep “aged” from becoming “orange.”)
Picking the Right Bracket Size: Where Most Shelves Win or Lose
Projection, height, and the “lever arm” problem
When people say “my bracket failed,” what they often mean is: physics showed up. The deeper the shelf, the more leverage it creates on the wall.
A shallow spice ledge is polite. A 14-inch slab loaded with cookbooks is basically doing CrossFit against your fasteners.
Rule of thumb: choose a bracket projection that makes sense for your shelf depth. Many builders like brackets that support roughly
two-thirds to three-quarters of the shelf depth for heavy loads (especially in kitchens). If you’re doing a more decorative shelf with
lighter items, you can get away with lessbut “get away with” is not the same as “sleep well at night.”
How many brackets do you need?
More brackets usually means more stabilitywithin reason. For long shelves, spacing matters: wide spans invite sagging, especially with wood that can flex
over time. Many home-improvement guides emphasize fastening supports into studs whenever possible and being thoughtful about span and load. If you can’t hit
studs exactly where you want the brackets, a backer board mounted to studs is the “cheat code” that makes your bracket spacing dreams come true.
Weight ratings: what they mean (and what they don’t)
Retail listings for cast iron shelf brackets sometimes quote approximate capacities “per pair.” For example, some cast iron bracket models are listed around
40–50 lbs per pair depending on size, while other heavier decorative models may claim up to 100 lbs per pair. Treat those
numbers as best-case scenarios based on proper installation into solid framing and the manufacturer’s testing assumptions.
Real-world capacity depends on:
where you mount (stud vs. hollow drywall),
the fasteners you use (quality screws, anchors, toggle bolts),
the wall condition (old plaster can be dramatic),
and how the load is distributed (deep shelves create more torque).
If you’re supporting something sensitivelike a small wall-mounted basindon’t guess. Overbuild, use the correct structural backing, and follow manufacturer
guidance for both bracket and fixture.
Installation That Won’t End in a Shelf Avalanche
Best case: mount into studs
The strongest, simplest setup is bracket screws driven into wood studs. Most pro-style guidance for shelves and heavy wall loads boils down to:
locate studs, pre-drill if needed, keep everything level, and use appropriately sized wood screws or lag screws for the load.
If your wall allows it, this is the gold standard.
No studs where you need them? Use anchors like you mean it
If you’re mounting on drywall without studs, you need anchors designed for heavier loads. Guides commonly recommend
toggle bolts or molly bolts for stronger holding power in hollow walls, and to spread the load by using more brackets or
anchor points when you can.
A few practical notes from major DIY resources and retailers:
- Some drywall anchor types are rated in the 25–75 lb range in 1/2-inch drywall (depending on anchor style and installation).
-
Toggle anchors can be among the strongest options; some guides note that toggle-style anchors can hold 100 lbs or more depending on the
wall and anchor design. - Retailer guidance often stresses using a safety margin rather than pushing the printed “max load” like it’s a personal challenge.
The takeaway: if you’re not in studs, choose high-quality anchors, follow the instructions, and use a sensible safety factorespecially for shelves that
will carry anything heavier than a plant that’s mostly here for vibes.
Step-by-step: installing a Strong Boy-style bracket (clean, simple, sturdy)
- Plan the layout. Mark bracket locations, shelf height, and spacing. Think about what the shelf will hold.
- Find studs (if possible). Adjust bracket placement to hit studs. If the design won’t allow it, consider a backer board.
- Level everything. Use a level for the first bracket, then match height for the rest. (Your eyes lie. Your level does not.)
- Pre-drill pilot holes. Especially in studs, pilot holes reduce splitting and make screw driving smoother.
- Use the right fasteners. Wood screws/lag screws into studs; heavy-duty toggles or molly bolts in hollow walls; masonry anchors for brick/concrete.
- Mount brackets, then mount shelf. Tighten snuglydon’t over-torque and strip holes or crush drywall.
- Load test gently. Add weight gradually and watch for movement. If anything flexes or shifts, fix it before you “trust it.”
Design Ideas: Where the Aged Cast Iron Look Really Works
Open kitchen shelving that doesn’t look like a rental
Aged cast iron shelf brackets shine in kitchens because they add contrast: warm wood + dark metal is an instant classic. Use them for everyday dishes,
mugs, pantry jars, or cookbooks. If you’re storing heavier items, choose deeper brackets, more frequent spacing, and stud mounting whenever possible.
Bathroom shelving and the “small basin” use case
Some Strong Boy-style brackets are marketed as suitable for supporting small basins in addition to shelves. If you’re considering that
route, treat it as a structural project: water is heavy, people lean on sinks, and “small” doesn’t mean “low stakes.” Plan for backing support, confirm
bracket and fastener ratings, and avoid relying solely on drywall anchors for plumbing-adjacent loads.
Mudroom, entryway, and utility spaces
Cast iron brackets are made for hardworking rooms: laundry shelves for detergents, mudroom ledges for baskets, entryway shelves for bags and bins. The aged
look also hides scuffs, which is perfect for high-traffic areas where pristine finishes last about three minutes.
Workshop or garage shelves with a “nice tool” vibe
If you love the look of old machinery and well-used hand tools, an aged cast iron bracket fits right in. Pair with thick lumber, mount into studs, and
consider a rust-protective wipe-down if the space gets humid.
Keeping the Patina, Avoiding the Rust Panic
Simple cleaning
Dust it. Wipe it with a dry cloth. Avoid soaking it or hitting it with harsh cleaners that strip protective coatings. If you spot early surface rust, address
it quicklylight abrasion and re-protection typically beat “ignore it and hope.”
Protection options that don’t ruin the aged look
- Wax or oil: A thin coat can help slow oxidation. Paste wax is popular on cast iron surfaces because it’s low shine and easy to refresh.
- Rust inhibitors: Products designed to prevent rust on bare metal can work well when applied correctly, especially in damp environments.
- Clear protective coatings: Clear sprays/enamels meant for corrosion protection can lock in the look, though they may slightly change sheen.
If your bracket lives outdoors or near salty air, prioritize protection. If it’s indoors in a dry room, light maintenance is often enough. The goal is to
preserve the “aged” finishwithout letting nature take the wheel.
Common Mistakes (So You Don’t Learn Them the Loud Way)
- Mounting heavy shelves into drywall with light anchors. If it’s heavy, use studs, a backer board, or serious toggles.
- Choosing brackets that are too small for shelf depth. Deep shelf + tiny bracket = leverage disaster.
- Assuming the bracket rating is the whole story. Fasteners and wall structure matter just as much.
- Over-tightening anchors. Stripped holes and crushed drywall reduce capacity fast.
- Ignoring humidity. Aged iron looks great; active rust looks like regret.
Field Notes: Real-World Experiences With an Aged Cast Iron Strong Boy L Bracket (Extra )
Here’s what people commonly experience once they bring an aged cast iron Strong Boy-style bracket into their livesbased on the patterns that show up in DIY
guides, retailer specs, and the way actual homes behave (which is rarely “perfectly flat, perfectly square, perfectly cooperative”).
1) The unboxing moment is weirdly satisfying. Cast iron has that dense, serious feel. You pick it up and instantly understand why it’s
popular for “sturdy” projects: it doesn’t feel hollow or flimsy. The aged finish also tends to look better in person than in photos. Under real light, you
see the subtle variationdark spots, warm undertones, tiny casting marksthat make it feel authentic rather than painted-on “distress.”
2) Patina variation is either a delight or a surprise. If you’re expecting every bracket to match like identical twins, the natural
differences can be jarring. The fix is simple: treat them as a set of siblings. Hang them in the same room, under the same light, and they’ll read as
intentionally variedespecially once shelves, décor, and daily life soften the “newly installed” look.
3) Walls rarely cooperate, so the level becomes your best friend. A common experience: you mark your holes, step back, and think “nailed it,”
then the level politely disagrees. Even a small tilt gets amplified once a long shelf goes up. The trick many DIYers learn quickly is to level the brackets
relative to each other (so the shelf sits right), even if the wall itself is a little off. You’re building a shelf, not proving your house is perfectly
plumb. (Spoiler: it probably isn’t.)
4) Studs are the difference between “solid” and “I hope this works.” When brackets land on studs, the shelf feels confident immediately.
When they don’t, the install gets more technical: you’re choosing anchors, drilling larger holes, and paying attention to the wall material. Many people
report that heavy-duty toggle anchors feel like magiconce you’ve used them correctly. But there’s a learning curve, and the best lesson is always the same:
don’t wing it. Use the right bit size, don’t over-tighten, and keep your spacing reasonable.
5) The first week reveals your “real” shelf habits. Everyone starts with curated styling: a plant, a vase, one tasteful bowl. Then reality
moves incoffee mugs multiply, the cookbook stack grows, and suddenly the shelf is doing actual work. This is where Strong Boy brackets earn their nickname.
If you installed them into studs (or used proper heavy-duty anchors with a safety margin), you’ll forget about them in the best way. If you cut corners,
you’ll notice tiny shifts, creaks, or sagging, and you’ll become intimately familiar with the phrase “I should have used a backer board.”
6) Maintenance is usually smallunless the room is humid. In a dry interior space, most people find that dusting and an occasional wipe is
enough. In humid zones (bathrooms, coastal homes, garages), you may see small orange freckles over time. The common experience is not panicit’s a quick
clean and a protective step (wax, a rust inhibitor, or a clear coat if you want to lock the look in). Once you build that habit, the aged finish stays
handsome instead of becoming “rusty in a sad way.”
Bottom line: most “experiences” with these brackets aren’t about the bracket failingthey’re about the installer learning where structure,
fasteners, and physics matter. Do it right once, and your Strong Boy bracket becomes the quiet hero of your wall: holding heavy stuff while looking like it
could also hold a grudge.
Conclusion
The Aged Cast Iron Strong Boy L Bracket is equal parts function and attitude: a heavy-duty shelf bracket that brings old-world texture to
modern spaces. Choose the right size for your shelf depth, respect the realities of wall structure, and install with studs or high-quality anchors.
Maintain the patina with light protection when moisture is part of the picture. Do all that, and you’ll get the best kind of home hardware: the kind you
never have to think aboutbecause it simply works and looks better doing it.