Table of Contents >> Show >> Hide
- Why No-Loom Loom Bands Still Work
- 1. Use Your Fingers for Fast, Beginner-Friendly Patterns
- 2. Turn Two Pencils into a Tiny DIY Loom
- 3. Use Forks for Chunkier and More Detailed Patterns
- 4. Make Hook-Only Patterns with a Crochet Hook or Paperclip
- How to Choose the Right No-Loom Method
- Tips for Better No-Loom Bracelets
- Real-Life Experiences: What Making Loom Band Patterns Without the Loom Actually Feels Like
- Final Thoughts
If your loom has vanished into the same mysterious place as missing socks, half your hair ties, and every pen that ever worked, do not panic. You can still make colorful loom band bracelets without the actual loom. In fact, some of the most popular no-loom methods are easier for beginners because they use tools you probably already have at home: your fingers, two pencils, a couple of forks, or a crochet hook.
That is the sneaky magic of loom band patterns without the loom. At their core, many rubber band bracelet designs rely on tension, layering, and looping. A fancy plastic board helps, sure, but it is not the boss of you. Once you understand how bands stack and flip, you can create beginner-friendly bracelets, test color patterns, and even make gifts that look surprisingly polished for something born in your kitchen between a cereal bowl and a rogue spoon.
In this guide, you will learn four practical ways to make loom band bracelets without a loom, which patterns work best for each method, what tools to grab, and how to avoid the classic beginner disasters. You know the ones: twisted bands in the wrong place, bracelets that become ankle bracelets, and clips that fly across the room like tiny plastic comets.
Whether you want a simple fishtail, a chunkier layered style, or a quick rubber band bracelet you can finish while pretending to watch TV, these no-loom techniques will keep the craft alive. Let’s get into it.
Why No-Loom Loom Bands Still Work
Before diving into the four methods, it helps to know why this craft adapts so well. A standard loom keeps bands separated on pegs so you can pull the lower loops over the upper loops in a consistent order. But that same basic motion can happen on other narrow tools. Fingers can act like two posts. Pencils can become a mini DIY loom. Fork tines can hold several bands at once for wider patterns. A hook can replace the entire setup for chain-style designs and small accessories.
That is why DIY loom bands remain such a fun boredom-buster. You do not need a huge setup. You need elastic bands, a clip, a little patience, and a willingness to restart once or twice when your masterpiece briefly turns into colorful spaghetti.
1. Use Your Fingers for Fast, Beginner-Friendly Patterns
Best for: fishtail bracelets, double fishtail, mini charms, and quick practice projects
If you want the easiest way to make rubber band bracelets without a loom, start with your fingers. This method is ideal for beginners because you can clearly see how the bands stack, cross, and flip. It is also wonderfully portable. You can do it on the couch, in the car while parked, at a sleepover, or anywhere you have a small bag of bands and a clip.
What you need
Grab a handful of loom bands, one C-clip or S-clip, and your index and middle finger. That is it. No giant kit. No dramatic entrance. Just fingers doing excellent unpaid labor.
How it works
The classic finger method usually starts with one band twisted into a figure eight across two fingers, then two more untwisted bands stacked on top. You pull the bottom band over the top of each finger so it drops into the center. Then you add another band and repeat. That repeating motion creates a fishtail bracelet, which is one of the easiest loom band patterns to learn without tools.
Once you understand that rhythm, you can experiment with color order. Alternate two colors for a clean striped bracelet. Use three shades from the same family for a gradient look. Go wild with neon if subtlety has never been your thing. When the bracelet is long enough, attach the loose loops to the starting end with a clip.
Why this method is so popular
The finger loom bracelet method is simple, quick, and forgiving. Because the “posts” are soft and flexible, it is easy to reposition bands if one slips. It is also a smart way to teach kids the basic logic of loom band construction before moving to more complicated patterns. If someone can make a fishtail on two fingers, they are already learning the core skill behind more advanced rubber band bracelet designs.
Watch-outs
Do not leave the bands too tight on your fingers for long stretches. Take breaks if your fingers start feeling sore or numb. And if the bracelet looks uneven, the problem is usually tension. Try keeping every new band at a similar height before flipping the lower loops over.
2. Turn Two Pencils into a Tiny DIY Loom
Best for: fishtail bracelets, single-chain styles, pencil toppers, and more even tension
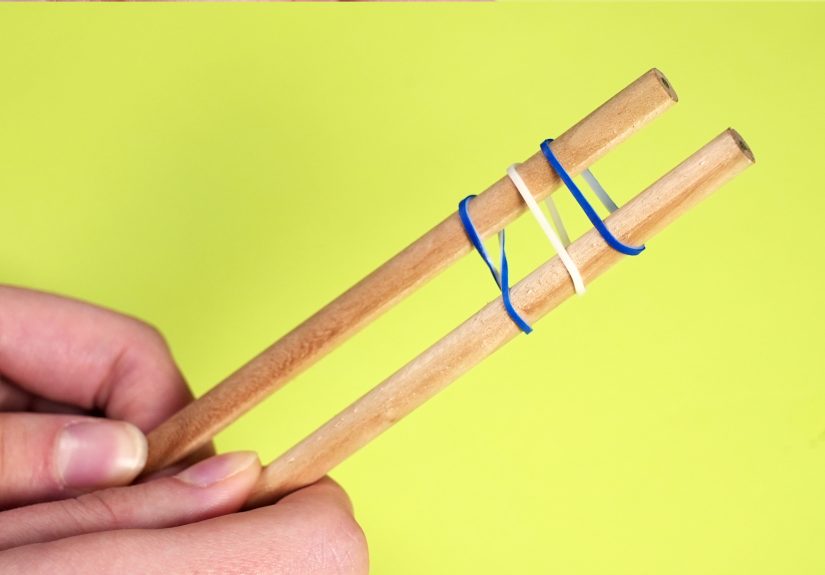
If your fingers are getting tired or you want a cleaner setup, two pencils can become a mini loom in about ten seconds. This is one of the most useful hacks for making loom band patterns without the loom because pencils are sturdy, slim, and easy to tape or hold together. Chopsticks, markers, and even smooth craft sticks can do the same job in a pinch.
What you need
You need two pencils, a rubber band or tape to hold them side by side, your loom bands, and a clip. Some people keep the pencils slightly separated. Others bind them tighter to create a more stable two-post setup. Either way works, as long as the bands can stretch around both posts.
How it works
The mechanics are similar to the finger method, but the pencils hold their position better and keep the loops more uniform. Start with one band crossed in the center like a figure eight, then stack two more bands above it. Pull the lowest loop over the top on each side, slide it down, add a new band, and repeat.
This setup is especially helpful if you are making a longer bracelet or teaching someone else. Because the pencils keep the spacing consistent, the finished bracelet often looks neater than a finger-made version. It also makes it easier to pause mid-project without losing your place. Just set the pencils down carefully and come back later, like the organized crafter you absolutely are now.
When pencils beat fingers
Two-pencil loom band bracelets are great when you want better tension control. They are also helpful for kids who understand the pattern logic but have trouble holding bands steady on their hands. If you are making matching bracelets in different colors, the pencil setup can produce more consistent results from one bracelet to the next.
Style ideas
Try a black-and-white fishtail for a graphic look, a rainbow bracelet with repeating color order, or a school-color combo for a spirit-day accessory. You can also stop short and turn the finished strip into a zipper pull or small keychain.
Common mistake
The biggest issue here is letting the pencils shift too far apart. If that happens, the bracelet can stretch awkwardly and the loops may not sit evenly. Secure the pencils before you start, and check them every few rows.
3. Use Forks for Chunkier and More Detailed Patterns
Best for: wider bracelets, triple single styles, railroad designs, and bolder texture
Now we move from “cute and simple” to “wait, you made that with dinner forks?” Forks are one of the best no-loom substitutes when you want more than two posts. A single fork gives you multiple tines to work with, while two forks tied back to back create a thicker setup that can handle more advanced loom band patterns without the loom.
What you need
Use one fork for narrow experiments or two forks secured together for wider patterns. Add loom bands, a clip, and optionally a small hook or bent paperclip to help lift the lower bands. Metal or sturdy plastic forks both work, though metal tends to feel more stable.
How it works
With a fork method, bands can stretch across different tines to mimic multiple loom pegs. That lets you make more dimensional styles than a basic two-post fishtail. Some crafters use two forks back to back for triple single bracelets or railroad-style patterns because the added depth helps separate the loops.
The exact sequence depends on the pattern, but the principle stays the same: place bands across specific tines, layer additional bands, and pull lower loops over upper loops in the right order. It sounds technical, but once your hands learn the pattern, it becomes surprisingly rhythmic.
Why forks are worth trying
Forks open the door to bigger, chunkier loom band bracelet ideas without buying extra gear. They are especially good if you have already mastered the finger fishtail and want a challenge. The result can look fuller and more structured, with better separation between color layers.
Good patterns for fork methods
Try a triple single if you want a classic bracelet with more body. A railroad-style bracelet is another fun option if you like defined tracks of color running side by side. You can also experiment with stacked color blocks that pop more clearly on a wider setup.
One honest warning
The fork method is not the fastest option for total beginners. The tines are narrower than loom pegs, and it is easier to snag the wrong loop if you rush. Work slowly at first. Neat is faster than frantic. That applies to crafts and, frankly, most of life.
4. Make Hook-Only Patterns with a Crochet Hook or Paperclip
Best for: chain bracelets, small charms, pencil huggers, and portable mini projects
If you have a crochet hook, a loom hook, or even a carefully bent paperclip, you can make hook-only loom band designs without using a full loom at all. This method is excellent for crafters who like working one loop at a time. It is also useful for making smaller projects, especially when you want tighter control over each step.
What you need
You need bands, a hook, a clip, and a flat surface. A small crochet hook is often easier to grip than the tiny hooks that come in kits, but both can work. The hook method is popular for compact projects because everything stays in one place instead of spread across multiple posts.
How it works
With hook-only patterns, you usually build loops directly onto the hook and pull new bands through existing loops to form a chain or layered structure. Some designs use a base set of loops, then add rows or decorative color changes from there. This approach is perfect for simple bracelets, mini accessories, and quirky little gifts like pencil huggers or zipper charms.
Why people love hook-only designs
The hook gives you very precise control. If you enjoy crochet, knotting, or detail work, this method may feel intuitive. It is also easy to throw a hook and a bag of bands into a pouch and craft on the go. No desk takeover. No giant setup. No plastic pegboard staring at you with judgment.
When this method shines
Use the hook method when you want to test a new color idea, make a quick chain bracelet, or create a small gift fast. It is also smart when your regular loom is missing but your craft drawer still contains one heroic little hook hanging on for dear life.
Beginner tip
Start with a basic chain-style project before trying anything heavily layered. Hook-only patterns can become intricate quickly, and it is easier to build confidence on a small success than to launch directly into a knotty rubber band existential crisis.
How to Choose the Right No-Loom Method
If you are not sure where to start, use this simple rule. Choose fingers if you want the easiest beginner bracelet. Choose pencils if you want better control and a neater finish. Choose forks if you want thicker or more advanced patterns. Choose a hook if you like small, precise projects and want maximum portability.
You do not have to marry one method forever. Many crafters start with fingers, switch to pencils for comfort, then move to forks or hooks when they want more variety. Think of it less as a strict ladder and more as a colorful rubber-band buffet.
Tips for Better No-Loom Bracelets
Use a limited color palette at first
Two or three colors make it easier to see your pattern. Once your hands know the steps, then you can go full rainbow chaos.
Keep your tension consistent
Bracelets look best when the bands are stretched evenly. Too tight, and the pattern bunches. Too loose, and the finished piece looks floppy.
Count rows for matching bracelets
If you are making a pair for friends, siblings, or party favors, counting the rows or repeating color sections helps keep them the same size.
Do not skip the clip check
Before calling a bracelet finished, make sure the clip is securely attached to both ends. A bracelet that explodes during wear is memorable, but not in the glamorous way.
Store bands by color
Even a simple organizer, sandwich bag, or muffin tin can save you from digging through a rainbow avalanche every time inspiration strikes.
Real-Life Experiences: What Making Loom Band Patterns Without the Loom Actually Feels Like
There is something weirdly satisfying about making loom band patterns without the loom because it feels a little improvised and a little genius at the same time. The first time most people try it, there is usually a moment of doubt. Two fingers? Two pencils? A fork from the kitchen? Surely this cannot produce a bracelet that looks intentional. And then, about five minutes later, a real pattern starts to appear, and suddenly the whole project feels like a tiny magic trick.
One of the most common experiences with no-loom bracelet making is how quickly it turns into a repeat hobby. You tell yourself you are making one fishtail bracelet just to see if it works. Then you make another in different colors. Then you decide your first one was “practice,” which is crafter language for “I am absolutely making six more.” Before long, you are sorting colors, planning combinations, and getting emotionally invested in whether teal looks better with white or neon pink. This is normal. This is the band life now.
Another very real experience is discovering that the method changes your mood. Finger bracelets feel casual and relaxing, almost like doodling with your hands. The pencil method feels more organized, like you are running a tiny bracelet laboratory. Forks bring a little chaos and ambition to the table because those patterns look more advanced and make you feel wildly accomplished when they work. The hook method feels surprisingly focused and satisfying, especially if you enjoy repetitive motions that click into place one loop at a time.
There is also the classic no-loom lesson in patience. Every beginner drops a loop. Every beginner twists the wrong band. Every beginner has at least one moment where the bracelet seems determined to become modern art instead of jewelry. But that is part of the experience that makes the craft stick. You learn to slow down, check your rows, and trust the process. And when the pattern finally looks right, the success feels earned in a way that mass-produced accessories never do.
No-loom projects are also social in the best way. They are easy to pass around a table, easy to teach, and easy to personalize. One person likes pastels. Another wants school colors. Somebody always makes a bracelet so bright it could guide aircraft. That variety is half the fun. Even when everyone uses the same pattern, the finished bracelets never look exactly alike.
And perhaps the best part is that making rubber band bracelets without a loom lowers the barrier to starting. You do not have to wait until you buy the perfect kit. You do not need a giant craft station. You can start with a few bands, a household tool, and some curiosity. That makes the hobby feel welcoming, flexible, and wonderfully low-pressure. It is craft therapy with a tiny clip at the end.
Final Thoughts
Loom band patterns without the loom are proof that good crafts do not always need fancy equipment. With fingers, pencils, forks, or a hook, you can make beginner bracelets, experiment with color, and build your skills one loop at a time. Start simple with a fishtail, move up to wider fork designs, and keep a clip nearby so your hard work does not make a dramatic break for freedom.
The best method is the one that matches your patience, your supplies, and your mood that day. Some days call for a quick two-finger bracelet. Other days call for a full fork-powered crafting session that takes over the table and possibly your evening. Both are valid. Both are fun. And both prove that when the loom goes missing, the creativity does not have to.


