Table of Contents >> Show >> Hide
- What a Siphon Needs to Work
- Way 1: Make a Basic Hose Siphon
- Way 2: Make a Valve-Filled Garden Hose Siphon
- Way 3: Make a Small Straw or Self-Starting Siphon
- How to Troubleshoot a Siphon That Refuses to Behave
- When a Siphon Is the Right Tool
- Safety Rules That Deserve to Be in Bold
- Final Thoughts
- Extra Experience: What I Learned the Hard Way About Making a Siphon
If you have ever needed to move water from one place to another without a pump, congratulations: you were only one tube away from meeting the siphon. A siphon is one of those wonderfully simple tricks of physics that feels like cheating the first time you see it work. Water climbs up, slides over a bend, and then keeps flowing as if gravity suddenly decided to moonlight as a magician. Spoiler: gravity is not confused. It is actually doing all the heavy lifting.
In plain English, a siphon lets liquid travel from a higher container to a lower container through a tube that has already been filled, or “primed,” with liquid. Once the flow starts, the lower end keeps pulling the liquid downward, and the higher side follows along. No motor, no fancy gadget, no tiny engineer hiding in the hose. Just pressure, gravity, and a setup that does not leak air like an old balloon animal.
This guide covers three practical ways to make a siphon: a basic hose siphon, a valve-filled garden hose siphon, and a small self-starting straw siphon for light jobs or science-project fun. Along the way, you will also learn what causes siphons to fail, how to fix common mistakes, and why some “movie methods” deserve to stay in movies.
What a Siphon Needs to Work
Before we get into the three methods, let’s make sure the rules of the game are clear. A siphon is not picky, but it does have standards.
1. The source liquid must sit higher than the destination
If the liquid you want to move is not above the place you want it to go, a siphon is not your tool. At that point, you need a pump, a bucket, or a very cooperative law of physics that has not been discovered yet.
2. The tube must be filled with liquid to start
This is called priming. If the tube is mostly air, the siphon will mostly do nothing. And “mostly nothing” is still nothing, just with more attitude.
3. The outlet end must stay lower
The lower end creates the downhill pull that keeps the liquid moving. Raise it too high, and the siphon loses its motivation.
4. Air leaks are the enemy
Tiny gaps, pinholes, loose joints, or bubbles can stop the flow. A working siphon depends on a continuous column of liquid. Break that column, and the magic trick ends in embarrassment.
5. Use siphons for safe liquids only
Stick with water or other non-hazardous liquids. Do not mouth-siphon fuel, chemicals, dirty water you should not ingest, or anything else that could turn a clever DIY moment into a terrible life choice.
Way 1: Make a Basic Hose Siphon
This is the classic siphon. It is simple, cheap, and perfect for moving water out of a container, pool cover, large bucket, rain barrel, or aquarium water-change bucket setup when you want the easy version.
What You Need
- A flexible hose or clear tubing
- A source container with water
- A lower container, drain area, or bucket
- Your fingers, which are about to become temporary valves
How to Make It
- Cut or choose a hose long enough to reach from the higher container to the lower one.
- Completely fill the hose with water. You can do this by submerging the entire hose in a tub or sink until all the air bubbles are gone.
- Once the hose is full, cover both ends with your thumbs or fingers so the water stays inside.
- Place one end into the source water and keep it below the surface.
- Move the other end to the lower container or drain point.
- Release the lower end first, then the upper end. Water should start flowing immediately.
Why This Method Works So Well
Because it solves the biggest siphon problem right away: priming. You already filled the hose with water, so there is no giant bubble of air blocking the path. Once one end is lower than the water level in the source container, gravity takes over and keeps the liquid moving.
Best Uses
This method is great for straightforward jobs where you can easily fill the hose before starting. It is especially handy for garden water transfer, aquarium maintenance, or draining standing water from a container. If the hose is clear, even better. You can see whether air bubbles are sneaking in like tiny troublemakers.
Common Mistakes
The biggest mistake is letting air into the hose while moving it. The second biggest mistake is putting the outlet at the same height as the source water and then staring at the hose like it has betrayed you. It has not. It is following instructions from gravity.
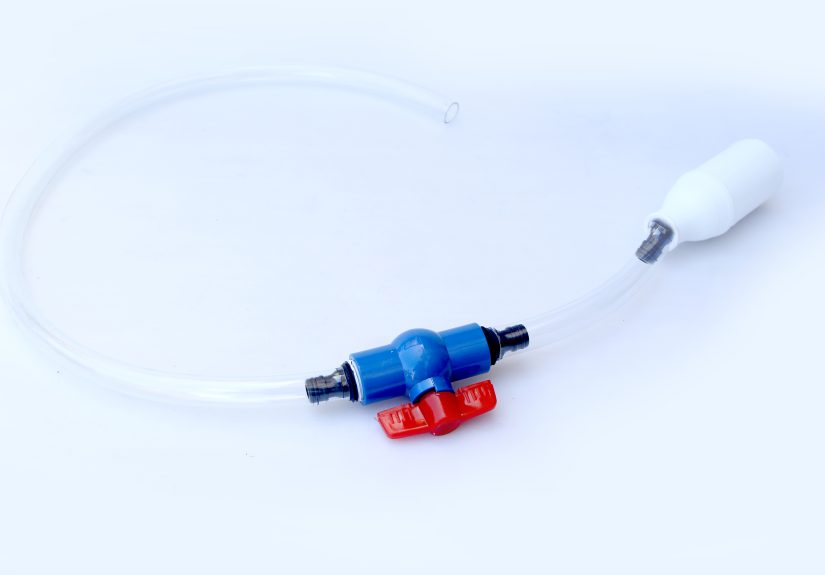
Way 2: Make a Valve-Filled Garden Hose Siphon
This version is ideal when you want a more controlled setup and do not feel like wrestling a water-filled hose like a slippery anaconda. It is especially useful for bigger household tasks, such as draining a washing machine, barrel, or other large container.
What You Need
- A garden hose
- Two shutoff valves or hose-end valves
- A faucet or spigot
- A lower drain point, bucket, or area where the water can safely go
How to Make It
- Attach a shutoff valve to both ends of the garden hose.
- Connect one end of the hose to a faucet.
- Turn on the faucet and let the hose fill completely with water.
- Shut both valves so the hose stays full and air-free.
- Disconnect the hose from the faucet.
- Place one valve end into the source water.
- Place the other end at a lower elevation where you want the water to drain.
- Open the valve on the submerged end first, then open the lower end.
Why This Method Is So Satisfying
It gives you an instant, well-primed siphon without needing to cover the hose ends with your fingers or perform the “don’t spill, don’t spill, don’t spill” dance. The valves keep the hose full, which makes the startup cleaner, faster, and much less dramatic.
Best Uses
Use this when you need a stronger, more controlled siphon for larger jobs. It is especially helpful if the hose is long, heavy, or awkward to maneuver when full of water. It also reduces the chance of losing prime while setting things up.
Extra Safety Tip
If you are working around home plumbing, remember that anti-siphon protection exists for a reason. You never want contaminated water flowing backward into a household water supply. That is why outdoor spigots and irrigation systems often use anti-siphon or backflow-prevention features. In other words, your hose should move water out of the problem, not back into your kitchen.
Way 3: Make a Small Straw or Self-Starting Siphon
Now for the fun-size version. This method is perfect for demonstrating the principle of a siphon, moving a small amount of water, or impressing kids, classmates, or skeptical relatives who believe physics should be more boring.
What You Need
- One bendy straw, or two straws connected together
- Tape or modeling clay if you are joining straws
- A tall container of water
- A second container placed lower
How to Make It
- If one straw is not long enough, connect two straws and seal the joint tightly with tape or modeling clay.
- Place the long end into the tall container of water.
- Cover the short end with your finger.
- Position the short end over the lower container.
- Release your finger quickly.
- If you made a longer version with both ends underwater, the water should keep flowing until the levels equalize.
How the Self-Starting Version Differs
You can also shape connected bendy straws into an “M” or similar multi-bend path. When inserted quickly into the water, the liquid can shoot over the first bend and then continue over the second, creating a self-starting siphon without sucking on the tube. It is clever, a little fussy, and very satisfying when it works.
Best Uses
This method is not for draining a hot tub or pretending you are a one-person irrigation department. It is best for demonstrations, experiments, tiny transfers, and learning exactly how important a good seal is. With small siphons, even a minor gap can let in enough air to kill the flow.
How to Troubleshoot a Siphon That Refuses to Behave
The water will not start flowing
The tube probably is not fully primed, or the outlet is not low enough. Refill the tube, remove trapped air, and make sure the discharge end is clearly lower than the source water level.
The water starts, then stops
You likely have an air leak, a loose connection, or the intake end rose above the water surface. Check all seals and keep the intake submerged.
The flow is weak
A narrower tube, shorter height difference, or extra bends can reduce flow. A larger diameter hose and a greater drop usually improve performance. Think of it as giving gravity a better slide.
The siphon breaks halfway through
If the liquid level in the source falls below the intake, the siphon stops. Same story if a bubble reaches the wrong place. Once the liquid column is broken, you usually have to prime again.
When a Siphon Is the Right Tool
A siphon shines when you need to move safe liquid from a higher place to a lower one without using electricity. It is great for aquarium water changes, draining a container, transferring rain barrel water, or moving water around a yard or workshop. It is not ideal when the source and destination are level, the outlet is higher, or the liquid is hazardous and requires specialized equipment.
Safety Rules That Deserve to Be in Bold
Never mouth-siphon gasoline, solvents, chemicals, sewage, or unknown liquids. In fact, do not mouth-siphon anything unless you enjoy risky decisions and unpleasant surprises. Use priming methods that keep your face out of the equation.
Do not connect homemade siphons in ways that could contaminate drinking water lines. Backflow prevention matters. Water is helpful, but only when it is going the correct direction.
Watch the discharge area. A siphon can keep running longer than expected, and water has a real talent for finding the one place you definitely did not want it to go.
Final Thoughts
Making a siphon is not complicated, but making a reliable siphon is all about respecting the details. The tube must be full, the outlet must be lower, and the seals must stay tight. Once those pieces are in place, the whole thing feels delightfully low-tech and almost suspiciously effective.
If you want the easiest all-purpose method, go with the basic water-filled hose. If you want a cleaner, more controlled setup, build the valve-filled garden hose version. If you want a fun demonstration or a small DIY trick, the straw siphon is the clear winner. Three ways, one principle, and zero need to beg a pump for attention.
Extra Experience: What I Learned the Hard Way About Making a Siphon
The first time I tried to make a siphon, I treated it like one of those “how hard could it be?” jobs. You know, the kind that begins with confidence and ends with wet shoes. I had a bucket of water, some tubing, and the deeply optimistic belief that gravity would be so impressed by my initiative that it would do the rest. Gravity was not impressed. Gravity wanted a proper setup.
My first mistake was not filling the tube completely. I thought “mostly full” was close enough. It was not. The siphon gave me a dramatic little burp of water, then stopped like it had clocked out for lunch. That was the day I learned the column of water needs to be continuous. Air is not a team player in this situation.
The second lesson came from height. I had the source bucket on a chair and the discharge end in another bucket that was, technically speaking, lower-ish. Apparently, “lower-ish” is not a scientific measurement. Once I dropped the outlet farther down, the siphon suddenly worked like it had been waiting for me to take the hint.
Then there was the aquarium episode. If you have ever used a siphon around gravel, fish, and a bucket that somehow migrates away from the hose, you know the setup can feel like a slapstick routine. I learned to secure the hose in the bucket, keep the intake angled properly, and move slowly. Fast hands look cool in movies; in real life they just spook the fish and splash your floor.
The valve-filled hose method was the one that made me feel like I had finally matured as a siphon user. No pinching both ends with my fingers. No trying to carry a full hose like a waiter balancing soup on a trampoline. Filling the hose from a faucet, shutting both ends, and then placing it where I wanted gave me a clean, reliable start. That method taught me a bigger lesson: most “clever hacks” become much better when you add a little control.
The straw siphon was the most fun and the most humbling. It looked ridiculously simple, which is exactly why it was so easy to underestimate. If the seal was even slightly loose, the whole thing failed. If I released my finger too slowly, it failed. If the cups were not positioned well, it failed. But when it finally worked, it was one of those tiny victories that makes you want to call someone over and say, “Look at this! Physics is showing off again.”
Overall, the biggest takeaway is that siphons reward patience more than force. You do not bully them into working. You set the conditions correctly, remove the air, give the liquid a continuous path, and let gravity handle the rest. It is one of the rare DIY tasks where being precise matters more than being strong. Also, keeping a towel nearby is not admitting defeat. It is wisdom.


