Table of Contents >> Show >> Hide
- Quick Jump
- Why Wires Curve in the First Place
- Safety & Prep (The “Future-You Will Be Grateful” Section)
- Method 1: Tension-Pull (The “Make It Behave” Method)
- Method 2: Roll-It-Flat (Boards, Hardboard, or a Smooth Surface)
- Method 3: Drill-and-Twist (Fast, Effective, and Slightly Magical)
- How to Choose the Best Wire Straightening Method
- Troubleshooting Stubborn Kinks
- When You Should Replace the Wire Instead
- Wrap-up
- Hands-on Experience: from the Wire Trenches
- SEO Tags
You know that moment when you pull wire off a spool and it immediately tries to become a slinky again? Congratulationsyour wire has “memory,” and it’s using it to remember every bad decision it ever made. The good news: you don’t need a fancy shop machine to straighten a wire. You need a little physics, a tiny bit of patience, and the willingness to say, out loud, “No. We are being straight today.”
Below are three easy, beginner-friendly wire straightening methods that work for everything from jewelry wire and head pins to coat hangers, copper grounding wire, and light-gauge fence wire. Pick the method that matches your wire type, your tools, and your tolerance for drama.
Why Wires Curve in the First Place
Most wire comes coiled because coils are compact, shippable, and generally not trying to spear anyone in transit. But when wire sits in a coil, it “learns” that shape. That’s wire memory: the metal has been bent and stored that way, so it naturally wants to spring back into that curve when you unroll it.
Add to that work hardeningevery time you bend, twist, or aggressively “convince” wire to change shape, you can make it stiffer and less forgiving. That’s great if you want a rigid component. Not great if you want the wire to relax. The goal with straightening is to use controlled force (tension, rolling pressure, or gentle twisting) to remove the coil set without creating new dents, kinks, or weak spots.
Safety & Prep (The “Future-You Will Be Grateful” Section)
- Wear eye protection if you’re using a drill or pulling hardwire can whip if it slips.
- Use gloves for heavier gauge wire or rough finishes (galvanized wire can be… spicy).
- Inspect first: If the wire has sharp kinks, deep nicks, or damaged insulation, straightening may not be wise.
- If it’s electrical wire: power off, double-check, and don’t “rehab” a wire that looks compromised.
One more pro tip: decide how straight you truly need. Jewelry wire for a clean wrap? Pretty straight. A coat hanger for a quick hook? “Straight-ish” is a respected engineering standard in many garages.
Method 1: Tension-Pull (The “Make It Behave” Method)
If you only learn one technique, make it this: controlled tension. Pulling wire under steady tension can remove gentle curves and help flatten that coil memory. This method is simple, effective, and doesn’t require specialty toolsjust a secure anchor.
Best for
- Coat hanger wire
- Copper grounding wire
- Galvanized craft/fence wire (light to medium gauge)
- Longer lengths that won’t fit comfortably between boards
What you’ll need
- A bench vise or a sturdy clamp/anchor point (even a heavy workbench leg can work)
- Pliers (linesman’s pliers, locking pliers, or strong flat-nose pliers)
- Optional: a short dowel/rod or screwdriver handle (for a comfortable pulling grip)
Step-by-step
- Anchor one end of the wire in a vise or clamp it securely to something that won’t move.
- Grip the free end with pliers, or wrap the wire once around a smooth handle (like a screwdriver) so your hand isn’t doing all the suffering.
- Pull steadilynot a jerk, not a panic yankjust a firm, consistent pull along the wire’s length.
- Check straightness every few pulls. If it’s improving, you’re winning. If it’s getting worse, you’re inventing modern art.
- Stop before you thin the wire. Over-pulling can slightly reduce diameter in some wires or create weak spots.
Bonus variation: the “2×4 hole” straightener
For wire that’s kinked but not deeply damaged, you can turn a scrap block of wood into a surprisingly effective hand tool: drill a hole slightly larger than the wire diameter in a short piece of 2×2 or 2×4, thread the wire through, anchor the far end, and pull the wood block along the wire like you’re flossing a very stubborn metal tooth.
Common mistakes
- Overstretching: If you pull like you’re starting a lawnmower, you may permanently alter the wire.
- Using bare steel pliers on soft jewelry wire: That’s how you get bite marks (on the wire, and possibly your soul).
- Ignoring sharp kinks: Tension can hide a kink, not heal the damage underneath.
Method 2: Roll-It-Flat (Boards, Hardboard, or a Smooth Surface)
Rolling is the quiet overachiever of wire straightening methods. It’s low-tech, low-risk, and weirdly satisfying: you sandwich the wire and roll it back and forth, smoothing curves out the way you’d roll a clay “snake” in art class except now you’re an adult, and your snake is metal.
Best for
- Short to medium lengths
- Jewelry wire (sterling, gold-filled, copper craft wire)
- Wire that’s slightly wavy rather than sharply kinked
What you’ll need
- Two flat boards (or two pieces of hardboard)
- A hard, flat surface (workbench, tabletop, or a smooth floor you don’t mind using)
- Optional: soft/nylon jaw pliers for a quick pre-straighten
Step-by-step
- Pre-straighten the worst bends with soft jaw/nylon jaw pliers or gentle hand pressure. Don’t aim for perfectjust reduce obvious waves.
- Place the wire on a hard surface and cover it with a second board (like a sandwich, but not delicious).
- Press down on the top board and roll back and forth along the wire’s length.
- Increase pressure gradually. The wire will respond better to “consistent coaching” than “sudden bullying.”
- Rotate the wire a quarter turn and repeat if one side still wants to curve.
Surface alternatives (if boards aren’t handy)
- Hardboard or smooth plywood: Great grip without scratching most craft wire.
- Glass or polished metal: Very smooth, but can be slipperyuse controlled pressure.
- A heavy ruler: Useful for small-gauge wire in a pinch (the “I swear this is fine” method).
Rolling shines when you want a clean, even straightness without twisting the wire. It’s also kinder to soft metals when compared to aggressive pulling or drillingespecially if surface finish matters.
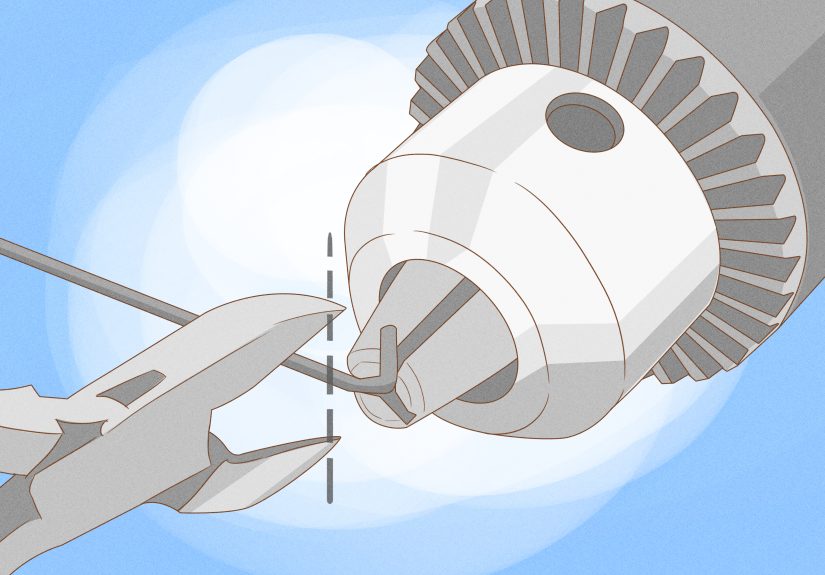
Method 3: Drill-and-Twist (Fast, Effective, and Slightly Magical)
This is the “wow, that worked” method. By applying tension and controlled rotation, you can cancel out the wire’s coiled set quickly. It’s especially handy for long wire lengths that arrived looking like they’ve been practicing interpretive dance inside the package.
Best for
- Long, coiled wire
- Heavier solid copper wire (like #12-ish range)
- Wire that needs to be “rod-straight” for a project
What you’ll need
- A drill (corded or cordless)
- A vise or strong anchor point
- Eye protection (seriously)
- Optional: a helper to keep things aligned
Step-by-step
- Anchor one end of the wire in a vise.
- Clamp the other end in the drill chuck, centered and tight.
- Pull the wire taut so it’s straight under tension. Keep it aligned with the drill, not off at an angle.
- Run the drill slowly. You’re not blending a smoothielow speed gives you control. The wire will twist slightly and straighten dramatically.
- Stop early rather than late. If you over-twist, the wire can start forming new waves or become overly work-hardened.
- Release tension carefully and re-check straightness. Repeat in short bursts if needed.
Safety notes (because wire is sneaky)
- Keep bystanders back: A slipping wire can whip like it has a personal vendetta.
- Don’t use high RPM: Fast rotation increases the risk of whipping and uneven twisting.
- For insulated/magnet wire: protect the coatingavoid serrated jaws, and don’t drag wire across rough edges.
Optional upgrade: roller straighteners
If you straighten a lot of wire, you’ll eventually meet roller straightenerstools with grooved rollers or bearings that intentionally bend the wire in alternating directions so it comes out straight. You don’t need one for casual DIY, but it’s helpful for high volume or very consistent results.
How to Choose the Best Wire Straightening Method
Here’s a simple way to decide without overthinking it (because overthinking is how we end up owning three sets of pliers we can’t explain).
If surface finish matters (jewelry wire, decorative wire)
- Start with nylon/soft jaw pliers or rolling between boards.
- Avoid steel jaws directly on soft wire unless you like “texture” in the form of teeth marks.
If the wire is thick and springy (copper, coat hangers, light fence wire)
- Use tension-pull first.
- If it’s long and coiled, move to drill-and-twist for speed and straightness.
If the wire is short (under a couple feet)
- Roll-it-flat is often the cleanest and safest option.
If it has sharp kinks
- Try gentle corrections, but be realistic: sharp kinks can be structural damage, not just “a bend with feelings.”
Troubleshooting Stubborn Kinks
Problem: The wire looks straight… until you let go
That’s coil memory coming back for an encore. Increase tension slightly (Method 1) or add a short, slow twist (Method 3). For soft metals, rolling (Method 2) often reduces spring-back without overworking the wire.
Problem: You removed the curve but created a new “S” shape
Usually a sign of uneven force: you pulled at an angle, rolled with pressure on one side, or twisted too aggressively. Reset with gentle rolling, rotating the wire frequently so you don’t “teach” it a new favorite curve.
Problem: The wire got scratched or marred
Switch to nylon jaw pliers, add tape to your jaws, or use boards/hardboard. For jewelry work, protecting the finish is half the battle.
Problem: The wire has a sharp kink that won’t disappear
Some kinks are permanent deformation. You can reduce the visual bend, but the metal at that point may be weakened. If the wire is load-bearing, structural, or electrical, replacement is often the smarter play.
When You Should Replace the Wire Instead
Straightening is greatuntil it isn’t. Replace the wire if you notice any of the following:
- Electrical wire with damaged insulation, deep nicks, crushed spots, or severe kinks.
- Heavily work-hardened wire that’s cracking, flaking, or feels brittle.
- Heat-risk situations: If the wire will carry meaningful current, damaged sections can become hotspots.
- Critical fit/finish: If your project needs perfect straightness (like a visible rod), start with better stock.
Translation: If your wire looks like it survived a tiny bar fight, don’t make it responsible for important jobs.
Wrap-up
Straightening a wire isn’t complicatedit’s just a small battle between physics and your patience. Use tension-pull when you need simple power, rolling when you want clean results, and drill-and-twist when you want to straighten a long coil fast.
The best method is the one that fits your wire type and your goal. The second-best method is whichever one you try next after muttering, “Okay, fine,” and giving the wire one more chance.
Hands-on Experience: from the Wire Trenches
The first time I tried to straighten wire, I assumed it would behave like rope: pull it taut, and voilàstraight. Wire does not share rope’s optimistic personality. Wire is more like a cat. It will do what it wants, and if you try to force it, it will remember your tone.
My earliest “project” involved craft wire for a quick plant trellis. I unspooled it, held it up proudly, and watched it form a beautiful, elegant curvecompletely unrelated to the straight line I requested. I tried hand-straightening by running it through my fingers. That helped, but only in the same way that politely asking a raccoon to leave your trash helps: a little, briefly, and mostly in your imagination.
What finally worked was learning the difference between bending and resetting. If you simply bend wire back and forth, you can create a new set of waves. But if you apply steady tension (Method 1), you’re essentially telling the wire, “We’re going to stretch out this drama until it runs out of energy.” I started anchoring one end in a vise and pulling with locking pliers. The first time I did it correctly, the wire straightened so dramatically I checked the room for witnesses.
Then came jewelry wire and head pins, where I learned a second lesson: straight isn’t the only goalpretty matters. Steel pliers left tiny marks that were invisible until the light hit them at the worst possible angle (usually under “final photos” lighting). Nylon jaw pliers changed everything. Pulling wire through soft jaws felt almost too easy, like cheatingbut the finish stayed clean, and my work stopped looking like it had been handled by a small, angry robot.
The drill-and-twist method (Method 3) was my “why didn’t anyone tell me this sooner?” moment. The key, in my experience, is going slow and staying aligned. If you pull at an angle or spin too fast, you can introduce a new wobble. But with light tension and a slow trigger, long coiled wire goes from “phone cord from 1998” to “actually usable” in seconds. The first time I tried it, I got overconfident, over-twisted, and created an accidental spiral that would’ve been perfect for a modern sculpture titled Hubris. After that, I started using short burstsspin, stop, check, repeat.
The biggest practical takeaway: don’t pick a method based on what looks coolest on the internet. Pick it based on what you’re making. If the wire is decorative, protect the surface. If it’s structural, avoid hidden weak points. If it’s electrical, treat damage like a stop sign, not a suggestion. And if the wire keeps fighting you, it’s okay to admit defeat and start with better materialsome victories are just buying the right wire in the first place.
Finally, I’ve learned to keep a “wire straightening corner” in my workspace: nylon jaw pliers, a scrap board, and a clear spot near the vise. Because wire projects rarely begin with, “I have perfectly straight wire.” They begin with, “Why is this doing that,” followed by, “I’m sure I can fix it,” followed by, “Okay, I can fix it… safely.”


