Table of Contents >> Show >> Hide
- Why Dessert Bars Are the MVP of Sweets
- 14 Dessert Bar Recipes to Bake on Repeat
- 1. Classic Lemon Bars
- 2. Fudgy Brownie Bars
- 3. Magic Cookie Bars (Seven-Layer Bars)
- 4. Raspberry Oat Crumble Bars
- 5. Blueberry Crumb Bars
- 6. Salted Caramel Pecan Bars
- 7. Carmelitas (Oatmeal Caramel Chocolate Bars)
- 8. Cheesecake Swirl Bars
- 9. Peanut Butter Chocolate No-Bake Bars
- 10. S’mores Bars
- 11. Blondie Bars
- 12. Nanaimo Bars
- 13. Apple Pie Crumble Bars
- 14. Cookies-and-Cream (Oreo) Bars
- Tips for Making Dessert Bars Like a Pro
- Real-Life Experiences with Dessert Bars (Extra Tips & Inspiration)
If you’ve ever stared down a mixing bowl and thought, “I want dessert, but I refuse to scoop 48 individual cookies,” dessert bars were invented for you. These easy treats pack all the flavor of cakes, cookies, and pies into one pan that you slice into tidy squares. They’re perfect for potlucks, bake sales, school events, and those “I invited people over and forgot about dessert” moments.
Across popular U.S. food sites, bakers agree on a few things: dessert bars are easier than layer cakes, feed a crowd with minimal work, and come in every flavor imaginablefrom classic lemon and gooey chocolate to nutty caramel and tangy fruit. They’re also wonderfully forgiving, which is exactly what we want from a weekday dessert.
Why Dessert Bars Are the MVP of Sweets
Compared with cakes and individual cookies, bars are gloriously low-maintenance. Most recipes come together in one bowl, bake in a 9×13-inch pan, and slice into anywhere from 12 to 36 servings. That simplicity makes them a go-to recommendation for everything from potlucks and school bake sales to lunchbox treats and holiday dessert tables.
Many popular recipes online highlight a few shared strengths:
- Big-batch friendly: One pan can feed a crowd without doubling or tripling a recipe.
- Easy to transport: Bake, cool, cover, and carry the whole pan to your event.
- Flexible layers: Shortbread crusts, oat crumbles, brownie bases, and cheesecake toppings are all fair game.
- Endless flavors: Brownies, blondies, fruit crumbles, no-bake cheesecake bars, and more.
Let’s dive into 14 delicious dessert bar ideas inspired by the most-loved recipes on major U.S. food and baking sitesthen we’ll talk real-life tips to help your bars look bakery-level without bakery-level stress.
14 Dessert Bar Recipes to Bake on Repeat
1. Classic Lemon Bars
Lemon bars are the sunshine of the dessert bar world. A buttery shortbread crust supports a silky lemon custard that’s baked until just set, then dusted with powdered sugar. Popular versions typically rely on fresh lemon juice and zest for bright, tangy flavor and a simple crust of flour, butter, and sugar.
For the best texture, bake the crust first so it firms up before you add the lemon filling. Chill before slicing so the custard sets cleanly, giving you sharp edges instead of lemon lava.
2. Fudgy Brownie Bars
Brownies are technically a bar cookie, which makes them automatic dessert bar royalty. Modern recipes emphasize a fudgy texture: lots of cocoa or melted chocolate, enough butter, and minimal mixing once the flour goes in. Overmixing introduces too much air and leads to cakey browniesgreat for some people, but not for hardcore fudge fans.
Swirl in peanut butter, cheesecake batter, or caramel, or top with chocolate chips for extra decadence. Underbake by just a minute or two for that shiny, crackly top and gooey center.
3. Magic Cookie Bars (Seven-Layer Bars)
Also known as seven-layer bars, these nostalgic favorites usually start with a graham cracker crust, then pile on chocolate chips, butterscotch chips, coconut flakes, and chopped nuts. A can of sweetened condensed milk gets poured over everything, binding the layers into a sticky, chewy, crunchy masterpiece.
They’re famous for being almost impossible to mess up. Press the crust firmly so it doesn’t crumble, and line the pan with parchment for easier removal. Let them cool completely before cutting or you’ll end up with “magic cookie piles” instead of bars.
4. Raspberry Oat Crumble Bars
Raspberry oat bars are basically fruit crumble you can hold in your hand. Most popular versions use a simple mixture of oats, flour, butter, and brown sugar as both the base and the crumb topping, sandwiching a layer of raspberry jam or thick fruit filling in between.
They’re an easy way to transform store-bought jam into something that looks like you spent hours baking. Swap in apricot, strawberry, or mixed berry jam if that’s what you have on hand.
5. Blueberry Crumb Bars
Blueberry crumb bars lean a little more “pie-like” than raspberry oat bars. A buttery base supports a juicy blueberry filling (often made with fresh or frozen blueberries tossed with sugar, lemon, and a bit of cornstarch), topped with a crumbly streusel layer.
The key is striking a balance between juicy and soggy: cornstarch or flour in the filling thickens the blueberry juices as they bake, so you end up with slices that hold together but still feel juicy and soft.
6. Salted Caramel Pecan Bars
Think of these as pecan pie in bar form, with a bonus drizzle of caramel and a sprinkling of flaky sea salt. Popular versions use a shortbread or pastry-style crust, topped with a mixture of pecans, brown sugar, butter, eggs, and sometimes sweetened condensed milk or caramel sauce.
They’re rich, sweet, and sticky, so the salt is more than decorationit balances the sweetness and makes the flavors pop. They’re ideal for holidays when you want that pecan pie flavor but don’t want to fuss with rolling a crust.
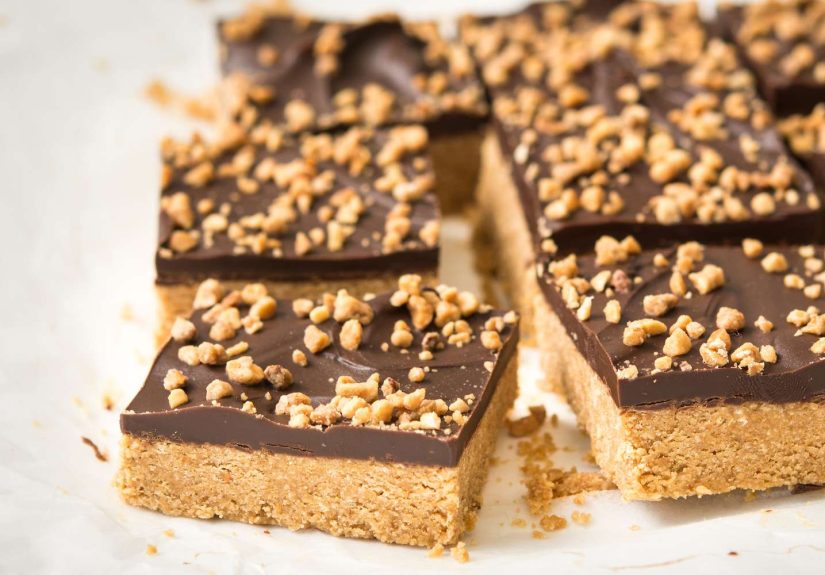
7. Carmelitas (Oatmeal Caramel Chocolate Bars)
Carmelitas are beloved oat-based dessert bars layered with chocolate chips and gooey caramel. Most recipes call for an oat and brown sugar crust, a silky caramel layer (often made with caramel candies and cream or a jarred sauce), and a generous sprinkle of chocolate chips and pecans.
The trick is to partially bake the base, pour on the caramel and chocolate, then crumble more oat mixture on top. As they bake, you get a buttery, chewy, caramel-loaded treat that’s a guaranteed crowd-pleaser.
8. Cheesecake Swirl Bars
Cheesecake bars give you all the creamy richness of cheesecake with none of the stress of water baths or springform pans. Many recipes start with a graham cracker crust or a cookie crumb base, topped with a simple cheesecake batter made from cream cheese, sugar, eggs, and vanilla.
To level up, swirl in raspberry, strawberry, or chocolate sauce. Bake until just set with a slight jiggle in the center, then cool completely in the pan. Chilling overnight gives the best flavor and textureand makes cutting clean squares much easier.
9. Peanut Butter Chocolate No-Bake Bars
No-bake dessert bars are the heroes of hot days and busy weeks. A classic no-bake combo uses peanut butter, crushed graham crackers or cookies, powdered sugar, and melted butter for the base, topped with a smooth chocolate-peanut butter layer.
You press everything into a pan and chill instead of baking. The result tastes like a peanut butter cup in bar form. They’re especially handy when you need to whip something up fast for a potluck or after-school snack.
10. S’mores Bars
S’mores bars capture campfire vibes without smelling like smoke. Typical versions incorporate a graham cracker crust or cookie base, a layer of chocolate, and mini marshmallows on top. Some recipes mix the marshmallows into the batter; others broil them at the end for a toasty finish.
To avoid a sticky mess when cutting, let the bars cool slightly after broiling the marshmallows, then use a well-oiled knife. They’re messy in a charming, “worth it” kind of way.
11. Blondie Bars
Blondies are like brownies’ butterscotch-obsessed cousins. Instead of cocoa, they rely on brown sugar and butter for flavor, sometimes enhanced with vanilla or a hint of espresso powder. Chocolate chips, white chocolate chunks, nuts, or toffee bits are common add-ins.
Many U.S. bakers use blondie bars as a base recipe and riff endlesslyswirling in Nutella, adding M&M’s for a bake sale, or folding in chopped cookies. They’re perfect when you want something rich and chewy but not chocolate-dominant.
12. Nanaimo Bars
Nanaimo bars may be Canadian by birth, but they’ve become a favorite dessert bar in many U.S. kitchens. They feature three distinct layers: a chocolate-coconut-crumb base (often with nuts), a custardy or buttercream middle, and a glossy chocolate topping.
They’re usually no-bake, though they do require chill time to set each layer. The reward is a bar that’s sweet, creamy, and just a bit chewy, with a nice textural contrast between the soft filling and the firm chocolate topping.
13. Apple Pie Crumble Bars
Apple pie bars bring all the cozy flavors of apple pie into a simpler format. A sturdy crust (shortbread or pastry-style) supports sliced apples tossed with sugar and warm spices like cinnamon and nutmeg, then topped with a crumb or oat streusel.
They’re amazing served slightly warm with a scoop of vanilla ice cream. Many bakers like to use tart apples for balancethink Granny Smith or a mix of sweet and tart for more complex flavor.
14. Cookies-and-Cream (Oreo) Bars
Cookies-and-cream bars are a hit with kids and adults. Common approaches include a crushed chocolate cookie crust with a cheesecake-style filling loaded with chopped sandwich cookies, or a blondie base packed with cookie chunks.
They’re visually strikingthose black-and-white speckles look great on a dessert trayand they deliver a fun mix of creamy and crunchy textures. Just be warned: these disappear fast at parties, so you may want to make a double batch.
Tips for Making Dessert Bars Like a Pro
Once you master a few basics, you can customize almost any dessert bar recipe to suit your taste or whatever’s in your pantry.
Use the Right Pan and Liner
Most dessert bar recipes are designed for a metal 9×13-inch pan. Glass and ceramic pans can bake more slowly and brown differently, so keep an eye on timing. Line the pan with parchment, leaving overhang on two sides, so you can lift the entire slab out and slice on a cutting board.
Don’t Overbake
Baked bars often continue to set as they cool. For brownies and blondies, a toothpick with a few moist crumbs (not wet batter) is perfect. Fruit bars should bubble at the edges, and cheesecake bars should still have a slight jiggle in the center.
Chill Before Cutting
Many barsespecially cheesecake, lemon, and caramel-heavy recipesslice much more neatly when chilled. Let them cool to room temperature, then refrigerate until firm. Use a sharp knife and wipe it clean between cuts for picture-perfect squares.
Plan for Storage and Freezing
Most dessert bars store well at room temperature for a day or two in an airtight container. Many also freeze beautifully. Slice, freeze on a tray, then transfer to a freezer bag. You’ll have an emergency stash of dessert ready for surprise guests or “I need something sweet right now” situations.
Real-Life Experiences with Dessert Bars (Extra Tips & Inspiration)
After you’ve made a few of these dessert bar recipes, you start to pick up small tricks that don’t always make it into the recipe cardbut make a huge difference in real life. Here are some hard-earned lessons and experiences from countless pans of bars baked for parties, potlucks, and “oops, I said I’d bring dessert” scenarios.
1. The Bake Sale Test
If you’re baking for a school or charity event, you quickly learn which dessert bars sell the fastest. Bright lemon bars dusted with powdered sugar and anything loaded with chocolate tend to disappear first. Magic cookie bars and brownies are the classic crowd-pleasers, while more adventurous flavors (like Nanaimo bars or chai-spiced blondies) attract curious foodies.
One smart strategy is to make a familiar pan (like brownies) and one pan that’s a little different (like raspberry crumble bars). That way you satisfy both the “safe choice” shoppers and the people hunting for something new.
2. Transporting Without Drama
Taking dessert bars on the road teaches you about structural integrity very quickly. Gooey caramel bars or extra-fudgy brownies can slide around if they’re too warm. Let your bars cool completely, then chill them before transport. A snug-fitting lid or tight foil helps keep everything in place.
For long drives or outdoor events, fruit crumble bars, blondies, and oat-based bars tend to hold up better than delicate cheesecake bars. If you’re bringing cheesecake or mousse-style bars to a summer picnic, pack them in a cooler and set them out closer to serving time.
3. Scaling for a Crowd
Once people know you’re “the dessert bar person,” requests escalate quicklyoffice parties, family gatherings, neighbors dropping hints. The good news: dessert bar recipes are easy to double. Two 9×13-inch pans will usually fit on the same oven rack, or you can bake in batches.
When doubling, pay attention to oven hot spots. Rotate pans halfway through baking so one corner doesn’t overbake while the other is still raw. Fruit and caramel bars especially benefit from this, since those fillings can bubble unevenly.
4. Kid Helpers and “Choose-Your-Own” Mix-Ins
Dessert bars are incredibly kid-friendly because most steps involve stirring, sprinkling, and pressing rather than delicate shaping. Let kids help press graham cracker crusts, scatter chocolate chips, or arrange sliced fruit on top of a base layer.
A fun trick is to set up a “mix-in station” for blondie or cookie bar batter: bowls of chocolate chips, chopped nuts, crushed cookies, and candies. Everyone can sprinkle their favorites into one side of the pan. When it’s done, you’ll have a pan of bars with slightly different flavors in each sectionlike a dessert bar flight.
5. Figuring Out Your Signature Bar
Over time, most home bakers develop a signature dessert bar they’re known for. Maybe it’s a raspberry oatmeal bar with a hint of orange zest, or a brownie layered with salted caramel and pretzels. The base usually starts from a reliable recipe; the “signature” comes from small tweakslike extra vanilla, a splash of espresso, a different nut, or a finishing sprinkle of flaky sea salt.
If you want your bars to stand out, pick one or two flavor notes to emphasize. For example, lean into citrus by adding zest to both crust and filling, or double down on texture with a crunchy topping over a fudgy base. You don’t need a dozen tricksjust one thoughtful twist can turn a great bar into your bar.
6. When Things Go Wrong (And How to Save Them)
Even experienced bakers have off days. Maybe your lemon bars are too soft to slice cleanly, or your brownies baked a little too long and turned cakey. The nice thing about dessert bars is that they’re incredibly forgiving.
- Too soft? Chill longer, then cut and serve in paper liners as “soft squares” or even spoon over ice cream.
- Too dry? Warm slightly and serve with ice cream, whipped cream, or a quick drizzle of chocolate or caramel sauce.
- Messy layers? Rebrand as “dessert bar crumble” and serve in bowls. People will assume it’s intentional.
At the end of the day, most people care more about flavor than perfect edges. A slightly crooked, gooey bar that tastes incredible will always win over something that looks perfect but tastes bland.
7. Building Your Own Dessert Bar Lineup
When you’re planning a dessert spread, variety is key. A smart lineup might include:
- One chocolate-heavy bar (brownies, carmelitas, or s’mores bars)
- One tangy bar (lemon, lime, or berry)
- One nutty or caramel bar (pecan bars or magic cookie bars)
- One “fun” bar for kids (cookies-and-cream or candy-loaded blondies)
With four pans, you can easily cover a big partyand most likely earn a reputation as the person whose dessert bars always disappear first.


