Table of Contents >> Show >> Hide
- What “Bathtub Trim” Actually Means (and Why It Looks So Good)
- Pick Your $10(ish) Trim Method
- Tools and Materials (Keep It Simple)
- The Secret Sauce: Prep Work (Don’t Skip This)
- How to Install Peel-and-Stick Bathtub Trim (Option A)
- How to Install PVC Quarter Round Bathtub Trim (Option B)
- Common Mistakes (So You Don’t Redo This Next Weekend)
- Maintenance: Keep It Looking Fresh
- FAQ
- Extra: of Real-World Experiences (What DIYers Commonly Run Into)
- Conclusion
If your bathtub is rocking that “new floor, old vibes” lookaka a weird little gap where the tub meets the floor, peeling caulk, or a sad edge that collects lint like it’s training for the Olympicsthis is your sign. You don’t need a full remodel. You need a tiny glow-up with a big payoff: bathtub trim.
This guide walks you through a quick, budget-friendly bathtub trim upgrade you can knock out in an afternoon. The goal: a cleaner edge, a more finished look, and fewer places for water to sneak into trouble. And yes, we’re doing it in “about $10” territorybecause your bathroom deserves nice things, but so does your wallet.
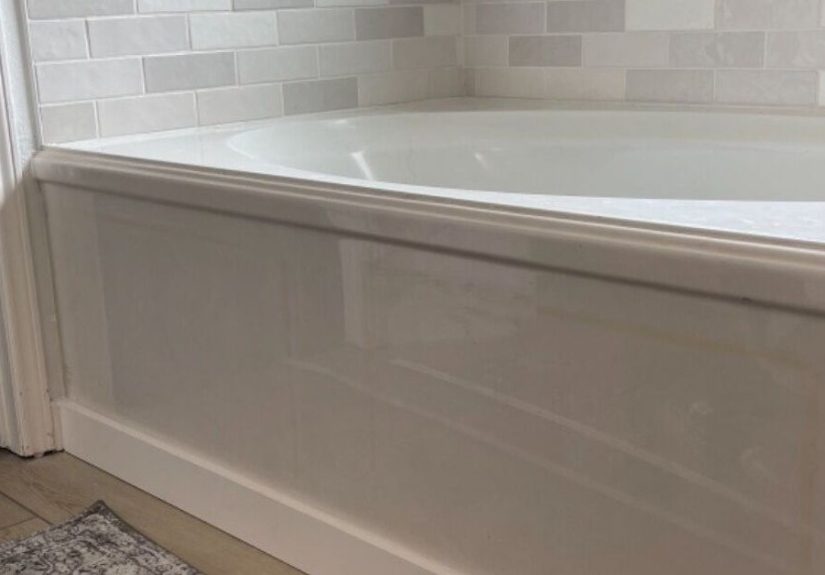
What “Bathtub Trim” Actually Means (and Why It Looks So Good)
“Bathtub trim” is a simple finishing strip installed along the bottom edge of the tub (or tub apron) where it meets the floor. It’s not structural. It’s not fancy. It’s basically a tiny border that says, “I have my life together,” even if your hairbrush is currently living in the sink.
Done right, bathtub trim can:
- Hide small gaps between the tub and flooring
- Make flooring installs look finished (especially after vinyl/LVP updates)
- Reduce splash creep and help keep edges cleaner
- Give your bathroom a “mini remodel” vibe without the mini mortgage
Pick Your $10(ish) Trim Method
There are two main budget-friendly ways to get this look. Your choice depends on the gap size, how curvy your tub is, and how committed you are to “perfect lines.”
Option A: Peel-and-Stick Caulk Strip (Fastest, Simplest)
This is a flexible waterproof strip with adhesive backing. You press it into place along the seam, and it creates a clean, bright edge. Great for renters (with caution), quick refreshes, and smaller gaps.
- Best for: small gaps, straight runs, quick cosmetic wins
- Typical cost: around $8–$15 for one roll (prices vary)
- Look: clean, modern, slightly “seal” style
Option B: PVC Quarter Round / Shoe Molding (Most “Built-In” Look)
A thin piece of water-resistant trim (often PVC) installed at the tub’s base, then sealed with a neat bead of bathroom-grade caulk. It looks more like real finish carpentrybecause it is, just on a tiny scale.
- Best for: slightly larger gaps, a more traditional finished edge
- Typical cost: about $4–$12 for trim, plus sealant if needed
- Look: classic, “the builder totally meant to do this” energy
Budget reality check: If you already have a caulk gun or leftover sealant, staying near $10 is easy. If you’re buying every tool from scratch, your “$10 makeover” becomes a “$10 plus a few helpful things you’ll own forever” makeover. Still a win.
Tools and Materials (Keep It Simple)
For Peel-and-Stick Caulk Strip
- Peel-and-stick caulk strip
- Rubbing alcohol and a clean rag (for prep)[1]
- Scissors or a utility knife (use carefully)
- A plastic smoothing tool or an old gift card
For PVC Quarter Round / Shoe Molding
- PVC quarter round or PVC shoe molding
- Miter box + hand saw (or a small miter saw if you already own one)
- Bathroom-rated silicone or kitchen/bath sealant
- Painter’s tape (optional, but it makes you look like a pro)[2]
- Rubbing alcohol + rag for cleaning[1]
The Secret Sauce: Prep Work (Don’t Skip This)
The difference between “wow, that looks amazing” and “why is it peeling like sunburn” is prep. Most trim failures happen because the surface wasn’t clean, dry, or free of old residue.
Step 1: Remove Old Caulk and Gunk
If you have peeling or moldy caulk, remove it first. A plastic scraper helps reduce the risk of scratching. If residue hangs on, use a caulk remover product per label directions.
Step 2: Clean Like You Mean It
Wipe the joint down thoroughly. Many pro guides recommend rubbing alcohol to remove residue and oils before re-caulking, then letting the area dry completely[1]. If you’re using silicone, some guides also note mineral spirits can help remove silicone residue (always follow product guidance).
Step 3: Dry Time Is Not a Suggestion
Adhesives and sealants hate moisture. Let the area dry well before installing trim or applying caulk[1]. If your bathroom stays humid, run the fan or open a window to speed things up and reduce lingering moisture[6].
How to Install Peel-and-Stick Bathtub Trim (Option A)
This is the fastest route to a cleaner bathtub edgeand it’s friendly for beginners.
- Measure the run. Start with the long side of the tub. Cut a strip slightly longer than needed so you can trim for a tight fit.
- Dry-fit first. Place it without removing the backing to confirm placement and corner alignment.
- Peel gradually, press firmly. Peel a small section of backing at a time and press as you go. This helps prevent crooked lines and trapped bubbles. Many install guides recommend working in short sections so you don’t have to reposition once it sticks.
- Smooth it down. Use a smoothing tool or gift card to press the strip into the seam and along the edges for maximum contact.
- Trim corners neatly. For inside corners, you can overlap and cut a clean seam. For outside edges, cut at a slight angle for a tighter look.
Pro Tips for Peel-and-Stick Trim
- Warm rooms help adhesion. If your bathroom is cold, adhesion can suffer. (No need to get dramaticjust avoid installing on an icy morning.)
- Avoid heavy water exposure immediately. Give the adhesive time to bond before you blast it with a long shower.
- Use it where it makes sense. This method is great for cosmetic sealing, but it’s not a substitute for fixing real leaks or water damage.
How to Install PVC Quarter Round Bathtub Trim (Option B)
If you want the most “finished” look, PVC trim plus a clean bead of sealant is the move. PVC is popular in damp areas because it resists water better than bare wood.
Step 1: Measure and Plan Your Corners
Measure the length of each tub side that meets the floor. Decide whether you’ll do: butt joints (straight cuts that meet) or mitered corners (angled cuts for a cleaner corner look). For most DIYers, mitered corners look sharper but require more careful cutting.
Step 2: Cut the Trim
Use a miter box and hand saw for clean angles without fancy tools. Dry-fit each piece as you go. If the tub apron has a slight curve, consider using flexible trim designed for curvesor keep the trim to straight sections where it sits flush.
Step 3: Tape for Crisp Lines (Optional but Gorgeous)
Painter’s tape along the top edge line helps create a neat boundary, especially if you’ll be caulking the top seam. Many DIY caulking guides suggest tape for straighter, cleaner resultsand removing it while caulk is still wet[2].
Step 4: Attach the Trim
For wet areas, choose an adhesive/sealant that bonds well and stays flexible. Products made for PVC trim can work well for trim-to-surface bonding, and some are designed to both adhere and seal (check compatibility with tub and flooring surfaces).
Apply a thin, consistent bead behind the trim. Press it into place. Use painter’s tape to hold it while it sets if needed.
Step 5: Seal the Edges
Once trim is in place, run a small bead of kitchen-and-bath sealant along the top edge where trim meets the tub (and optionally along the bottom edge). For a cleaner bead, cut the nozzle at a 45-degree angle and apply steady pressure as you move[3]. Smooth the bead with a tool or gloved finger.
Silicone and kitchen/bath sealants vary in “water-ready” time and full cure time. Some products advertise water-ready in as little as about 30 minutes, but full curing can take longer depending on humidity, ventilation, and formula[4][5].
Common Mistakes (So You Don’t Redo This Next Weekend)
1) Caulking Over Old Caulk
New caulk doesn’t reliably bond to old, especially if the old bead is silicone or contaminated. Removing the old material and cleaning the surface improves adhesion and longevity[1].
2) Installing on Damp Surfaces
Moisture is the enemy of adhesion. Dry the area thoroughly before you install anythingand reduce bathroom humidity with a fan or open window when possible[6].
3) Using the Wrong Sealant
For wet zones, many guides recommend silicone because it stays flexible and resists water better than typical latex caulk. Some kitchen-and-bath silicones also market mold-resistant protection for bathroom conditions[4].
4) Leaving a Messy Bead
Caulk looks best when it’s smooth and consistent. Taping edges can help create crisp lines and makes cleanup easier[2]. Also: less caulk than you think. You’re sealing a seam, not frosting a cupcake.
Maintenance: Keep It Looking Fresh
Once your trim is installed, keep it looking sharp with a few easy habits:
- Ventilate after showers (fan or window) to reduce moisture buildup[6].
- Wipe the tub edge occasionally so soap scum doesn’t become permanent architecture.
- Check corners every few monthscorners are where small failures start.
FAQ
Will this stop a real leak?
This project is best for cosmetic gaps and light water control at the edge. If water is getting behind the tub, into the wall, or under the floor, you need to address the source (plumbing, waterproofing, failed surround, etc.).
Is this renter-friendly?
Peel-and-stick trim can be renter-friendly, but removal may take effort and could affect paint or finishes. Always test a small area first and follow your lease rules. PVC trim with adhesive is usually more permanent.
How long will it last?
With proper prep and the right sealant, a cleanly installed edge can last a long time. Humidity control matters: keeping moisture down helps prevent mold and helps sealants stay in better shape[6].
Extra: of Real-World Experiences (What DIYers Commonly Run Into)
The funniest thing about a “quick bathtub trim project” is how often it reveals the bathroom’s secret personality. DIYers tend to start with a confident, “This will take 20 minutes,” and end with a new understanding of geometry, humidity, and the fact that no wall in America is truly straight. Here are a few common experiences people reportand the lessons that save time and frustration.
Experience #1: The Gap Is Bigger Than You Thought. A lot of homeowners notice the problem when they install new vinyl plank or LVP and suddenly the tub edge looks… unfinished. Once the old baseboard or shoe molding is gone, the gap can be more visible. The fix is choosing the method that matches reality: peel-and-stick strips look best on small seams, while PVC quarter round can cover a slightly larger gap without looking like a bandage. The lesson: measure the widest part of the gap (often near the tub’s center) and pick trim that covers it comfortably. If you choose trim that barely covers the gap, you’ll spend the whole install fighting for coverage and end up with a “why is there still a crack?” mood.
Experience #2: Corners Will Humble You. Corners are where neat projects go to get messy. DIYers often find that a perfect 45-degree miter doesn’t look perfect once the tub edge and floor line don’t meet at a perfect angle. A practical workaround is focusing on clean, tight fits and using a tiny, smooth bead of sealant to visually “blend” small imperfections. Painter’s tape helps a lot here, because it creates a crisp line even if the corner isn’t mathematically perfect.
Experience #3: Adhesion Problems Usually Trace Back to Prep. People who’ve tried to “just stick it on” over soap scum, damp surfaces, or old caulk residue tend to see edges lift firstoften within days. The common lesson is that cleaning and drying are the actual project, and installing trim is the reward. Wiping down with rubbing alcohol and letting the area dry fully sounds boring, but it’s the difference between a trim that stays put and a trim that peels like a sticker on a water bottle.
Experience #4: The Bathroom Fan Is the Unsung Hero. In bathrooms that stay humid, caulk cures slower, corners stay damp longer, and mold returns faster. DIYers often report better long-term results when they run the fan after showers, crack a window when possible, and keep the edge wiped down. It’s not glamorous, but neither is scraping mildew on a Saturday.
Experience #5: The “$10 Makeover” Feeling Is Real. Even when the total cost creeps a little above ten bucks, people consistently say the visual payoff is huge. That single clean line at the tub base makes floors look more intentional, makes the tub look newer, and upgrades the whole room’s vibewithout changing a fixture. It’s the kind of tiny improvement that makes you stand in the doorway and think, “Okay… this bathroom is doing better.”
Conclusion
A $10-ish bathtub trim upgrade is one of those rare DIY projects that’s fast, affordable, and surprisingly dramatic. Whether you go peel-and-stick for speed or PVC trim for a built-in finish, the keys are the same: clean prep, smart measuring, and a tidy seal. Your bathtub edge can absolutely look finishedwithout a full renovation, without a contractor, and without you learning what “demo day” really means.


