Table of Contents >> Show >> Hide
- Why the Wind Waker boat hits so hard
- Choose your build style
- What you’ll need for the tabletop model
- Step-by-step: Make your Wind Waker watercraft
- 1) Pick a size (and save future-you’s sanity)
- 2) Sketch the silhouette and build a simple pattern
- 3) Build the hull (foam board “sandwich” method)
- 4) Shape and smooth: where the magic starts
- 5) Add the deck and cabin details
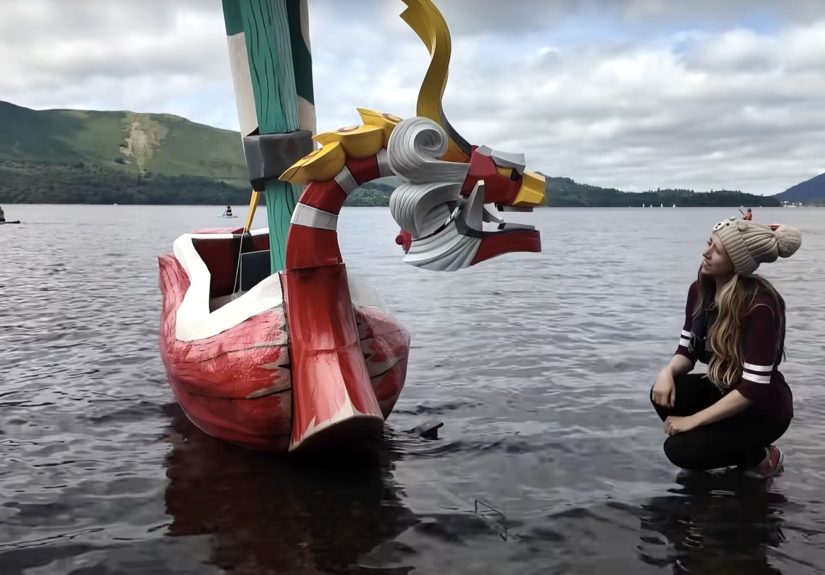
- 6) The prow figure: your “wow” moment
- 7) Mast and sail: make it look like it’s catching wind (even indoors)
- 8) Prime and paint: the cel-shaded cheat code
- 9) Seal it (and choose your vibe)
- Make it display-ready
- Common mistakes (and how to dodge them like a pro)
- FAQ
- Conclusion: Build the boat, keep the wonder
- Experiences: What it’s like to make a Wind Waker watercraft (and why people get emotional about it)
There are two kinds of people in this world: those who saw The Legend of Zelda: The Wind Waker and thought,
“Aw, cute boat,” and those who immediately thought, “I must build that boat and sail directly into my feelings.”
If you’re here, you’re probably the second kind. Welcome. We have sea spray, craft glue, and a healthy respect for
sharp blades.
This project is a maker-friendly guide to creating a Wind Waker–inspired watercraftmost famously, a display model
of the King of Red Lionsthat looks like it sailed straight out of the Great Sea and into your living room.
You can keep it as a tabletop showpiece, hang it as a ceiling mobile, or level up into a floating (or even RC) build
if you’re feeling brave and have towels nearby.
Why the Wind Waker boat hits so hard
The Wind Waker “boat” isn’t just transportationit’s a character. It has a bold silhouette, bright color blocking,
and that iconic prow that looks like a mythical creature decided to become nautical. The design is also beautifully
“readable”: big shapes, crisp edges, and clean patterns that translate well to DIY builds.
That’s good news for makers. If you can cut clean lines, paint confidently, and resist the urge to “add one more detail”
until it becomes a tiny, floating dissertationthis project will love you back.
Choose your build style
Before you touch a ruler, decide what kind of maker day you’re having. Here are three build paths, from “cozy craft night”
to “I own epoxy and I’m not afraid to use it”:
Option A: Tabletop display model (recommended)
- Best for: Most people. Looks great, low risk, no plumbing required.
- Materials: Foam board or XPS foam, craft foam/EVA, dowel mast, fabric or heavy paper sail.
- Finish: Acrylic paint + clear coat.
Option B: Lightweight “con-safe” cosplay prop
- Best for: Carrying in photos without destroying your back or your friendships.
- Materials: EVA foam sheets, contact cement, flexible primer, lightweight fabrics.
- Finish: Flexible paints/sealers to avoid cracking.
Option C: Float-capable build (advanced)
- Best for: Makers who hear “waterproofing” and smile instead of blinking slowly.
- Materials: XPS foam or sealed foam board, fiberglass/epoxy or marine-safe sealers, ballast.
- Finish: Marine-grade topcoat; careful testing in a tub before any heroic voyages.
What you’ll need for the tabletop model
The list below keeps it practical and forgiving. Substitute based on what you already havethis is DIY, not a courtroom.
Core materials
- Foam board (3/16″) or XPS insulation foam (for more carving control)
- Craft foam/EVA foam sheets (2–6 mm) for trim and raised details
- Wooden dowel (mast) + thin rod/skewer (boom or supports)
- Fabric scrap (cotton works well) or heavy paper for the sail
- Cardstock for patterns and stencils
Adhesives & coatings
- PVA glue (white glue) for paper/card
- Hot glue for quick tack (use sparinglyfoam can warp)
- Foam-safe contact cement (especially for EVA)
- Primer: gesso or a foam-safe primer
- Clear coat: matte/satin for “game look,” gloss for “freshly launched”
Tools
- Sharp craft knife + extra blades (dull blades tear foam like a tiny villain)
- Metal ruler, cutting mat, pencil
- Sandpaper (120–220 grit) or sanding sponge
- Paint brushes + optional foam brushes
- Optional: heat gun (for shaping EVA), rotary tool (for carving details)
Step-by-step: Make your Wind Waker watercraft
1) Pick a size (and save future-you’s sanity)
Choose a finished length that fits your display space. A sweet spot is 12–18 inches long:
big enough for crisp paint details, small enough to finish without turning your dining table into a shipyard for three weeks.
Tip: If you plan to add a stand, include it in your size thinking now. Nothing is sadder than a gorgeous boat that can’t sit down.
2) Sketch the silhouette and build a simple pattern
You don’t need perfect blueprintsthis art style forgives slight stylization. Focus on big shapes:
hull profile, deck line, the prow figure, and mast placement.
- Draw a side profile on cardstock (one “master” template).
- Mirror it for the other side so your hull doesn’t look like it sailed into a doorframe.
- Mark anchor points: bow, stern, mast hole, deck height.
3) Build the hull (foam board “sandwich” method)
For a clean, sturdy hull, make a layered core:
- Cut two identical side profiles from foam board.
- Cut internal ribs/spacers (think: cardboard skeleton) to set the width.
- Glue ribs between the sides, keeping everything square.
- Add a bottom plate to close the hull.
If you’re using XPS foam, you can carve the hull as a single block for smoother curves. Either way, you’re aiming for a
bold, slightly rounded formnot hyper-realistic shipwright perfection.
4) Shape and smooth: where the magic starts
Use sandpaper to soften edges and refine curves. Wind Waker designs love clean transitions:
crisp enough to look graphic, rounded enough to look friendly. Like a cartoon shark with a skincare routine.
- Sharp corners: Keep for trim lines and panel breaks.
- Soft corners: Use on the hull’s outer curves and deck edges.
5) Add the deck and cabin details
Cut a deck piece to sit on top of the hull. Then layer details using thin craft foam:
- Raised borders along the deck edge
- Simple panel shapes (rectangles and arcs read well)
- A small cabin/seat form if you want extra dimension
This is where restraint pays off. Big shapes first. Fancy bits later. The sea is not impressed by impatience.
6) The prow figure: your “wow” moment
The prow is the iconic face of the build. Make it as a separate piece so you can refine it without threatening the whole hull.
- Start with stacked foam shapes: a base wedge + rounded forms.
- Carve/sand into a smooth, stylized animal-like head.
- Add layered trim with craft foam for bold outlines.
- Cut eye shapes as insets or raised pieces depending on your style.
Pro tip: Take a photo of your prow in black-and-white. If the silhouette reads clearly without color,
you’re on the right track.
7) Mast and sail: make it look like it’s catching wind (even indoors)
Drill or poke a clean hole for the mast. Glue the dowel in place with enough depth to stay vertical.
For the sail, you have two great approaches:
- Fabric sail (best): Cut a sail shape, hem the edges with fabric glue, and lightly weather with diluted paint.
- Paper sail (fast): Use heavy paper, gently curve it over a round object, then seal it so it holds the shape.
To create that “wind-filled” look, attach the sail with a subtle curvedon’t leave it hanging flat like a sad napkin.
8) Prime and paint: the cel-shaded cheat code
Wind Waker aesthetics are all about clean color blocking. Prime first so paint doesn’t soak or look patchy.
Then work in layers:
- Base coats: Lay down your main hull colors in smooth, even passes.
- Shadow lines: Use slightly darker tones at panel edges to mimic toon shading.
- Highlight edges: Add lighter accents where light would catchespecially along trim.
If you want maximum “game pop,” keep outlines crisp. Painter’s tape helps, but burnish the edge gently
so paint doesn’t bleed underneath.
9) Seal it (and choose your vibe)
Clear coat protects the finish and changes the feel:
- Matte/satin: More “animated” and display-friendly.
- Gloss: Looks like it just splashed out of a cutscene (and shows fingerprints like it’s paid to do it).
For float-capable builds, sealing is not optional. Water is patient. It will find your one unsealed seam. Always.
Make it display-ready
Quick stand ideas
- Wood cradle: Two curved supports mounted to a base
- Acrylic rods: “Floating” look without visible bulk
- Wave base: Sculpted foam painted as stylized ocean (instant drama)
Micro-details that add big charm
- Rope lines with twine or waxed cord
- Tiny “metal” accents painted with silver + brown wash
- Weathering along the waterline (light and subtlelike the sea kissed it, not mugged it)
Common mistakes (and how to dodge them like a pro)
Wobbly mast
If the mast leans, reinforce it from inside with extra foam blocks and glue. Don’t “just live with it”
unless you want your boat to look permanently disappointed.
Warped foam board
Too much wet glue or paint can warp foam board. Use thin coats, let layers dry fully, and seal the surface before heavy paint work.
Messy paint edges
The fix: tape + light coats + patience. Also, touch-ups are normal. Even heroes miss a spot.
FAQ
Can I make it actually float?
Yes, but it becomes a waterproofing project first and an art project second. Use a sealed foam core, minimize seams,
and test in a tub before any outdoor adventures. Add ballast low in the hull for stability.
Can I add RC controls?
You canmany makers adapt foam or small hulls for simple RC boats. If you go this route, plan internal space for the battery,
motor, and steering mechanism from the beginning. Retrofitting later is like trying to install a kitchen after you’ve baked the cake.
Am I allowed to sell these?
Fan builds are fantastic for personal use and gifts, but selling replica designs can raise intellectual property issues.
If you want a shop-friendly version, design an “inspired-by” ocean craft with original shapes and motifs.
Conclusion: Build the boat, keep the wonder
The best part of a Wind Waker watercraft build isn’t just the finished modelit’s the moment it starts to look alive.
The prow gets its expression. The sail catches its curve. The paint snaps into that bright, storybook style.
Suddenly you’re not “doing crafts.” You’re building a tiny vessel for nostalgia, adventure, and the very specific joy
of making something that makes other people grin on sight.
Keep it bold. Keep it clean. And if you accidentally glue your thumb to the mast, congratulations:
you have officially joined the proud maritime tradition of learning things the sticky way.
Experiences: What it’s like to make a Wind Waker watercraft (and why people get emotional about it)
Makers who tackle a Wind Waker–inspired boat often describe the first hour as pure optimism and the second hour as
“why is foam board secretly alive?” That’s normal. The early steps are all structuremeasuring, cutting, aligning,
and re-cutting because the ruler slid half a millimeter and suddenly your “symmetry” is a myth told to children.
But something interesting happens once the hull stands on its own: the project stops feeling like materials and
starts feeling like a thing. It’s the same spark people get when a costume finally looks like the character,
or when a baked loaf turns from dough into bread. Progress becomes visible, and that visibility is addictive.
The prow is usually the emotional turning point. Up to that moment, your build might look like a stylish wedge.
Then you add the facethe sculpted lines, the bold eyes, the trim that frames itand suddenly the boat has presence.
Makers often take a quick photo right then (sometimes without meaning to) because it’s the first “I can’t believe
this is working” moment. It’s also the part where you learn the value of stepping away. If the expression looks
slightly off, a ten-minute break and a fresh glance can save you from carving the poor thing into an accidental
sea potato. The best builds aren’t rushed; they’re paced.
Painting is where people either fall in love or briefly question every decision they’ve ever made. The Wind Waker style
looks simple until you try to recreate it. Clean edges take patience. Even coats take restraint. And those crisp,
confident lines? They don’t happen when you’re hungry, tired, or trying to “just finish tonight.”
Makers who enjoy the process often set up a “paint snack” ritualsomething small, something celebratorybecause
it turns the long middle stretch into a pleasant routine instead of a grind. The funny part is that one careful
coat can feel slow, but it’s faster than fixing drips later. The ocean rewards preparation. So does paint.
Another common experience: people underestimate how much the sail changes the whole build. Before the sail, it’s a boat.
With the sail, it’s a story. The curve you give the fabric (or paper) makes it feel like it’s catching wind even
while sitting perfectly still. Makers love that illusion. Some even test different sail shapes like they’re auditioning
curtains for a tiny nautical theater production. And honestly? They kind of are. The sail is the drama. The mast is
the posture. Together, they create motion without movementthe secret sauce of a great display piece.
Finally, there’s the “watcher” effect: people who see the finished model rarely keep it to themselves. Friends lean in.
Kids point. Fellow gamers do the instant recognition grin. Even non-gamers tend to react to the bright colors and
bold silhouette because it reads as playful and handcrafted. Makers often say that’s the best payoffwatching someone
else light up because you built a physical version of a memory. It’s not just fan art; it’s a tiny bridge between
imagination and reality. And whether your boat ends up perfectly polished or charmingly imperfect, it still carries
the same message: you made something joyful on purpose. That’s the real wow.


