Table of Contents >> Show >> Hide
- Why Hang Bikes from the Ceiling?
- Before You Start: Check the Ceiling, Bike Weight, and Clearance
- Tools and Supplies You May Need
- Method 1: Hang a Bike with Simple Ceiling Hooks
- Method 2: Use Two Hooks to Hang the Bike Upside Down
- Method 3: Install a Ceiling Bike Pulley Hoist
- Method 4: Mount a Board Across Ceiling Joists
- Method 5: Use a Ceiling Rail or Sliding Bike Rack
- Method 6: Try a Ceiling-Mounted Claw Hook
- How to Choose the Best Ceiling Bike Storage Method
- Safety Mistakes to Avoid
- How to Protect Your Bike While It Hangs
- Ceiling Bike Storage Ideas for Small Spaces
- Real-Life Experience: What Actually Makes Ceiling Bike Storage Easier
- Conclusion
If your bicycle currently lives in the middle of the garage like a two-wheeled coffee table, you are not alone. Bikes are wonderful on trails, roads, and neighborhood loops, but at home they have a sneaky habit of becoming ankle traps, car-door enemies, and clutter magnets. The good news? The ceiling is probably doing nothing right now except holding up cobwebs and judging your storage choices.
Learning a few simple ways to hang bikes from the ceiling can transform a cramped garage, basement, shed, apartment storage room, or utility space into a cleaner, safer, more organized area. Ceiling bike storage works especially well because it uses overhead space that usually goes wasted. Whether you own one commuter bike, a couple of kids’ bikes, a mountain bike with tires wide enough to frighten a squirrel, or a full family fleet, there is likely a ceiling-mounted solution that fits your space and comfort level.
This guide walks through the most practical methods: screw-in bike hooks, pulley hoists, ceiling rails, sliding bike racks, and DIY wooden support systems. You will also learn how to find ceiling joists, choose the right hardware, protect your bike, avoid common mistakes, and make the setup feel less like a wrestling match with gravity.
Why Hang Bikes from the Ceiling?
The main reason is simple: floor space is precious. A bicycle leaning against the wall may look harmless until you need to park the car, reach the lawn mower, open a freezer, or carry groceries through the garage without performing an obstacle-course audition. Hanging bikes from the ceiling clears walking paths and keeps bikes away from accidental bumps.
Ceiling bike storage is also flexible. You can hang a bike vertically by one wheel, upside down by both wheels, or flat using a pulley system. Some methods are best for daily-use bikes, while others are ideal for seasonal storage. A road bike used every morning should be easy to grab. A beach cruiser that comes out twice a year can live higher overhead without complaint.
Another advantage is protection. When bikes are shoved into corners, pedals scratch walls, handlebars tangle, chains rub against frames, and one falling bike can create a dramatic domino effect. Proper ceiling storage keeps each bike in its own zone. Think of it as giving your bike a parking spot instead of letting it wander the garage like a confused shopping cart.
Before You Start: Check the Ceiling, Bike Weight, and Clearance
Before buying hooks or drilling holes, take a few measurements. First, weigh or estimate the weight of your bike. Most standard adult bikes fall somewhere between 20 and 35 pounds, but electric bikes, cargo bikes, and heavy cruisers can weigh far more. Always choose ceiling bike hooks, hoists, or racks rated above the actual bike weight. If a product says it holds 50 pounds, do not treat that as an invitation to hang a 49.9-pound e-bike and hope for the best.
Next, check your ceiling height. A standard garage ceiling may give enough room to hang bikes vertically or upside down, but a low basement ceiling may require a flatter solution. Measure the bike’s length, handlebar width, and the distance between the floor and the lowest hanging point. If you plan to park a vehicle underneath, open the hatch, trunk, or garage door before deciding where the bike will go. Many storage regrets begin with the sentence, “I’m sure it’ll fit.”
Most importantly, locate the ceiling joists. Ceiling-mounted bike storage should be attached to solid structural wood, not drywall alone. Drywall is great at looking smooth; it is terrible at holding bicycles over your head. Use a stud finder, small test nail, or visible joist pattern in an unfinished garage or basement to confirm where the joists run.
Tools and Supplies You May Need
The exact tools depend on the system you choose, but most ceiling bike storage projects use a similar starter kit. You may need a stud finder, tape measure, pencil, drill, drill bits, ladder, socket wrench, screw hooks, lag screws, ceiling bike hoist kit, mounting rail, or a sturdy 2×4 board. Safety glasses are a smart idea, especially when drilling overhead, because sawdust has a strange talent for falling directly into your eye.
If you are installing screw-in hooks, choose heavy-duty hooks with a rubber or vinyl coating. The coating helps protect rims from scratches. If you are installing a pulley hoist, look for a system with secure locking hardware and hooks that fit both the saddle and handlebars. For multiple bikes, a rail or sliding rack may be more convenient than a row of fixed hooks.
Method 1: Hang a Bike with Simple Ceiling Hooks
Ceiling hooks are the classic solution. They are affordable, easy to find, and surprisingly effective when installed correctly. This method works best in garages, sheds, and basements with exposed joists or accessible ceiling framing.
How It Works
A large hook screws directly into a ceiling joist. You lift the bike and hang it by the front wheel or rear wheel. The bike hangs vertically, with one wheel up and one wheel down. For tighter spacing, you can alternate bikes front-wheel-up and rear-wheel-up so handlebars do not clash like antlers in a very small forest.
Step-by-Step Installation
Start by finding the center of the ceiling joist. Mark the spot with a pencil. Drill a pilot hole slightly smaller than the screw threads on the hook. This makes installation easier and reduces the chance of splitting the wood. Twist the hook into the pilot hole until the threads are fully seated and the hook feels solid.
Test the hook by pulling downward with firm pressure before hanging the bike. Then lift the bike by the frame and guide the rim onto the hook. If you are hanging several bikes, leave enough space between hooks for handlebars, pedals, and shoulders. A spacing of roughly 16 to 24 inches may work for many bikes, but wider handlebars need more room.
Best For
Ceiling hooks are best for lightweight and medium-weight bikes, simple garage organization, and homeowners who want a low-cost solution. They are not ideal if you struggle to lift your bike overhead or if you ride daily and dislike hoisting the bike manually every time.
Method 2: Use Two Hooks to Hang the Bike Upside Down
If vertical hanging makes your bike dangle too low, consider two hooks. With this method, the bike hangs upside down by both wheels. It takes up more ceiling length but usually hangs closer to the ceiling than a vertical setup.
Measure the distance between the front and rear wheel contact points. Transfer that measurement to the ceiling joist or to a mounted 2×4 board. Install two heavy-duty hooks so they line up with the wheels. Lift the bike upside down and place each rim into a hook.
This setup is useful for storing a bike above a workbench, in a shed, or in a garage bay where vertical hanging would drop too low. It also distributes the bike’s weight across two hooks instead of one. Just make sure the bike is stable and that the hooks are deep enough to cradle the rims securely.
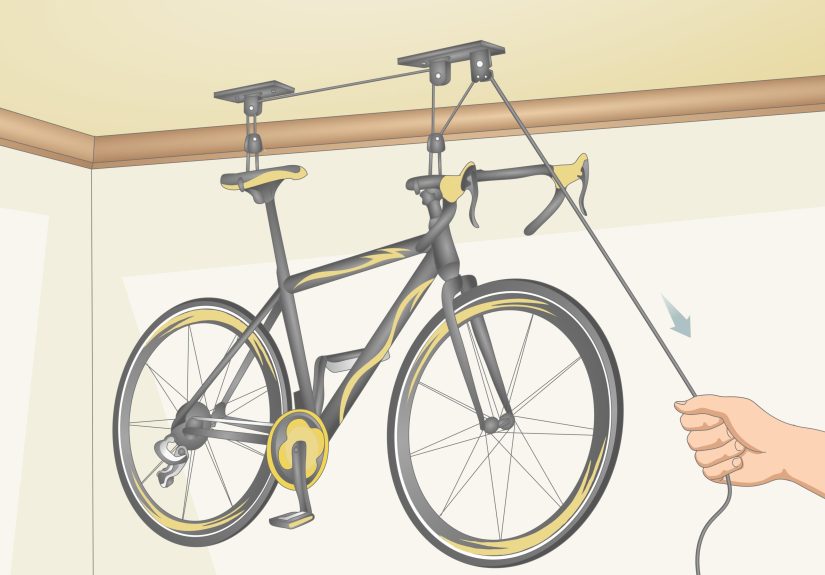
Method 3: Install a Ceiling Bike Pulley Hoist
A ceiling bike hoist is the friendlier option for anyone who does not enjoy deadlifting a bicycle over their head. A hoist uses pulleys and rope to raise the bike flat toward the ceiling. Most systems attach one hook near the handlebar area and another near the saddle, then lift both ends together.
Why a Hoist Is Helpful
Bike hoists are especially useful for high ceilings, heavier bikes, and riders who want a smoother lifting process. Instead of lifting the full bike overhead, you attach the hooks while the bike is near the floor, pull the rope, and raise the bike upward. Many hoists include locking mechanisms to help prevent accidental lowering.
Installation Tips
Measure the distance from the handlebars to the saddle, because the pulley brackets need to match that spacing. Mount the brackets into ceiling joists or into a solid board that is securely fastened across joists. Pre-drill pilot holes, keep the pulleys aligned, and follow the product’s weight limit exactly.
When using the hoist, check that the ropes are not twisted and the hooks are fully seated before lifting. Raise the bike slowly. If it tilts dramatically, lower it and adjust the hook positions. A bicycle swinging overhead is not a storage system; it is a garage chandelier with trust issues.
Best For
A pulley hoist is best for high ceilings, occasional-use bikes, people who prefer less lifting, and garages where bikes can be stored flat above cars or storage bins. It may be less convenient in very tight spaces where ropes and wall cleats get in the way.
Method 4: Mount a Board Across Ceiling Joists
Sometimes the ceiling joists do not run in the direction you need. That does not mean the project is doomed. A common solution is to mount a sturdy 2×4 or 2×6 board across multiple joists, then attach hooks or hoist brackets to the board.
This method gives you more freedom to position hooks exactly where you want them. It is also helpful when storing multiple bikes in a neat row. Fasten the board into at least two joists with appropriate lag screws or structural screws. Then install the hooks into the board, making sure each hook has enough depth and grip.
The board should be straight, solid, and properly anchored. Do not use weak scrap wood, thin trim, or anything that looks like it once belonged to a broken bookshelf. Ceiling bike storage depends on strength, not optimism.
Method 5: Use a Ceiling Rail or Sliding Bike Rack
If you have several bikes, fixed hooks can become annoying. Handlebars overlap, pedals catch, and getting the back bike down may require moving three other bikes first. A ceiling rail or sliding bike rack solves that problem by allowing hooks to move along a track.
Sliding systems are popular with families, serious cyclists, and anyone who has embraced the “N+1” bike philosophy, which means the correct number of bikes is always one more than you currently own. The rail mounts to the ceiling, and individual hooks slide along it. You can push bikes closer together for storage and spread them apart when removing one.
These systems cost more than basic hooks but provide better access and flexibility. They work especially well in long garages, bike rooms, and workshops. As with all ceiling systems, the rail must be fastened into joists or structural supports, not just drywall.
Method 6: Try a Ceiling-Mounted Claw Hook
A ceiling-mounted claw hook is a more polished version of the basic bike hook. Instead of manually placing the wheel into a fixed hook, some claw-style designs use a spring or push-lock mechanism to grab the wheel. You lift the bike wheel into the claw, and the mechanism helps hold it in place.
This can be a good option if you want a cleaner-looking setup or if you dislike balancing the wheel on a plain hook. Claw hooks are often used for single-bike storage in garages and gear rooms. Check the weight capacity and wheel compatibility before buying, especially if you have deep rims, fat tires, or an unusually heavy bike.
How to Choose the Best Ceiling Bike Storage Method
The best way to hang a bike from the ceiling depends on your space, strength, bike type, and how often you ride.
For One Lightweight Bike
A single ceiling hook is usually enough. It is cheap, fast, and effective. Install it into a joist, hang the bike by one wheel, and enjoy your newly reclaimed floor space.
For Multiple Family Bikes
Use a row of hooks, a mounted board, or a sliding rail system. Alternate bike direction to reduce handlebar conflicts. Put kids’ bikes lower or closer to the access point so you are not constantly playing garage Tetris.
For Heavy Bikes
Consider a pulley hoist rated for the bike’s weight. For heavy e-bikes, be extra cautious. Some e-bikes exceed the limits of common ceiling hooks and hoists. Remove the battery before lifting if the manufacturer allows it, and never exceed the stated capacity of the storage system.
For Daily Riders
Convenience matters. If hanging the bike is annoying, you will stop doing it. A low ceiling hook near the garage door or a smooth pulley system may work better than a high overhead setup.
Safety Mistakes to Avoid
The biggest mistake is mounting hardware into drywall only. It may hold briefly, but eventually gravity will file a complaint. Always anchor into joists, rafters, studs, or properly installed structural blocking.
Another mistake is ignoring the garage door path. Open and close the garage door before finalizing the bike location. Also check ceiling lights, storage shelves, attic ladders, vehicle roof racks, and door tracks. A bike suspended in the wrong spot can become a very expensive noise.
Do not hang a dirty or wet bike over items you care about. Tires can drip mud, chains can shed grime, and water can fall onto boxes or tools. If the bike is wet after a rainy ride, let it dry before raising it above your holiday decorations.
Finally, inspect the hardware regularly. Hooks can loosen, ropes can fray, screws can shift, and moving parts can wear. A quick monthly check is much easier than repairing a dented car hood or explaining to your family why the mountain bike tried to join dinner.
How to Protect Your Bike While It Hangs
Use coated hooks whenever possible. Bare metal can scratch rims, especially if the bike moves slightly during storage. For carbon rims or high-end wheels, check the bike or wheel manufacturer’s guidance before hanging by the rim. Many bikes tolerate wheel hanging just fine, but delicate components deserve extra care.
If using a pulley hoist, make sure the hooks do not pinch cables, brake hoses, electronic shifting wires, or accessories. Remove loose bags, water bottles, lights, and computers before hoisting the bike overhead. They have a way of falling at exactly the wrong moment.
Keep bikes away from extreme heat, chemical fumes, and direct sunlight when possible. Garages can be harsh environments. If you store bikes long-term, inflate tires occasionally, clean the drivetrain, and check for rust or corrosion.
Ceiling Bike Storage Ideas for Small Spaces
In a small garage, hang bikes above the hood area of a parked car rather than above the roof, where clearance is usually tighter. In a shed, use the highest wall-to-ceiling area and hang bikes vertically to preserve floor space for tools. In a basement, use two-hook upside-down storage to keep bikes tucked close to exposed joists.
For apartments or rental units, ceiling drilling may not be allowed. In that case, consider freestanding bike stands, tension poles, or wall-leaning racks. They do not provide the same overhead storage benefit, but they avoid security-deposit drama, which is a storage category of its own.
Real-Life Experience: What Actually Makes Ceiling Bike Storage Easier
After dealing with bikes in garages, sheds, and small utility spaces, one lesson becomes obvious: the best ceiling bike storage system is the one you will actually use. A setup can look perfect in a product photo, but if it requires a ladder, three deep breaths, and a motivational speech every time you want to ride, it will eventually become decorative hardware.
The easiest setup for a casual rider is usually a simple rubber-coated hook installed into a ceiling joist near the garage entrance. It is inexpensive, reliable, and quick. For one or two bikes, this method feels almost too simple. The only challenge is lifting the bike high enough to catch the wheel. If the rider is tall and the bike is light, it is a breeze. If the rider is short and the bike is a heavy cruiser, the process feels more like negotiating with a stubborn farm animal.
For families, spacing matters more than people expect. At first, it is tempting to place hooks close together to save every inch. Then the handlebars overlap, pedals hook onto spokes, and removing one bike becomes a puzzle invented by someone who dislikes weekends. Leaving a little extra space between bikes makes the whole system calmer. Alternating front-wheel and rear-wheel hanging also helps because the handlebars land at different heights.
Pulley hoists feel luxurious when installed well. They are especially helpful when the ceiling is high or the bike is awkward to lift. The key is alignment. If the pulley brackets do not match the bike’s saddle-to-handlebar distance, the bike may tilt as it rises. That is not the end of the world, but it is annoying. Measuring carefully before drilling saves a lot of rope-tugging frustration later.
A mounted 2×4 board can be a lifesaver when joists are not where you want them. It also gives the garage a more intentional look, as if the bikes belong there instead of being randomly suspended from the ceiling like trophies from a very strange fishing trip. Painting the board to match the ceiling or wall can make the whole setup look cleaner.
One overlooked tip is to create a “landing zone” below the bike storage area. Keep that patch of floor clear when lowering bikes. Do not place buckets, scooters, toolboxes, or sleeping dogs underneath. When you are tired after a ride, you want the bike to come down smoothly without needing to rearrange half the garage first.
Another practical habit is to hang the most-used bike in the easiest spot. Seasonal bikes, guest bikes, and kids’ outgrown bikes can go higher or deeper into the storage area. The daily commuter or weekend favorite should be the easiest to remove. Storage should support your routine, not punish you for wanting a quick ride.
Finally, ceiling bike storage has a surprisingly positive effect on how a space feels. Once the bikes are overhead, the garage floor suddenly looks bigger. Sweeping becomes easier. Cars fit better. Tools are easier to reach. The entire room feels less chaotic. It is one of those home projects that seems small but delivers an immediate “why didn’t I do this sooner?” moment.
Conclusion
Hanging bikes from the ceiling is one of the simplest ways to reclaim garage or storage space without building an addition, renting a storage unit, or pretending you do not see the clutter. From basic ceiling hooks to pulley hoists and sliding rail systems, there is a solution for nearly every type of bike and every level of DIY confidence.
The most important rule is to mount everything securely into structural framing. Once that is handled, choose a method that matches your bike’s weight, your ceiling height, and how often you ride. Keep the setup easy, inspect it regularly, and give each bike enough room to hang without bumping its neighbors.
Do it right, and your bikes will be safer, your garage will feel bigger, and your shins will no longer live in fear of surprise pedal attacks. That alone is worth a Saturday afternoon with a drill.


