Table of Contents >> Show >> Hide
- Why Simple Animatronic Eyes Work So Well
- What Makes an Eye Mechanism “Simple”
- Core Parts for a Beginner-Friendly Build
- How the Mechanism Usually Works
- Making the Eyes Look Real, Not Robotic
- Controllers, Code, and Motion Strategy
- Common Problems and How to Avoid Them
- Should You Add Eyelids?
- Best Uses for Simple Animatronic Eyes
- Final Thoughts
- Experience Notes: What It Feels Like to Build Simple Animatronic Eyes
- SEO Metadata
There is a special kind of magic that happens when a prop suddenly looks back at you. A cardboard box with LEDs is a gadget. A skull with moving eyes is a personality. That is why simple animatronic eyes are such a favorite in the maker world: they deliver a wildly dramatic payoff without demanding a Hollywood budget, a machine shop, or a secret lair under a volcano.
If you want to build expressive robotic eyes for a costume, creature head, Halloween prop, puppet, or interactive art piece, the good news is that you do not need a terrifyingly complicated mechanism. A smart servo setup, a lightweight eyeball, clean pivot alignment, and sensible programming can take you surprisingly far. In fact, the simplest animatronic eye projects work because they focus on what people actually notice: smooth motion, believable gaze changes, and a blink that does not look like the prop is having an existential crisis.
Why Simple Animatronic Eyes Work So Well
Human beings are hardwired to notice eyes. We can forgive a rough paint job, a slightly lumpy foam head, or a body shape that looks like it came from the “close enough” school of design. But eyes? Eyes are the deadline. Get them wrong and the illusion collapses. Get them right and suddenly your build feels alive.
That is exactly why a simple animatronic eye mechanism is such a smart project. It gives you one of the most emotionally powerful parts of animatronics without requiring a full facial rig. Even a modest two-axis movement system can create lifelike behavior. Add a blink or subtle pause between movements, and the build jumps from “cool electronics project” to “why is that thing staring at me?”
What Makes an Eye Mechanism “Simple”
In maker terms, “simple” does not mean crude. It means efficient. Most successful DIY animatronic eyes rely on a handful of practical design choices:
1. A lightweight eyeball
Ping-pong balls remain a classic for a reason. They are cheap, easy to paint, easy to cut, and light enough that small servos can move them without sounding like they are negotiating overtime.
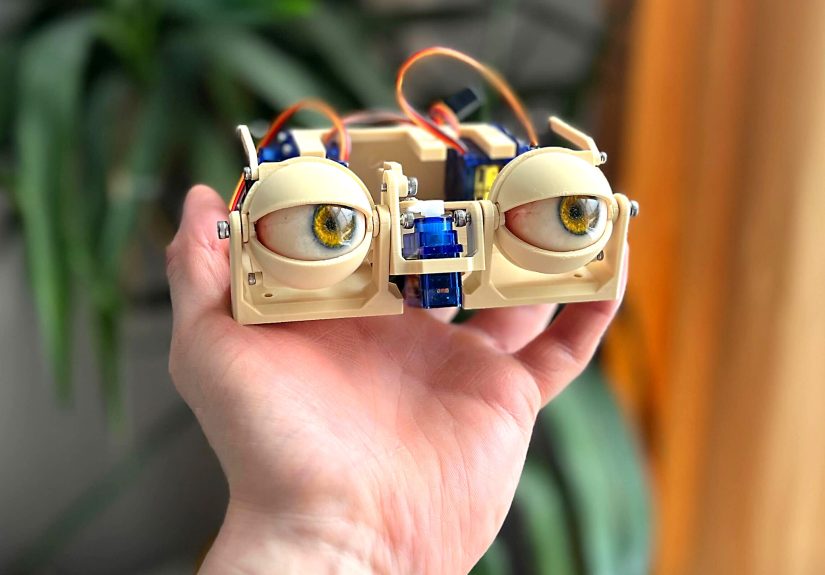
2. Two-axis movement
The core motion is usually left-right plus up-down. That can be done with a gimbal-style arrangement, stacked servos, or a bracket that lets one servo carry another. You do not need a fancy cinematic mechanism to get convincing gaze shifts. You need predictable motion and a pivot that lines up correctly.
3. Minimal linkage drama
Some builds use pushrods, some use cable or pull-pull systems, and some attach the eyeball directly to a servo horn. The simplest route depends on whether you are building a single eye, paired eyes, or an eye-and-eyelid assembly. The fewer loose variables in the linkage, the easier the tuning process becomes.
4. Independent servo power
This part is less glamorous, but it matters. Servo projects get flaky fast when builders try to power everything from a tiny controller board alone. Separate, appropriate servo power helps avoid jitter, brownouts, random twitching, and the classic maker phrase: “It worked five minutes ago.”
Core Parts for a Beginner-Friendly Build
A simple animatronic eyes project can be built with surprisingly accessible parts. The most practical starter setup usually includes:
- 2 to 4 hobby servos, depending on whether you are building one eye or a synchronized pair
- Ping-pong balls, plastic craft eyes, or 3D-printed eyeballs
- Servo horns, brackets, cardboard, thin plywood, or printed mounts
- An Arduino-compatible board or dedicated servo controller
- A separate 5V power source sized for the servos
- Wire, mounting hardware, hot glue, and patience in industrial quantities
If you are new to this space, start with one eye before building a full pair. A single eye teaches the geometry, centering, and code logic without doubling your mechanical headaches. In robotics, as in cooking, it is wise to burn only one thing at a time.
How the Mechanism Usually Works
Most beginner builds follow one of two broad approaches.
Direct-drive stacked servos
This is one of the cleanest ideas for a first build. One servo handles left-right motion, while another carries that axis and handles up-down motion. The trick is making sure the eyeball’s center of rotation lines up with the servo pivots as closely as possible. When the pivot is off, the eye does not rotate cleanly; it wobbles, drifts, or behaves like it is trying to escape.
Gimbal or linkage-based movement
This approach is common in more advanced or paired-eye systems. The eyeball sits in a cradle or pivot arrangement, and the servos drive movement through rods, cables, or arms. It can produce very elegant motion, especially for dual-eye rigs, but it also introduces more adjustment points. That means more realism once dialed in, and more muttering under your breath during assembly.
For beginners, the golden rule is simple: reduce friction, keep the mechanism light, and align pivots carefully. Fancy geometry cannot save a sticky mechanism.
Making the Eyes Look Real, Not Robotic
A lot of builders assume realism comes from extreme mechanical complexity. In practice, it often comes from restraint. The eye mechanism can be basic, but the behavior must feel natural.
Use small, quick gaze shifts
Eyes rarely drift around lazily like a sleepy security camera. Believable eyes make short, purposeful movements, then pause. Quick darts followed by stillness read better than constant sweeping.
Limit the motion range
Just because a servo can travel farther does not mean the eye should. Over-rotation is one of the fastest ways to make a character look cartoony or broken. Constrain the movement so the gaze feels intentional.
Add motion smoothing
Servo motion can look harsh when commanded in big jumps. Interpolated motion, eased transitions, or dedicated servo controllers with speed and acceleration settings make a major difference. A slightly slower start and stop can turn “toy movement” into “creature performance.”
Think in behaviors, not angles
Do not just write code that says “move 35 degrees left.” Think like a performer. Glance. Pause. Track. Blink. Reset. That is what gives robotic eyes their presence.
Controllers, Code, and Motion Strategy
An Arduino-compatible board is still one of the most approachable control options for an Arduino servo eye project. It is inexpensive, well documented, and flexible enough for joystick control, timed routines, sensor-triggered behavior, or pre-scripted sequences.
That said, there are two different control mindsets:
Live control
This is perfect for puppetry, cosplay, and demonstrations. A joystick, gamepad, or external knob lets the operator drive the eyes in real time. The result feels responsive and theatrical.
Automated control
This works best for props, displays, and installations. You can program idle behaviors, random glances, wake-up routines, or sensor-driven tracking. A dedicated servo driver is often useful when multiple servos need consistent timing and stable control.
For larger or more polished builds, a separate servo controller or PWM board can help reduce timing conflicts and keep motion clean. That becomes especially helpful when you add eyelids, head pan, neck tilt, or audio-reactive behavior. In other words, it is the moment the project says, “You thought two servos were enough? That was adorable.”
Common Problems and How to Avoid Them
Servo jitter
Jitter is usually a power problem, a timing problem, or both. Weak power, noisy supply rails, overloaded USB power, and interrupt-heavy code can all create twitchy motion. Clean wiring and proper external power solve more problems than most people expect.
Backlash and slop
If the eye feels loose or inconsistent, check the linkages, mounting rigidity, and gear play. Lightweight materials are great, but floppy mounts are not. A rigid frame beats a clever frame that flexes like a noodle.
Bad centering
Always center the servos before attaching horns and eyeballs. If you skip this, your “straight ahead” position will be permanently weird, and every later adjustment becomes a mechanical group project you did not volunteer for.
Too much weight
Heavy eyelids, dense eyeballs, oversized brackets, and decorative add-ons all increase strain. Keep the moving parts light and let the frame carry the load.
Should You Add Eyelids?
Yes, eventually. But not first.
A blink makes an animatronic build far more expressive, yet eyelids also multiply the complexity. They introduce more servos, more synchronization, and more opportunities for mechanical misalignment. The best path for most makers is to build a reliable two-axis eye first, then layer in a blink mechanism once the gaze movement is smooth.
If your project absolutely needs maximum character, eyelids are worth the effort. A stationary eye can feel eerie. A blinking eye feels aware.
Best Uses for Simple Animatronic Eyes
The beauty of a compact animatronic eye mechanism is how adaptable it is. You can use it in:
- Halloween skulls and monster props
- Creature masks and cosplay heads
- Puppets and theater pieces
- Interactive museum or classroom displays
- Art installations
- Robot heads and expressive desktop companions
This is one of those rare builds that scales well. The same core idea works whether you are making a creepy one-eyed relic for a haunted porch or a polished character head with synchronized lids and tracking behavior.
Final Thoughts
Simple animatronic eyes sit in a sweet spot between craft, robotics, and performance design. They are technical enough to be rewarding, visual enough to impress instantly, and flexible enough for endless customization. Better still, they teach excellent maker habits: careful alignment, lightweight design, motion testing, power planning, and the art of simplifying mechanisms until they do exactly what matters.
The biggest lesson is this: realism does not come from throwing more parts at the problem. It comes from understanding what the audience notices. A clean pivot, a believable pause, a crisp blink, and a quiet power system will beat a complicated mess every single time.
So build the eye. Then build the second one. Then resist, heroically, the urge to put them in every object you own. Or do not resist at all. Frankly, a lamp that makes eye contact sounds memorable.
Experience Notes: What It Feels Like to Build Simple Animatronic Eyes
The first experience most makers have with animatronic eyes is a strange mix of excitement and mild disrespect from the hardware. On paper, it looks easy: a couple of servos, a round eyeball, a bracket, a microcontroller, and some code. In reality, the first evening usually includes a servo horn installed one tooth off-center, an eyeball that points emotionally but not mechanically forward, and a workbench conversation that sounds suspiciously one-sided. That is not failure. That is the normal initiation ceremony.
What surprises many builders is how quickly the project becomes less about electronics and more about behavior. The moment the eye starts moving, you stop thinking like a technician and start thinking like a puppeteer. You notice that one fast glance feels curious while another feels aggressive. A tiny pause can make the character seem cautious. A blink at the wrong moment can make the whole thing look confused, sleepy, or accidentally judgmental. This is where the project gets addictive. You are no longer just assembling parts; you are sculpting personality out of timing.
There is also a very specific satisfaction in solving the mechanical side. When the pivot alignment finally clicks and the eye rotates cleanly without rubbing or drifting, it feels like magic. Before that moment, the mechanism often behaves like a shopping cart with one bad wheel. After that moment, it suddenly moves with purpose. That shift teaches an important lesson: elegant motion usually comes from boring precision. Tiny adjustments matter. A millimeter matters. A horn angle matters. The stiffness of a cardboard bracket matters more than your pride wants to admit.
Another common experience is discovering that power delivery is either your best friend or your favorite recurring villain. Builders often spend an hour rewriting code for a problem that was really caused by weak power or noisy wiring. Then they switch to a proper external supply, and the servos behave as if nothing had ever been wrong. It is a humbling rite of passage. Animatronics has a way of teaching that software gets blamed for many crimes committed by hardware.
The emotional payoff comes when someone else sees the project for the first time. They rarely ask about voltage, PWM timing, or torque. They lean in. They react. They smile, laugh, or step back a little. That reaction is the reward. Good animatronic eyes create presence out of simple materials. A ping-pong ball, a few servos, and some careful programming suddenly hold attention in a way many more expensive projects never do.
Over time, builders also develop a more intuitive sense of motion design. They learn that less is often more, that random movement is not the same as natural movement, and that a character does not need to thrash around to feel alive. The best builds often make tiny choices very well. A glance to the side. A return to center. A blink after a pause. Those details feel surprisingly human.
In the end, working on simple animatronic eyes is one of the best maker experiences because it blends craft and engineering so neatly. It asks you to design, troubleshoot, improvise, and perform. It rewards patience more than brute force. And once you have built a set that works, ordinary objects begin to look suspiciously unfinished without them. That is how the hobby gets you. One day you are testing a single eyeball on your bench. The next day you are wondering whether your bookshelf dragon, desk robot, or Halloween mailbox deserves a gaze system. The answer, of course, is yes.


