Table of Contents >> Show >> Hide
- Why a Trash Can Makes a Surprisingly Perfect Centerpiece Base
- What You’ll Need for Your Fall Trash Can Centerpiece
- Step-by-Step: Turning a Trash Can into a Fall-Inspired Centerpiece
- Step 1: Clean, Dry, and De-Label the Trash Can
- Step 2: Give the Can a Stylish Makeover
- Step 3: Add Weight and Structure Inside
- Step 4: Start with a Focal PointYour “Thriller”
- Step 5: Add “Fillers” for Fullness and Color
- Step 6: Finish with “Spillers” and Small Details
- Step 7: Style It on Your Table or Mantel
- Design Ideas to Match Your Fall Style
- Safety and Practical Tips
- How to Reuse Your Trash Can Centerpiece After Fall
- Real-Life Experiences: What You Learn from Turning a Trash Can into a Centerpiece
If you’ve ever stared at your dining table thinking, “This needs something cute, cozy, and very fall,”
but your budget said, “Please sit down,” this project is for you. Believe it or not, that plain little
trash can or wastebasket hiding in the corner can become the star of your fall table. With a bit of
paint, some faux foliage, and a few clever styling tricks, you can turn a basic bin into a gorgeous
fall-inspired centerpiece that looks like it came straight out of a boutique home decor shop.
Upcycling everyday items into decor is huge right now, from tin cans turned into vases to vintage
trash cans repainted as accent pieces. DIYers love giving “throwaway” objects a second life, and fall
decor is the perfect place to start because it’s all about warmth, texture, and layering. A trash can
might not scream “pumpkin spice” at first glance, but once we’re done, it’ll absolutely whisper,
“I’m the main character.”
Why a Trash Can Makes a Surprisingly Perfect Centerpiece Base
Before we dive into the step-by-step instructions, it helps to understand why a trash can works so
well as the backbone of a fall centerpiece. You’re not just being thrifty; you’re actually being
smart about design.
It Has Built-In Height and Presence
A good centerpiece needs some height to draw the eye, especially on a larger dining table, buffet,
or console. A small wastebasket, wire bin, or metal trash can naturally gives you that vertical
structure. Instead of stacking books or buying an expensive vase, you’re repurposing something you
already own (or snagged for a few dollars at the dollar store or thrift shop).
It’s Sturdy and Easy to Fill
Unlike a delicate vase, a trash can is meant to handle bumps, knocks, and daily life. That makes it
ideal for a centerpiece that might get moved around or surrounded by kids, pets, or clumsy relatives.
The wide opening also gives you plenty of room for floral foam, pumpkins, branches, and other fall
goodies without feeling cramped.
It’s Budget-Friendly and Eco-Conscious
Instead of buying new decor every season, upcycling a trash can keeps one more item out of the
landfill and gives you a custom piece no one else has. You can use a cheap plastic can, a wire
mesh bin, or even a metal can with dents and scratchesthe “before” doesn’t matter. With paint,
fabric, or decoupage, you’ll be amazed at how fancy it can look.
What You’ll Need for Your Fall Trash Can Centerpiece
You can adapt this project to whatever you already have, but here’s a solid starting list. Think of
this as your fall-decor shopping list, whether you’re heading to a craft store, the dollar store,
or your own closet of “I’ll use this someday” supplies.
Choose the Right Trash Can
- Size: A small to medium wastebasket works best for a dining or coffee table. For an entry table or fireplace hearth, you can size up.
- Material: Plastic, metal, or wire mesh are all great. Smooth plastic is easy to paint; metal or mesh adds texture and a farmhouse feel.
- Shape: Cylindrical or gently tapered cans look most like decorative buckets or planters once they’re made over.
Don’t worry if the trash can is ugly. The more boring it looks now, the more dramatic the transformation
will feel when you’re done.
Fall Filler and Decorative Elements
Mix and match to fit your style and color palette:
- Faux fall leaves, eucalyptus, or wheat stems
- Mini pumpkins and gourds (real or faux)
- Faux mums, sunflowers, dahlias, or marigolds
- Berry picks, pinecones, or acorns (real or faux)
- Ribbon, burlap, or twine for wrapping the can
- Battery-operated fairy lights or flameless candles
- Wood slices or a tray to ground the arrangement on the table
Basic Tools and Supplies
- Multi-surface spray paint or chalk paint (in warm fall tones or neutrals)
- Painter’s tape (if you want stripes or color blocking)
- Hot glue gun and glue sticks
- Floral foam or a block of Styrofoam
- Small rocks or pea gravel for weight
- Scissors and wire cutters (for trimming picks and stems)
Step-by-Step: Turning a Trash Can into a Fall-Inspired Centerpiece
Step 1: Clean, Dry, and De-Label the Trash Can
Give your trash can a quick spa day. Wash it with warm soapy water, peel off any stickers, and make
sure it’s completely dry. Paint and glue stick better when you’re not fighting grease or dust, and
you definitely don’t want lingering “old trash can” energy in your beautiful centerpiece.
Step 2: Give the Can a Stylish Makeover
This is where the magic happens. You’re basically turning your trash can into a faux vase or decorative
bucket. Choose one of these approachesor combine them:
-
Painted look: Spray the can with a warm neutral like cream, mushroom, or soft gray.
For a farmhouse feel, lightly distress the edges with sandpaper after it dries. -
Wrapped in texture: Use hot glue to wrap the can in jute rope, twine, or burlap
from bottom to top. This creates a cozy, rustic look that pairs beautifully with pumpkins and leaves. -
Decoupage pattern: Tear or cut pieces of fall-themed napkins, tissue, or fabric
and decoupage them around the can with a clear craft medium. Once dry, it looks like printed,
custom decor. -
Metallic glam: Spray the can with bronze, antique gold, or copper paint. The warm,
lightly reflective finish adds a luxe note that still feels fall-appropriate.
Let everything dry completely according to the paint or glue instructions. This is a great time for a
snack breakor to dig out your stash of faux pumpkins.
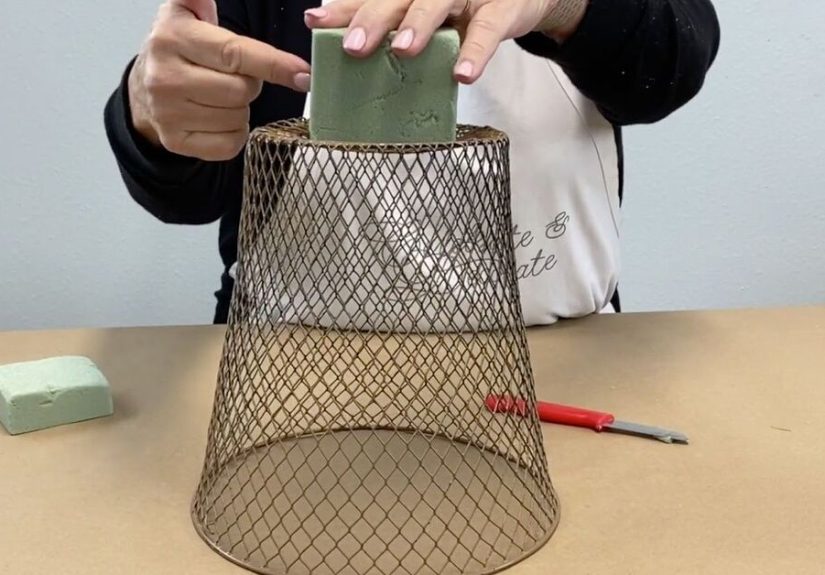
Step 3: Add Weight and Structure Inside
To keep your centerpiece from tipping over, first pour a layer of rocks or pea gravel into the bottom
of the can. Then wedge a block of floral foam or Styrofoam on top. The foam gives you something to
anchor stems and picks into, while the rocks keep everything stable.
If your trash can is quite tall, you can stuff the lower portion with crumpled paper or grocery bags
and keep the foam closer to the top. You only need structure in the top third where the decor will show.
Step 4: Start with a Focal PointYour “Thriller”
In floral design, “thriller” refers to the tall, eye-catching element in an arrangement. For a fall
trash can centerpiece, your thriller could be:
- Several tall branches of faux maple leaves
- Dried wheat or pampas grass plumes
- A cluster of tall stems with small pumpkins or berries
Insert these first, toward the center or slightly off-center for a more modern look. Aim for a height
about 1.5 times the height of the trash can so the arrangement feels generous without blocking everyone’s view at the table.
Step 5: Add “Fillers” for Fullness and Color
Next, fill in around your tall stems with medium-height flowers and greenery. Think mums, sunflowers,
eucalyptus, and leafy branches. Place them at varying angles so the arrangement looks natural rather than stiff.
Work in odd numbersgroups of three or five stemsso your eye moves easily around the centerpiece.
Rotate the can as you go to make sure it looks good from every side, not just the front.
Step 6: Finish with “Spillers” and Small Details
Now for the fun finishing touches. Add elements that cascade slightly over the edge of the can, such as:
- Trailing faux ivy or eucalyptus
- Ribbon tails or strips of burlap
- Berry vines or flexible stems that can drape outward
Tuck mini pumpkins, pinecones, or acorns into gaps at the base of the arrangement. If you’re using
fairy lights, weave them around the stems and let the battery pack hide inside the can or under a
nearby pumpkin on the table.
Step 7: Style It on Your Table or Mantel
To make the centerpiece look intentional (not like “Oh, they put a trash can in the middle of the
table”), give it a little stage:
- Set it on a round wood slice or a woven tray.
- Scatter more pumpkins, leaves, or candles around it.
- Add a runner underneath to frame the whole vignette.
Step back and take a look. Adjust height, fullness, and colors until it makes you want to grab a
sweater and a mug of something warm.
Design Ideas to Match Your Fall Style
One of the best parts about this project is how adaptable it is. With the same basic trash can base,
you can create very different looks just by changing colors and accents.
1. Rustic Farmhouse Harvest Bucket
Paint or wrap your trash can in a soft off-white or warm gray, then add jute rope around the top
rim. Fill it with wheat, cotton stems, and neutral pumpkins in cream and tan. Layer it on a plank
wood tray with a plaid runner for a “chilly-day-on-the-farm” vibe.
2. Colorful Pumpkin Patch Centerpiece
Love color? Go for a rich teal, mustard, or burnt orange can, then stuff it with bold faux sunflowers,
orange and red maple leaves, and bright mini pumpkins. Add a string of warm white fairy lights to make
the colors glow during cozy evening dinners.
3. Moody Halloween-Chic Arrangement
Spray the trash can matte black or charcoal. Use deep burgundy florals, black eucalyptus, and branches.
Add a few white pumpkins for contrast and tuck in a raven or bat pick for a subtle Halloween nod.
Instead of fairy lights, use black or dark purple flameless candles nearby to complete the spooky-but-stylish look.
4. Minimal, Modern Fall Moment
Keep things sleek with a white or soft stone-colored can and a very limited palette: think sage
greenery, a few dried stems, and just one or two pumpkins. This style works perfectly in smaller
spaces or modern apartments where you want fall decor without clutter.
Safety and Practical Tips
- Skip real flames inside the arrangement. Use flameless candles or fairy lights instead of real tealights to avoid fire risk.
- Mind the weight balance. If your stems are heavy or tall, add extra rocks at the bottom so the centerpiece doesn’t tip when someone bumps the table.
- Protect your table surface. If the bottom of the can is rough, stick felt pads or a piece of felt underneath to prevent scratches.
- Think about cleanup. Use faux stems and pumpkins if you want to store and reuse the centerpiece year after year.
How to Reuse Your Trash Can Centerpiece After Fall
One smart bonus of this project: your “trash can vase” doesn’t have to retire after Thanksgiving.
You can easily swap out the contents for winter, spring, and summer:
- Winter: Replace leaves and pumpkins with evergreen branches, pinecones, and a few ornaments or faux snowflakes.
- Spring: Add pastel flowers, faux tulips, and greenery. Tie a fresh ribbon around the can in a light color.
- Summer: Think hydrangeas, lemons, or coastal elements like rope, shells, and blue-and-white accents.
The more seasons you use it for, the more you’ll appreciate that this centerpiece started life as a
humble trash can.
Real-Life Experiences: What You Learn from Turning a Trash Can into a Centerpiece
The first time you turn a trash can into a fall centerpiece, there’s usually a moment where you think,
“This might be a terrible idea.” And then, about halfway through, when the paint dries and the first
few stems go in, you start to see it: this actually looks…legit.
One of the most common “aha” moments people have with this project is realizing how forgiving it is.
Maybe your paint job isn’t perfect, or the rope wrap has a tiny gap in the backthat all disappears
once the arrangement is full and styled. The eye goes straight to the colors and shapes of the flowers
and pumpkins, not the tiny imperfections in the base. In fact, a slightly imperfect finish often makes
the piece feel more vintage and authentic, like something you found in a small-town antique shop.
Another experience people share is just how much personality these centerpieces bring to a room. When
guests ask, “Where did you get that?” and you answer, “It used to be a trash can,” you almost always
get a double take, followed by a laugh and then ideas spinning about what else they could upcycle.
It’s a conversation starter in the best waycharming, a little unexpected, and very on-brand for fall,
a season that already celebrates transformation.
This project also tends to change how you shop for decor. Suddenly, the dollar store trash can aisle
looks like a decor department. Tall wire cans become “textured vases.” Smooth plastic bins turn into
“blank canvases” for chalk paint. Even an old dented metal trash can found at a yard sale can become
the base for a dramatic, rustic arrangement. You stop focusing on what an item is and start thinking
about what it could be with a bit of effort and creativity.
There’s also a practical lesson here: you don’t need a huge budget to create something that feels
special and intentional. A basic can, a couple of cans of paint, and some faux foliage or clearance
stems can give you a centerpiece that feels custom. Many people who try this project realize that
the “designer” part isn’t about the price tag, it’s about the stylinglayering textures, repeating
colors, balancing height, and adding soft lighting.
From a family standpoint, this is an incredibly kid-friendly project. Children love helping choose
pumpkins, stuffing the can with paper for height, or pushing stems into the foam. You can even make
it a yearly tradition: pull out last year’s trash-can centerpiece base and have everyone help “dress
it for fall” with whatever colors or theme your family is loving that year. It becomes more than decor;
it becomes part of your seasonal ritualsright up there with carving pumpkins and baking pies.
Finally, there’s a deeper satisfaction that comes from knowing you made something beautiful out of
something ordinary. In a season already built around gratitude, there’s something extra fitting about
looking at your table and seeing proof that creativity can turn a simple, functional object into a
centerpiece that anchors gatherings, meals, and memories. It’s a quiet reminder that with a bit of
imagination, even a trash can can get its moment to shine.
So, the next time you’re scrolling decor ideas and feeling like everything you love is out of budget,
remember this little hack. You don’t need the perfect store-bought arrangement. You just need a trash
can, some fall stems, and the willingness to try something a little unexpected. The result is a
pretty, fall-inspired centerpiece that feels personal, clever, and totally worthy of a Hometalk feature.


