Table of Contents >> Show >> Hide
- Before You Light Up: Gear, Safety, and Basic Rules
- Method 1: Charcoal Chimney Starter (Fast, Clean, and No Lighter Fluid)
- Method 2: Charcoal Mound (With or Without Lighter Fluid)
- How to Tell When Your Charcoal Grill Is Ready to Cook
- Common Mistakes When Starting a Charcoal Grill (and How to Avoid Them)
- Quick FAQs About Starting a Charcoal Grill
- Real-World Experiences & Extra Tips for Starting a Charcoal Grill
If you’ve ever stared at a pile of stubborn charcoal wondering why nothing is catching fire except your patience, you’re not alone. Starting a charcoal grill can feel like a mysterious art formespecially if you grew up watching someone douse everything in lighter fluid and hope for the best.
The good news? Lighting a charcoal grill doesn’t have to be smoky chaos. With just a few basic tools and two simple methods, you can go from “Why won’t this light?” to “Who wants seconds?” in 20–30 minutes, without bathing your dinner in chemical fumes.
In this guide, you’ll learn two quick and easy ways to start a charcoal grill, plus practical tips for knowing when the coals are ready, managing heat, and staying safe while you’re at it.
Before You Light Up: Gear, Safety, and Basic Rules
Essential tools you’ll want on hand
You don’t need a truckload of gadgets to start a charcoal grill, but a few basics make the job easier and safer:
- Charcoal chimney starter – A metal cylinder with a handle and vented bottom. It’s widely considered the gold standard for lighting charcoal quickly and evenly.
- Charcoal – Either briquettes (more consistent burn) or lump charcoal (hotter, faster, more “natural”).
- Fire starters – Newspaper, natural fire starter cubes, or wax-based starters. Avoid anything that smells like a science experiment gone wrong.
- Long lighter or matches – Keep your fingers away from the flame zone.
- Heat-resistant grill gloves and tongs – You’re moving hot metal and glowing coals. Dress accordingly.
Safety first (yes, really)
Charcoal grilling is fun. House fires are not. A few non-negotiable safety rules:
- Grill outside only – Never use a charcoal grill indoors, in a garage, or any enclosed area. Charcoal produces carbon monoxide.
- Set up on a stable, nonflammable surface – Think concrete or pavers, not wooden decks or dry grass.
- Keep kids and pets at a safe distance – Treat the grill like a campfire: look but don’t touch.
- Have a plan for flare-ups – A lid, vents, and baking soda or sand (not water) can help tame sudden flames.
- Handle food safely – Use a food thermometer and avoid cross-contamination between raw and cooked foods.
Know your grill’s airflow
Charcoal needs oxygen to burn. Most charcoal grills have:
- Bottom vents – Feed oxygen to the coals.
- Top vent (lid vent) – Lets hot air and smoke escape.
Opening vents increases airflow and heat. Closing them reduces heat and can eventually smother the fire. When you’re starting the grill, make sure both top and bottom vents are fully open for maximum airflow.
Method 1: Charcoal Chimney Starter (Fast, Clean, and No Lighter Fluid)
If you only learn one way to start a charcoal grill, make it the chimney starter method. Many grilling experts call it the best, most reliable way to light charcoal without lighter fluid.
Step 1: Set up the chimney
- Remove the cooking grate so you can access the charcoal grate inside the grill.
- Make sure the bottom vents are open all the way.
- Place the chimney starter on the charcoal gratenever on a wooden deck or directly on concrete, which can crack from the heat.
Step 2: Add fuel and fire
- Fill the top of the chimney with charcoal. A full chimney is usually enough for a standard 22-inch kettle grill.
- Under the chimney, place:
- Two loosely crumpled sheets of newspaper, or
- A couple of natural fire starter cubes.
- Light the newspaper or fire starters through the holes at the bottom of the chimney.
As the paper burns, it creates a strong updraft through the chimney, igniting the charcoal from the bottom up. This simple bit of “grill physics” is why chimney starters work so well.
Step 3: Wait for the “ready” signal
Once lit, the charcoal will start turning from black to gray and ashy as it heats up. Most chimney loads are ready in about 10–20 minutes, depending on the type of charcoal and the wind.
You’ll know it’s ready when:
- The top coals are at least partially covered in light gray ash.
- You see a strong glow from the bottom if you peek down the chimney.
Step 4: Pour and arrange the coals
- Put on heat-resistant gloves.
- Carefully lift the chimney by the handle and slowly pour the lit coals onto the charcoal grate.
- Arrange the coals depending on what you’re cooking:
- Even single layer for general grilling (burgers, hot dogs, veggies).
- Two-zone setup with more coals on one side for a hot searing zone and a cooler side for finishing thicker cuts.
Put the cooking grate back in place, close the lid, and let the grill preheat for about 10–15 minutes before cooking so the grates get hot and the temperature stabilizes.
Method 2: Charcoal Mound (With or Without Lighter Fluid)
No chimney starter? No problem. You can still start a charcoal grill using a simple charcoal mound or “pyramid” method. It’s a little less efficient but still effectiveespecially if you don’t mind using a small amount of lighter fluid.
Step 1: Build a charcoal mound
- Open the bottom vents.
- Arrange your charcoal in a tight mound or pyramid in the center of the charcoal grate. The close contact helps coals ignite each other more easily.
Method 2A: Light without lighter fluid
If you want to skip lighter fluid altogether (many grillers do), try this:
- Place a few natural fire starters or a small pile of waxed wood shavings at the base of the charcoal mound.
- Light the starters in several spots.
- Let the flames naturally spread through the charcoal. Add a few coals as needed once the base is glowing.
This takes a bit more patience than a chimney starter but avoids any risk of chemical off-flavors.
Method 2B: Light with lighter fluid (if you choose to use it)
Lighter fluid is controversial because using too much (or using it incorrectly) can leave your food tasting like a gas station. But when used properly and sparingly, it’s still a common method recommended by charcoal brands.
Here’s how to use it safely:
- Check your charcoal type. Do not add lighter fluid to self-lighting (match-light) charcoal, which already has additives.
- Apply a modest amount. Gently squirt lighter fluid over the top and sides of the charcoal mound for about 5–10 seconds (or follow the instructions on the bottle).
- Wait 30 seconds. Let the fluid soak into the charcoal. This helps it burn off more completely.
- Light immediately. Use a long lighter and ignite the mound in several spots.
- Never add fluid to hot or burning coals. This is a serious fire hazard.
Step 2: Let the coals ash over
Whether or not you use lighter fluid, the coals need time to heat up and become cooking-ready. Plan on 15–25 minutes for a typical charcoal mound.
You’ll know the mound is ready when:
- The outer surfaces of most coals are covered in light gray or white ash.
- The flames have died down and you’re mostly seeing glowing coals.
Step 3: Spread and preheat
- Use tongs to spread the coals evenly or into a two-zone setup (hot and cool side).
- Replace the cooking grate, close the lid, and let the grill preheat for 10–15 minutes so the grates get nice and hot.
This preheat step helps prevent food from sticking and gives you those picture-perfect grill marks.
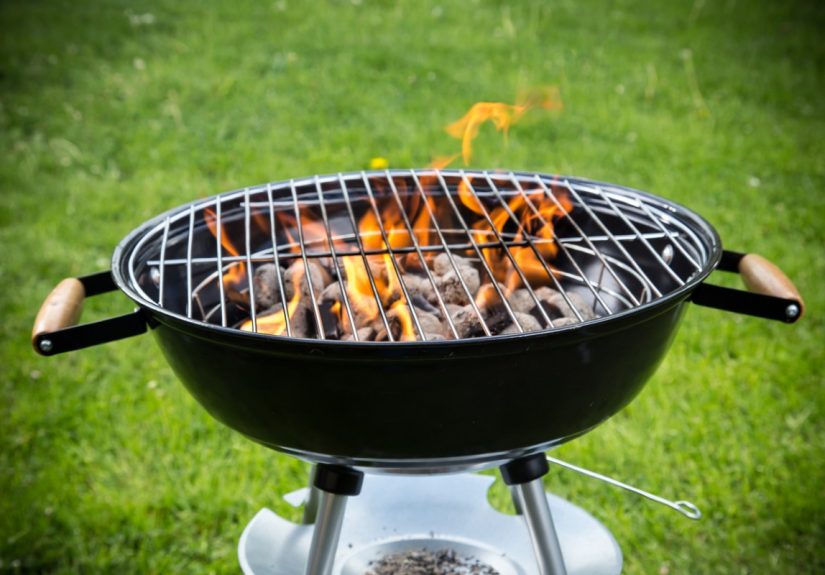
How to Tell When Your Charcoal Grill Is Ready to Cook
Perfectly lit charcoal is a bit like perfectly ripe avocadoyou want to catch it at just the right moment. Too early and your food tastes smoky and bitter; too late and you lose heat.
Visual cues
- Coals are mostly gray or white on the surface.
- You see a steady glow with minimal tall flames.
- Smoke is light and wispy, not thick and billowing.
The “hand test” (no tools required)
Hold your hand palm-down about 5–6 inches above the cooking grate (not directly in a big flame) and count how many seconds you can comfortably keep it there:
- 2–3 seconds – High heat (good for searing steaks).
- 4–5 seconds – Medium heat (great for chicken, pork, and veggies).
- 6–7 seconds – Low heat (perfect for sausages or slow-cooking).
It’s not a lab-grade measurement, but it’s surprisingly accurate and used by many backyard grillers and pros alike.
Common Mistakes When Starting a Charcoal Grill (and How to Avoid Them)
1. Putting food on the grill too soon
This might be the #1 rookie mistake. If you throw burgers on while the coals are still black and shooting flames, you’ll get a scorched outside, undercooked inside, and harsh smoky flavor. Waiting those extra 10–15 minutes for the coals to ash over and the grill to preheat makes a huge difference.
2. Skipping grill cleaning
A dirty grate makes food stick, adds burnt flavors, and can even increase flare-ups. Clean the grates after preheating while they’re hot, using a grill brush or an alternative like a halved onion on tongs.
3. Overusing lighter fluid
If your grill smells like a chemical plant, that’s a sign you’ve gone overboard. Use only a moderate amount, let it soak in, and never re-spray once coals are lit. Or better yet, switch to a chimney starter and skip lighter fluid entirely.
4. Closing the vents too early
Shutting down airflow right when you’re trying to light the grill is like stepping on the hose while you’re filling a bucket. Keep the vents fully open while lighting and preheating. You can always adjust them later to control the cooking temperature.
5. Ignoring wind and weather
Wind can work for or against you. A light breeze helps airflow; a strong gust can blow ash onto food or make lighting difficult. If it’s windy, angle the vents away from the direct gusts, and place the grill where it’s somewhat sheltered.
Quick FAQs About Starting a Charcoal Grill
How long does it really take to start a charcoal grill?
From lighting to cooking, plan on about 20–30 minutes. Roughly 10–20 minutes to get the coals fully lit, and another 5–10 minutes to preheat the grill and grates.
Is a charcoal chimney starter worth it?
Absolutely. Chimney starters are inexpensive, last for years, and let you light charcoal quickly without lighter fluid. Many serious grillers consider them essential gear.
Can I reuse leftover charcoal?
Yes. Close all vents after cooking to extinguish the coals. Next time you grill, knock off the loose ash and mix the partially used coals with fresh charcoal before lighting.
Real-World Experiences & Extra Tips for Starting a Charcoal Grill
The more you light a charcoal grill, the more you realize that small details can make a big difference. Here are some extended, real-world-style experiences and tips to help you get comfortable with both methods and avoid common frustrations.
Learning the “personality” of your grill
Every grill has quirks. Maybe yours runs hot on the back right side, or struggles to stay hot on windy days. The first couple of times you light a charcoal grill, think of it as an experiment. Take mental notes:
- How long did the coals take to ash over with a full chimney?
- Did your grill thermometer match what the hand test suggested?
- Were there spots where burgers cooked faster?
After two or three cooks, you’ll start to anticipate how your specific grill behaveshow many coals you need, where to put them, and how far to open the vents.
Dialing in fuel amounts for different meals
If you’re just grilling a couple of hot dogs or veggie skewers, you don’t need a mountain of charcoal. Half a chimney might be plenty. For a big cookout with chicken, burgers, and maybe some corn on the cob, a full chimney plus a small extra handful of briquettes can keep the heat going longer.
A simple rule of thumb:
- Half chimney – Quick weeknight grilling (2–3 people).
- Full chimney – Standard cookout (4–6 people).
- Full chimney + extra – Longer sessions or thicker cuts like bone-in chicken.
Don’t be afraid to experiment. If you overshoot and have a lot of heat left after cooking, just shut the vents and save the half-burned coals for next time.
Managing nerves the first time you pour hot coals
Pouring a chimney full of blazing charcoal can feel a little intense the first time. That’s normal. Set yourself up for success:
- Wear closed-toe shoes and long pants.
- Use heat-resistant gloves and long-handled tongs.
- Lift the chimney slowly and deliberately, keeping it well away from your body.
Once you’ve done it a few times, it becomes second naturejust like flipping food with tongs or closing the lid without looking.
Adjusting for lump vs. briquettes
Lump charcoal lights quickly and burns hot, which can be great for fast meals or searing steaks. Briquettes tend to burn more steadily and predictably, making them a favorite for beginners or longer cooking sessions.
If you’re using lump charcoal:
- Expect it to be ready a little sooner.
- Use slightly less than a full chimney for the same heat output.
- Pay extra attention to vents to avoid overheating.
If you’re using briquettes, give yourself a few extra minutes for them to fully light and ash over, but enjoy the more even temperature curve once you’re cooking.
Dealing with “my coals keep going out” syndrome
If your coals refuse to stay lit, it’s almost always one of three things:
- Not enough airflow – Check that bottom vents are open and there’s no ash buildup blocking them.
- Damp charcoal – If your bag sat in a damp garage or outdoors, the coals may be absorbing moisture.
- Too small a fire – A tiny cluster of coals has a harder time sustaining itself. Add more charcoal and relight using a chimney or concentrated mound.
Once you fix the underlying cause, you’ll find your future lighting sessions go much more smoothly.
Practicing on a low-stress day
One of the best “experience hacks” is to practice lighting the grill on a day when you’re not cooking for guests. Fire up the grill just to learn:
- How long your chimney takes to fully light.
- How your vents affect temperature.
- How much charcoal you really need for different heat zones.
Throw on a few hot dogs or a pack of chicken thighs if you want, but treat it like a training session. That way, when people are actually hungry and waiting, you’re calm, confident, and already know what you’re doing.
Building your own little ritual
Part of the charm of charcoal grilling is the ritual. Maybe your routine becomes:
- Open vents, clean the grate, and set up the chimney.
- Light the starters, then mix a quick seasoning rub or prep veggies while the coals heat.
- Pour and arrange the coals, preheat, then bring food out when the grill is readynot before.
Over time, starting your charcoal grill becomes less of a chore and more like a satisfying pre-game routine before the main event: great food and good company.
The bottom line: once you master a chimney starter and a simple charcoal mound, you’ll never again be that person frantically spraying lighter fluid while everyone else backs away. Instead, you’ll be the calm, collected grill boss who makes starting a charcoal grill look as easy as turning on a light switchonly much more delicious.


