Table of Contents >> Show >> Hide
- What Is a Stripped Allen Screw, Exactly?
- Before You Start: 5 Smart Rules That Save Time
- How to Remove a Stripped Allen Screw: 11 Fast & Easy Tricks
- 1. Switch to the Exact Right Hex Key and Go Manual
- 2. Tap the Hex Key into the Socket
- 3. Add Grip with a Rubber Band, Steel Wool, or an Abrasive Pad
- 4. Hammer in a Torx Bit for a Tighter Bite
- 5. Grab the Head with Locking Pliers If It Sticks Out
- 6. Spray Penetrating Lubricant and Let It Sit
- 7. Use Gentle Heat to Soften Threadlocker
- 8. Cut a Slot and Use a Flathead Screwdriver
- 9. Try Super Glue or Epoxy with a Sacrificial Driver
- 10. Use a Left-Hand Drill Bit
- 11. Bring in a Screw Extractor or Drill the Head Off
- Which Trick Should You Try First?
- Mistakes That Make a Stripped Allen Screw Worse
- How to Prevent Stripped Allen Screws in the Future
- Real-World DIY Experiences: What These Tricks Feel Like in Practice
- Conclusion
A stripped Allen screw can turn a five-minute fix into a full-blown garage soap opera. One minute you are tightening a bike stem, bed frame, towel bar, or furniture bracket. The next minute, the hex socket is rounded out, the key spins like it is auditioning for a figure-skating team, and your patience begins filing for divorce.
The good news: a stripped Allen screw is usually removable without destroying the entire project. The better news: you do not always need fancy tools right away. In many cases, the winning move is to start small, add grip, slow down, and work from the least aggressive trick to the “well, now we mean business” methods.
This guide walks through 11 fast and easy tricks to remove a stripped Allen screw, plus the common mistakes that make the problem worse, when to use each method, and how to avoid getting stuck with another rounded hex screw later. Whether you are working on furniture, fixtures, power tools, automotive trim, or a stubborn piece of flat-pack engineering drama, there is a good chance one of these methods will save the day.
What Is a Stripped Allen Screw, Exactly?
An Allen screw, also called a hex socket screw, has a recessed hex-shaped opening that is meant to be turned with an Allen wrench or hex key. A screw becomes “stripped” when that internal shape wears down enough that the tool can no longer grip it properly. Instead of turning the screw, the wrench slips inside the socket.
This usually happens for a few predictable reasons:
- Using the wrong size hex key, including mixing up metric and SAE sizes.
- Using a worn-out or rounded Allen key.
- Applying too much force too quickly.
- Using a drill or driver when a hand tool would have given more control.
- Rust, corrosion, paint, grime, or threadlocker making the screw extra stubborn.
- Trying the same slipping move over and over until the socket gets smoother than a polished pebble.
Before You Start: 5 Smart Rules That Save Time
Before you attack the screw like it insulted your family, slow down and set yourself up for success.
- Stop spinning it. Every failed turn rounds out the socket more.
- Clean the recess first. Pick out dust, paint, rust flakes, or grease with a toothpick, awl, or compressed air.
- Use hand tools first. A drill can strip the socket faster than you can say “well, that got worse.”
- Apply steady downward pressure. Traction matters as much as torque.
- Start with the least destructive method. Save cutting and drilling for last.
How to Remove a Stripped Allen Screw: 11 Fast & Easy Tricks
1. Switch to the Exact Right Hex Key and Go Manual
This sounds obvious, but it is the first fix for a reason. Many stripped Allen screws are not fully stripped at first; they are just being attacked with the wrong key or a worn-out tool.
Try a fresh, sharp-edged hex key in the correct size. If the screw may be metric, test the matching metric key instead of forcing a close SAE size, or vice versa. Then remove the screw by hand, not with a driver. Press down hard and turn slowly counterclockwise.
Best for: mildly rounded sockets, furniture hardware, bike bolts, fixtures, and recent damage.
2. Tap the Hex Key into the Socket
If the wrench fits but still slips, give it a little mechanical encouragement. Place the correct Allen key in the screw and tap it lightly with a hammer. This can seat the tool deeper, break light corrosion, and improve contact inside the damaged recess.
Use gentle taps, not Thor-level swings. You want a snug fit, not a crater. Once the key is seated, press down and turn slowly.
Best for: screws with light rounding, surface rust, or packed debris.
3. Add Grip with a Rubber Band, Steel Wool, or an Abrasive Pad
This is the classic cheap fix, and yes, it really can work. Place a wide rubber band over the stripped Allen screw, then press the hex key into the rubber and turn. The extra material helps fill tiny gaps and adds traction.
No rubber band? A small piece of steel wool or the rough side of a scouring pad can do a similar job. Keep firm downward pressure as you turn. This method is not magic, but for a screw that is only partly stripped, it can feel suspiciously close.
Best for: shallow damage, household repairs, and “I want to solve this with stuff already in my junk drawer.”
4. Hammer in a Torx Bit for a Tighter Bite
When the hex recess is too rounded for an Allen key, a slightly oversized Torx bit can sometimes save the day. Choose one that is just big enough to bite into the damaged socket, tap it in gently with a hammer, and turn slowly with a hand driver or ratchet.
This works because the star-shaped Torx edges can dig into the softened corners of the stripped hex socket. It is a smart middle-ground trick before you move on to cutting or drilling.
Best for: moderately stripped Allen screws with enough head material left to bite into.
5. Grab the Head with Locking Pliers If It Sticks Out
If any part of the screw head is exposed above the surface, stop worrying about the damaged hex socket and attack the outside instead. Clamp locking pliers tightly onto the head and twist the screw out counterclockwise.
This method is often faster than fighting the recess. The key is clamping the pliers hard enough to prevent slipping. If needed, rock the screw slightly back and forth to break it loose before backing it out all the way.
Best for: raised screw heads, hardware brackets, appliance panels, and automotive trim.
6. Spray Penetrating Lubricant and Let It Sit
If rust, grime, or age is part of the problem, friction may not be your only enemy. A penetrating lubricant can help loosen the screw so your extraction method has a fighting chance. Spray the screw head and surrounding threads if accessible, then give it time to work.
Five to fifteen minutes can help; longer can be even better for stubborn corrosion. After that, retry one of the grip-based methods. This is especially useful on outdoor furniture, bathroom fixtures, shop equipment, and older hardware.
Best for: rusted or seized screws, outdoor projects, and metal assemblies.
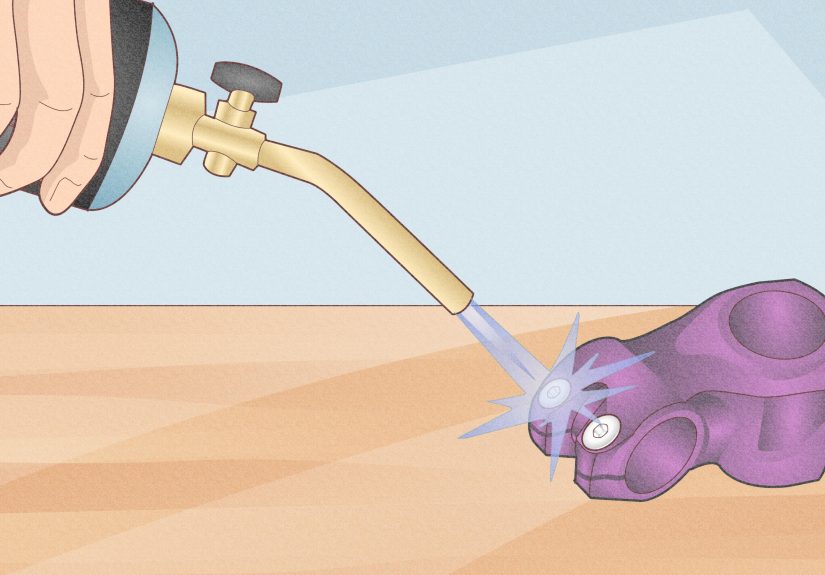
7. Use Gentle Heat to Soften Threadlocker
Some Allen screws are not just tight; they are intentionally locked in place with threadlocker. In that case, a little heat can soften the compound and make removal much easier. A soldering iron placed on the screw head for a short time is often safer and more targeted than open flame.
Once the screw warms up, try again with the correct hex key, Torx bit, or pliers. Use caution around plastic, painted surfaces, electronics, adhesives, fuel, and anything flammable. This is a precision move, not a bonfire.
Best for: machine screws, equipment fasteners, bikes, and assemblies that may use threadlocker.
8. Cut a Slot and Use a Flathead Screwdriver
If the socket is hopelessly rounded, create a new drive surface. Use a rotary tool, angle grinder, or hacksaw to cut a straight slot across the top of the screw head. Then use a flathead screwdriver to turn it out.
This method works surprisingly well because it gives you a fresh shape to grip. Keep the cut shallow but wide enough for a sturdy flathead. Protect nearby surfaces from sparks and scratches, and wear eye protection.
Best for: countersunk screws, stubborn metal fasteners, and screws with accessible heads.
9. Try Super Glue or Epoxy with a Sacrificial Driver
Yes, glue can help. For smaller screws or awkward recessed fasteners, put a tiny dab of super glue or epoxy into the stripped socket, insert a driver that fits as well as possible, and let it cure. Then turn slowly to remove the screw.
This is not my first recommendation for every job, but it can work well when you need one controlled shot at removal and do not want to jump straight to drilling. Use very little adhesive so you do not accidentally glue the screw to the surrounding surface. That would be a plot twist nobody requested.
Best for: small screws, delicate assemblies, and lightly seized fasteners.
10. Use a Left-Hand Drill Bit
A left-hand drill bit spins in reverse, which means it can sometimes bite into the screw and back it out while drilling. Center the bit carefully, use a low speed, and keep the drill in reverse. Sometimes the screw loosens before you even need an extractor.
This is an excellent step when grip methods have failed but you still want to avoid fully drilling the screw out. Go slowly and stay centered to avoid wandering off the head.
Best for: tougher screws in metal or wood and projects where the head is too damaged for simple traction tricks.
11. Bring in a Screw Extractor or Drill the Head Off
When nothing else works, a screw extractor is the go-to professional-style fix. Most extractor kits work in two stages: first you drill a small pilot hole into the screw head, then you switch to the extractor and turn in reverse until it bites and backs the screw out.
If the extractor fails and the project absolutely must move forward, the last resort is to drill the head off. Once the attached part is removed, you can usually grip the remaining screw shank with pliers and twist it out. It is the nuclear option, but hey, sometimes diplomacy has failed.
Best for: badly damaged screws, hardened fasteners, and jobs where you are done negotiating.
Which Trick Should You Try First?
If you want the short version, use this order:
- Correct-size fresh Allen key
- Tap the key in
- Rubber band or abrasive material
- Oversized Torx bit
- Locking pliers if the head is exposed
- Penetrating lubricant
- Gentle heat for threadlocker
- Cut a slot
- Glue or epoxy trick
- Left-hand drill bit
- Screw extractor or drilling the head off
That order protects the workpiece, saves time, and lowers the chance of turning a bad screw into a broken screw. And trust me, broken screws are the overachievers of inconvenience.
Mistakes That Make a Stripped Allen Screw Worse
- Using too much speed. Fast spinning removes metal; it does not create miracles.
- Using a rounded hex key. A worn tool chews up the recess faster.
- Skipping cleanup. Packed debris can make the fit seem worse than it is.
- Forgetting reverse on the drill. It happens more often than anyone admits.
- Using heat carelessly. Plastic, paint, wiring, and adhesives do not enjoy surprises.
- Drilling off-center. If the bit walks, the repair gets uglier in a hurry.
How to Prevent Stripped Allen Screws in the Future
Removing a stripped Allen screw is useful. Avoiding one is even better.
- Match metric to metric and SAE to SAE.
- Replace worn hex keys before they turn into tiny metal spoons.
- Use hand pressure and control instead of speed and hope.
- Start screws straight and avoid cross-threading.
- Use penetrating lubricant on rusty hardware before forcing it.
- Use the proper torque when tightening bolts on bikes, tools, furniture, and fixtures.
- Consider anti-seize or appropriate threadlocker depending on the application.
Real-World DIY Experiences: What These Tricks Feel Like in Practice
If you have ever worked with stripped Allen screws in the real world, you learn quickly that the problem is rarely just the screw. It is the situation around it. Maybe the screw is tucked inside a bed frame bracket where your hand barely fits. Maybe it is recessed in a bike stem and you are trying not to scratch the finish. Maybe it is in a damp bathroom fixture that has not moved since the previous decade. The method that works best often depends less on theory and more on access, patience, and how much collateral damage you can tolerate.
One of the most common experiences is with flat-pack furniture. People often use the tiny Allen key that comes in the box, tighten one screw at a weird angle, and round out the socket before the furniture even has emotional stability. In that case, the simplest fix is usually a fresh hex key with better edges, followed by the rubber-band trick. It feels almost too easy, which is probably why so many people skip it and jump straight to chaos.
Bike repairs create a different kind of drama. Allen bolts on stems, seat posts, bottle cages, and brake hardware can be snug, dirty, or threadlocked. Here, control matters more than brute force. A careful tap on the tool, a little penetrating oil, or gentle heat can work better than trying to muscle the bolt out. The lesson many DIYers learn the hard way is that bike fasteners hate impatience almost as much as they hate the wrong size tool.
Bathroom and outdoor hardware often adds rust to the party. A stripped Allen screw in a shower handle, patio chair, or exterior fixture usually resists removal because corrosion has practically made it part of the property. In those cases, lubricant buys time, and locking pliers can be the hero if the head is exposed. When the head is recessed, the slot-cutting method often becomes the turning point. Messy? A little. Effective? Very often.
Then there is the “I already made it worse” experience, which deserves its own award category. This is when someone tried a power driver first, slipped three times, and now the socket looks like a tiny cave. That is when extractor kits earn their keep. They are not glamorous, but they are the grown-up answer. The best part is psychological: once you switch from improvising to using the right extraction tool, the whole job feels less cursed.
The biggest practical takeaway from all these experiences is simple: success usually comes from stepping down the aggression ladder, not up it. Start with grip, fit, pressure, and patience. Move to pliers, slots, or heat only when the gentler options fail. And once the screw comes out, replace it. Do not put the same chewed-up fastener back in and act surprised when it returns for a sequel.
Conclusion
When you need to remove a stripped Allen screw, the smartest approach is not brute force. It is strategy. Start with the easiest, least destructive fix, improve grip, slow things down, and escalate only when necessary. In many cases, a fresh hex key, rubber band, Torx bit, or pair of locking pliers gets the job done. For tougher cases, heat, slot-cutting, left-hand drill bits, and screw extractors can rescue the situation.
So no, your project is not ruined. Your stripped Allen screw is just asking for better technique, a little patience, and maybe one less dramatic relationship with power tools.