Table of Contents >> Show >> Hide
- First: What Tarnish Actually Is (and Why Foil Works)
- What You’ll Need
- Step-by-Step: Polish Silver with Aluminum Foil
- What NOT to Clean This Way (and Safer Alternatives)
- Troubleshooting: If the “Magic” Isn’t Magic-ing
- How to Keep Silver Shiny Longer (So You Do This Less Often)
- Quick Alternatives (When Foil Isn’t the Right Tool)
- Frequently Asked Questions
- Real-World Experiences: What It’s Like to Use the Foil Method (and What People Learn the Hard Way)
- Conclusion
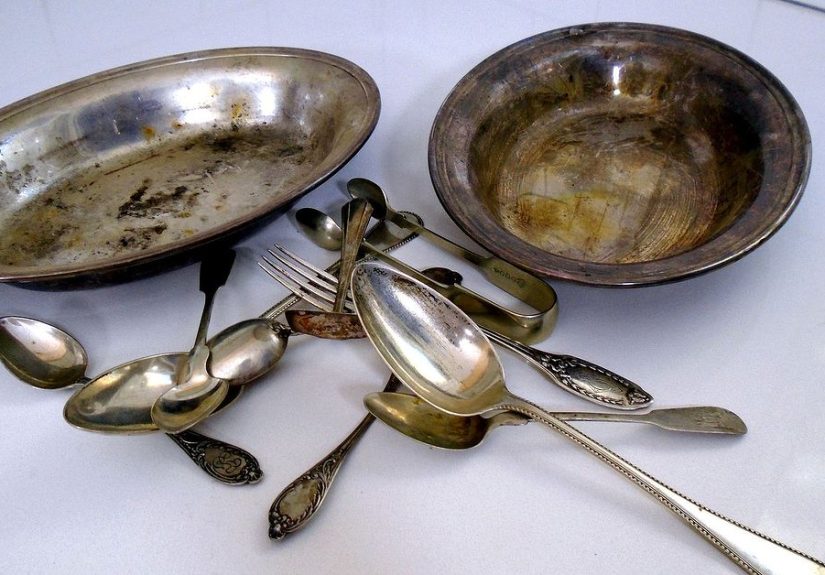
Silver is dramatic. You wear it once, put it away, and it comes back looking like it joined a goth band.
That dark coating is tarnish, and while traditional silver polish works, it also comes with elbow grease,
smelly chemicals, and the uncomfortable realization that you’ve been scrubbing a spoon like it owes you money.
The aluminum foil method is the low-effort, high-satisfaction option: you set up a simple “bath” with foil,
baking soda (and usually salt), add hot water, and watch tarnish lift off with minimal rubbing. It’s not magic
it’s chemistry doing chores for you.
First: What Tarnish Actually Is (and Why Foil Works)
Silver tarnish is a chemical reaction, not “dirt”
That black or brownish film on silver is typically silver sulfide, formed when silver reacts with sulfur-containing
compounds in air (or from foods like eggs, onions, and some rubbery storage materials). Tarnish is a thin layer on
the surfaceso you don’t need to “grind” it off if you can reverse the reaction.
The foil trick is an electrochemical trade
When tarnished silver touches aluminum in a hot solution of baking soda (often with salt to boost conductivity),
an electrochemical reaction helps convert the tarnish and shift it away from the silver. The aluminum “volunteers”
to react so your silver doesn’t have to. Your reward: brighter silver. The foil’s reward: it looks… sacrificed.
Translation: you’re not sanding off tarnish like you do with many polishes. You’re using a reaction to loosen or
reverse the tarnish, then finishing with a gentle dry buff for shine.
What You’ll Need
- Aluminum foil (standard kitchen foil)
- Baking soda (sodium bicarbonate)
- Salt (optional but helpful; plain table salt is fine)
- Very hot water (near-boiling works best)
- A non-aluminum container: glass baking dish, ceramic bowl, or a plastic tub rated for heat
- Tongs or a spoon (because fingers and near-boiling water should not be friends)
- Soft microfiber cloth or a clean cotton towel for drying and buffing
Pro tip: Choose a container that lets pieces lie in a single layer. The foil method works best when
silver has direct contact with the foilnot stacked like a chaotic drawer of forks.
Step-by-Step: Polish Silver with Aluminum Foil
1) Line the dish
Line your dish with aluminum foil, covering the bottom and (if possible) the sides. If you’re a “which side is up?”
person: shiny-side up can make it easier to see contact points, but the key is contactnot foil aesthetics.
2) Add baking soda (and salt)
Sprinkle baking soda into the lined dish. Add salt if you’re using it.
Both ingredients dissolve in water and help the bath do its job.
Easy ratios that work in real kitchens:
- Small batch (8×8 or 9×13 dish): 2–3 tablespoons baking soda + 1–2 tablespoons salt
- Large batch (about 1 gallon of water): 1/2–1 cup baking soda + 1/2 cup salt
Don’t stress like this is pastry. The method is forgiving. More important than perfect measuring:
hot water + dissolved ingredients + silver touching foil.
3) Pour in very hot water
Carefully pour near-boiling water into the dish until the ingredients dissolve and you have enough depth to submerge
the silver. You may see fizzingthat’s normal.
4) Add the silver (make sure it touches the foil)
Place silver pieces into the bath in a single layer. The silver should touch the foil somewhere. If it’s a chain,
gently spread it out. If it’s silverware, avoid stacking.
5) Wait, check, and flip if needed
Light tarnish may improve in 1–3 minutes. Heavier tarnish can take 5–10 minutes. If you still see dark areas,
use tongs to reposition so the tarnished sections touch foil, and give it another few minutes.
6) Rinse and dry immediately
Remove pieces with tongs, rinse thoroughly under clean water, then dry completely. Buff lightly with a microfiber
cloth to bring out the shine and remove any residue.
If your silver looks cleaner but not “sparkly,” that’s normal. This method excels at removing tarnish; the final
shine comes from drying and a quick buff.
What NOT to Clean This Way (and Safer Alternatives)
Silver with delicate gemstones or organic materials
Avoid this method for jewelry set with pearls, opals, turquoise, amber, or other porous/delicate stones.
Heat, soaking, and residue can be risky. Instead, clean the metal gently with mild soap and water on a cloth,
working around the settingand keep the stone as dry as possible.
Antiques, heirlooms, or anything you value for its “aged” look
Some tarnish is considered patinaan intentional, desirable darkening that gives antique silver depth and character.
The foil method can strip that look fast, leaving a piece bright but historically “flattened.”
If the piece is valuable, sentimental, or museum-worthy, consider a gentle polishing cloth or consult a professional.
Pieces with intentional oxidation (“antiqued” or blackened details)
Many modern silver items have darkened recesses by design. The foil bath can lighten those shadows,
turning “antique chic” into “oops, I erased the cool part.”
Items with hollow handles, glued parts, or finishes that shouldn’t be soaked
Some knives and serving pieces have hollow handles or seams where liquid can enter and linger. If water gets trapped,
you can end up with corrosion or internal damage. For these pieces, stick to a minimally damp cloth and careful drying.
Troubleshooting: If the “Magic” Isn’t Magic-ing
Problem: Nothing happens
- Check contact: Silver must touch the foil somewhere.
- Check heat: Water needs to be very hot. Warm is okay for mild tarnish, but hot is faster.
- Check concentration: Add a bit more baking soda (and salt if using) and stir carefully.
Problem: Some spots remain dark
- Flip/reposition: Move the piece so the dark area touches foil.
- Repeat: Run a second short bath rather than one super-long soak.
- Detail work: Finish crevices with a soft toothbrush and mild soapy water, then rinse/dry.
Problem: A cloudy film appears
- That’s usually residue: Rinse longer and buff dry.
- Use distilled water: If your tap water is hard, minerals can leave haze.
- Polish lightly: A silver polishing cloth can add clarity without heavy abrasion.
Problem: You smell “rotten eggs”
That sulfur smell can happen during the reaction, especially with heavy tarnish. It’s a good reminder to use
ventilation and not do this directly under your smoke alarm unless you enjoy surprise beeping.
How to Keep Silver Shiny Longer (So You Do This Less Often)
- Dry immediately after washing: Water spots and moisture speed up tarnish.
- Store smart: Keep silver in a dry place, ideally in anti-tarnish cloth or separate pouches.
- Avoid sulfur sources: Some rubber bands, wool, felt, and certain papers can accelerate tarnish.
- Use it: Regular handling and gentle washing often slows the “forgotten-in-a-drawer” tarnish spiral.
Quick Alternatives (When Foil Isn’t the Right Tool)
Mild soap + warm water for light grime
If the silver isn’t blackenedjust dull from oils and everyday usemild dish soap and warm water with a soft cloth
may be all you need. Rinse and dry thoroughly.
Baking soda paste for targeted tarnish
Mix three parts baking soda with one part water into a paste, apply gently with a soft cloth, rinse, and buff dry.
This is more hands-on than the foil bath but gives you control over small areas.
Commercial silver polish for heirloom-level shine
For a mirror finish (or when you want to preserve certain details), a reputable silver cream used gently can be a
better choiceespecially on pieces where soaking isn’t wise. Think of it as skincare: effective when used correctly,
disastrous when used like sandpaper.
Frequently Asked Questions
Is the aluminum foil method safe for silver-plated items?
It’s commonly used for both sterling silver and silver plate, especially for removing tarnish without heavy rubbing.
That said, silver plate is a thin layer over base metal, so treat it gently and avoid aggressive polishing afterward.
Will aluminum foil scratch my silver?
The bath method relies on contact, not scrubbing. Don’t rub the silver with foil. If you keep it to soaking + rinsing
+ soft-cloth buffing, scratching risk stays low.
Does this actually “polish” silver?
It removes tarnish extremely well, which makes silver look dramatically brighter. For true high-gloss shine, finish
with a dry buff or a polishing cloth.
How often should I do this?
As rarely as your lifestyle allows. Frequent cleaningno matter the methodcan wear surfaces over time. Better storage
and quick post-wash drying reduce how often you’ll need a deep clean.
Real-World Experiences: What It’s Like to Use the Foil Method (and What People Learn the Hard Way)
In real kitchens, the foil method usually starts for one of two reasons: (1) a holiday is approaching and you just
remembered you own “nice” silverware, or (2) you bought something silver at a thrift store and it’s giving
“mysterious attic relic.” Either way, the first experience tends to be surprisingly satisfyinglike watching
a stain lift in a laundry commercial, but with forks.
The most common “wow” moment is how fast the change can be when the setup is right. People will often place a spoon
in the bath, glance away to answer a text, and look back to find the spoon noticeably brighter. That instant feedback
is why this method feels magical: you’re not grinding away at tarnish; you’re letting a reaction do the heavy lifting,
and you get visible progress in minutes instead of an arm workout.
But the method also has a learning curve that looks suspiciously like: “Why isn’t it working?” Ninety percent of the
time, the answer is contact. Someone stacks spoons, or drops a chain into a tangled knot that barely touches foil, and
then concludes the internet lied. The fix is almost comically simple: spread pieces out and make sure each one touches
the foil somewhere. Once people figure that out, the bath suddenly behaves like it read the instructions.
Another shared experience is the “cloudy film panic.” A lot of first-timers pull items out and think, “Great, now it’s
clean… and also weirdly hazy.” Usually, that haze is residue from baking soda/salt or minerals in the water. The cure
is not despair; it’s rinsing thoroughly and drying immediately, then buffing with a soft cloth. In fact, the buffing
step is where silver starts to look truly polished, and it’s also where people realize they can stop scrubbing like
they’re sanding a deck.
Jewelry brings its own set of stories. A simple sterling chain responds beautifully, but pieces with stones can be
tricky. A common “oops” moment is soaking something with pearls or porous stones and noticing the surface looks duller
afterward. That’s why many experienced cleaners switch strategies: they’ll use the foil bath only for plain silver
pieces, and for gemstone jewelry they’ll use a mild soap-and-water wipe on the silver parts, staying as dry as possible
around the stones. Once you separate “plain metal” cleaning from “mixed materials” cleaning, the process becomes much
more predictable (and far less stressful).
Then there’s the heirloom dilemma: someone loves the bright results… but realizes their antique piece now looks a bit
too new, like it got a makeover without permission. That’s the patina lesson. Many people end up choosing a gentler
routine for antiqueslike a polishing cloth for highlights and leaving darker recessed areas alonebecause the goal
isn’t always maximum shine. Sometimes the goal is “clean and cared for” without erasing the character that made the
piece special in the first place.
The best long-term experience comes after the cleaning: storage changes. People who start storing silver in a dry place,
separated from humid air and questionable drawer debris, often notice they don’t need the foil method nearly as often.
The foil bath becomes a once-in-a-while reset, not a monthly crisis. And honestly, that’s the dream: silver that behaves
like a calm adult, not a diva.
Conclusion
If you want a fast, low-scrub way to brighten tarnished silver, the aluminum foil method is one of the easiest tools
you can use with basic pantry ingredients. Set up the bath, make sure the silver touches the foil, keep the water hot,
then rinse and dry like you mean it. Use it for everyday silverware and plain sterling pieces, be cautious with
antiques and gemstone jewelry, and store silver smarter so tarnish doesn’t keep making unwanted encores.