Table of Contents >> Show >> Hide
- What is a Petoskey stone, really?
- Before you start: tools and materials
- How to Polish Petoskey Stones: 9 Steps
- Step 1: Choose a “polish-worthy” stone (and keep it legal)
- Step 2: Clean it like you mean it
- Step 3: Shape the stone (optional, but often worth it)
- Step 4: Start wet sanding with 220 grit (the “real work” stage)
- Step 5: Move to 400 grit (erase the 220 “storyline”)
- Step 6: Finish sanding with 600 grit (and optional higher grits)
- Step 7: Polish with compound (the “wow, there it is” moment)
- Step 8: Decide on a finish (optional, but popular)
- Step 9: Cure, buff, and maintain
- Common mistakes and how to fix them
- Conclusion
- of Rockhound Experiences (What It’s Really Like)
Petoskey stones are the ultimate “boring until you add water” glow-up. Dry, they can look like a plain, gray rock you’d accidentally kick into the lake.
Wet (or polished), they reveal a honeycomb pattern that looks like nature invented stained glass for stone collectors.
If you’ve got a pocket-sized Petoskey stone and a little patience, you can hand-polish it at home with basic supplies. No fancy lapidary workshop required.
Just you, wet sandpaper, and the kind of determination normally reserved for assembling furniture without reading the instructions.
What is a Petoskey stone, really?
A Petoskey stone is fossilized coralmost famously associated with Michigan and formed hundreds of millions of years ago. The “cells” you see are
corallites (the skeletal cups where coral polyps once lived). The pattern is often easiest to spot when the stone is wet, which is why beach hunters
will sometimes carry a small water bottle to “preview” rocks before taking them home.
Petoskey stones are largely calcite-based, which matters because calcite is relatively soft compared to many other rocks. That softness is exactly why
hand polishing is doable: sandpaper can actually make progress without requiring industrial-strength tools.
Before you start: tools and materials
You can polish Petoskey stones with either “hand tools only” (budget-friendly) or with optional upgrades if you want to speed things up.
Must-haves
- Wet/dry sandpaper: 220, 400, 600 grit (and optional 800–2000 for extra shine)
- Water: a bowl, sink, or spray bottle (wet sanding is the secret sauce)
- Soft backing: towel, rubber pad, or folded newspaper (keeps sanding even)
- Cleaning supplies: mild dish soap and an old toothbrush
- Polishing cloth: corduroy, denim, felt, or velvet
- Polishing compound: a polishing powder, rock polish, or even a suitable car rubbing compound
Nice-to-have upgrades
- Small file for shaping (especially if your stone has sharp ridges)
- Higher grits (800, 1000, 1500, 2000, even 3000) for a more glassy finish
- Cerium oxide or aluminum oxide polish for a brighter final shine
- Finishing option: mineral oil, paste wax, or a clear spray finish (optional)
Safety basics (quick, but important)
- Wet sand whenever possible to keep dust down and reduce scratchy grit buildup.
- Eye protection is smart if you’re filing, using a rotary tool, or polishing with power equipment.
- Adult supervision is recommended for kids/teensespecially if tools or sprays are involved.
How to Polish Petoskey Stones: 9 Steps
-
Step 1: Choose a “polish-worthy” stone (and keep it legal)
Not every Petoskey stone will polish beautifully. A great candidate is fairly dense, not overly crumbly, and has a pattern that shows when wet.
If it’s extremely porous or full of deep pits, you can still polish it, but it may keep a chalky look in spots.Also: collect responsibly. Rules vary by location (and some places prohibit collecting natural items entirely). When in doubt, take photos and leave the stone
where you found ityour camera roll has unlimited capacity; park resources do not. -
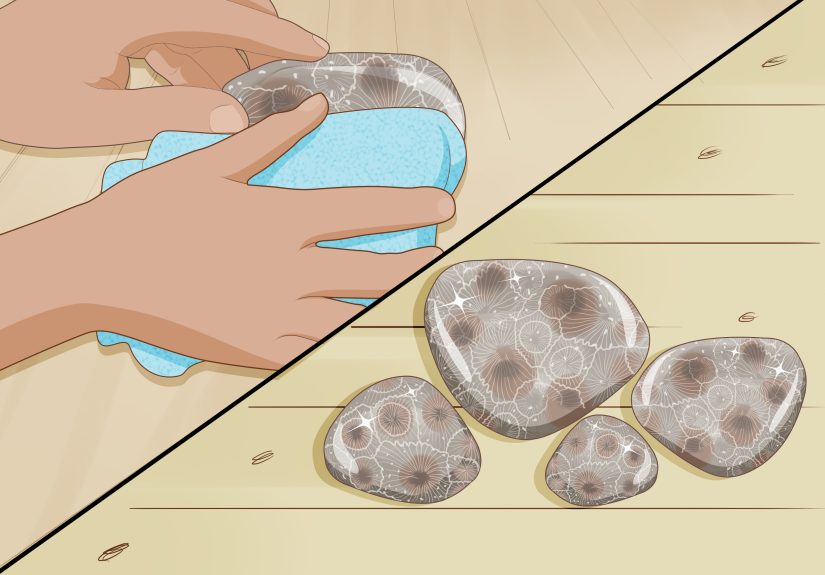
Step 2: Clean it like you mean it
Wash the stone with mild soap and water. Use a toothbrush to scrub out sand and grime from the coral pattern. Rinse well.
Any leftover grit can act like surprise sandpaper laterexcept not the helpful kind.Pro tip: Keep a spray bottle nearby. Petoskey stones often look dramatically better wet, and you’ll use water constantly throughout the process anyway.
-
Step 3: Shape the stone (optional, but often worth it)
If the stone has jagged edges, rough knobs, or a weird “this side looks like a potato chip” shape, do light shaping before sanding.
A small metal file works well for knocking down sharp points.Aim for a shape that feels good in your hand and has at least one broad surface for the pattern to show. You’re not carving the Hope Diamond herejust making sanding easier.
-
Step 4: Start wet sanding with 220 grit (the “real work” stage)
Place the 220-grit wet/dry sandpaper on a soft pad (towel/newspaper). Dampen the stone and the paper.
Rub the stone in steady, rotating motions so you sand evenly rather than creating flat spots only on one edge.This stage removes surface scratches, stains, and weathered crust. It’s also the stage where your patience gets tested.
Take your time: a rushed 220 stage guarantees you’ll keep seeing the same scratches at the end like a horror movie villain who won’t stay gone.Rinse the stone often, then briefly dry it to inspect. Dry inspection matters because water can “hide” micro-scratches.
-
Step 5: Move to 400 grit (erase the 220 “storyline”)
Repeat the same wet sanding process with 400 grit. Your goal here is simple: remove every scratch left by the 220 grit.
If you can still see 220 scratches at 400, they’ll absolutely show up after polishing.Rinse, dry, inspect under good light. If you see long, deeper scratches, go back to 220 for that area and then return to 400.
This backtracking is not failure. This is craftsmanship. -
Step 6: Finish sanding with 600 grit (and optional higher grits)
Now wet sand with 600 grit. When the stone feels smooth, don’t stop immediatelysand another 5–10 minutes.
This extra time helps even out the surface and reduces the “chalky haze” that can appear when the stone dries.Want a higher shine? Add 800, 1000, 1500, and/or 2000 grit. Each step takes less time than the earlier grits, but only if you fully removed scratches
in the previous grit. Think of grits like laundry: you don’t put clean clothes on top of mud and hope it works out. -
Step 7: Polish with compound (the “wow, there it is” moment)
Lightly dampen your polishing cloth (corduroy, denim, felt, or velvet). Add a small amount of polishing compound/powder and rub in small circular motions.
You don’t need a huge pile of compoundmore doesn’t mean shinier; it usually means messier.If you’re using a dedicated lapidary polish (like cerium oxide or aluminum oxide), keep everything slightly damp and work methodically across the surface.
Wipe clean, inspect, and repeat if needed.If scratches show up now, it usually means you need to step back to 400 or 600 and re-sand before polishing again. Yes, it’s annoying.
Yes, it’s also the difference between “nice rock” and “gift-shop shine.” -
Step 8: Decide on a finish (optional, but popular)
A well-polished Petoskey stone can look great dry, but many collectors like a finish that keeps the “wet look” longer.
You have a few options:- Mineral oil: Wipe on a tiny amount, let it absorb, buff off extra. Easy, reversible, needs reapplication.
- Paste wax: Adds a soft shine and some protection. Buff well.
- Clear spray finish: Can boost contrast, but it’s less “natural,” and you’ll want good ventilation and careful application.
If you plan to handle the stone a lot (worry stone, desk stone, pocket stone), oil or wax is usually more forgiving than a hard clear coat.
-
Step 9: Cure, buff, and maintain
After polishing (and finishing, if you chose one), wipe the stone clean with a dry cloth and give it a final buff.
Let any applied oil/wax settle, then buff again.Maintenance is easy: if it looks dull, wash it, dry it, and re-buff. If you used oil, a tiny refresh coat brings back contrast fast.
Store stones so they don’t rub against harder rocks that can scratch them.
Common mistakes and how to fix them
You can see the pattern wet, but it looks “chalky” dry
This is extremely common. Usually it means micro-scratches or tiny rough patches are still scattering light.
Fix: go back to 600 (or 1000 if you’re already beyond that), sand longer with consistent pressure, then re-polish.
Random deep scratch lines appear at the end
That’s almost always leftover 220 scratches that never got fully removed. Fix: back up to 220 only for the scratched area (or full face, if needed),
then redo 400 → 600 → polish.
The stone loses crisp detail in some spots
Petoskey stones can include softer material and impurities. Over-sanding can “round over” fine pattern edges.
Fix: use lighter pressure, keep sanding time consistent, and avoid aggressive power tools unless you’re experienced.
Should you use a rock tumbler?
You can, but it’s risky for Petoskey stones. Tumblers remove material everywhere, and because Petoskey stones are relatively soft,
tumbling can sacrifice detail and shape faster than you expect. If you love the exact shape you found, hand polishing gives you much more control.
Conclusion
Polishing a Petoskey stone is simple in theorysand through grits, polish, admirebut the magic is in the details:
wet sanding, careful inspection, and refusing to “just move on” when scratches are still there.
Once you finish your first stone, you’ll understand why people come home from Michigan beaches with pockets that clink like pirate treasure.
Except your treasure is fossil coral, and your ship is a slightly sandy car.
of Rockhound Experiences (What It’s Really Like)
Most people’s first Petoskey stone experience goes like this: you pick up a rock that looks… fine. Maybe even suspiciously ordinary.
Then you dip it in water and suddenlybamhexagon patterns pop out like a secret message. It’s the geological version of scratching a lottery ticket,
except you don’t lose $10 and gain existential regret.
The second experience is realizing that polishing is not a “quick craft,” it’s more like a relationship. You can’t rush it. You have to check in regularly.
You have to pay attention to tiny flaws. And occasionally you’ll think, “Is this working?” before it suddenly does.
The 220 grit stage is where most beginners feel personally challenged by a rock. It’s the longest step, and it’s easy to get impatient and jump to 400.
But the first time you do that, you learn a universal truth: scratches are forever… unless you remove them now.
A lot of people end up making the process part of their routine. You’ll hear rockhounds talk about sanding while watching a game, listening to a podcast,
or sitting at the table pretending they’re doing something productive. The towel-on-the-lap method is popular for a reason: wet sanding can be messy,
and nobody wants their couch to become a permanent “indoor beach.” A spray bottle helps, not just for sanding, but for moralewhen you’re tired,
you spritz the stone, see the pattern brighten, and remember why you started.
There’s also a very specific “first polish reveal” moment. The stone goes from “smooth” to “shiny,” and the coral pattern looks deeper and more contrasty.
It’s common to rotate it under a lamp like you’re inspecting a diamondeven though it’s a fossil coral and your lamp is probably from a big-box store.
If you finish a stone and it still looks dull when dry, don’t panic. That’s a normal learning curve. Many people discover that a little extra time at 600,
or adding 1000–2000 grit, makes a bigger difference than adding more polish. In other words: the shine is mostly earned in sanding, not wished into existence at the end.
Finally, there’s the “what now?” phase. Some folks display Petoskey stones in a bowl, some make jewelry, and some keep one as a desk stone to pick up when thinking.
A lot of rockhounds also keep a small bottle of mineral oil or a bit of wax nearby because they like the contrast the finish brings out.
And almost everyoneeventuallystarts gifting them. A polished Petoskey stone is a surprisingly perfect souvenir: it’s science, art, history, and beach day nostalgia
all in one palm-sized object. Plus, it doesn’t melt in the mail. That alone makes it a champion gift.


