Table of Contents >> Show >> Hide
- Why Rocket Launch Photography Is Harder Than It Looks
- Decide What Kind of Launch Photo You Want
- The Best Gear for Rocket Launch Photography
- How to Plan Before Launch Day
- Best Camera Settings for a Rocket Launch
- Should You Use Autofocus or Manual Focus?
- How to Compose a Strong Rocket Launch Photo
- Tips for Tracking a Rocket During Ascent
- Don’t Forget the Weather and the Environment
- Mistakes That Ruin Rocket Launch Photos
- How to Edit Rocket Launch Photos
- What the Experience Actually Feels Like: Field Notes From a Launch Photographer’s Point of View
- Conclusion
Photographing a rocket launch is one of those glorious challenges that sounds simple until you actually try it. In theory, you just point your camera at a giant flaming machine and press the shutter. In practice, you are dealing with distance, heat shimmer, darkness, changing light, launch delays, moving smoke, and the cruel emotional damage of realizing your lens is fogged five minutes before liftoff.
The good news is that you do not need NASA credentials or a camera that costs the same as a used sedan to make a great launch photo. What you do need is a plan. The best rocket launch images are usually the result of preparation, not luck. That means choosing the right lens, arriving early, locking in focus, understanding exposure, and knowing whether you want a crisp action shot, a dramatic long trail, or a wider scene that tells the story of the launch environment.
This guide breaks down exactly how to photograph a rocket launch, from gear and settings to composition, timing, and post-processing. Whether you are heading to Florida’s Space Coast, watching from California, or photographing a launch from a public viewing area miles away, these tips will help you come home with more than a bright blur and a powerful memory.
Why Rocket Launch Photography Is Harder Than It Looks
A rocket launch is bright, fast, distant, and unpredictable all at once. Day launches can fool your meter because the exhaust plume is intensely bright. Night launches can blow highlights or disappear into darkness if your settings are off. Add changing weather, shifting schedules, and the fact that the rocket gets smaller every second, and you have a recipe for chaos with flames.
That is why launch photography rewards preparation. Unlike portrait work, you cannot ask the rocket to do one more take because your shutter speed was weird. Once it goes, it goes. Your job is to be ready before the countdown ever starts.
Decide What Kind of Launch Photo You Want
Before you even think about camera settings, decide what success looks like. Different goals require different lenses, compositions, and exposure strategies.
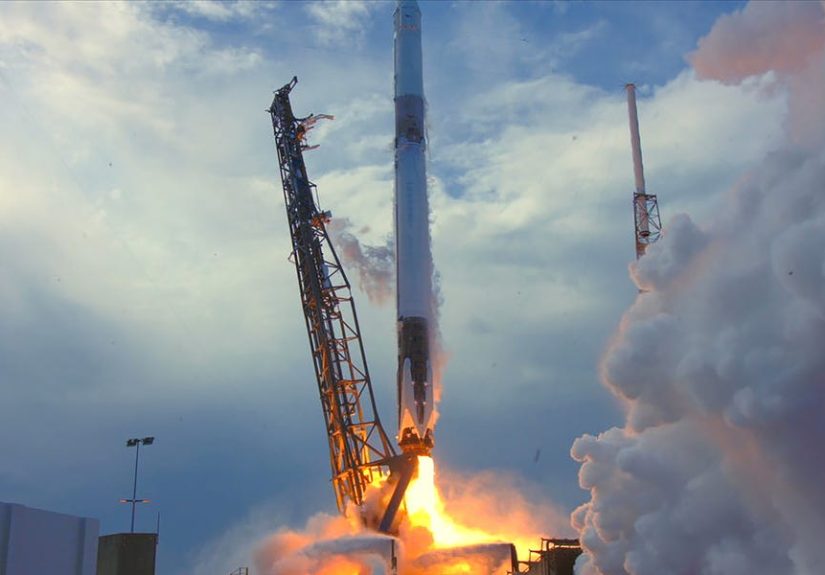
1. The Tight Liftoff Shot
This is the classic frame where the rocket dominates the image and the exhaust looks explosive and detailed. To get it, you usually need a telephoto lens and a clear line of sight. This style works best for daylight launches or for photographers with access to a relatively close viewing area. If you are shooting from a standard public location, remember that “close” in rocket photography still often means “not exactly next door.”
2. The Long-Trail Shot
This is the fan favorite for night and twilight launches. Instead of freezing the rocket, you let it paint a bright arc through the sky with a long exposure. These images can be dramatic, graphic, and surprisingly cinematic, especially when you include water, city lights, or silhouettes in the foreground.
3. The Environmental Storytelling Shot
This style shows the launch in context: spectators looking up, reflections in water, the glow over the coastline, or a foreground landmark that gives the image a sense of place. A rocket against black sky is cool. A rocket over marsh grass, surf, or a packed viewing area is cooler because it tells a fuller story.
The Best Gear for Rocket Launch Photography
Camera Body
A DSLR or mirrorless camera with manual controls is ideal. You want solid low-light performance, the ability to shoot RAW, and dependable burst shooting. A smartphone can capture the experience, but if your goal is a publication-quality image, a dedicated camera gives you much more control.
Lenses
A telephoto lens is great for tight launch shots. Something in the 70-200mm, 100-400mm, or even 150-600mm range can help if you are far from the pad. A wide-angle lens, such as 14-24mm or 16-35mm, is often better for night trails and environmental images because it includes more sky and foreground.
If possible, bring two setups: one long and one wide. That is the dream team. One camera can chase detail, while the other captures the larger scene. If you only have one camera, choose based on your goal and resist the urge to switch lenses during the countdown like a caffeinated game show contestant.
Tripod
A sturdy tripod is non-negotiable for long exposures and helpful even for telephoto daylight work. Rocket photography punishes vibration. Flimsy support can turn a strong image into a fuzzy tragedy.
Remote Shutter Release
A wired or wireless remote reduces camera shake and makes bulb exposures much easier. You can also use a self-timer in a pinch, but a remote is more flexible and much less annoying.
Other Essentials
- Extra batteries
- Extra memory cards
- Lens cloths for humidity and sea spray
- A flashlight or headlamp for night launches
- Gaffer tape if you want to lock focus
- A folding chair, water, and patience, because launches love to delay
How to Plan Before Launch Day
Rocket launches can shift by hours, days, or longer. Always recheck the official schedule and viewing guidance before you leave. Do not build your whole strategy around one screenshot you saved two weeks ago. Launch windows change, viewing access changes, and weather has a wicked sense of humor.
Arrive early enough to scout composition, test your shot, and set focus. If you are going to a public viewing area, research sight lines ahead of time. Ask yourself three questions:
- Will I have a clear view of the pad or only of the rocket after it rises?
- Do I want the widest possible sky, or do I want a more compressed telephoto frame?
- What foreground can make this image feel like a rocket launch rather than a mysterious glowing noodle?
If you are photographing from the Space Coast, for example, your distance from the pad may vary significantly depending on the viewing area and mission. That distance affects lens choice more than people expect.
Best Camera Settings for a Rocket Launch
There is no single perfect exposure because every mission, pad, time of day, and viewing distance is different. Still, there are reliable starting points.
For a Day Launch
Start with manual mode or shutter priority. A good baseline is around 1/1000 second, f/7.1 to f/8, ISO 100 to 400. That gives you a fast enough shutter to freeze motion and enough flexibility to protect detail in the bright exhaust. Shoot in RAW so you can recover highlights and shadows later.
If the plume looks blown out, slightly reduce exposure. In rocket photography, preserving highlight detail often matters more than making the whole frame look bright straight out of camera.
For a Twilight Launch
Twilight is gorgeous and slightly evil. Start around 1/250 to 1/1000 second for a frozen rocket, or switch to a longer exposure if you want a trail. Use ISO 200 to 800 depending on how dark it is. Watch your histogram, because the sky may be dim while the plume is blazing.
For a Night Launch Trail
Use a tripod, manual mode, and either a long shutter speed or bulb mode. A practical starting point is ISO 100 to 200, f/8 to f/11, then keep the shutter open anywhere from 20 seconds to several minutes depending on the sky brightness and how much trail you want. Some photographers expose even longer for a full arc when conditions allow.
Check your frame before launch, then keep your hands off the camera once the exposure begins. This is not the time for “just a tiny adjustment.” Tiny adjustments become giant regrets.
Should You Use Autofocus or Manual Focus?
For launch photography, manual focus is usually the safer choice, especially at night. Autofocus can struggle in darkness or hunt at exactly the wrong moment. A smart workflow is to focus on a distant object ahead of time, then switch to manual focus so the lens does not move.
If you are shooting at night and have no obvious distant target, use live view and magnify a bright light, the horizon, or another faraway object to fine-tune focus. If your lens lacks a reliable hard stop at infinity, do not assume twisting it all the way will be perfect. Test it first.
Many experienced photographers even tape the focus ring once they are happy. It may feel dramatic, but so is missing focus on a rocket launch because your hand brushed the lens. Drama belongs in the sky, not in your settings.
How to Compose a Strong Rocket Launch Photo
Good launch images are not only about sharpness. They are about story. Composition matters because the rocket may occupy a surprisingly small part of the frame, especially from public viewing areas.
Use Foreground Elements
Water, shoreline, spectators, trees, bridges, buildings, and silhouettes can make the image more compelling. They anchor the scene and help viewers understand scale.
Leave Room for the Flight Path
Do not frame the rocket too tightly at liftoff unless you are going for a pad detail shot. If you want to track the climb or capture a trail, leave space in the direction the rocket will travel. A launch photo with no room to breathe can feel cramped.
Try Vertical and Horizontal Frames
Vertical composition can be excellent for a clean trail climbing skyward. Horizontal framing often works better when you want landscape, reflections, or crowd context. Neither is universally right. The mission decides.
Tell the Viewer Where This Happened
The best launch photos often include a clue about place. Coastline, marsh, city lights, palm trees, or a viewing crowd can turn a technically decent image into a memorable one.
Tips for Tracking a Rocket During Ascent
If you are trying to freeze the rocket rather than make a trail, burst shooting can help. Start shooting just before liftoff and continue as the vehicle clears the pad. Use a reasonably fast shutter speed and smooth panning if the rocket remains visible long enough for follow-up frames.
Practice matters here. Tracking a tiny bright subject against sky with a long lens is not as easy as it sounds. If your camera offers subject tracking and performs well in bright conditions, it may help during daytime launches. But when in doubt, a prepared manual setup is often more dependable than trusting the camera to guess what your flaming priority is.
Don’t Forget the Weather and the Environment
Humidity, wind, haze, and clouds can make or break a launch photo. Humid coastal air can fog lenses, especially when you move gear from air conditioning into warm night air. Let your equipment acclimate. Bring lens cloths. Check glass regularly.
Wind can shake tripods and blow straps around. If you are on a boardwalk or metal platform, even nearby footsteps can introduce vibration during long exposures. Small details matter when your shutter is open for a long time.
Cloud cover is not always bad. Sometimes it reflects plume light beautifully. Other times it swallows the rocket after three seconds and leaves you staring at a bright cloud like you just photographed a very aggressive flashlight. That is part of the game.
Mistakes That Ruin Rocket Launch Photos
- Showing up late: You lose time to test, compose, and focus.
- Using auto mode: Your camera may expose for the wrong thing.
- Forgetting RAW: You throw away editing flexibility.
- Touching the camera during long exposures: Instant blur.
- Leaving stabilization on while on a tripod: It can reduce sharpness in some situations.
- Trusting infinity without testing it: A classic path to soft images.
- Ignoring the foreground: The result may feel generic.
- Not checking for lens fog: Coastal moisture loves ambushes.
How to Edit Rocket Launch Photos
Editing is where a good launch shot often becomes a great one. Rockets are high-contrast subjects, so post-processing usually involves balancing very bright highlights with darker surroundings.
Start by recovering highlights in the flame and plume if needed. Then lift shadows carefully to reveal the environment without making the image look flat. Adjust white balance so the sky and foreground feel natural, and apply contrast with restraint. Noise reduction may help for darker launches, especially if you had to brighten the file.
For trail images, clarity and contrast can help define the streak. For frozen action images, selective sharpening on the rocket and plume can add punch. Crop only if it strengthens composition. A tight crop cannot invent detail that was never there.
What the Experience Actually Feels Like: Field Notes From a Launch Photographer’s Point of View
If you have never photographed a rocket launch before, here is the part nobody fully explains: the technical side matters, but the experience side matters too. Launch photography is part preparation, part adrenaline, and part standing in the dark wondering whether the giant machine in front of you is really going to leave Earth in a few minutes.
The first surprise is how much waiting is involved. You may arrive hours early, test your composition, re-test it, and then sit through delays that stretch longer than your snacks were designed to survive. You watch other photographers make tiny adjustments to tripods with the intensity of surgeons. Nobody wants to admit it, but there is usually a moment when everyone quietly wonders if they have overthought everything.
Then the countdown tightens. The crowd changes. Conversations get shorter. People look up from their phones. If it is a night launch, the pad glows with that strange, theatrical brightness that makes the whole scene feel unreal. If it is a day launch, heat shimmer and haze start to play tricks on your eyes and lens. You double-check focus. You check the histogram one more time. You tell yourself not to touch anything. Naturally, this makes you want to touch everything.
And then ignition happens. Not the photo first. The feeling first. You see the light before your brain catches up. From some locations, the sound arrives later, rolling across water or open land with a chest-thumping force that no livestream can reproduce. That gap between light and sound is one of the reasons launch photography becomes addictive. You are photographing a machine, yes, but you are also photographing anticipation becoming motion.
In those seconds, the discipline you built before launch finally pays off. If your setup is ready, you are free to experience the event instead of wrestling with menus. That is a huge lesson. The best launch photographers are not magically calmer than everyone else. They simply make enough decisions early that they can enjoy the moment when it counts.
Afterward, there is another emotional swing. You look at the back of the camera with equal parts hope and terror. Maybe you nailed it. Maybe the rocket trail is perfect but your horizon is crooked. Maybe your telephoto shot is sharp, but your wide shot is the one with all the heart. Sometimes the “best” frame is not the one you planned. It is the one that captured the glow in the clouds, the crowd looking up, or the reflection in the water that you almost ignored.
That is part of what makes rocket launch photography special. It is not only about documenting liftoff. It is about translating a rare human event into a still image that feels alive. Every launch teaches something: arrive earlier, focus better, go wider, crop less, trust the tripod, bring a towel for humidity, and maybe, just maybe, look up with your own eyes for one second before the rocket disappears. The camera matters. The experience matters too.
Conclusion
If you want to photograph a rocket launch well, think like a planner first and a button-pusher second. Choose the kind of shot you want, arrive early, use manual control, stabilize your camera, lock focus, and leave room for the story around the rocket. Do that, and your odds of coming home with a strong image rise dramatically.
The most memorable rocket launch photos are rarely accidents. They are the result of preparation meeting a once-in-a-while moment. And when that fireball climbs into the sky and your camera catches it cleanly, you will understand why so many photographers keep coming back for another countdown.


