Table of Contents >> Show >> Hide
- Step 1: Learn What a Stair Stringer Actually Does
- Step 2: Measure the Total Rise From Finished Surface to Finished Surface
- Step 3: Account for Flooring, Landing Height, and Real-World Conditions
- Step 4: Estimate the Number of Risers
- Step 5: Calculate the Exact Riser Height
- Step 6: Choose the Tread Depth, Also Called the Run
- Step 7: Calculate the Total Run and Make Sure the Stair Will Fit
- Step 8: Choose the Right Stringer Stock and Lay Out the Pattern
- Step 9: Adjust the Top and Bottom of the Stringer
- Step 10: Check Strength, Test-Fit One Stringer, Then Use It as a Template
- Common Mistakes When Measuring Stair Stringers
- Quick Example: Measuring Stair Stringers for a Small Deck
- Final Thoughts
- Experience and Practical Lessons From Measuring Stair Stringers
- SEO Tags
Measuring stair stringers sounds like one of those jobs that should be simple until you’re standing in the garage staring at a 2×12, a framing square, and your own rapidly fading confidence. The good news is that stair stringers are not magic. They’re just geometry, consistency, and a little respect for building code. Once you understand the relationship between total rise, tread run, and stringer layout, the whole process gets a lot less intimidating and a lot more “I’ve got this.”
This guide breaks the job into 10 practical steps so you can measure stair stringers accurately, avoid the most common mistakes, and keep your stairs comfortable, safe, and buildable. Whether you’re planning deck stairs, porch stairs, or a basic residential run, the logic is the same: measure carefully, calculate precisely, and cut only after you’ve double-checked everything. Lumber is patient, but your budget probably isn’t.
Before you begin: local building codes can vary, so always confirm your requirements with your local building department before cutting materials. The dimensions in this article reflect common U.S. residential guidance, but your permit office is the final boss.
Step 1: Learn What a Stair Stringer Actually Does
A stair stringer is the diagonal structural board that supports the treads and risers. In most wood-framed stair projects, it’s cut from a 2×12. Think of it as the skeleton of the staircase: the treads are where your feet go, the risers are the vertical faces between steps, and the stringers carry the load.
Why start here? Because measuring stair stringers is not just about finding a board length. You are really designing a repeated pattern of rise and run that must stay uniform from top to bottom. If one step is even a little off, your body notices immediately. Stairs are weirdly unforgiving like that.
Step 2: Measure the Total Rise From Finished Surface to Finished Surface
The total rise is the full vertical distance from the finished lower landing to the finished upper landing or deck surface. This is the number that drives almost everything else, so measure it carefully with a tape measure and a level.
If you’re building deck stairs, measure from the top of the finished deck boards down to the point where the stairs will land. If the ground slopes, measure at the exact landing point, not at some optimistic patch of dirt nearby. If you’re working indoors, measure from the finished lower floor to the finished upper floor, not from subfloor to subfloor unless you are also accounting for future flooring thickness.
This is where a lot of DIY projects go sideways. People measure the rough framing height, forget the finish flooring, and then wonder why the bottom step feels different from the others. Stairs remember every shortcut.
Step 3: Account for Flooring, Landing Height, and Real-World Conditions
Now refine that total rise. If flooring, tile, composite decking, or a landing pad will be added later, include that thickness now. One missed layer can throw off every riser on the staircase.
For exterior stairs, make sure the landing area is planned and stable. A stair that lands on loose soil today and settles later is basically a future argument with gravity. If the stairs will terminate on concrete, pavers, or a framed landing, measure to that finished surface. Good stair measurement starts with knowing exactly where the stairs begin and exactly where they end.
Step 4: Estimate the Number of Risers
Once you know the total rise, divide it by a target riser height. A common planning number is around 7 inches, while many residential codes cap risers at 7 3/4 inches. This gives you an estimated number of risers.
Example: if your total rise is 55 inches, divide 55 by 7. You get 7.86. Round up to 8 risers, not down to 7. Rounding down would make each step taller, and that is how comfortable stairs become leg-day revenge.
Always round in the direction that keeps you within code and makes the stairs easier to climb. A slightly shorter rise is usually more comfortable than a taller one, especially for kids, older adults, and anyone carrying a laundry basket while pretending they are not one wrong step from disaster.
Step 5: Calculate the Exact Riser Height
Now divide the total rise by the exact number of risers you chose. This gives you the precise height of each riser.
Using the same example: 55 inches divided by 8 risers equals 6.875 inches, or 6 7/8 inches per riser. That is a comfortable number and usually well within code limits.
This step matters because stair risers should be uniform. If one step is taller or shorter than the others, it creates a trip hazard. In most residential guidance, variation across the stairway should not exceed 3/8 inch. In real life, aim for much tighter than that. Your goal is not “barely legal.” Your goal is “every step feels identical.”
Step 6: Choose the Tread Depth, Also Called the Run
The run is the horizontal depth of each step. Many residential guidelines call for a minimum tread depth of 10 inches, and a run around 10 to 11 inches is common for comfortable stairs. A 7-inch rise paired with an 11-inch run tends to feel especially easy to use.
Do not assume deeper is always better. Very deep treads can make a staircase feel awkward because people start taking “step-and-a-half” movements. Very shallow treads, on the other hand, make the stair feel steep and cramped. Stairs are happiest in the middle, like most decent houseguests.
If you’re building deck stairs with two deck boards per tread, your actual tread assembly may end up around 11 inches depending on board width and spacing. Choose your run with both comfort and material layout in mind.
Step 7: Calculate the Total Run and Make Sure the Stair Will Fit
Now multiply the tread run by the number of treads to find the total run, which is the horizontal distance the staircase will occupy. In many stair layouts, the number of treads is one less than the number of risers because the upper deck or floor acts as the final tread.
In our 55-inch example, 8 risers often means 7 treads. If each tread has an 11-inch run, the total run is 77 inches.
This is the moment where the tape measure tells you whether your staircase fits the space or whether your dream staircase is trying to walk through a wall. Check bottom landing space, nearby doors, and headroom. A stair that works on paper but crashes into the ceiling is less “home improvement” and more “wooden obstacle course.”
Step 8: Choose the Right Stringer Stock and Lay Out the Pattern
Use straight 2×12 lumber with as few knots as possible. Smaller boards usually do not leave enough solid wood after the notches are cut. Also pay attention to the crown of the board and orient it consistently.
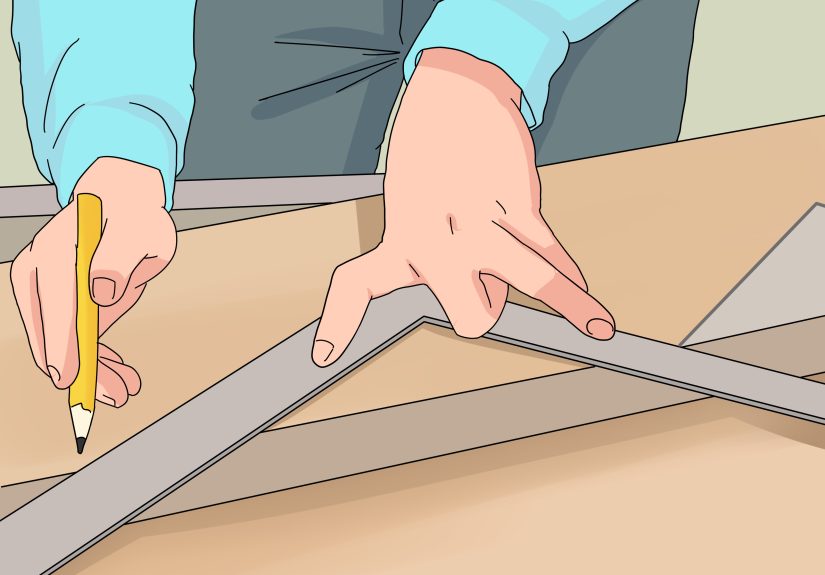
To lay out the stringer, use a framing square with stair gauges or a clamped guide. Set one leg of the square to the exact riser height and the other to the exact tread run. Then mark the first rise and run on the board. Slide the square down and repeat the pattern until all steps are laid out.
This is the part where patience pays off. A sloppy layout here turns into a sloppy staircase later. Mark clearly. Stay consistent. And don’t cut yet. The board is innocent until proven measured.
Step 9: Adjust the Top and Bottom of the Stringer
The raw stepped pattern is not always the final cut. You usually need to adjust the top and bottom of the stringer to account for tread thickness, riser material, landing conditions, and the way the stringer attaches.
For example, the bottom cut may need to be shortened by the thickness of the tread so that the first step height matches all the others after the tread is installed. The top may also need to be modified depending on whether the stair lands flush to a deck rim, ledger, or landing frame.
This is also the time to estimate overall stringer length. If you know the total rise and total run, you can use the Pythagorean theorem to find the diagonal stringer length: rise squared plus run squared, then take the square root. It sounds fancy, but it is really just the triangle doing triangle things.
Step 10: Check Strength, Test-Fit One Stringer, Then Use It as a Template
Before you cut a whole stack of stringers, inspect the layout. After the notches are cut, there should still be enough uncut material along the back of the stringer for strength. With a 2×12 and a 10-inch run, you are already using much of the board, so this check matters.
Cut one test stringer first. Use a circular saw for the long cuts, then finish the inside corners with a handsaw to avoid overcutting. Test-fit that first stringer in place. Check riser consistency, tread level, top connection, bottom bearing, and overall fit.
If it fits correctly, use that first piece as your template for the remaining stringers. This is the professional move that saves time and prevents the classic DIY outcome of cutting three beautifully identical wrong parts.
Common Mistakes When Measuring Stair Stringers
Forgetting finished-floor thickness
This is probably the most common measurement error. If the final surface changes, the stair changes.
Using rough estimates instead of exact riser math
“About seven inches” is fine for a rough plan, not for final layout. Always calculate the exact riser height before marking the stringer.
Ignoring total run
A staircase can be perfectly measured and still not fit the available space. Check the run before you cut lumber.
Making the first or last step different
If you forget tread thickness or landing buildup, the first or last step ends up off. That is where ankles go to file complaints.
Cutting all stringers before testing one
Never mass-produce a mistake. Cut one, test it, then duplicate success.
Quick Example: Measuring Stair Stringers for a Small Deck
Let’s say the finished height from deck surface to landing is 48 inches. You divide 48 by 7 and get 6.86, so you round up to 7 risers. Then divide 48 by 7 to get an exact riser height of about 6.86 inches.
Choose a tread run of 10 1/2 to 11 inches, depending on your tread material. If you use 6 treads at 10 1/2 inches, your total run is 63 inches. Then lay out the stringer using 6.86 inches on one leg of the framing square and 10.5 inches on the other. Adjust the top and bottom cuts, test one stringer, and only then cut the rest.
That is the whole process in miniature. Measure the rise, choose the risers, calculate the exact rise, choose the run, check the fit, lay out carefully, and verify before committing. No wizardry required.
Final Thoughts
If you want to know how to measure stair stringers correctly, remember this: you are not measuring one diagonal board. You are building a repeated system where every rise and every run must agree with the next one. That is why careful measuring matters more than flashy tools.
Get the total rise right. Account for finished surfaces. Choose a sensible number of risers. Lock in the exact riser height. Pick a comfortable tread run. Check the total run. Lay out one accurate stringer. Then use that first success as your pattern. Do that, and your stairs will feel solid, safe, and comfortable instead of looking like they were designed during a caffeine emergency.
Experience and Practical Lessons From Measuring Stair Stringers
The most useful experience-based lesson with stair stringers is that the measuring phase deserves way more time than most people think. New builders often want to rush to the saw because cutting feels like progress. Measuring, recalculating, and dry-fitting feel slower, but that is exactly where a good stair project is won. Experienced carpenters know that a staircase is one of those assemblies where tiny mistakes do not stay tiny. A missed quarter inch can show up on every step and turn into a staircase that feels off every single time someone uses it.
Another real-world lesson is that stairs rarely exist in a perfect world. The landing may not be fully finished yet. The grade may slope. The deck boards may still be waiting to be installed. The interior flooring might change at the last minute. In theory, measuring stair stringers is clean math. In practice, you are constantly translating real construction conditions into clean math. That is why seasoned builders double-check finished heights, use levels to confirm landing points, and avoid trusting assumptions they made two days earlier. Stairs punish outdated assumptions with unusual enthusiasm.
Many people also discover that comfort matters just as much as code. A set of stairs can technically pass minimum requirements and still feel awkward. That is why experienced builders pay attention not only to the maximum riser and minimum tread depth, but also to the overall feel of the stair. If a staircase feels too steep, too shallow, or oddly stretched out, users notice immediately. Good stair measurement is partly about compliance and partly about human movement. Your body is the final quality-control inspector, and it is not shy about complaints.
One of the smartest habits is making a story pole, sketch, or sample layout before cutting all the stringers. Builders who do this save themselves from repeating errors. Builders who skip it often end up with a pile of expensive firewood and a sudden interest in premade stringers. The first test stringer tells you whether your math makes sense in the actual space. It also reveals details that drawings do not always show clearly, like whether the nosings align nicely, whether the bottom bears correctly, and whether the top connection is as clean as you imagined.
Finally, there is the confidence factor. Measuring stair stringers seems intimidating until you do it once carefully and see how the pieces relate. After that, the process becomes logical instead of mysterious. You start to recognize the rhythm: rise, run, repeat; adjust top, adjust bottom, test, then duplicate. That experience is what separates a stressful stair project from a satisfying one. Once you have measured one staircase the right way, the next one feels a lot less like advanced carpentry and a lot more like a methodical job with a satisfying result. And that may be the best lesson of all: the tape measure is not the enemy. It is the part that keeps your staircase from becoming a very expensive ladder.


