Table of Contents >> Show >> Hide
- Before You Start: What “Square Footage” Are You Measuring?
- Tools You’ll Want (So This Doesn’t Turn Into a Three-Hour Episode)
- The Core Formula (AKA the Only Math You Truly Need)
- How to Measure Square Footage: 11 Steps
- Step 1: Decide what you’re counting (and what you’re not)
- Step 2: Sketch a simple floor plan (it can be uglyjust not confusing)
- Step 3: Break the space into simple shapes
- Step 4: Measure each section at floor level (and do it the same way every time)
- Step 5: Convert inches to decimals when needed (so multiplication isn’t a circus)
- Step 6: Calculate each section’s area
- Step 7: Handle odd shapes with the “slice and add” method
- Step 8: Measure closets, alcoves, and built-in bumps (they add up fast)
- Step 9: Treat stairs and open-to-below areas carefully
- Step 10: Add up totals by level, then create a grand total
- Step 11: Sanity-check your results (because humans are… creatively inaccurate)
- What “Counts” as Square Footage in Real Life (GLA vs. Total Area)
- Common Mistakes (So You Don’t Buy 37 Extra Boxes of Flooring)
- How Much Extra Material Should You Buy?
- of Real-World Experience (A.K.A. Square Footage Stories From the Trenches)
- Conclusion
Measuring square footage sounds like something you do once, write down, and then never think about againlike your
blood type or your Wi-Fi password. And yet, square footage is the number that quietly runs your life: it decides how
much flooring you buy, how much paint you need, how big your furniture can be, and how intense the side-eye gets when
a listing says “spacious” but your couch says “absolutely not.”
The good news: you don’t need a math degree or a drone (although the drone would be fun). You just need a simple
system and the patience to measure the same wall twice because the first time your tape measure decided to become a
spaghetti noodle.
Before You Start: What “Square Footage” Are You Measuring?
“Square footage” can mean different things depending on your goal:
-
Project square footage (DIY mode): The interior floor area you’re covering with flooring, rugs, or
tile. You typically measure from inside wall to inside wall. -
Living space square footage (real estate mode): Often refers to Gross Living Area (GLA)finished, livable space.
Rules vary by market, but many lenders and appraisers use standardized measuring guidelines (more on that later). -
Total area (everything mode): May include garages, basements, unfinished areas, porches, and other
spacesusually reported separately.
This guide helps you measure accurately for both DIY projects and whole-home estimates, with a few “don’t get sued”
notes for the real estate side.
Tools You’ll Want (So This Doesn’t Turn Into a Three-Hour Episode)
- Tape measure (25 ft works for most rooms; 30–35 ft is nicer for bigger spaces)
- Laser distance measurer (optional, but it makes you feel like a superhero)
- Clipboard + paper or a notes app
- Pencil (erasers are the unsung heroes of measurement)
- Calculator (or your phone, which is already judging you for not charging it)
The Core Formula (AKA the Only Math You Truly Need)
For a rectangle or square:
Length × Width = Area
Example: A room that measures 12 ft by 10 ft is:
12 × 10 = 120 sq ft
How to Measure Square Footage: 11 Steps
Step 1: Decide what you’re counting (and what you’re not)
Start with your purpose:
- Flooring project: Count floor surfaces you’ll cover. Exclude built-in tubs, islands, or permanent features only if you truly won’t cover them.
- Whole-home estimate: Measure each level and keep notes on what’s finished vs. unfinished.
- Real estate/GLA: Be extra carefulfinished above-grade vs. below-grade often must be reported separately, and ceiling height can matter.
Step 2: Sketch a simple floor plan (it can be uglyjust not confusing)
Draw each floor separately. Use boxes and labels. You’re not auditioning for an architecture show; you’re building a
map so your numbers don’t wander off and start a new life in another notebook.
Add labels like: Living Room, Bedroom 1, Hallway, Closet, Stairs. If your home is open-concept, sketch
“measurement zones” anyway (you can’t measure “vibes” in feetyet).
Step 3: Break the space into simple shapes
Most homes are a bunch of rectangles wearing a trench coat. Even “weird” spaces can usually be split into:
- Rectangles / squares
- Triangles (for angled nooks)
- Circles or partial circles (bay windows, rounded corners)
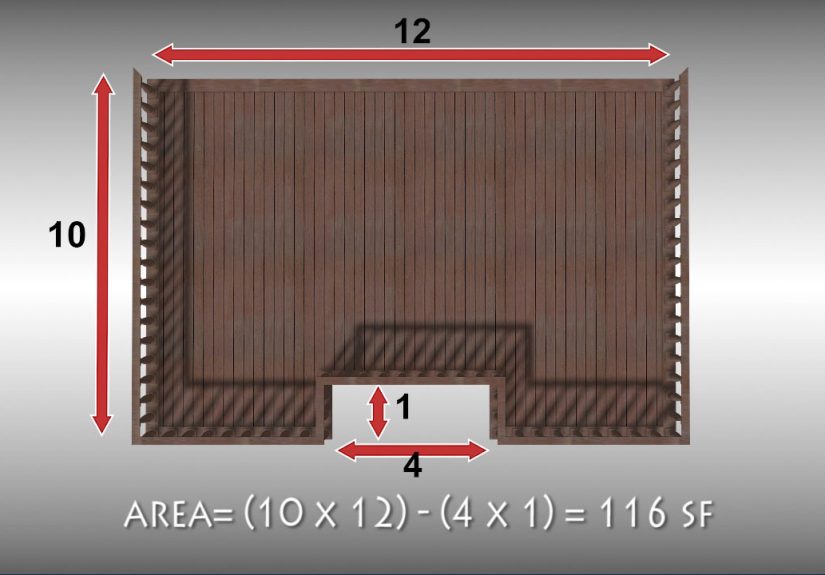
For L-shaped rooms: split into two rectangles and treat them like separate mini-rooms.
Step 4: Measure each section at floor level (and do it the same way every time)
Measure the length and width of each rectangle. Keep your tape straight and level.
If the wall bows, measure along the floor line where the flooring actually sits.
Pro move: measure to the nearest inch (or nearest 0.1 ft if you like decimals). Consistency beats
perfection.
Step 5: Convert inches to decimals when needed (so multiplication isn’t a circus)
If your measurement is 12 ft 6 in, convert the inches:
6 ÷ 12 = 0.5, so that’s 12.5 ft.
Handy mini-cheat sheet:
| Inches | Feet (decimal) |
|---|---|
| 3 in | 0.25 ft |
| 6 in | 0.5 ft |
| 9 in | 0.75 ft |
| 10 in | 0.83 ft (approx.) |
Step 6: Calculate each section’s area
For rectangles:
Length × Width
Example: A hallway section measures 14 ft 3 in by 3 ft 6 in.
- 14 ft 3 in = 14.25 ft
- 3 ft 6 in = 3.5 ft
- Area = 14.25 × 3.5 = 49.875 sq ft (round to 50 sq ft for most DIY projects)
Step 7: Handle odd shapes with the “slice and add” method
If a space looks like it belongs in a geometry textbook, don’t panic. Slice it into shapes you know.
Triangles: (Base × Height) ÷ 2
Example: A triangular nook has a base of 6 ft and a height of 4 ft:
(6 × 4) ÷ 2 = 12 sq ft
Circles: π × r²
Example: A rounded bay area is close to a half-circle with a radius of 3 ft:
Full circle = 3.1416 × 3² = 28.27 sq ft, so half ≈ 14.14 sq ft
If you’re estimating for materials, it’s usually safer to round slightly up (your future self will thank you when you
don’t run out of tile with 12 square inches left to cover).
Step 8: Measure closets, alcoves, and built-in bumps (they add up fast)
Closets are the “hidden taxes” of square footage. Individually they feel small. Collectively they can be a whole extra
room’s worth of area, especially in older homes with a closet in every corner (and a corner in every closet).
Include them if they’re part of the area you’re counting (flooring, GLA, etc.). If you’re unsure, label them separately
on your sketch so you can decide later.
Step 9: Treat stairs and open-to-below areas carefully
Stairs can be tricky because they occupy space on more than one level, and “open-to-below” spaces (like two-story
foyers) can accidentally get counted twice if you’re not careful.
-
DIY tip: If you’re measuring for carpet on stairs, you’ll usually calculate stair tread/risers as
surface area (different from floor square footage). For whole-home floor square footage, you’re typically counting
the footprint where the stairs land on a level. -
Real-estate style note: Many standardized guidelines count stair tread/landing area on the level
from which the stairs descend, and do not count openings to the floor below as “floor area.”
Step 10: Add up totals by level, then create a grand total
Add the areas of all sections on each floor. Then add floors together.
If you have a basement, finished attic, or garage, keep them in their own buckets:
- Above-grade finished
- Below-grade finished (basements often go here)
- Unfinished (unfinished basement, unfinished attic, crawlspace, etc.)
- Garage / porch / deck (often reported separately)
Step 11: Sanity-check your results (because humans are… creatively inaccurate)
Do a quick reality check:
-
Compare your total to tax records, appraisal reports, or blueprints if you have them.
Differences are common, but giant gaps are a red flag. - Check for double-counting (especially around stair openings, lofts, and open spaces).
-
Re-measure any wall that seems suspicious. If one bedroom is “somehow” bigger than your living room, the tape
measure is probably the liar.
What “Counts” as Square Footage in Real Life (GLA vs. Total Area)
Here’s where people get frustrated: two professionals can measure the same home and get different numbers, because
they may follow different standards or local practices.
-
Gross Living Area (GLA): generally focuses on finished, livable, year-round space that’s part of
the home’s main living area. -
Garages, unfinished areas, and many basements: often aren’t included in GLA, even if they’re
useful spaces (your treadmill will feel personally attacked). -
Ceiling height: can matter. Some standards require minimum ceiling heights for space to qualify as
finished living areaespecially with sloped ceilings.
If you’re measuring for a listing, refinance, or dispute resolution, consider hiring a pro who uses a recognized
standard. For DIY projects, you can absolutely do this yourselfjust be consistent and document your work.
Common Mistakes (So You Don’t Buy 37 Extra Boxes of Flooring)
- Mixing units: measuring one wall in inches, another in feet, and then multiplying “12.7” by “9 ft-ish.”
- Not splitting shapes: trying to measure an L-shape as one rectangle (spoiler: it’s not).
- Forgetting closets and hallways: those “small” spaces can add 50–150 sq ft surprisingly fast.
- Not adding waste: most flooring/tile jobs need extra material for cuts, pattern matching, and mistakes made by humans who are hungry.
How Much Extra Material Should You Buy?
This depends on the material and layout, but common planning ranges are:
- Flooring (planks/laminate/vinyl): add ~5–10% for waste, more if you’re doing diagonal layouts or complex patterns.
- Tile: often ~10% extra (and more for intricate layouts, small tiles, or lots of corners).
of Real-World Experience (A.K.A. Square Footage Stories From the Trenches)
The first time I measured square footage for a flooring project, I did what many brave beginners do: I measured one
wall, measured another wall, multiplied them, and celebrated like I had discovered fire. Then I went to order flooring
and realized my “simple rectangle” living room had a fireplace bump-out, a bay window, and a closet that was somehow
shaped like a lowercase “r.” My rectangle was a lie. A beautiful, confident liebut still a lie.
The biggest lesson was that measuring is less about math and more about planning your approach.
Once I started sketching first, everything got easier. The sketch didn’t need to be pretty; it just needed to tell the
truth. When you draw the room as it really isbumps, nooks, and allyou naturally start breaking it into smaller,
measurable sections. Suddenly the bay window isn’t scary; it’s just “a rectangle plus half a circle,” which sounds
like something you’d order at a breakfast place that serves geometry.
Another real-life surprise: walls are not always parallel, especially in older homes. I once measured a bedroom and got
a different width depending on whether I measured near the door or near the window. That’s not me being dramaticthat’s
the house being… artisanal. In that situation, measuring in multiple spots helped me make a practical decision. For
buying flooring, I used the larger measurement (because running short is worse than having a few extra planks). For
documenting the room, I wrote a note like “varies from 10.1 ft to 10.4 ft” and moved on with my life.
Stairs were another “aha” moment. If you’re measuring for carpet, stair square footage is not the same as floor square
footagebecause you’re covering treads (and sometimes risers), not just the footprint. The first time I ignored that,
my carpet order was short by a “this is fine” amount… which is to say, not fine. After that, I learned to keep a
separate measurement section for stairs and anything vertical (like wall surface area for paint). The moral: always
measure the surface you’re actually covering.
The most useful habit I’ve picked up is a simple one: label everything on the sketch. I write the
length and width directly inside each shape, then write the calculated area next to it. That way, when a number looks
off, I can trace it back instantly instead of re-measuring the entire house like I’m stuck in a home-improvement time
loop. If you take nothing else from these stories, take this: sketches save sanity, and sanity is a limited resource.
Conclusion
Measuring square footage is a repeatable skill: sketch, split into shapes, measure consistently, calculate, and total
everything up. For DIY projects, your goal is practical accuracy (plus a little extra material so you don’t lose a weekend
to “one last box”). For real estate and official reporting, keep finished vs. unfinished and above-grade vs. below-grade
clearly separated, and consider professional measurement when the number has financial or legal consequences.