Table of Contents >> Show >> Hide
- Before You Start: What "Pressure Cooker Fried" Really Means
- Ingredients and Equipment
- How to Make Pressure Cooker "Fried" Chicken in 14 Steps
- Step 1: Pick the Right Chicken Cuts
- Step 2: Pat the Chicken Dry
- Step 3: Mix a Bold Spice Rub
- Step 4: Season the Chicken Generously
- Step 5: (Optional but Smart) Add a Quick Buttermilk Dip
- Step 6: Set Up the Pressure Cooker Correctly
- Step 7: Pressure-Cook the Chicken
- Step 8: Quick-Release Safely and Drain
- Step 9: Let the Chicken Cool and Dry a Bit
- Step 10: Build a Crispy Coating
- Step 11: Dredge the Chicken and Let It Rest
- Step 12: Heat the Oil to the Right Temperature
- Step 13: Fry in Batches Until Crispy and Golden
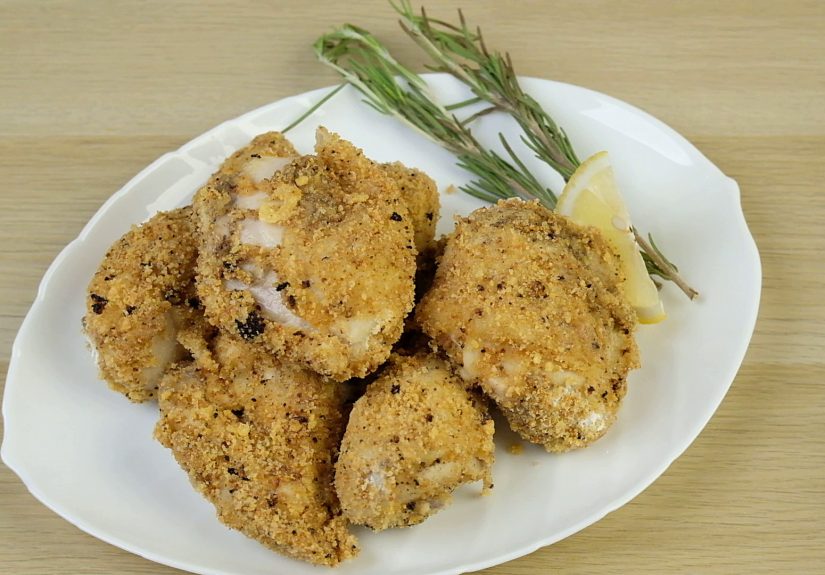
- Step 14: Drain, Season, Rest Briefly, and Serve
- Why This Method Works (And Why It’s So Popular)
- Common Mistakes to Avoid
- Serving Ideas
- Conclusion
- Real-World Kitchen Experiences and Lessons (500+ Words)
If you’ve ever wanted fried chicken faster (without sacrificing that glorious crunch), pressure cooker "fried" chicken is your weeknight superhero. The trick is in the quotation marks: you are not pressure-frying chicken in oil. Instead, you pressure-cook the chicken first to make it tender and juicy, then finish it in hot oil to crisp the skin and coating. Think of it as a tag-team effort: the pressure cooker handles tenderness, the skillet handles drama.
This method works especially well for bone-in, skin-on chicken thighs because they stay juicy, cook evenly, and crisp beautifully. You’ll also get better results (and a lot less stress) if you treat this as a hybrid technique rather than a shortcut that skips food safety. So yes, we’re chasing crispy chickenbut we’re doing it with a thermometer, good timing, and a little common sense.
Before You Start: What "Pressure Cooker Fried" Really Means
Let’s get the big safety note out of the way first: do not deep-fry or pressure-fry with oil inside a home electric pressure cooker. Home multi-cookers are not designed for that. The safe, popular approach is:
- Pressure-cook chicken on a trivet with water (or broth) in the pot.
- Dry and bread the chicken.
- Pan-fry or shallow-fry in a separate skillet to crisp it up.
That’s why the title uses quotes around "fried." You still get crunchy, satisfying chicken, but you avoid trying to turn your countertop cooker into a commercial pressure fryer. (Your kitchenand eyebrowswill thank you.)
Ingredients and Equipment
Chicken and Seasoning
- 8 bone-in, skin-on chicken thighs (or a mix of thighs and drumsticks)
- 2 teaspoons kosher salt (plus more to finish)
- 1 tablespoon paprika
- 1 teaspoon garlic powder
- 1 teaspoon onion powder
- 1 teaspoon black pepper
- 1/4 to 1/2 teaspoon cayenne (optional, but fun)
- 1 cup buttermilk (optional but highly recommended for flavor and coating texture)
Coating
- 1 1/2 cups all-purpose flour
- 1/2 cup cornstarch
- 1 teaspoon baking powder
- Pinch of salt and pepper
- 1 to 2 tablespoons buttermilk drizzled into the flour (for craggy bits)
For the Pressure Cooker and Frying
- 1 cup water (for the pressure cooker)
- Neutral frying oil (peanut, canola, or vegetable)
- Electric pressure cooker + trivet
- Large skillet or Dutch oven (cast iron works great)
- Wire rack and sheet pan or paper towels
- Thermometer (oil thermometer + instant-read meat thermometer)
- Tongs
How to Make Pressure Cooker "Fried" Chicken in 14 Steps
Step 1: Pick the Right Chicken Cuts
Start with bone-in, skin-on thighs for the best balance of flavor, moisture, and crisp texture. Thighs are forgiving, which is excellent news if you occasionally get distracted by your own playlist. Drumsticks also work well. Breasts can work, but they’re easier to overcook during the pressure stage.
Step 2: Pat the Chicken Dry
Pat each piece dry with paper towels. Do not rinse raw chicken. Drying helps the seasoning stick, and skipping the rinse also helps reduce cross-contamination in the kitchen. If you’re trying to get crispy skin later, moisture is the enemy anyway.
Step 3: Mix a Bold Spice Rub
In a small bowl, combine kosher salt, paprika, garlic powder, onion powder, black pepper, and cayenne. This gives the chicken flavor before it ever sees flour. Think of this as your “base coat”the kind of seasoning that makes people ask, “What did you put in this?” while already reaching for a second piece.
Step 4: Season the Chicken Generously
Sprinkle the spice mix all over the chicken, pressing it onto the skin and meat. Let it sit for 10 to 15 minutes at room temperature while you prep the cooker and coating. This short rest helps the seasoning adhere and jump-starts flavor.
Step 5: (Optional but Smart) Add a Quick Buttermilk Dip
If you want more classic fried chicken flavor, pour buttermilk into a bowl and dip the seasoned chicken pieces lightly. You don’t need an overnight soak for this method, but even a quick dip helps tenderize and improves coating adhesion. Buttermilk also plays nicely with the final crunch.
Step 6: Set Up the Pressure Cooker Correctly
Pour 1 cup of water into the pressure cooker and place the trivet inside. Arrange the chicken on the trivet (stacking is okay if needed). The chicken should be elevated above the liquidthis is a pressure-cook/steam environment, not a simmer. Lock the lid and make sure the valve is set to seal.
Step 7: Pressure-Cook the Chicken
Cook on High Pressure for about 10 to 15 minutes (timing depends on piece size and your model; thighs are more forgiving). A common sweet spot for medium bone-in thighs is around 10 minutes, while larger pieces may need closer to 15. The goal is fully cooked, tender chicken that can handle a short finishing fry.
Pro tip: the pressure cooker takes time to come up to pressure before the timer starts, so budget extra time. This method is fast, but it’s not teleportation.
Step 8: Quick-Release Safely and Drain
Once cooking is done, carefully quick-release the pressure according to your cooker’s instructions. Open the lid away from your face, then transfer the chicken to a wire rack or paper towel-lined tray. Let the surface moisture drain off. You want the chicken cookedbut not soggybefore breading.
Step 9: Let the Chicken Cool and Dry a Bit
This step matters more than people think. Let the chicken sit for 15 to 30 minutes so steam escapes and the skin dries. If you rush straight from pressure cooker to flour, the coating can slide off like a bad decision. A slightly drier surface = better crust.
Step 10: Build a Crispy Coating
In a large bowl, combine flour, cornstarch, baking powder, and a pinch of salt and pepper. For extra texture, drizzle in 1 to 2 tablespoons of buttermilk and toss with your fingers to create little clumps. Those clumps fry up into crunchy ridgesthe kind that make chicken look gloriously craggy and taste even better.
Step 11: Dredge the Chicken and Let It Rest
Dredge each piece in the flour mixture, pressing firmly so the coating sticks. If you want a thicker crust, do a quick double dip (buttermilk, then flour again). Place breaded pieces on a wire rack and let them rest for 10 to 15 minutes. This rest helps the coating hydrate and adhere, which means less breading left behind in the oil.
Step 12: Heat the Oil to the Right Temperature
Pour oil into a large skillet or Dutch oven to a depth of about 1/2 inch (up to 1 inch if you prefer more coverage). Heat to 350°F. Once you add chicken, the temperature will drop, so keep an eye on it and adjust the heat as needed. A good working range for crisp chicken is roughly 325°F to 350°F.
Using a thermometer here is not “extra.” It’s the difference between crispy and greasy.
Step 13: Fry in Batches Until Crispy and Golden
Add the chicken skin-side down, leaving space between pieces. Fry without fussing for 4 to 5 minutes until the skin is crisp, then flip and cook another 3 to 4 minutes, or until deeply golden. Because the chicken is already pressure-cooked, this stage is mainly about texture, color, and reheating the exteriornot fully cooking raw meat from scratch.
Still, check a piece with an instant-read thermometer, especially on your first batch. Chicken should be at least 165°F in the thickest part. Dark meat often tastes even better at a slightly higher finished temp because connective tissue softens more.
Step 14: Drain, Season, Rest Briefly, and Serve
Move the chicken to a wire rack (best for staying crisp) or paper towels. Sprinkle with a little extra salt while hot. Let it rest for 5 minutes before serving so the crust sets and the juices redistribute. Then serve immediately and act surprised when everyone hovers in the kitchen.
Why This Method Works (And Why It’s So Popular)
1) Pressure cooking gives you juicy meat fast
Pressure cooking tenderizes the chicken and cuts down the time you’d normally spend frying raw bone-in pieces. That means less time standing over oil, less chance of a burnt crust + undercooked center situation, and more reliable results.
2) The finishing fry gives you real fried-chicken texture
Air fryers are great, ovens are useful, but a quick finish in hot oil still delivers the best crispy skin and classic fried flavor. Since the chicken is already cooked, you can focus on crunch instead of playing temperature roulette.
3) The coating strategy improves crunch
A flour + cornstarch coating with a little baking powder creates a lighter, crispier crust. Adding a few drops of buttermilk to the dredge creates textured bits that fry up beautifully. It’s a small step with big payoff.
Common Mistakes to Avoid
- Trying to deep-fry in the pressure cooker: Don’t. Use a skillet or Dutch oven.
- Skipping the drying/rest step after pressure cooking: Wet chicken = slippery coating.
- Crowding the pan: This drops oil temperature and makes the crust soggy.
- Guessing oil temperature: Use a thermometer to stay in the crisp zone.
- Skipping the post-dredge rest: Let the coating settle so it sticks better during frying.
- Overcooking breasts with thigh timing: Different cuts need different pressure times.
Serving Ideas
Serve your pressure cooker "fried" chicken with biscuits, slaw, mac and cheese, pickles, hot honey, or a simple salad if you want to pretend this is a balanced meal (which, to be fair, it can be). Leftovers reheat best on a rack in a low oven so the crust perks back up.
Conclusion
If you love fried chicken but don’t love long fry times, this hybrid method is a winner. Pressure-cooking first gives you tender, juicy meat, and the finishing fry delivers the crisp, golden payoff everyone actually wants. The secret isn’t a gadget gimmickit’s using each tool for what it does best. Follow the 14 steps, keep your oil temperature steady, and use a thermometer, and you’ll get chicken that tastes like you spent all day on it (without actually spending all day on it).
Real-World Kitchen Experiences and Lessons (500+ Words)
One of the most common experiences people have with pressure cooker "fried" chicken is the moment of skepticism right after the pressure-cook step. The chicken comes out looking pale, soft, and very much not like the crispy masterpiece in your imagination. This is normal. In fact, it’s the point. At that stage, the chicken is basically your tender, juicy base layer. The first time someone tries this method, they often panic and think they’ve ruined it. Then they dry it, dredge it, fry it for a few minutesand suddenly it looks like something from a Sunday dinner spread. The big lesson: don’t judge the chicken by its pre-fry appearance. Great crust happens in the final act.
Another common experience is discovering how much the drying time matters. Many home cooks rush from the pressure cooker to the flour because everyone is hungry and the kitchen smells amazing. The result is usually a patchy crust that slips off in the pan. People often describe it as “my breading stayed in the oil instead of on the chicken,” which is a very poetic way to say, “I was too impatient.” Once they try the same recipe again and let the chicken cool and dry for 15 to 30 minutes, the difference is huge. The coating grabs better, fries cleaner, and looks much more intentional.
Oil temperature is another reality check. In a lot of kitchens, the first batch comes out gorgeous and the second batch looks tired because the oil dropped too low. Or the opposite happens: the oil creeps too hot and the coating darkens before the crust fully crisps. People who start using an oil thermometer almost always report the same thing: “I didn’t realize how much the temperature moves.” That small tool makes the process feel less like guessing and more like cooking. It also helps with confidence, which matters when you’re frying anything.
A fun pattern shows up with seasoning too. First-time attempts are often under-seasoned because cooks assume the coating will carry all the flavor. Then they taste the chicken and realize the meat itself needs seasoning before pressure cooking. On the next round, they season the chicken directly and add a little salt while it’s still hot after frying. Suddenly the flavor goes from “pretty good” to “who made this?” in the best possible way. The lesson here is simple: layered seasoning beats one-note seasoning.
There’s also the very relatable “I tried to make this with boneless skinless chicken breasts because that’s what I had” experience. It can work, but it behaves differently. Breasts cook faster, dry out faster, and don’t give you that same old-school fried chicken vibe. After one or two attempts, many people switch to thighs and immediately understand why so many recipes favor them for this method. Thighs are juicy, forgiving, and better suited to the pressure-cook-then-fry workflow.
Finally, one of the best experiences with this recipe is how well it fits real life. It’s easier to pause after the pressure-cook step than in a traditional fried chicken recipe. You can pressure-cook the chicken, let it cool, and fry it a little later when everyone is actually ready to eat. That flexibility is a huge win for busy households, dinner parties, or any evening when timing gets weird (which is, honestly, most evenings). The method also feels less intimidating for beginners because the final fry is short and focused on crisping, not raw-chicken doneness alone.
In other words, pressure cooker "fried" chicken is one of those recipes that teaches good habits: dry your food, season in layers, watch your temperatures, and don’t rush the crust. It rewards patience without demanding perfection. And once you nail it, it becomes the kind of recipe you make when you want comfort food with a little kitchen swagger.