Table of Contents >> Show >> Hide
- What You’ll Need
- Origami Basics You Should Know (No PhD in Paper Required)
- How to Make an Easy Origami Giraffe (Standing, Long Neck, Cute Vibes)
- Make It Look Like a Real Giraffe (Easy Customizations)
- Troubleshooting: Common Origami Giraffe Problems (and Fixes)
- Origami Giraffe Ideas for Kids, Classrooms, and Parties
- Real-World Folding Experiences (500+ Words of “What It’s Actually Like”)
- Conclusion
If you’ve ever looked at a giraffe and thought, “Nature really said legs for days,” you’re not alone.
The good news: you can capture that long-necked charm with nothing but a square sheet of paper, a flat table,
and the stubborn optimism that powers all great craft projects.
In this guide, you’ll learn how to make an origami giraffe using a beginner-friendly method that’s popular across
classic origami tutorials: you build a strong base first, then sculpt the neck, head, legs, and tail using simple
shaping folds. I’ll also show you how to customize it (spots! ossicones! tiny paper drama!) and troubleshoot the
most common “why is my giraffe doing the splits?” moments.
What You’ll Need
Supplies
- 1 square sheet of origami paper (recommended: 6 in x 6 in / 15 cm x 15 cm)
- A flat surface (tables are underrated heroes)
- Optional: a ruler or bone folder for sharper creases
- Optional: markers or colored pencils for spots and facial details
Paper Tips (So Your Giraffe Doesn’t Become a Paper Burrito)
For your first giraffe, standard origami paper (often called “kami”) is ideal because it’s thin enough to fold
cleanly but sturdy enough to hold its shape. A 15 cm square is the sweet spot for beginners: big enough to handle,
small enough to finish without feeling like you’re folding a bedsheet.
Want color that “reads” like a giraffe? Try yellow, tan, or light brown paper. If you use paper that’s colored on
one side and white on the other, you can intentionally place the colored side outward for a classic giraffe look.
Origami Basics You Should Know (No PhD in Paper Required)
This model relies on a few core folds you’ll see in lots of origami animals. If you’ve made a paper crane before,
you’re already ahead of the game. If notwelcome. The paper will teach you humility and then reward you with a
giraffe.
Valley Fold vs. Mountain Fold
- Valley fold: fold the paper toward you so it makes a “valley” crease.
- Mountain fold: fold the paper away from you so the crease peaks like a “mountain.”
Pre-creasing
A “pre-crease” is a fold you make firmly and then unfold. It’s like drawing a roadmap into the paper so later
collapses don’t feel like wrestling an octopus.
Squash Fold, Reverse Fold, and Crimp Fold
- Squash fold: open a pocket and flatten it into a new shape.
- Inside reverse fold: push a point inward along existing creases (great for snouts).
- Outside reverse fold: fold a point outward along existing creases (great for neck/head angles).
- Crimp fold: a quick zig-zag fold that makes a bendperfect for tails and “giraffe attitude.”
How to Make an Easy Origami Giraffe (Standing, Long Neck, Cute Vibes)
This approach builds a strong base and then shapes the giraffe in stages. Read through the steps once before you
fold. Origami rewards confidence… and also punishes skipping Step 6.
Part 1: Make the Base (The “Skeleton” of Your Giraffe)
-
Start with the paper color-side down (if your paper is two-sided). Place it like a diamond
(one corner pointing up). -
Pre-crease diagonally both ways: fold bottom corner to top corner (valley fold), crease, unfold.
Then fold left corner to right corner, crease, unfold. You should see an “X” crease. -
Pre-crease horizontally and vertically: rotate to a square orientation. Fold in half top-to-bottom,
crease, unfold. Fold left-to-right, crease, unfold. Now you have a grid + Xyour paper is basically wearing a
“fold roadmap.” -
Collapse into a square base: with the paper slightly cupped, bring the left and right edges inward
while the top collapses down. You should land on a smaller square with open flaps at the bottom. -
Make a kite shape (front layer): take the top flap’s left edge and fold it to the center line.
Repeat with the right edge. Crease sharply. -
Repeat on the back layer: flip the model over and fold the left and right edges to the center line again.
Now the model is symmetrical and ready to become an animal instead of “abstract paper ambition.” -
Create a petal fold (bird-base style step): lift the top flap from the bottom point upward.
As you lift, open the flap slightly and flatten it so the sides align with the existing creases.
You’ll form a long diamond shape. -
Repeat the petal fold on the back: flip over and do the same lift-open-flatten motion.
Congratulationsyou now have the kind of base that powers a lot of origami animals.
Part 2: Form the Legs and Body (So It Can Actually Stand)
-
Identify the four points: you should have a long top point (future neck area), a long bottom point
(future legs), and side flaps that will help define the body. -
Split the bottom point into two legs: gently open the bottom layers and separate them into a left
and right leg. Crease along the center so the legs have definition. -
Shape the front legs: take one lower flap and fold it slightly outward to create a “front leg”
angle. Repeat with the matching flap on the other side. -
Shape the back legs: do the same with the remaining two lower flaps. You’re aiming for four distinct
legs that can balance. -
Give the feet a tiny fold: on each leg, fold a small bit of the tip upward (a short valley fold).
This creates flat “feet” and helps your giraffe stand instead of performing accidental yoga. -
Adjust the stance: spread the legs slightly and press the body area so it’s more three-dimensional.
If it wobbles, widen the legs a touch and reinforce the foot folds.
Part 3: Make the Neck and Head (The Part Everyone Notices)
-
Locate the top point: this becomes the neck. Fold it upward to set the giraffe’s “standing tall”
posture. Crease firmly. -
Thin the neck (optional but recommended): fold the left and right edges of the neck inward slightly,
like a gentle kite fold, to make a slimmer neck. Keep it symmetrical. -
Create the head angle: near the top of the neck, make a small outward bend using an
outside reverse fold. This sets where the head will project forward. -
Form the snout: fold the very tip of the head inward using an inside reverse fold.
This shortens the point and makes it look more like a face than a spear. -
Add “ossicones” (giraffe horn nubs): on the top of the head, make two tiny pinches or micro-folds
upward. Keep them subtlepaper has limits, and we respect boundaries in this house. -
Shape the ears (optional): if there are small side layers near the head, fold them outward slightly
to suggest ears. If your model doesn’t naturally offer this, skip ityour giraffe can be “minimalist.”
Part 4: Tail and Final Shaping (The Finishing Touches)
- Find the back point or back flap: this becomes the tail. Fold it outward slightly.
-
Crimp the tail: make a small zig-zag fold so the tail bends. This instantly adds personality,
like your giraffe just heard a joke it refuses to laugh at. -
Round the body slightly: gently press the sides so the torso looks less flat. Reinforce the leg
creases to keep balance. -
Final balance check: place it on a table. If it tips forward, slightly angle the back legs back.
If it tips backward, angle the front legs forward. Tiny adjustments matter.
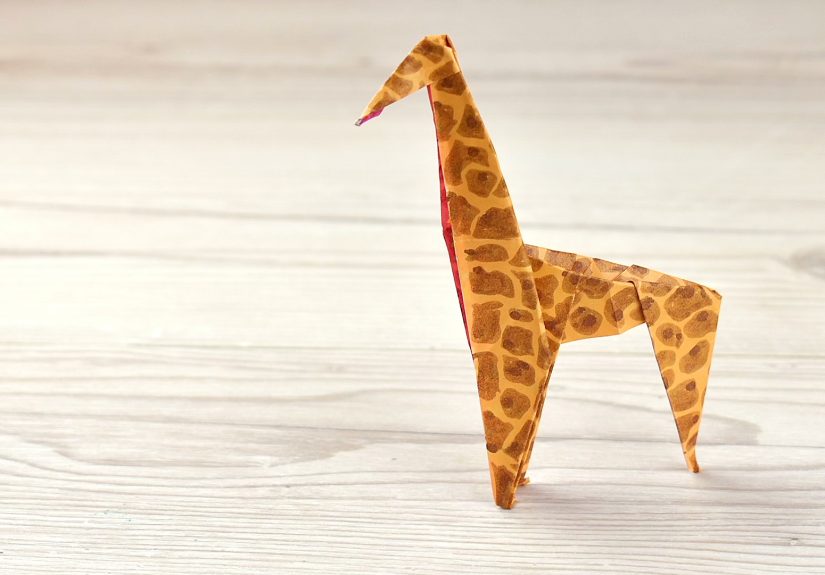
Make It Look Like a Real Giraffe (Easy Customizations)
1) Add Spots Without Turning It Into a Leopard
Giraffe coats have distinct patch patternsno two giraffes have exactly the same spot arrangement. After folding,
use a brown marker or colored pencil to draw irregular polygon-like patches along the body and neck. Leave thin
lighter “lines” between patches to mimic that classic giraffe pattern.
2) Suggest a Mane
Many giraffes have a short mane running down the back of the neck. You can hint at this by drawing a thin darker
line along the neck ridge, or by making tiny serrated micro-folds if your paper is thin enough.
3) A Fun Fact You Can “Bake In” (The Tongue)
Giraffes are famous for their long, dark tongues, which help them grab leaves. If you want a playful touch, color a
tiny strip of paper dark purple/blue and tuck it into the mouth arealike your giraffe is mid-snack.
(Yes, you are now making a giraffe charcuterie moment.)
Troubleshooting: Common Origami Giraffe Problems (and Fixes)
“My giraffe won’t stand.”
- Make the feet folds slightly larger and flatter.
- Spread the legs wider for a bigger base of support.
- Reinforce leg creases so they don’t spring back.
“The neck is too thick.”
- Use thinner paper (standard kami works well for most beginner models).
- Do the optional “thin the neck” folds more aggressivelybut keep them symmetrical.
- If you attempted extra shaping folds, undo the last one and simplify.
“The head looks weird… like an anteater.”
- Shorten the snout by increasing the inside reverse fold at the tip.
- Adjust the head angle by redoing the outside reverse fold with a slightly different bend.
- Add tiny ossiconesyour brain instantly registers “giraffe” when those appear.
Origami Giraffe Ideas for Kids, Classrooms, and Parties
Origami giraffes are surprisingly great for group activities because the “wow factor” is high, but the paper and
setup are simple. If you’re folding with kids:
- Use larger paper (9 in / 23 cm squares) for easier handling.
- Pre-fold creases for younger learners so the collapses are less frustrating.
- Make it a safari set: fold a giraffe, elephant, rhino, and birdthen build a paper “savanna” scene.
- Turn it into a mini-lesson: talk about how giraffes use long tongues to eat leaves and why their coats are patterned.
Real-World Folding Experiences (500+ Words of “What It’s Actually Like”)
Folding an origami giraffe is one of those projects that feels simple in theory“just fold paper into giraffe
shape”until you’re three creases deep and realize paper remembers everything. The first experience most
people have is the satisfying snap of a clean crease. It’s oddly calming, like lining up puzzle pieces, except the
puzzle is also a living creature with legs you’re about to invent. You start confident, then hit the first
collapse step and think, “Why is this square suddenly trying to become a tent?” That moment is normal. Origami
often looks like chaos right before it clicks into place.
One of the most relatable experiences with a giraffe model is discovering how much the final look depends on
shaping, not just folding. Two people can follow the same steps and end up with completely different vibes:
one giraffe looks elegant and alert, the other looks like it stayed up all night watching nature documentaries.
That’s because little adjustmentsneck angle, head tilt, leg spacingchange the “personality” fast. A slightly
forward head tilt can make your giraffe look curious. A straighter neck makes it look proud. A wider stance makes
it look stable and calm. A narrow stance makes it look like it’s on a runway. (You didn’t sign up for giraffe
fashion week, but here we are.)
Another common experience is the battle between “sharp creases” and “paper fatigue.” Beginners often crease hard
(which is good), but repeated re-folding in the same area can weaken the paper fibers. If you notice your paper
starting to look fuzzy at the edges or refusing to lay flat, that’s the paper politely telling you it’s tired.
This is when it helps to slow down and commit to the crease you want instead of repeatedly “testing” folds. Many
folders find that reading the next two steps before making a fold prevents backtracking and keeps the paper crisp.
Decorating is where the experience gets especially fun because it turns origami into something personal. Drawing
spots is oddly satisfyinglike giving your giraffe its own fingerprint. Some people go realistic with patch-like
shapes, while others lean into cartoons and add big eyes, rosy cheeks, or dramatic eyelashes (no judgment).
If you’re folding with friends or kids, a great shared experience is lining up everyone’s finished giraffes and
realizing no two are the same. Even without decorations, the small differences in shaping create a tiny paper herd
with surprisingly distinct “attitudes.”
Finally, there’s the experience of making your second giraffe. The first one teaches you the model. The second one
teaches you control. You crease more confidently, you anticipate the tricky steps, and you start making
intentional design choices: slimmer neck, sharper head, more balanced legs. Many folders find the second giraffe
takes half the time and looks twice as goodnot because you became an origami wizard overnight, but because the
paper stopped feeling like an opponent and started feeling like a material you can guide. That’s the real win:
your giraffe is cute, yesbut you also just leveled up a skill you can reuse across dozens of origami animals.
Conclusion
Making an origami giraffe is equal parts technique and tiny sculpture. Start with solid creases, build a reliable
base, then spend an extra minute shaping the neck, head, legs, and tail. That’s where your giraffe goes from
“paper object” to “paper animal with personality.” Once you’ve folded one, try a different paper color, add spots,
or tweak the stance. Before you know it, you’ll have a whole paper safarino plane ticket required.


