Table of Contents >> Show >> Hide
- What Is an Electroscope?
- Why This DIY Electroscope Experiment Is Worth Trying
- Materials You Need
- How to Make an Electroscope Step by Step
- How an Electroscope Works
- Best Tips for Getting a Strong Response
- Common Problems and Easy Fixes
- What Materials Work Best in a DIY Static Electricity Test?
- Safety Notes
- How to Turn This into a Better Science Project
- A Little History Makes It Cooler
- Final Thoughts
- Field Notes: What It Feels Like to Build and Use an Electroscope
If you have ever rubbed a balloon on your hair and suddenly looked like you had stuck your finger in a cartoon socket, congratulations: you have already met static electricity. Now it is time to level up. A homemade electroscope is one of the simplest, smartest, and most satisfying science builds you can make with ordinary household materials. It is cheap, quick, and just dramatic enough to impress kids, students, skeptical siblings, and that one adult who always says, “Science is boring.”
In this guide, you will learn how to make an electroscope, how it works, why it sometimes refuses to cooperate on humid days, and how to turn the whole thing into a genuinely useful DIY static electricity experiment. Better yet, you do not need a fancy lab. You need a few simple materials, a charged balloon, and a willingness to act like a curious inventor for half an hour.
What Is an Electroscope?
An electroscope is a device that detects electric charge. In plain English, it tells you whether an object is electrically charged by showing movement. Traditional electroscopes used delicate gold leaves inside a glass case. Your homemade version will use foil and a lightweight moving indicator, but the scientific idea is the same: like charges repel.
When electric charge moves onto the metal parts of an electroscope, the charges spread out. If two connected lightweight metal pieces end up carrying the same kind of charge, they push away from each other. That visible motion is your clue that static electricity is present. It is basically a tiny lie detector for invisible electrons.
Why This DIY Electroscope Experiment Is Worth Trying
This is more than a cute rainy-day project. A DIY electroscope teaches several big ideas in one small setup: static electricity, conductors and insulators, charge transfer, grounding, and electrostatic repulsion. It also helps explain everyday mysteries such as why socks cling together, why balloons stick to walls, and why winter doorknobs sometimes feel personally offended by your existence.
Because the materials are familiar, this experiment is especially good for classrooms, homeschool activities, science clubs, and family STEM nights. It also has real replay value. Once the electroscope works, you can test different fabrics, plastics, paper products, and household items to see which ones hold charge best.
Materials You Need
- 1 Styrofoam or foam cup
- 1 plastic drinking straw
- 1 aluminum pie pan or shallow aluminum tray
- Aluminum foil
- Thread
- Tape
- Scissors
- Clay or extra tape for support, optional
- 1 balloon
- 1 foam plate or foam takeout lid
- A nonmetal table, such as wood or plastic
These materials are common, inexpensive, and beginner-friendly. The key is keeping the moving part light and making sure the metal parts can carry charge without you accidentally draining it away every two seconds.
How to Make an Electroscope Step by Step
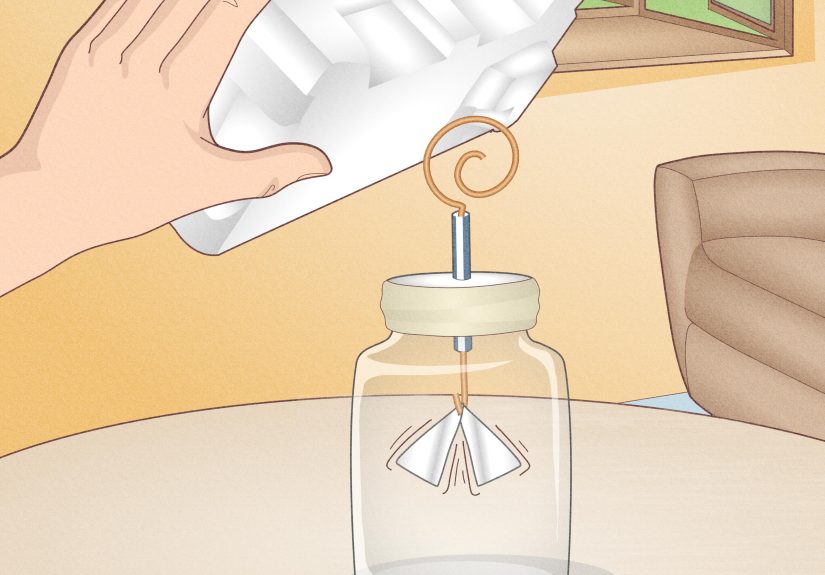
Step 1: Build the cup support
Poke two small holes on opposite sides near the bottom edge of the foam cup. Slide the straw through both holes so it spans the inside of the cup like a little bridge. When you flip the cup upside down later, the straw will hang down inside like a support beam for your foil indicator.
Try to keep the straw steady. If it wiggles, tape it in place or use a small bit of clay. A stable straw means cleaner movement and fewer moments of staring at your experiment as if it has betrayed you.
Step 2: Make the moving foil ball
Cut a piece of thread about two to three times the distance from the straw to the edge of the aluminum pan. Tie a knot at one end. Wrap a small square of aluminum foil around the knotted end to create a tiny foil ball. Think marble-sized or smaller. You want it light enough to move easily, not a foil wrecking ball.
Tape the other end of the thread to the straw so the foil ball hangs down freely. Adjust the length until the ball just touches the edge of the aluminum pan when the cup is upside down. That contact matters because it allows charge to move between the pan and the foil ball.
Step 3: Assemble the electroscope body
Turn the cup upside down and attach its open rim to the center of the aluminum pan using tape or small bits of clay. The straw and hanging foil ball should now be tucked underneath the pan, inside the cup. The foil ball should hang right beside the pan’s edge and lightly touch it.
This is your homemade electroscope. It may not look like Victorian laboratory equipment, but it will still do the job beautifully.
Step 4: Create static electricity
Inflate the balloon and rub it against the foam plate several times. This rubbing transfers electrons and creates a static charge. Place the charged foam plate on a nonmetal table. Then set the electroscope on top of the plate, holding it only by the foam cup, not by the aluminum pan.
If everything is working, the foil ball should move away from the pan. That movement means charge has traveled through the metal pan and into the foil ball, giving both parts the same type of charge. Since like charges repel, the ball swings away. Tiny science drama achieved.
Step 5: Discharge and repeat
Touch the foil ball or the pan with your finger to discharge the electroscope. This grounds the device and lets excess charge flow away. Then repeat the process using other materials: plastic wrap, wool, tissue paper, nylon, silk, wood, cotton, or aluminum. Some will hold a charge well. Some will be total disappointments. That contrast is the experiment.
How an Electroscope Works
Understanding the mechanism makes the experiment much more satisfying. When you charge an object by rubbing it, electrons move from one material to another. One object ends up with extra electrons and becomes negatively charged; the other loses electrons and becomes positively charged.
When the charged object touches or strongly influences the metal part of the electroscope, charge redistributes through the conductor. Because the aluminum pan and foil ball are connected through contact, they share the same kind of charge. Since similar charges repel, the foil ball swings away from the pan.
This is why the electroscope is such a classic static electricity experiment. It turns an invisible effect into something you can actually see. No equations required. Although if you like equations, the physics is still there, quietly showing off.
Best Tips for Getting a Strong Response
Use dry air if possible
Static electricity works best in dry conditions. Humid air leaves a thin film of moisture on surfaces, and that moisture allows charge to leak away. If your electroscope seems lazy, the weather may be the villain. Winter days, air-conditioned rooms, and low-humidity spaces tend to give better results.
Keep the moving part very light
If your foil ball is too heavy, it may not respond to small charges. The indicator should be delicate enough to move with only a modest charge. Less is more here. This is not the time to build a tiny tinfoil meteor.
Do not touch the metal parts while testing
Your body can act as a path to ground. If you hold the aluminum pan directly, you may drain away the charge before the foil has time to move. Handle the electroscope by the foam cup only.
Use the right surfaces
Set the charged plate and the electroscope on wood, plastic, or another nonmetal surface. Metal tables can bleed off charge and make the experiment much less dramatic.
Common Problems and Easy Fixes
The foil ball does not move at all. First, check whether the foil ball is actually touching the pan edge. If it is hanging too far away, charge cannot transfer properly. Also make sure you charged the balloon and foam plate enough.
The foil ball twitches but does not swing clearly. Your indicator may be too heavy, the room may be humid, or the straw may be wobbling. Reduce the foil size, dry the setup, and stabilize the straw.
The setup works once and then stops. You may be accidentally grounding it by touching the metal or using a conductive surface. Reset by discharging the system, then try again with careful handling.
Everything is chaos. Honestly, welcome to electrostatics. Repeatable chaos is still data.
What Materials Work Best in a DIY Static Electricity Test?
Some materials build or hold static charge more effectively than others. In many home experiments, items such as wool, human hair, dry skin, tissue paper, nylon, polyester, and some plastics tend to produce stronger effects than materials like cotton. Metals conduct charge very well, but that does not always mean they are the best at holding static charge in a simple test, because the charge can move away quickly depending on the setup.
This is where your electroscope becomes more than a craft. It becomes a detector for comparing materials. Try rubbing a balloon against different surfaces and record how far the foil ball moves. That gives you a rough comparison of which materials are more effective at producing or transferring charge. Congratulations, you are now doing home electrostatics with the energy of a Victorian scientist and the budget of a snack run.
Safety Notes
This experiment uses static electricity, not household current, so it is generally safe when done with common materials. Still, use common sense. Be careful with scissors, sharp objects used to poke the cup, and hot glue if you use it. Do not connect your homemade electroscope to wall outlets, batteries, or electrical wiring. This is a static electricity detector, not a “let’s see what happens” machine.
How to Turn This into a Better Science Project
If you want to go beyond a one-time demo, turn your electroscope experiment into a controlled investigation. For example, ask one clear question: Which household material creates the strongest static charge when rubbed with a balloon? Then test one variable at a time.
- Keep the same balloon
- Keep the same number of rubs
- Use the same table surface
- Test in the same room conditions
- Measure foil movement the same way each time
You can compare fabrics, track the effect of humidity, test whether more rubbing creates more charge, or see how long a charge lasts before fading. That is how a simple kitchen-table activity becomes a strong school science project.
A Little History Makes It Cooler
Electroscopes have been around for centuries. Early scientists used versions with pith balls, threads, or delicate gold leaves to detect electric charge long before modern electronic instruments existed. These devices helped researchers study fundamental electrical behavior and later even played a role in radiation research. So yes, your foil-ball contraption on the dining room table belongs to a surprisingly noble scientific family tree.
Final Thoughts
Learning how to make an electroscope is one of those rare science activities that is simple enough for beginners and rich enough for deeper exploration. It combines visible action, real physics, and low-cost materials in a way that feels satisfying almost immediately. The build is quick, the science is real, and the moment the foil ball jumps away from the pan feels a little like magic until you remember that magic with electrons is still just physics.
If you want a hands-on STEM activity that teaches static electricity without needing a lab full of equipment, this easy DIY electroscope is hard to beat. It is practical, educational, and just theatrical enough to make people lean in and say, “Wait, do that again.” That is usually a good sign.
Field Notes: What It Feels Like to Build and Use an Electroscope
One of the best things about making an electroscope is that the experience feels bigger than the build itself. On paper, it sounds almost too simple: cup, straw, foil, thread, balloon. Nothing about that supply list screams “electrical discovery.” It sounds more like the leftovers from a child’s birthday party and a recycling bin. But that is exactly why the experiment is so memorable. You start with ordinary objects, and then suddenly one tiny foil ball begins reacting to invisible charge as if the air itself has secrets.
The first time the electroscope works, there is usually a moment of disbelief. You rub the balloon, place the charged plate underneath, and stare at the foil ball as though sheer concentration might help. Then it moves. Not dramatically at first, maybe just a neat little swing away from the pan, but enough to make you grin. It is the kind of result that feels personal because you built the tool with your own hands. You are not watching science happen behind glass. You are making it happen on your table.
There is also something strangely satisfying about troubleshooting the experiment. If the foil does not move, you do not just shrug and quit. You start thinking like an investigator. Is the room too humid? Did I touch the metal and ground it? Is the foil ball too heavy? Did I charge the balloon enough? Suddenly you are not just following instructions anymore. You are diagnosing variables, refining a setup, and learning that experimental science is often a dance between patience and adjustment.
Another fun part is testing random household materials. The experiment quickly turns the room into a low-budget research lab. A plastic wrapper becomes interesting. A wool sock becomes a suspect. A cotton T-shirt that seemed innocent five minutes ago is now part of your materials list. People who were not planning to join in tend to drift over and offer suggestions. “Try this comb.” “What about the tissue paper?” “Will it work with my sweater?” That group curiosity is one reason electroscopes work so well in classrooms and family settings.
The experiment also has a way of changing how you notice everyday life. After using an electroscope, static electricity stops feeling random. You begin to connect the tiny shock from a doorknob, the cling of laundry, the crackle of synthetic fabric, and the weird ability of a balloon to make hair stand up. The world starts to look a little more explainable. Not less magical, exactly, just more beautifully logical.
And maybe that is the real charm of this DIY project. It proves that meaningful science does not always require expensive sensors or polished equipment. Sometimes all you need is curiosity, a few lightweight materials, and a willingness to test what cannot be seen directly. An electroscope turns invisible charge into visible motion, but it also turns abstract ideas into lived experience. You do not just read about static electricity. You build a device, watch it respond, troubleshoot its behavior, and come away with a sharper sense of how matter, charge, and materials interact.
That is a pretty good return on investment for a foam cup and a balloon.


