Table of Contents >> Show >> Hide
- Why Throw Pillows Are the Perfect Beginner DIY
- What You Need for a Beginner Throw Pillow DIY
- Method 1: Simple Envelope Throw Pillow (Beginner Sewing)
- Method 2: Easy No-Sew Throw Pillow (Fabric Glue or Fusible Tape)
- Customize Your Beginner Throw Pillow (Hometalk Inspired)
- Styling Tips: Make Your DIY Pillows Look Designer
- Common Beginner Mistakes (and How to Fix Them)
- Real-Life Beginner Experience: What You Learn After a Few DIY Pillows
- Conclusion: Your First Throw Pillow (and Many More)
If you can fold a burrito and vaguely operate scissors, you can absolutely make a beginner throw pillow DIY. No sewing degree, no fancy studio, and definitely no “I spent $60 on one pillow” regrets required.
In true Hometalk spirit, this guide walks you through easy, budget-friendly ways to make your first DIY throw pillow with both simple sewing and no-sew options. We’ll cover what to buy (or upcycle), how to cut and assemble your fabric, and a few fun customization tricks like iron-on letters inspired by those Pinterest-perfect Hometalk projects.
By the end, you’ll know exactly how to turn a plain pillow form or even an old pillow into something you’re proud to toss on your couch, bed, or that chair nobody actually sits in.
Why Throw Pillows Are the Perfect Beginner DIY
Throw pillows are beginner gold for a few reasons:
- Straight lines only: Most basic pillow covers are just simple rectangles and straight seams.
- Forgiving fit: Unlike clothes, your pillow doesn’t complain if the “fit” is a little snug or loose.
- Huge impact: One or two pillows can totally change a room’s vibe.
- Easy to customize: Paint, stencils, iron-on letters, fabric markers – it’s all fair game.
- Great practice: You get to practice measuring, cutting, and finishing edges without ruining anything expensive.
So if you’ve been lurking on Hometalk or Pinterest thinking, “I wish I could do that,” a beginner throw pillow DIY is the perfect place to start.
What You Need for a Beginner Throw Pillow DIY
You don’t need a huge craft room or a pro sewing setup. Here’s a basic supply list you can scale up or down depending on whether you’re sewing or going no-sew.
Basic Supplies
- Pillow insert (commonly 16" x 16", 18" x 18", or 20" x 20")
- Medium-weight woven fabric (cotton, linen, canvas, or a blend)
- Fabric scissors or rotary cutter and cutting mat
- Measuring tape or clear ruler
- Fabric marker or chalk
- Iron and ironing board (or a heat-safe surface)
- Pins or fabric clips
For the Sewn Version
- Sewing machine with all-purpose needle
- All-purpose thread matching your fabric
- Straight pins or clips
For the No-Sew Version
- Fabric glue or iron-on fusible tape (Heat n’ Bond or similar)
- Iron (if using fusible tape)
- Optional: pre-made cloth napkins, kitchen towels, or a throw blanket
Optional Customization Supplies
- Iron-on letters or vinyl (Cricut-style designs work great)
- Stencils and fabric paint
- Trim, tassels, or pom-poms
Method 1: Simple Envelope Throw Pillow (Beginner Sewing)
If you’re ready to dip your toes into sewing, an envelope-style pillow cover is the easiest project to start with. No zipper, no buttonholes – just overlapping fabric in the back that creates a flap.
Step 1: Decide on Pillow Size
Grab your pillow insert and check the label (for example: 18" x 18"). For a nice, plump look, most tutorials recommend cutting the front piece the same size as the insert and keeping your seam allowance in mind so the cover hugs the pillow and doesn’t look baggy.
Example for an 18" pillow:
- Front piece: 18" x 18"
- Back pieces (envelope): 18" x 13" each (half of 18 is 9, plus about 4 inches overlap)
You can use the same math for any size: front equals pillow size, each back piece equals pillow height divided by 2 plus 4–5 inches for overlap.
Step 2: Wash, Iron, and Cut Your Fabric
Pre-wash your fabric if it’s washable (this helps prevent shrinking later), then press it smooth. Measure and mark your pieces carefully, using a ruler to keep lines straight. Cut with sharp fabric scissors or a rotary cutter.
Step 3: Hem the Back Edges
On each back piece, choose one long edge that will form the envelope opening. Fold that edge over about 1/2", press, fold again 1/2" to hide the raw edge, press, and stitch along the fold. This gives you a clean, sturdy finish where the pillow opens.
Step 4: Assemble the Pillow Cover
Lay your front piece right side up. Then place one back piece on top, right side down, lining up the raw edges along one side. Place the second back piece on top, overlapping the first one at the hemmed edges to form the envelope opening. Pin or clip all around the perimeter.
Step 5: Sew the Perimeter
Sew all the way around the pillow cover using a 1/2" seam allowance. When you reach each corner, stop with the needle down, lift the presser foot, pivot 90°, lower the foot, and keep sewing. Don’t forget to backstitch at the beginning and end to secure the thread.
Step 6: Clip Corners and Turn
Trim the seam allowance slightly and clip the corners diagonally without cutting the stitching. This helps the corners turn out sharp instead of bulky. Turn the cover right side out through the envelope opening and use a blunt tool (like a chopstick) to gently poke out the corners.
Step 7: Stuff and Fluff
Slide your pillow insert through the envelope opening, coax it into the corners, and give everything a good fluff. Congratulations you just completed a real-life sewing project that you can actually use!
Method 2: Easy No-Sew Throw Pillow (Fabric Glue or Fusible Tape)
No sewing machine? No problem at all. A beginner throw pillow DIY can be completely no-sew using fabric glue or iron-on tape. This is a lifesaver if you’re short on time, tools, or patience.
Option A: Fabric-by-the-Yard No-Sew Pillow
For a basic no-sew version, follow almost the same measurements as the sewn pillow you’ll just seal the edges with glue or fusible tape instead of stitching.
- Cut one front piece and one back piece the same size as your pillow insert plus about 1" total for seams. For an 18" insert, cut two 19" squares.
- Place the pieces right sides together.
- Run a narrow line of fabric glue or place strips of fusible tape around three sides, about 1/2" from the edge. Press together firmly (or iron if you’re using fusible tape).
- Let everything dry or cool according to product instructions.
- Turn the cover right side out through the open side, insert the pillow, then glue or tape that final edge closed.
Option B: Napkins, Towels, or Blankets as Pillow Covers
Want to level up the “I just hacked my house” satisfaction? Use items you already own:
- Cloth napkins: Two napkins of the same size can become an instant pillow cover.
- Kitchen towels: Fold and glue to fit a smaller pillow.
- Throw blanket: Cut into large squares and turn one blanket into multiple pillows.
The process is the same: layer right sides together, glue or fuse three sides, turn inside out, stuff, and close the final edge. It’s fast, satisfying, and great for beginners who want a quick win.
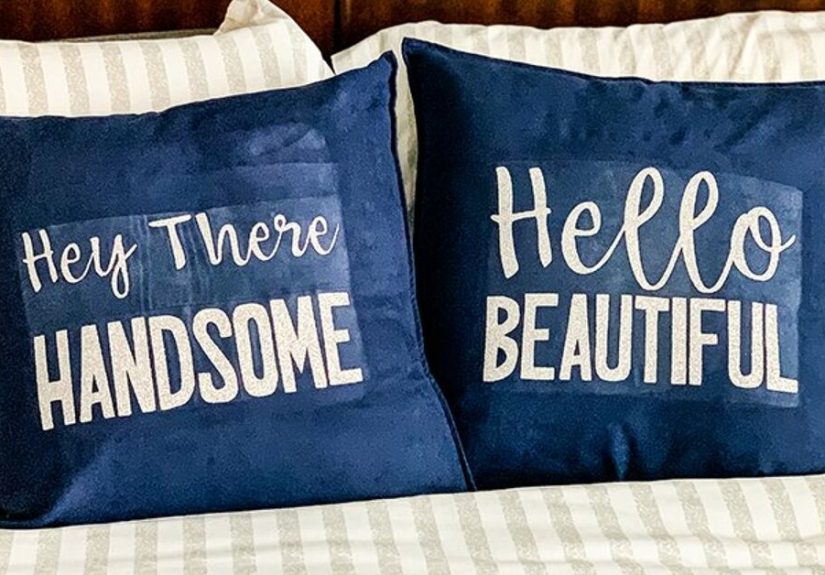
Customize Your Beginner Throw Pillow (Hometalk Inspired)
Now for the fun part: turning a plain pillow into something that actually looks custom. Many Hometalk-style projects use iron-on letters or vinyl to add words, monograms, or cute phrases across simple pillow covers.
Ideas for Iron-On Designs
- Short quotes like “COZY,” “NAP QUEEN,” or “READING NOOK.”
- Family names or initials.
- Seasonal words: “JOY,” “FALL,” “LOVE,” “HOME.”
- Simple shapes: hearts, stars, arrows, or minimalist icons.
To apply iron-on letters or vinyl:
- Make or buy your design (Cricut or pre-made iron-ons both work).
- Place it on the pillow cover before stuffing the pillow so the surface is nice and flat.
- Follow the heat and timing instructions for your vinyl or letter set.
- Let it cool completely before peeling the backing and handling the cover.
With this one extra step, your beginner throw pillow goes from “Oh, that’s nice” to “Wait, you made that?” in seconds.
Styling Tips: Make Your DIY Pillows Look Designer
You’ve done the DIY work now let’s make sure your pillows look intentional, not random.
- Mix sizes: Try one 20" pillow with a smaller 16" or lumbar pillow in front.
- Play with texture: Combine smooth cotton with a nubby or faux fur pillow.
- Stick to a color palette: Choose 2–3 main colors and repeat them across your pillows and throws.
- Vary patterns: Pair one bold print with a subtle stripe and a solid.
- Use odd numbers: Three or five pillows often look more balanced than two or four.
Because your covers are DIY, you can easily swap them out for seasons or mood changes without spending a fortune on new store-bought pillows.
Common Beginner Mistakes (and How to Fix Them)
1. The Pillow Cover Is Too Big and Looks Saggy
This usually happens when you add too much extra fabric “just in case.” Next time, cut your front piece the same size as the pillow insert and keep seam allowances consistent. For a saggy pillow you already made, try a slightly larger insert or add a bit of extra stuffing.
2. The Corners Are Bulky or Don’t Turn Out Nicely
Always trim the corners at a diagonal before turning the cover right side out. Use a blunt tool to gently push the corners from the inside don’t stab them, or you may poke a hole through your new masterpiece.
3. Glue Seams Pop Open
Make sure you’re using fabric-specific glue or fusible tape and pressing the layers together firmly. Let it cure for the full recommended time before stuffing the pillow. If a seam opens, add more glue and clamp with clips or clothespins while it dries.
4. Iron-On Letters Peel Off
Check the heat settings and time, and always peel backing only after the design cools. Wash gently inside out, and avoid high-heat dryers if you want your lettering to last.
Real-Life Beginner Experience: What You Learn After a Few DIY Pillows
Once you’ve made your first beginner throw pillow DIY, something funny happens: you start seeing potential pillow fabric everywhere. That curtain panel you’re over? Pillow. The leftover yard of fabric from another project? Pillow. Those napkins from last Thanksgiving that don’t match anything? Definitely a pillow.
Here are a few “lessons learned the hard way” that many new crafters discover after a handful of projects.
Start with Fabric You’re Not Scared to Mess Up
For your very first pillow, don’t use your most expensive fabric or the vintage textile you inherited from your grandma. Grab a remnant, an inexpensive cotton, or a clearance curtain panel. Knowing it’s okay if you mess up takes the pressure off and makes the project more fun.
Once you trust yourself with straight lines and simple seams, that’s when you bring out the good stuff.
Measure Twice, Cut Once (Seriously)
One of the most common beginner regrets is cutting too small. A 1/2" mistake on all sides adds up quickly. Taking a few extra minutes to double-check your measurements, mark clearly, and use a straight edge saves a lot of frustration later.
A good habit: write the needed measurements on a sticky note and keep it right next to your cutting area so you don’t have to keep re-checking the pillow insert.
Ironing Is Not Optional
Most beginners want to skip the iron, but pressing seams and smoothing fabric before cutting makes everything look more professional. A pressed hem looks crisp instead of wavy, and corners lay flat instead of puffed and bulky.
Think of the iron as a magic “make it look store-bought” wand not a fussy extra step.
Your First Pillow Won’t Be Perfect (and That’s Fine)
Maybe your envelope opening is slightly off-center. Maybe your glue seam wobbles. Maybe the letters on your Hometalk-inspired quote pillow read “HOM E” because you mis-spaced the vinyl. That’s okay. The point of a beginner throw pillow DIY isn’t perfection; it’s learning the process and building confidence.
In fact, those tiny imperfections are often what make DIY pieces charming. Guests will notice the custom design and the creativity long before they spot a slightly crooked seam.
It’s Weirdly Addictive
Once you realize you can transform a basic pillow form into a stylish, custom decor piece in under an hour, you might find yourself planning pillows for every season:
- Bright florals for spring.
- Beachy blues and stripes for summer.
- Plaids and pumpkins for fall.
- Cozy faux fur and metallic lettering for winter.
The best part? Most of the time you can reuse the same pillow inserts and just swap out covers. That means less clutter, less storage space, and more flexibility for your decor.
Confidence Spills Over into Bigger DIY Projects
Completing a small but visible project like a throw pillow does more than upgrade your couch. It gives you proof that you can plan, measure, cut, assemble, and finish something from start to finish. That confidence is exactly what you need when you’re ready to tackle curtains, slipcovers, or even basic upholstery down the road.
In other words, a beginner throw pillow DIY isn’t just a cute accessory it’s a gateway project. After that first pillow, you’re not just someone who watches Hometalk videos and scrolls past DIY tutorials; you’re someone who actually makes the stuff.
Conclusion: Your First Throw Pillow (and Many More)
Making a beginner throw pillow DIY is one of those small home projects that delivers big satisfaction. Whether you choose a simple sewn envelope cover or a no-sew glued version, you’re learning skills you can reuse again and again and you get instant decor upgrade points.
Start with fabric you like, keep your lines straight, don’t fear the iron, and feel free to customize with Hometalk-style touches like iron-on letters or fun trims. After your first pillow, the only real problem you’ll have is figuring out where to stop. (Spoiler: you probably won’t.)


