Table of Contents >> Show >> Hide
- What a Green Roof Actually Is
- Before You Install Anything, Do These Non-Negotiable Checks
- The Basic Anatomy of a Green Roof
- Step-by-Step: How to Install a Green Roof
- Step 1: Assess the Existing Roof
- Step 2: Create the Green Roof Design
- Step 3: Install or Upgrade the Waterproof Membrane
- Step 4: Add the Root Barrier and Protection Layer
- Step 5: Set the Drainage Layer
- Step 6: Install Filter Fabric
- Step 7: Add Edging and Containment
- Step 8: Place the Engineered Growing Medium
- Step 9: Plant the Roof
- Step 10: Water for Establishment
- Step 11: Inspect the Finished Assembly
- Best Plants for a Green Roof
- Common Mistakes to Avoid
- What Maintenance Looks Like After Installation
- Can You DIY a Green Roof?
- Real-World Experiences: What Installing a Green Roof Feels Like in Practice
- Conclusion
Note: This article is based on current U.S. guidance and practical building experience. Source links are intentionally omitted for web publication.
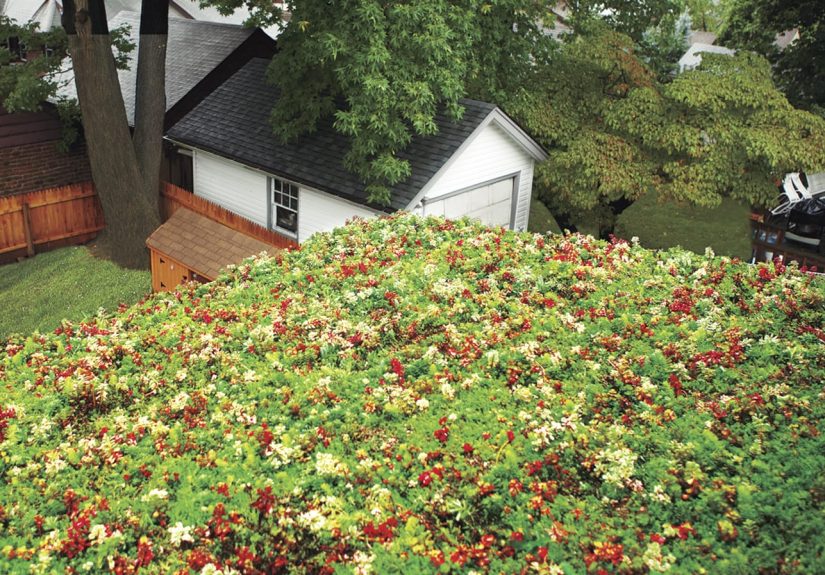
A green roof sounds a little magical, like your house woke up one morning and decided to become a meadow. In reality, it is not magic at all. It is a carefully layered roofing system that combines waterproofing, drainage, lightweight growing media, and plants in a way that protects the building while turning dead roof space into something useful, beautiful, and surprisingly hardworking.
Done right, a green roof can help manage stormwater, reduce heat buildup, protect the roofing membrane, and give a building a softer, cooler, more inviting top layer. Done wrong, it becomes an expensive science experiment with soggy consequences. That is why installation is less about throwing soil on a roof and more about engineering, sequencing, and choosing plants that do not panic every time the weather gets dramatic.
This guide walks through how to install a green roof the smart way, with practical steps, realistic expectations, and just enough humor to keep the waterproofing membrane from feeling lonely.
What a Green Roof Actually Is
A green roof, also called a vegetated roof or living roof, is a roof assembly designed to support plant life above a protected roof structure. The key word here is assembly. A green roof is not just plants. It is a system of layers that each do one job well.
The Three Main Types
Extensive green roofs are the most common starting point. They usually have a shallow growing medium, low-profile plants such as sedums and other tough groundcovers, and relatively light maintenance once established. If green roofs had a “starter pack,” this would be it.
Semi-intensive green roofs sit in the middle. They allow more variety in plant choices and a little more visual drama, but they also bring more weight, more irrigation, and more maintenance.
Intensive green roofs are rooftop gardens. They can support deeper planting, shrubs, pathways, seating areas, and serious design features. They can also support serious invoices, so plan accordingly.
Before You Install Anything, Do These Non-Negotiable Checks
1. Get a Structural Review
This is the big one. A green roof must be evaluated for fully saturated load, not just dry conditions. Water adds weight. Growing media adds weight. Plants add weight. Snow, people, pavers, and decorative features can add even more. A structural engineer should confirm what the roof can handle and whether reinforcement is needed.
If you skip this step, you are not being adventurous. You are just auditioning for a very expensive mistake.
2. Check Local Codes, Permits, and Fire Rules
Some jurisdictions have clear green roof guidance, while others fold requirements into roofing, drainage, stormwater, fire safety, and structural code reviews. Confirm permit needs, drainage rules, parapet or guardrail requirements, and any wildfire or vegetation restrictions that apply in your area.
3. Decide Whether This Is a Retrofit or New Construction
New construction is easier because the building can be designed for green roof loads from day one. Retrofitting an existing roof is possible, but it requires more investigation. The roof deck, membrane condition, insulation, edges, penetrations, and drain layout all matter.
4. Choose a Roofing Team, Not Just a Plant Team
A green roof is first a roofing project and second a planting project. That means you want a qualified roofing contractor, waterproofing expertise, and a team that understands root barriers, drainage mats, flashing details, and warranty coordination. Pretty plants will not save a bad membrane.
5. Match the System to the Roof Shape
Most green roofs are easiest to install on low-slope or flat roofs. Sloped roofs can work, but they need retention details and erosion control to keep the growing medium and plants from trying to relocate downhill.
6. Plan for Maintenance Access and Safety
Green roofs are not maintenance-free. They are maintenance-light when designed well. You still need safe access, inspection space around drains and walls, and a plan for weeding, checking outlets, and replacing plants where needed.
The Basic Anatomy of a Green Roof
While systems vary by manufacturer and project type, most green roofs include the following layers, from bottom to top:
- Roof deck or structural support – the base that carries the system.
- Insulation – depending on the roof design.
- Waterproof membrane – the layer that protects the building from water intrusion.
- Root barrier – prevents roots from damaging the membrane.
- Protection layer – helps reduce mechanical damage during installation and use.
- Drainage layer – directs excess water away from plant roots and toward drains.
- Filter fabric – keeps fine particles from clogging the drainage layer.
- Engineered growing medium – lightweight, stable, and designed for rooftop conditions.
- Vegetation – plants selected for the site’s climate, sun, wind, and maintenance plan.
Notice what is not on that list: ordinary backyard topsoil. Regular garden soil is usually too heavy, too unstable, and too likely to compact. Rooftop systems need engineered growing media that balance drainage, water retention, and weight.
Step-by-Step: How to Install a Green Roof
Step 1: Assess the Existing Roof
Start by evaluating the roof’s age, slope, drainage pattern, penetrations, and membrane condition. If the current roof is near the end of its life, replace it before installing the green roof. Building a vegetated assembly on top of a failing roof is like putting expensive frosting on a collapsing cake.
Step 2: Create the Green Roof Design
The design should account for load, slope, drainage, wind exposure, edge conditions, overflow paths, plant palette, maintenance access, and irrigation strategy. Decide early whether you are using a modular system with trays or a built-in-place system with loose-laid layers.
Modular systems are often easier to install and inspect because individual trays can be lifted or replaced. Built-in-place systems can offer more design flexibility and a more seamless look, but they demand careful installation and detailing.
Step 3: Install or Upgrade the Waterproof Membrane
This is the most important layer in the whole assembly. Use a membrane suitable for green roof applications, installed by experienced professionals. Many projects also include leak testing before the next layers go down. Fixing a membrane problem before plants are installed is called planning. Fixing it after plants are installed is called character development.
Step 4: Add the Root Barrier and Protection Layer
Once the waterproofing is complete, install the root barrier if it is not integrated into the membrane. Then add the protection layer required by the system. This helps shield the membrane from abrasion, foot traffic, and construction activity during the remaining work.
Step 5: Set the Drainage Layer
The drainage layer channels excess water toward roof drains while often holding some water for plant use. This is where the roof stops being a plain surface and starts acting like a smart landscape. Drainage boards, mats, cups, or composite systems may be used depending on the design.
Keep drain locations visible and accessible. Leave inspection zones around drains, parapets, skylights, and penetrations so maintenance crews can do their jobs without performing interpretive dance in a sedum patch.
Step 6: Install Filter Fabric
Place the filter fabric above the drainage layer to prevent the growing medium from washing into the drainage path. This layer is simple, but it matters. A clogged drainage system is the rooftop equivalent of a sink that only believes in chaos.
Step 7: Add Edging and Containment
Metal or manufactured edge restraints help keep media and plants where they belong. This is especially important near perimeter zones, around drains, and at transitions to walkways or ballast borders. Clean detailing at the edges makes the whole roof perform better and look more intentional.
Step 8: Place the Engineered Growing Medium
Install the specified depth of lightweight growing medium. For many extensive roofs, that depth is relatively shallow. Deeper systems support more plant diversity but add more weight. Spread the medium evenly, avoid compacting it too much, and follow the manufacturer’s guidance for moisture content and handling.
Step 9: Plant the Roof
You have several options:
- Pre-vegetated trays for faster installation and instant visual coverage.
- Vegetation mats for a more continuous look.
- Plugs or cuttings for lower initial cost, with slower fill-in.
- Seed mixes when the design, budget, and climate make them appropriate.
For many extensive roofs, drought-tolerant succulents and hardy low growers perform well. In other climates, a broader palette of native and adapted plants may work. The right choice depends on sun exposure, wind, rainfall, maintenance commitment, and how quickly you want full coverage.
Step 10: Water for Establishment
Many green roofs need irrigation during establishment, even if they are designed to be low-water later. A newly planted roof is basically a rooftop teenager: independent in theory, dramatic in practice, and not yet ready to be left alone for long stretches.
Water thoroughly at installation and continue based on weather, plant type, and contractor guidance. Do not assume “drought tolerant” means “never thirsty.”
Step 11: Inspect the Finished Assembly
Before signing off, inspect drains, edges, inspection zones, plant coverage, irrigation components, and any bare spots. Confirm that maintenance access is clear and that the owner receives a maintenance plan, warranty information, and as-built documentation.
Best Plants for a Green Roof
Plant selection should be based on climate and rooftop conditions, not wishful thinking. Roofs are hotter, windier, brighter, and drier than most ground-level gardens. That means your plant palette has to be a little tougher and a lot less needy.
For many extensive systems, good candidates include:
- Sedums and other succulents
- Low native grasses
- Alliums
- Yarrow
- Ice plant and other heat-tolerant spreaders
- Select flowering natives suited to shallow media and high exposure
In deeper systems, designers may add perennials, meadow mixes, herbs, shrubs, and even small trees if structure and maintenance plans allow. The trick is to plant for the roof you actually have, not the rooftop fantasy you saw in a glossy magazine next to a tiny espresso cup.
Common Mistakes to Avoid
- Skipping the structural review because the roof “looks sturdy.” Roofs are not judged on vibes.
- Using standard garden soil instead of engineered media.
- Ignoring drainage details and blocking inspection access.
- Choosing plants only for appearance instead of survival.
- Assuming no maintenance is needed after installation.
- Forgetting wind exposure, especially on taller buildings.
- Installing over an aging membrane that should have been replaced first.
What Maintenance Looks Like After Installation
A well-designed green roof should get easier to maintain over time, but it still needs routine attention. Typical maintenance includes:
- Checking drains and outlets
- Removing weeds or volunteer trees
- Inspecting bare spots and erosion
- Monitoring plant health during dry or extreme weather
- Replacing failed plants where needed
- Reviewing flashings, edges, and walkways
Many roofs need more hands-on care during the first growing season or two, then settle into a lighter maintenance rhythm. The goal is not a roof that never needs attention. The goal is a roof that rewards attention instead of punishing neglect.
Can You DIY a Green Roof?
For a major home, commercial building, school, or occupied structure, this is usually a professional project. The risks are simply too high to wing it. Structural loading, waterproofing, roof warranties, and drainage details are not great places to embrace a trial-and-error lifestyle.
For small outbuildings, sheds, or specialty garden structures, a carefully planned modular system may be more realistic for experienced DIYers, but only after confirming load, waterproofing, and local code requirements. In other words, “possible” is not the same thing as “casual weekend project.”
Real-World Experiences: What Installing a Green Roof Feels Like in Practice
One of the most common experiences people report with green roofs is that the project becomes more technical, more quickly, than they expected. At first, it seems like a landscaping idea. Then the structural review happens, and suddenly the conversation is about saturated dead loads, membrane compatibility, edge restraints, and drainage protection. That shift surprises a lot of first-time owners. The project stops being “let’s put plants on the roof” and becomes “let’s create a long-term roof assembly that also supports plants.” That is a healthy mindset change.
Another common experience is that installation day looks more like a roofing job than a gardening session. There are membranes, rolls of fabric, edge pieces, inspection zones, trays, pallets, and a lot of attention paid to drains and perimeter details. The plants are exciting, but they usually arrive late in the sequence. Owners often say that seeing the waterproofing and drainage layers go down changes how they think about the whole system. It becomes obvious that the green part is only as good as the hidden layers beneath it.
Teams that choose modular systems often appreciate how organized the process feels. Trays arrive pre-grown or nearly established, crews place them in sequence, and the visual payoff is immediate. It is deeply satisfying to watch a blank roof become green in a single day. The flip side is that trays are heavy, logistics matter, and access can be a challenge. Cranes, lifts, loading zones, and rooftop staging plans suddenly become part of the story. Green roofs have a funny way of making everyone on a project learn at least three new words they did not expect to use that week.
Maintenance experiences are also revealing. Owners sometimes expect a green roof to be either a full garden or a no-touch miracle. In reality, it lives somewhere in between. The first year tends to be the most instructive. You learn where the roof dries out fastest, which plants thrive, where weeds appear, and how important it is to keep drains visible and clean. By the second season, most owners are much calmer because they understand the roof’s patterns. That learning curve is normal.
There is also the visual and emotional payoff, which should not be dismissed. People consistently talk about how different the building feels once the roof is installed. Upper-floor views improve. The roof looks intentional rather than purely mechanical. In some cases, occupants notice the rooms below staying more comfortable during hot weather. Even when the performance benefits were the original reason for the project, the daily experience of seeing a living roof often becomes the favorite part.
Perhaps the biggest lesson from real projects is simple: the best green roofs are the ones that respect both building science and plant science. When those two disciplines work together, the result is practical, durable, and genuinely beautiful. When one gets ignored, the roof complains. Loudly. Usually with water.
Conclusion
Installing a green roof is one of those projects that rewards patience, planning, and professional coordination. It is not just a design feature. It is a functional roof system that can help manage runoff, reduce heat stress, protect the roof surface, and create a better building experience overall.
The winning formula is simple: start with structure, prioritize waterproofing, respect drainage, use engineered materials, choose plants that match the site, and commit to maintenance. Do that, and your roof can become far more than the thing that keeps the rain out. It can become the hardest-working garden in the neighborhood.


