Table of Contents >> Show >> Hide
- What Is Watercress, Exactly?
- Why Gardeners Love Growing Watercress
- The Ideal Growing Conditions for Watercress
- How to Grow Watercress at Home
- How to Start Watercress From Seed
- How to Grow Watercress From Cuttings
- How to Care for Watercress All Season
- Common Problems and How to Fix Them
- How and When to Harvest Watercress
- Food Safety and Smart Growing Precautions
- Best Ways to Use Homegrown Watercress
- of Real-World Watercress Growing Experiences
- Conclusion
- SEO Tags
If lettuce is the quiet kid in the salad bowl, watercress is the one with opinions. Peppery, crisp, and just a little dramatic, watercress brings a bright bite to sandwiches, soups, egg dishes, and anything else that could use a green upgrade. The good news is that this leafy herb is not difficult to grow. The catch? It is a diva about moisture. Watercress does not want “occasionally watered.” It wants “my roots should never know hardship.”
Once you understand that one personality trait, growing watercress becomes much easier. This cool-season, water-loving plant can thrive in containers, shallow trays, bog-style planters, and simple hydroponic setups. You do not need a babbling brook in your backyard or a cottage that looks like it belongs on a tea tin. You just need cool conditions, rich growing media, clean water, and the good sense to keep the plant from escaping into natural waterways.
In this guide, you will learn how to grow watercress from seed or cuttings, how to keep it healthy, when to harvest it for the best flavor, and how to avoid the common mistakes that turn a promising patch into a sad swamp experiment.
What Is Watercress, Exactly?
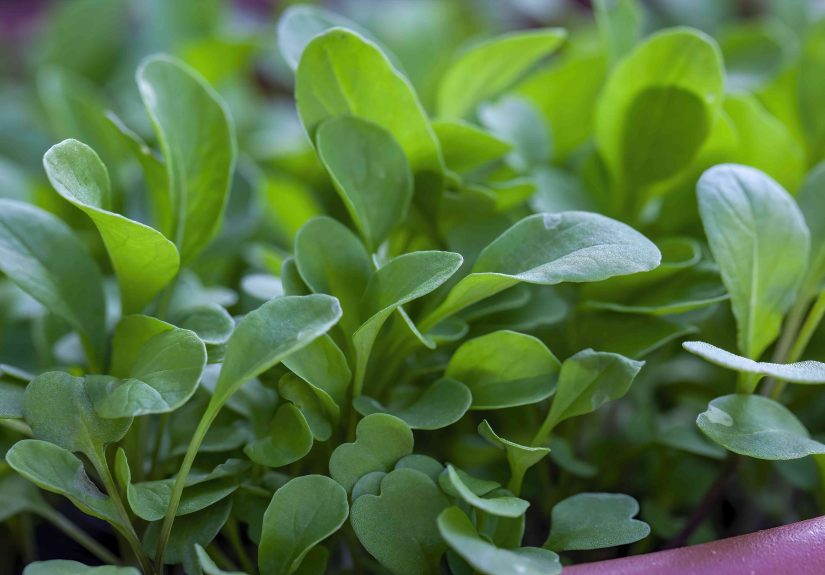
Watercress is a semi-aquatic perennial herb grown for its edible leaves and tender stems. It has a fresh, slightly spicy flavor that lands somewhere between arugula, mustard greens, and a very polite horseradish cousin. Because it grows naturally in and around clean moving water, many gardeners assume it is tricky. In reality, it is straightforward once you recreate the conditions it loves most: cool temperatures, steady moisture, and rich nutrition.
Watercress is especially popular with gardeners who want a fast crop. It grows quickly, harvests early, and bounces back well after cutting. It also earns bonus points for being one of those crops that makes you feel strangely accomplished. Growing tomatoes is impressive, sure. Growing a fancy peppery green in a bucket of shallow water? That feels like wizardry.
Why Gardeners Love Growing Watercress
There are practical reasons watercress has such loyal fans. It is quick to mature, productive in a small space, and versatile in the kitchen. It can be grown outdoors in spring and fall, indoors near a bright window, or under grow lights in a compact setup. If your garden space is limited, watercress is the kind of crop that proves you do not need a huge raised bed to harvest something delicious.
It also brings strong nutritional value to the table. Watercress is known for being rich in vitamins A, C, and K, which helps explain why it often shows up on lists of nutrient-dense greens. Of course, nobody needs to eat it while wearing a superhero cape, but it does have a very overachiever energy.
The Ideal Growing Conditions for Watercress
Cool Temperatures Matter
Watercress prefers cool weather. It is happiest in spring and fall, and it can struggle when summer turns aggressive. Seeds germinate best in cool conditions, and mature plants produce the best flavor when temperatures stay moderate. In hot weather, leaves can become stronger, more bitter, and generally less charming.
If you live in a warm climate, give watercress morning sun and some afternoon shade. In cooler areas, it can handle more sun. Indoors, a bright window or grow light works well, especially if you keep the growing area from becoming too warm.
Consistent Moisture Is Non-Negotiable
This is the golden rule of watercress care. The soil or growing medium should stay consistently wet. Not damp-ish. Not dry between waterings. Wet. Watercress naturally grows along streams, springs, and shallow water, so the closer you can get to that condition, the better.
The easiest way to manage this at home is to place the pot or growing container in a shallow tray or bucket with water. That setup keeps the roots moist and saves you from the “Did I water this today?” panic spiral.
Rich Soil and the Right pH
Watercress prefers fertile, organic-rich growing media. If you are growing it in potting mix, choose one that holds moisture well without turning into compacted cement. Mixing in compost is a smart move. As for pH, watercress generally does best in a neutral to slightly alkaline range, though it can tolerate some variation. If your soil is healthy, rich, and stays wet, you are already most of the way there.
How to Grow Watercress at Home
Option 1: Grow Watercress in a Container
This is the easiest method for most home gardeners. Start with a wide container that has drainage holes. Fill it with a rich potting mix, then set the pot inside a larger tray, basin, or watertight container that can hold a shallow layer of water. The goal is for the potting mix to stay saturated without the entire setup turning into a mysterious backyard science project.
Sow seeds thinly on the surface of the wet mix and lightly press them in, or cover them very lightly. You can also start with rooted cuttings. Place the container where it gets bright light and keep water in the outer tray at all times. Once seedlings are established, thin them enough to allow airflow. Crowded greens may look adorable, but they invite problems.
Option 2: Grow It Hydroponically
Watercress is a natural fit for simple hydroponic growing. You do not need a commercial greenhouse setup to make this work. A shallow container, clean water, net pots or small cups, and a nutrient solution can do the job. This method is especially useful if you want tidy indoor production without hauling around heavy soil.
Hydroponic watercress needs clean water, regular monitoring, and enough light. If algae starts building up or the water smells off, that is your cue to refresh the system. Your watercress wants “fresh spring vibes,” not “forgotten bucket behind the garage.”
Option 3: Create a Bog-Style Planter
If you like gardening projects, a bog planter is a fun middle ground between containers and a full water feature. Use a large watertight pot or tub, add rich soil, and keep the soil line consistently wet. Some gardeners leave a small water reservoir at the bottom or let a few inches of water remain around the inner pot.
This method gives watercress the soggy root zone it loves while keeping the plant controlled. That last part matters. Watercress is considered invasive in some parts of the United States, so it is best grown in contained systems instead of released into ponds, creeks, or drainage areas.
How to Start Watercress From Seed
Starting from seed is simple, especially in cool weather. Moisten your growing medium first so you do not wash tiny seeds away later. Scatter seeds thinly, press them gently into the surface, and keep everything evenly wet. Germination is usually fairly quick under the right conditions.
Once seedlings appear, keep the light consistent and the moisture level high. If you started seeds densely, thin them once they gain size. You can use the thinnings in salads, which is one of the few times plant crowding gets rewarded with lunch.
Succession sowing is a smart strategy if you want a steady harvest. Instead of planting one huge batch, sow smaller amounts every couple of weeks during the cool growing season. That way, you are not suddenly drowning in greens and making watercress soup out of desperation.
How to Grow Watercress From Cuttings
Watercress also roots readily from cuttings, which makes it a satisfying plant for impatient gardeners. Take a healthy stem cutting, remove the lower leaves, and place the stem in clean water. Once roots begin forming, transplant it into a saturated potting mix or a hydroponic setup.
You can even start from a fresh grocery-store bunch if the stems are healthy and not too far gone. Not every bundle will root successfully, but many gardeners have managed it. It is one of the rare moments when buying greens can honestly count as gardening.
How to Care for Watercress All Season
Watering
Keep watercress wet at all times. Check the water level in trays and outer containers daily, especially during warm or windy weather. Indoors, evaporation may be slower, but do not assume the plant has become low-maintenance. It has not.
Feeding
Because watercress grows quickly and produces lots of tender leaves, it benefits from light feeding. Compost-enriched soil may be enough for short-term growing, but longer harvest windows can improve with a diluted liquid fertilizer or a balanced hydroponic nutrient solution. Go easy. Overfeeding can produce lush but weak growth.
Pruning and Pinching
Regular trimming encourages bushier growth and keeps leaves tender. Pinch back stems before the plant flowers if possible. Once watercress starts bolting, flavor can become harsher. Think of flowering as the plant announcing that it is ready to move on, while you are still trying to make sandwiches.
Light
Aim for full sun to partial shade. In cooler climates, more sun is usually fine. In hot regions, partial shade helps prevent stress. Indoors, use a bright window or grow lights for several hours a day to keep stems from stretching.
Common Problems and How to Fix Them
Leaves Taste Bitter
This usually means the plant is getting too hot, too old, or too close to flowering. Harvest younger leaves, trim regularly, and grow during cooler months for the best flavor.
Growth Is Weak or Pale
Weak growth often points to low light, depleted nutrients, or poor water quality. Move plants to brighter light, feed lightly, and refresh standing water if it looks cloudy or stagnant.
Plants Rotting at the Base
Yes, this can happen even with a water-loving plant. Watercress wants oxygen around the roots too, especially in container culture. If your setup smells swampy or the stems look mushy, clean the container, refresh the water, and improve circulation.
Pests
Watercress is not usually the biggest magnet in the garden, but snails, slugs, spider mites, and whiteflies can show up. Outdoors, watch for chewing damage. Indoors, inspect the undersides of leaves. A quick response matters more than a dramatic response.
How and When to Harvest Watercress
Watercress is a cut-and-come-again crop, which is gardener language for “the gift that keeps on giving if you are nice to it.” Begin harvesting once the stems are well developed and the leaves are lush. Use clean scissors to snip the top few inches, leaving enough plant behind to regrow.
Harvest regularly for the best texture and flavor. Younger growth is usually the most tender. If the plant gets tall, leggy, or close to flowering, cut it back more firmly and encourage fresh growth. Frequent harvesting is not cruel. It is good management and a convenient excuse to eat more sandwiches.
After harvest, rinse the greens in clean water and dry them gently. Store them in the refrigerator wrapped loosely in a damp paper towel or in a breathable produce container. Watercress is best used fresh, because it loses quality faster than sturdier greens.
Food Safety and Smart Growing Precautions
This part matters. Watercress has a long history as an edible plant, but freshwater plants can carry contamination if grown or collected in unsafe conditions. For home growing, always use clean water and clean containers. Do not harvest watercress from unknown streams, roadside ditches, or places exposed to animal waste or poor sanitation.
If you are growing watercress outdoors, contain it carefully. In some regions, it can spread beyond the garden and naturalize in waterways. That may sound romantic in a “secret English garden” kind of way, but ecologically it can become a real problem. Keep it in pots, tubs, or managed beds, and do not dump trimmings into creeks or ponds.
Best Ways to Use Homegrown Watercress
Once you start harvesting, the kitchen possibilities come fast. Toss watercress into salads for a peppery lift. Layer it into sandwiches with roast chicken, smoked salmon, or sharp cheddar. Stir it into soups at the last minute. Blend it into pesto with walnuts. Fold it into scrambled eggs. Add it to a potato dish and pretend you are on a cooking show that uses the word “elevate” every seven minutes.
The flavor is strongest when raw, but cooking softens the bite. If someone in your household claims not to like greens, butter, lemon, and a warm skillet can work surprising miracles.
of Real-World Watercress Growing Experiences
One of the most common beginner experiences with watercress is underestimating how quickly it tells you when it is unhappy. Miss a watering with basil, and you may still have a little time to recover. Forget to top off a watercress tray, and the plant can go from cheerful to offended in record time. Gardeners often describe the first week with watercress as a lesson in vigilance. After that, most settle into a rhythm: check the water, trim the tips, admire the lush green leaves, repeat.
Another frequent experience is surprise at just how little space watercress needs to be productive. People start with a modest tub, a windowsill tray, or a pot sitting in a bowl of water, fully expecting a tiny garnish crop. Then, a few weeks later, they are clipping enough for salads, sandwiches, and “I should probably put this in dinner somehow” levels of abundance. It is the sort of plant that makes small-space gardeners feel wildly competent.
Indoor growers often say the biggest challenge is not the plant itself but the setup. A shallow container with stale water can get funky fast, especially in a warm room. The watercress may still look decent while the grower begins to suspect they have created an indoor marsh with attitude. The fix is simple: clean water, fresh airflow, and regular container rinses. Once those habits are in place, watercress becomes much easier and a lot less likely to smell like bad decisions.
Outdoor growers tend to remember the first hot spell. Watercress can look absolutely glorious in cool spring weather, with crisp stems and lush leaves, then suddenly lose its sweetness when temperatures climb. Many gardeners learn to treat it like a seasonal star rather than a year-round workhorse. In spring and fall, it performs beautifully. In summer, especially in hot regions, it may need shade, extra attention, or a graceful exit until cooler weather returns.
There is also the harvest learning curve. Beginners often wait too long, assuming bigger means better. Then they taste a more mature leaf and realize that tender young growth is where the real magic lives. Experienced growers start snipping earlier, more often, and with much less hesitation. Once you understand that regular cutting improves the plant, harvesting stops feeling like a risk and starts feeling like the whole point.
Many gardeners also become oddly attached to watercress because it feels a little special. Tomatoes are wonderful, but everyone expects a tomato. Watercress has a niche-crop charm. It makes guests say, “Wait, you grew this?” in a tone usually reserved for handmade pasta or suspiciously good pie crust. That tiny thrill is part of the appeal.
Perhaps the most honest shared experience is this: watercress makes people feel more organized than they really are. A person with one thriving tray of watercress on the patio suddenly feels capable of running a kitchen garden empire. Whether that leads to wisdom or to six more experimental containers is a personal journey. Either way, watercress is often the plant that convinces gardeners to keep going.
Conclusion
Watercress is one of the most rewarding greens you can grow at home if you give it what it wants: cool weather, constant moisture, bright light, and clean growing conditions. It is fast, flavorful, and surprisingly productive in small spaces. Start with a container, tray, or simple hydroponic setup, harvest often, and keep it contained so it does not wander where it should not. Do that, and you will have a steady supply of crisp, peppery greens that make ordinary meals feel much less ordinary.