Table of Contents >> Show >> Hide
- Carrot Growing Basics
- Soil Preparation: The Secret to Straight, Sweet Roots
- How to Plant Carrot Seeds
- Thinning, Watering, and Everyday Care
- Growing Carrots in Containers and Raised Beds
- Common Carrot Problems (and How to Fix Them)
- When and How to Harvest Carrots
- of Real-World Carrot-Growing Experience
If you’ve ever pulled a crooked little carrot out of your garden and thought, “Well… at least it has personality,” this guide is for you. Growing carrots isn’t hard, but they are picky about a few things: soil, spacing, and steady care. Get those right, and you’ll be swimming in sweet, crunchy roots before you know it.
Carrot Growing Basics
Carrots are cool-season root vegetables that prefer mild temperatures and loose, rock-free soil. Most varieties mature in about 50–75 days, depending on type and conditions. They can be grown in traditional garden beds, raised beds, or deep containers, as long as their roots have room to stretch.
Best Time to Plant Carrots
In most parts of the United States, you can plant carrots twice a year:
- Spring crop: Sow seeds 2–4 weeks before your average last spring frost date, as soon as the soil can be worked.
- Fall crop: Sow seeds about 10–12 weeks before your first expected fall frost for a sweet, autumn harvest.
Carrots handle light frosts well, and cool weather actually helps them convert starches into sugars, making the roots taste sweeter.
Sunlight and Temperature Needs
Carrots grow best in full sunabout 6 or more hours of direct sunlight per daybut they’ll tolerate light shade, especially in warmer regions. Ideal soil temperatures for germination and growth are roughly 50–75°F (10–24°C).
Soil Preparation: The Secret to Straight, Sweet Roots
Carrots are basically soil critics. If the soil is lumpy, compacted, or full of rocks, they’ll fork, twist, and grow in bizarre shapes. Funny? Yes. Easy to peel? Not so much.
Ideal Soil Type
- Texture: Loose, deep, and well-drained. Sandy loam is ideal.
- Depth: Aim for at least 10–12 inches of loosened soil for standard carrots; shorter or “mini” varieties need less.
- pH: Slightly acidic to neutral (around 6.0–7.0).
Before planting, remove stones, roots, and clods, and break up any crusted soil. Many university extensions emphasize that compacted or rocky soil is the top culprit behind forked and misshapen carrots.
Fertilizing Without Overdoing It
Carrots are not heavy feeders, but they appreciate fertile soil enriched with compost. Work in well-rotted compost or a balanced, low-nitrogen fertilizer before planting. Too much nitrogen encourages leafy tops at the expense of root size and can lead to hairy, bitter roots.
How to Plant Carrot Seeds
Carrots absolutely hate being transplanted, so they’re almost always direct sown where they’ll grow to maturity. The seeds are tinythink “sprinkling pepper,” not “carefully placing beans.”
Planting Depth and Spacing
- Depth: Sow seeds about 1/4–1/2 inch deep.
- In-row spacing at sowing: Scatter or sow thinly, then thin later.
- Final spacing after thinning: About 1.5–3 inches between plants, depending on variety.
- Row spacing: 12–18 inches between rows for easy weeding and airflow.
To improve germination, some growers sow carrot seeds on the soil surface and cover them with a light layer of compost or fine sand. This helps prevent soil crusting, which can keep seedlings from breaking through.
Helping Tiny Seeds Germinate
Carrot seeds can take a whileoften 10–21 daysto sprout, especially in cool soil. The key is consistent moisture at the soil surface. Lightly water the bed daily (or use a soaker hose) until seedlings emerge, making sure not to blast the seeds out of the soil.
A fun trick: mix carrot seeds with sand or radish seeds. The sand helps spread them out evenly, and the radishes germinate quickly, marking the row. Just harvest the radishes early before they crowd the carrots.
Thinning, Watering, and Everyday Care
Once the seeds finally sprout, your job is to give each young carrot enough room, water, and a reasonably weed-free life. Basically, you’re running a tiny carrot spa.
Thinning Seedlings
Carrots are often sown thickly, so thinning is non-negotiable. When seedlings are about 2–3 inches tall, gently thin them to their final spacing (around 1.5–3 inches apart). Use small scissors to snip the extras at soil level instead of pulling them, which can disturb neighboring roots.
Watering for Sweet, Tender Carrots
Carrots like consistent moisturenot swampy, not bone dry. Irregular watering can lead to:
- Cracked roots
- Bitter or woody flavor
- Stunted growth
Most extensions recommend about 1 inch of water per week from rain or irrigation. Deep, infrequent watering encourages roots to grow down instead of lingering near the surface. Mulch around plants to conserve moisture and reduce weeds.
Weeding Without Disturbing Roots
Carrots don’t like competition. Keep the bed as weed-free as possible, especially while seedlings are small. Hand-weed carefully or use a small hoe, staying shallow so you don’t slice the developing roots.
Growing Carrots in Containers and Raised Beds
No big yard? No problem. Carrots are surprisingly happy in deep containers or raised beds, as long as their basic needs are met.
Container Requirements
- Depth: At least 10–12 inches for standard carrots; 8 inches may suffice for shorter or round varieties.
- Drainage: Essentialmake sure containers have drainage holes.
- Soil: High-quality potting mix blended with compost; avoid heavy, garden soil in pots.
Lightly moisten the mix before sowing so the tiny seeds stick to the surface. Many container-growing guides recommend placing the container in bright light but keeping it shaded during germination to prevent the surface from drying out.
Choosing Varieties for Small Spaces
If you’re growing in containers, look for shorter or “stubby” varieties marketed as patio or mini carrots. These produce plump roots in shallow soil and are perfect for raised beds, window boxes, and balcony gardens.
Common Carrot Problems (and How to Fix Them)
Even experienced gardeners get weird carrots sometimes. If your carrots look more like abstract art than vegetables, here are some likely causes.
Forked or Misshapen Roots
Possible causes:
- Rocky, compacted, or clumpy soil
- Fresh manure or high-nitrogen fertilizer
- Transplanting instead of direct sowing
- Damage from pests or careless thinning
Fix: Use loose, rock-free soil, avoid fresh manure, direct sow seeds, and thin carefully.
All Tops, No Roots
If your carrot tops look lush and fabulous but the roots are tiny or nonexistent, blame one of these:
- Excess nitrogen in the soil
- Plants spaced too closely and never thinned
- Too much shade
To prevent this, thin on time, plant in full sun, and go easy on nitrogen-heavy fertilizers.
Thin, Spindly Carrots
Carrots that never seem to fatten up may be dealing with:
- Overcrowding from lack of thinning
- Poor, compacted, or dry soil
- Insufficient sunlight
- Planting too late in hot weather
Better Homes & Gardens notes that improving soil quality, spacing, watering, and timing typically fixes the “too thin” problem in future plantings.
Pests and Diseases
The biggest threats to carrots include:
- Carrot rust fly: Larvae tunnel into roots, leaving rusty-brown trails.
- Aster yellows disease: Causes hairy, bitter roots and yellowed tops.
- Root-knot nematodes and other soil-borne problems: Lead to knobby, stunted roots.
Covering carrot beds with insect mesh, rotating crops, removing infested plants, and keeping weeds in check are standard strategies for reducing damage.
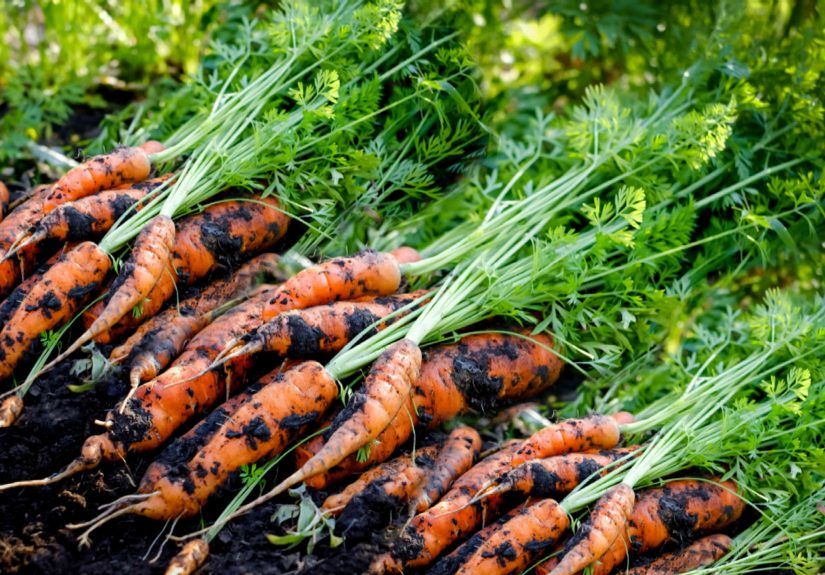
When and How to Harvest Carrots
Carrots don’t send you a calendar invite when they’re ready, but they do leave clues.
Signs Your Carrots Are Ready
- Check the “shoulder” (top of the root) where it meets the soil; when it’s about 3/4–1 inch wide, many varieties are ready.
- Most carrots mature within 50–75 days after sowing, depending on the variety.
- You can harvest baby carrots earlier if you prefer smaller, more tender roots.
To harvest, loosen the soil with a fork or trowel beside the row and gently pull the carrots by the tops. Yank too hard on a compacted bed, and you may end up with a handful of greens and no rootvery humbling.
Post-Harvest Handling
Once harvested, twist or cut off the tops to prevent them from drawing moisture and sugars out of the roots. Rinse off excess soil and store:
- In the refrigerator, in a perforated bag, for several weeks
- In a cool root cellar, layered in damp sand or sawdust for longer storage
Carrots grown slowly in cool temperatures tend to store longer and keep their sweetness better.
of Real-World Carrot-Growing Experience
Textbook advice is great, but real gardens are messy, imperfect, and full of surprises. Here are some experience-based tips and lessons that home gardeners often learn the hard way when figuring out how to grow and care for carrots.
The First Carrot Disaster (and What It Teaches You)
Many gardeners have the same first-carrot story: they sprinkle seeds generously because the packets look full, forget about thinning, and proudly pull their harvest a couple of months lateronly to find a handful of orange spaghetti. It’s incredibly common. The take-away isn’t that you’re a bad gardener, just that carrots are unforgiving about spacing. The first time you thin and actually give each plant 2 inches of room, the difference is dramatic. Suddenly, instead of a tangled orange knot, you get real, full-sized roots that feel like a minor miracle.
Germination: Where Patience Pays Off
Carrot germination tests your patience more than almost any other vegetable. It’s tempting to assume “nothing is happening” and start poking around in the soil. That usually ends with disturbed seeds and even fewer sprouts. Gardeners who have grown carrots for years often swear by a few hacks: covering the bed with a lightweight board or shade cloth to hold moisture, watering gently with a fine rose or mist nozzle, and checking daily instead of hourly. After about two weeks, the first feathery seedlings appear, and you realize all that hovering actually did helpas long as you didn’t dig them up in frustration.
Why Soil Prep Is Worth the Extra 20 Minutes
It’s easy to skip deep soil prep when you’re in a hurry. But carrots are the one crop that will absolutely “tell on you” later. If you rushed and left in rocks or didn’t break up hardpan, you’ll see it months later in forked, split, or curled roots. Gardeners who switch from shallow tilling to really loosening 10–12 inches of soil (or moving to raised beds) usually see night-and-day improvement. Growing in deep containers filled with fluffy potting mix can feel almost too easy by comparisonit’s like giving carrots their dream apartment.
Watering Lessons (or, How Not to Grow Woody Carrots)
Another common experience: inconsistent watering. Maybe you’re enthusiastic in spring, then summer hits, you get busy, and the garden is on its own for a week. When you finally check, the soil is dry, the tops look stressed, and the roots have tough cores and slightly bitter flavor. Gardeners quickly learn that carrots respond best to a steady routine: a weekly deep soak plus mulch, or a drip system on a timer. It doesn’t have to be perfect, just predictable. Once you dial this in, your carrots become much sweeter and more tender, even if the tops still look a little wild.
Experimenting with Varieties
One of the joys of growing your own carrots is discovering that they’re not all long, straight, and orange. Many home gardeners start with a standard Nantes or Danvers type, then gradually branch out into rainbow mixes, stubby “Chantenay” types for heavy soils, or round, golf-ball-like “Parisian” carrots that thrive in containers and raised beds. Trying a few different varieties side by side is like a mini taste test. You might find that one type is amazingly sweet for fresh snacking, while another holds texture better in soups and roasts.
The Carrot Fly & Other Plot Twists
Pests like carrot rust fly are an unwelcome surprise for many gardeners. You pull what looks like a perfect carrot, only to find brown tunnels inside. After one or two of those, most people become instant fans of row covers and crop rotation. The good news is that even with occasional pest damage, you can often salvage part of the root by trimming away affected areas. Over time, you learn your local patterns: maybe fall plantings have fewer issues in your area, or perhaps container-growing away from old garden soil works better.
The Payoff: From Garden to Plate
The real magic happens the first time you cook with your own carrots. Homegrown roots often taste sweeter and more complex than supermarket ones, especially if they were grown in cool weather and harvested at the right size. They roast beautifully, stay vibrant in soups, and shine in fresh salads. Many gardeners joke that growing your own carrots ruins store-bought ones foreveryou’ll constantly think, “These are fine, but they’re not my carrots.”
In the end, learning how to grow and care for carrots is a blend of science and practice. Follow the basic guidelines on soil, spacing, watering, and timing, then let each season teach you a little more. The carrots, twisted or perfect, will always give honest feedback.