Table of Contents >> Show >> Hide
- What Is a Monkey Lamp?
- Materials and Tools You Will Need
- Step 1: Choose the Right Monkey Figure
- Step 2: Decide Where the Light Will Go
- Step 3: Build a Stable Base
- Step 4: Prep the Monkey for Paint
- Step 5: Paint the Monkey Lamp
- Step 6: Attach the Monkey to the Base
- Step 7: Install the Lamp Kit Safely
- Step 8: Choose the Right Bulb
- Step 9: Test the Lamp Before Styling It
- Step 10: Style Your Monkey Lamp Like a Pro
- Common Mistakes to Avoid
- Creative Variations for Your DIY Monkey Lamp
- Maintenance and Care
- Real-World DIY Experience: What It Feels Like to Make a Monkey Lamp
- Conclusion
A monkey lamp is not just a lamp. It is a tiny indoor drama, a jungle joke, a sculptural sidekick, and a very useful way to stop your nightstand from looking like it gave up in 2008. Inspired by playful animal lighting designs, the DIY monkey lamp combines character, function, and a little theatrical mischief. The best part? You can make one without needing a design degree, a bronze foundry, or a pet monkey with strong opinions about interior décor.
This guide explains how to create your own monkey lamp DIY project using accessible materials such as a resin or plastic monkey figure, a ready-made lamp cord kit, an LED bulb, primer, paint, sealant, and a stable base. The goal is to build a decorative monkey table lamp that looks intentional, feels sturdy, and uses safe lighting components. We will focus on a plug-in accent lamp, because it is the most beginner-friendly option and does not require modifying your home’s electrical wiring.
Before we start swinging from the craft-room vines, one rule matters more than style: electrical safety comes first. A gorgeous lamp that overheats, wobbles, or uses a mystery cord from the “box of questionable things” is not quirky; it is a future cautionary tale. Use a listed lamp kit or cord-and-socket assembly, choose an LED bulb within the socket’s wattage rating, and keep the finished lamp indoors unless every component is rated for outdoor use.
What Is a Monkey Lamp?
A monkey lamp is a decorative light fixture shaped like a monkey, usually posed as if it is holding, presenting, climbing with, or hanging near a light source. High-design versions often use sculptural resin and a small LED bulb to create the feeling of a little primate performer bringing light into the room. The result is both functional lighting and conversation-starting décor.
For a DIY version, you do not need to copy any designer piece. In fact, you should not try to make a counterfeit. Instead, use the idea as creative inspiration: an animal figure, a visible bulb, a playful pose, and a finish that matches your room. Your monkey can be matte black and dramatic, glossy white and gallery-like, banana yellow and outrageous, or antique gold like it guards treasure in a very tiny jungle temple.
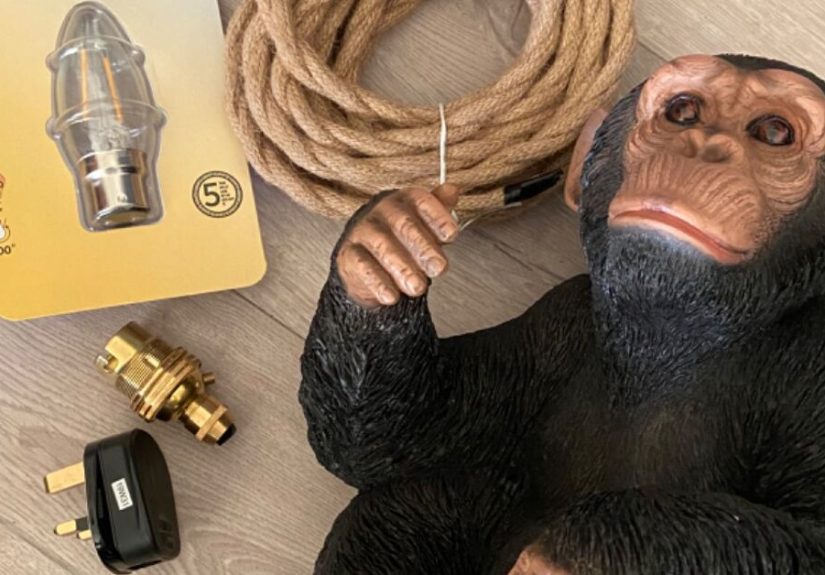
Materials and Tools You Will Need
Core Materials
- A resin, plastic, ceramic, or 3D-printed monkey figure
- A ready-made plug-in lamp kit or pendant cord with socket and switch
- An LED bulb that fits the socket and stays within the lamp kit’s wattage rating
- A wood, metal, or heavy acrylic base
- Two-part epoxy or strong construction adhesive
- Primer suitable for plastic or resin
- Acrylic spray paint or brush-on craft paint
- Clear sealant in matte, satin, or gloss finish
- Felt pads for the bottom of the base
- Cable clips or small zip ties for cord management
Helpful Tools
- Small drill and drill bits
- Painter’s tape
- Fine-grit sandpaper
- Utility knife
- Small clamps
- Ruler or measuring tape
- Pencil
- Protective gloves and eye protection
- Drop cloth or cardboard spray area
The easiest route is to use a complete lamp kit rather than building electrical parts from scratch. Many make-a-lamp kits include a cord, polarized plug, socket, and hardware designed for small lamp projects. This keeps your monkey lamp DIY project more approachable and reduces the guesswork.
Step 1: Choose the Right Monkey Figure
Your monkey figure is the star of the show, so choose carefully. A sitting monkey works well for a table lamp because it naturally balances on a base. A climbing monkey is great if you want the bulb to look like a torch. A hanging monkey can be fun, but it is harder to stabilize unless you are making a wall-mounted or pendant-style design.
Look for a figure that is hollow or lightweight enough to work with, but not so flimsy that it bends under the lamp socket. Resin is a strong choice because it holds detail and takes paint well after proper priming. Plastic can also work, especially for budget projects, but it may need extra sanding and primer to help paint stick. Ceramic looks elegant but is easier to crack when drilling, so beginners may want to avoid it.
Pay attention to the hands. A monkey with open hands, forward-reaching arms, or a natural gripping pose makes it easier to position the bulb. If the hands are closed or awkwardly placed, you can still create a great lamp by attaching the bulb near the monkey rather than directly in its grip.
Step 2: Decide Where the Light Will Go
There are three beginner-friendly monkey lamp layouts:
Option A: The Torch Holder
The monkey appears to hold a small bulb like a torch. This is the most iconic look and works best with a small LED globe bulb or vintage-style LED bulb. The socket can be secured behind or below the monkey’s hand, while the bulb becomes the visual “torch.”
Option B: The Sidekick Glow
The monkey sits beside a small bulb mounted on the base. This is easier to build because the socket does not need to be supported by the figure. It looks more like a sculpture with an attached accent light.
Option C: The Mini Shade Lamp
The monkey sits at the base while a small lampshade rises above it. This option is less dramatic but more practical for bedside lighting. It also softens glare if you do not want an exposed bulb shining directly at your eyes while you are trying to read, relax, or pretend you are not scrolling at midnight.
For most DIYers, the torch-holder layout offers the best mix of personality and practicality. It says, “Yes, I made this,” without requiring a full workshop or a permission slip from an electrician.
Step 3: Build a Stable Base
A monkey lamp needs a sturdy base because the figure, socket, and bulb can create uneven weight. Choose a base that is wider than the figure’s footprint. A small wood plaque, round cutting board, thick acrylic disc, or metal plate can work beautifully.
Sand the base lightly, wipe away dust, and test the monkey’s position before gluing anything. Place the figure, socket, and cord on the base to check balance. Gently nudge the setup from different sides. If it tips easily, use a larger or heavier base. This is not the moment to trust hope as an engineering strategy.
If the cord needs to pass through the base, mark the hole location and drill carefully. A back exit hole usually looks cleanest. If drilling is not possible, route the cord along the back using cable clips and paint the clips to match the base.
Step 4: Prep the Monkey for Paint
Most store-bought figures have glossy surfaces, mold seams, or small imperfections. Lightly sand the surface with fine-grit sandpaper to help primer adhere. Do not sand away the sculpted details; the goal is to dull the shine, not erase the monkey’s entire personality.
Wipe the figure with a damp cloth and let it dry fully. Tape off any areas you do not want painted. If the figure has glass eyes or decorative details you want to keep, protect them with painter’s tape.
Apply a thin coat of primer designed for the material. Plastic and resin often need specialty primer. Let it dry according to the label, then add a second light coat if needed. Thin coats are better than one heavy coat, which can drip into details and make your monkey look like it fell into pancake batter.
Step 5: Paint the Monkey Lamp
Paint color sets the mood of your DIY monkey lamp. Matte black feels modern and bold. White creates a gallery-inspired look. Gold or bronze adds vintage drama. Green, coral, cobalt, or banana yellow creates a playful pop-art effect. If your room is neutral, the lamp can be the one piece that gets to act a little ridiculous.
Spray paint gives the smoothest finish, but brush-on acrylic paint offers more control for details. If using spray paint, work outdoors or in a well-ventilated area, follow the paint label, and apply several thin coats. Rotate the figure between coats so you reach under arms, behind ears, and into all the tiny areas that somehow become obvious only after the paint dries.
Once the color is even, add clear sealant. Matte sealant looks sophisticated, satin is forgiving, and gloss adds a ceramic-like shine. Let the finish cure fully before assembly. Dry to the touch is not the same as cured; patience here prevents fingerprints, smudges, and the classic “I ruined it because I got excited” moment.
Step 6: Attach the Monkey to the Base
Position the painted monkey on the base and mark the contact points. Use two-part epoxy or strong adhesive rated for the materials you are joining. Apply adhesive carefully, press the figure into place, and clamp or support it while it cures.
If the figure is hollow and lightweight, consider adding weight inside the base or behind the monkey. Adhesive wheel weights, metal washers, or a hidden steel plate can help. The finished lamp should feel stable when touched lightly. If it wobbles, fix the balance before installing the light.
Step 7: Install the Lamp Kit Safely
Use a preassembled plug-in lamp kit or cord-and-socket set whenever possible. Follow the manufacturer’s instructions exactly. Do not splice wires, remove grounding features, force a plug into an outlet, or modify a socket unless you know what you are doing. If a step feels confusing, ask a qualified electrician or choose a simpler battery-powered LED puck light instead.
For a torch-holder monkey lamp, position the socket so the bulb appears to rest in or near the monkey’s hand. Secure the socket mechanically when possible, using the lamp kit’s included hardware, a bracket, or a hidden support. Adhesive alone should not carry the entire stress of a cord that may be tugged over time.
Route the cord behind the figure and out the back of the base. Keep the cord smooth, visible, and free from pinching. Do not run the cord under a rug or through a doorway. Extension cords should not be treated as permanent wiring, and covered cords can trap heat. For a tabletop lamp, the safest look is usually the simplest: cord exits the back, reaches a nearby outlet, and stays out of foot traffic.
Step 8: Choose the Right Bulb
An LED bulb is the best choice for a DIY monkey lamp. LEDs use far less energy than traditional incandescent bulbs and are available in many shapes, sizes, and color temperatures. For a sculptural lamp with an exposed bulb, choose a warm white LED around 2700K to 3000K for a cozy glow. If you want a crisp modern look, try 3500K to 4000K.
Always check the socket rating. If the socket says 40 watts maximum, use a bulb that stays within that limit. With LEDs, brightness is measured mostly by lumens, not just watts. A small accent lamp may only need 250 to 450 lumens. For reading, you may want 450 to 800 lumens, but avoid making an exposed bulb too bright unless you enjoy being interrogated by your own furniture.
A globe LED bulb, small frosted bulb, or decorative filament-style LED can all look great. Frosted bulbs reduce glare. Clear bulbs show off the filament style. Smart bulbs can add dimming and color, but make sure the bulb physically fits the socket and does not exceed the recommended rating.
Step 9: Test the Lamp Before Styling It
Place the finished monkey lamp on a clear, stable surface. Make sure the bulb is screwed in securely, the socket is not loose, and the cord is not twisted or pinched. Plug it directly into a wall outlet and switch it on. Watch it for several minutes during the first test.
The bulb should light steadily. The socket should not smell hot, spark, buzz, or feel unusually warm. A little warmth from a bulb is normal, but heat buildup around plastic, paper, or paint is a warning sign. If anything seems wrong, unplug the lamp immediately and inspect the components. When in doubt, replace the lamp kit or consult a professional.
Step 10: Style Your Monkey Lamp Like a Pro
A monkey lamp works best when it has room to perform. Place it where the shape can be seen, not buried behind books, cables, and a mug from three Tuesdays ago. Good locations include a side table, console, bookshelf, desk corner, nursery shelf, or playful guest room nightstand.
For modern rooms, pair a black or white monkey lamp with clean lines and simple accessories. For eclectic interiors, surround it with plants, art books, woven textures, and colorful ceramics. For kids’ rooms, use a frosted LED bulb, secure the lamp where it cannot be pulled down, and avoid long dangling cords.
If your monkey lamp looks too theatrical, balance it with calm surroundings. If it looks too plain, add a patterned base, metallic finish, or small decorative vine around the base. The secret is to make the lamp feel like an intentional accent, not something that escaped from a craft fair and is currently hiding in your living room.
Common Mistakes to Avoid
Using the Wrong Bulb
A bulb that is too bright, too hot, or too large can ruin the look and create safety concerns. Choose an LED that fits the socket, stays within the wattage limit, and provides the right amount of light for the room.
Skipping Primer
Paint often peels from slick plastic or resin if you skip primer. Take the extra step. Your future self, who does not want to repaint monkey elbows, will be grateful.
Making the Base Too Small
A small base may look cute until the lamp tips over. Prioritize stability. You can always paint or decorate a larger base to make it feel lighter visually.
Hiding the Cord Unsafely
Do not bury cords under rugs, staple through them, or trap them under furniture legs. Cord management should be tidy but visible enough to prevent heat buildup and damage.
Copying a Designer Lamp Too Closely
Use famous animal lamps as inspiration, not a blueprint for imitation. Your DIY project should have its own personality. Maybe your monkey wears a tiny painted bow tie. Maybe it holds the bulb like a glowing coconut. Originality is where the fun lives.
Creative Variations for Your DIY Monkey Lamp
The Jungle Shelf Lamp
Paint the monkey matte green or bronze and place it among trailing plants. Use a warm LED bulb and a wood base. This version works beautifully on a bookshelf or plant stand.
The Pop-Art Monkey Lamp
Choose a bright color such as yellow, red, cobalt blue, or hot pink. Pair it with a white globe bulb and a glossy clear coat. This style is perfect for a creative office, dorm room, or maximalist apartment.
The Antique Gold Monkey Lamp
Use gold spray paint, then add a dark wax or glaze into the details to create depth. The result looks dramatic and slightly fancy, like your monkey inherited a mansion and now judges your throw pillows.
The Kid-Friendly Glow Monkey
Use a battery-powered LED puck or low-voltage LED string lights instead of a plug-in socket. Secure everything firmly, keep small parts away from children, and choose a soft frosted glow.
Maintenance and Care
Dust the monkey lamp regularly with a soft cloth or small brush. Avoid soaking the figure, especially if it is painted or sealed. Check the cord occasionally for wear, cracks, or loose connections. If the lamp flickers or the switch feels unreliable, unplug it and replace the cord kit.
When moving the lamp, lift it by the base rather than by the monkey or socket. Decorative figures are strong enough to look heroic, but not always strong enough to survive being carried by one dramatic arm. Keep the lamp away from water, heavy curtains, and spots where pets can knock it over during their nightly parkour routine.
Real-World DIY Experience: What It Feels Like to Make a Monkey Lamp
The first thing you learn while making a monkey lamp is that every object has a “front.” This sounds obvious until you rotate a monkey figure for twenty minutes trying to decide whether it should look curious, heroic, sneaky, or like it just discovered electricity and intends to use it responsibly. The pose matters because the lamp is not only a light source; it is a little character in the room.
In a real DIY setting, the planning stage usually takes longer than expected. You may start with one idea, such as “the monkey will hold the bulb,” then realize the hands are too small or the socket looks bulky. That is not failure. That is the project telling you what it wants to become. Many successful monkey lamp DIY projects improve when the maker stops forcing the original plan and lets the materials guide the design.
Painting is another lesson in patience. The first coat often looks disappointing. Primer can appear chalky. Spray paint can reveal seams you never noticed. The monkey may briefly look like it has made poor life choices. Keep going. Thin, even coats transform the figure gradually. By the third coat, the surface begins to look intentional. After sealant, the lamp suddenly feels like décor instead of a rescued toy from a garage bin.
Assembly teaches balance. A monkey figure that sits perfectly alone may become unstable once a socket and bulb are added. This is why test-fitting matters. Before gluing, set everything in place and check the center of gravity. A heavier base can turn a wobbly novelty into a confident table lamp. Felt pads underneath are a small finishing touch, but they make the lamp feel polished and protect furniture from scratches.
The electrical part is where many beginners feel nervous, and that is healthy. Respecting electricity is not being dramatic; it is being sensible. A ready-made lamp kit makes the process much easier. The key is to avoid improvising with unknown parts. Do not use damaged cords, mystery sockets, or bulbs that exceed the rating. A DIY lamp should be creative, but the electrical components should be boring in the best possible way: standard, listed, intact, and used as intended.
The most satisfying moment is the first test. You clear the table, plug in the lamp, press the switch, and suddenly the monkey has a job. The room changes. The project moves from “thing I painted” to “object with atmosphere.” A warm LED bulb creates a cozy glow, and the monkey’s shadows add depth to the wall or shelf behind it. Even if the finish is not perfect, the lamp has charm because it is handmade.
Another practical experience: guests notice it immediately. A monkey lamp does not quietly blend into the background. It starts conversations. People ask where you bought it, and saying “I made it” is half the reward. The other half is watching them lean closer to inspect the details while pretending they are not now mentally reviewing every object in their house that could become a lamp.
The best DIY monkey lamps have a little imperfection. A tiny brush mark, a slightly exaggerated pose, or a handmade base gives the piece personality. Store-bought décor often tries to look flawless. Handmade décor gets to look alive. That is the magic of this project: it turns ordinary craft materials into a functional sculpture with humor, style, and enough glow to make a corner feel special.
Conclusion
Creating your own monkey lamp DIY project is a fun way to combine sculpture, lighting, and personality in one unforgettable accent piece. Start with a strong monkey figure, use a stable base, choose a safe lamp kit, and finish everything with paint that matches your style. The project is beginner-friendly if you keep the electrical components simple and respect basic safety rules.
A DIY monkey lamp can be elegant, silly, modern, tropical, vintage, or completely bananas. That is the beauty of it. You are not just making a lamp; you are building a small glowing character for your home. And honestly, most rooms could use at least one object that looks like it knows a secret.


