Table of Contents >> Show >> Hide
- Quick Jump Menu
- Supplies You’ll Actually Use
- How to Clean the Sink (The Right Way, Not the “Splash Water and Hope” Way)
- Material-Specific Sink Tips (Because Not All Sinks Want the Same Spa Day)
- How to Clean and Deodorize a Kitchen Sink Drain
- How to Clean a Garbage Disposal (Without Sacrificing a Spoon)
- How to Fix a Slow or Clogged Kitchen Sink Drain
- How to Keep Your Sink and Drain Clean Longer (Low Effort, High Payoff)
- When to Call a Plumber
- Real-World Experiences and “Oops” Moments (Extra )
- SEO Tags (JSON)
Your kitchen sink is where coffee grounds go to stage a coup, where spaghetti sauce splatters practice modern art, and where “I’ll rinse that later” becomes a lifestyle. The good news: cleaning a sink and drain doesn’t require a hazmat suit, a chemistry degree, or a dramatic monologue. You just need the right order of operations, a few simple tools, and the confidence to say, “No, drain odor, you don’t live here now.”
This guide covers daily and deep-clean steps, safe ways to deodorize the drain (and garbage disposal), how to clear minor clogs, and what to avoid so you don’t accidentally turn your plumbing into a science fair volcano that still smells like onions.
Quick Jump Menu
- Supplies you’ll actually use
- How to clean the sink (by material)
- How to clean and deodorize the drain
- How to clean a garbage disposal (without regrets)
- How to fix a slow or clogged kitchen sink
- How to keep it clean longer
- When to call a plumber
- Real-world experiences and “oops” moments ()
- SEO tags (JSON)
Supplies You’ll Actually Use
You don’t need a cleaning aisle shopping spree. Most sink-and-drain grime responds best to a few basicsand a little consistency.
Everyday basics
- Dish soap (cuts grease better than most “miracle” sprays)
- Baking soda (gentle scrub + odor helper)
- White vinegar (great on mineral filmuse thoughtfully; see material notes)
- Non-scratch sponge or soft scrub brush
- Microfiber cloths or paper towels (drying matters more than people think)
- An old toothbrush (for faucet base, seams, and the “mystery gunk zone”)
- Rubber gloves (optional, but your hands will feel appreciated)
For drain trouble (pick what fits your problem)
- Kettle or pot for hot water flushes
- Sink plunger (a regular cup plunger works; keep one just for sinks)
- Zip-it style drain tool or a small hand auger (great for gunk grabs)
- Bucket + towel (for checking/cleaning the P-trap under the sink)
- Enzyme drain cleaner (helpful for recurring organic buildup; slower, gentler)
- Disinfectant (EPA-registered product or diluted bleach solution when appropriate)
Safety note (tiny but mighty): Never mix bleach with vinegar, ammonia, or other cleaners. If you use any chemical drain product, don’t follow it with another product “to make it work better.” That’s how you end up ventilating the house with panic.
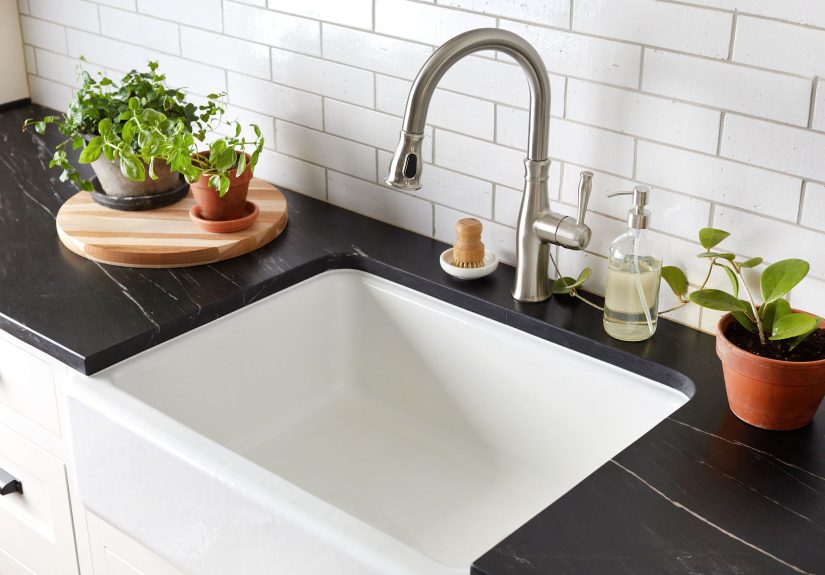
How to Clean the Sink (The Right Way, Not the “Splash Water and Hope” Way)
Start with the sink itself. A clean drain won’t feel clean if the basin is wearing a film of grease and yesterday’s coffee like a trench coat.
Step 1: Clear, rinse, and de-gunk
- Remove dishes, strainers, and sink mats.
- Rinse the sink with warm water to wash away loose crumbs and sauce splatters.
- If there’s sticky grease, add a few drops of dish soap and spread it around with a wet sponge.
Step 2: Scrub with baking soda (your sink’s gentle exfoliant)
- Sprinkle baking soda over the wet sink (a thin, even coat works).
- Scrub with a non-scratch sponge, focusing on corners, seams, and around the drain.
- For stubborn spots, make a paste (baking soda + a little water) and let it sit 5–10 minutes before scrubbing.
Step 3: Detail the hardware (because the faucet base is a liar)
- Use a toothbrush around the faucet base, handles, and the rim where water likes to hide and mineral deposits move in.
- Rinse thoroughly.
Step 4: Rinse, then dry (drying is the secret handshake)
Rinse everything well and dry the sink with a microfiber cloth. Drying prevents water spots and slows mineral buildupespecially if you have hard water.
Optional: Disinfect when it matters
If you handled raw meat, cleaned up something questionable, or someone in the house is sick, disinfecting is smart. The key is: clean first, then disinfect. Follow product instructions. If using a diluted bleach solution on hard, nonporous sink surfaces, use the right dilution and rinse after the appropriate contact time.
Material-Specific Sink Tips (Because Not All Sinks Want the Same Spa Day)
| Sink Material | Best Approach | Avoid |
|---|---|---|
| Stainless steel | Dish soap + baking soda scrub; wipe with the grain; rinse and dry; optional polish with a drop of mineral oil | Steel wool, harsh abrasives, and bleach; leaving salty/acidic residues sitting too long |
| Porcelain / fireclay | Dish soap + soft sponge; baking soda paste for stains; rinse well | Abrasive powders used aggressively; metal scrubbers that scratch the glossy finish |
| Composite granite / quartz composite | Mild soap; gentle scrub; prompt rinsing; occasional manufacturer-approved deep clean | Strong acids (including frequent vinegar soaks), harsh abrasives, and leaving staining foods to sit |
| Copper | pH-neutral soap + soft cloth; follow manufacturer guidance | Acids and abrasive scrubs that strip patina or cause uneven finish |
How to Clean and Deodorize a Kitchen Sink Drain
Drain odor usually comes from biofilm (a thin, bacteria-loving layer), trapped food particles, or grease coating the inside of the pipe. Your goal is to loosen buildup, flush it away, and keep it from coming back.
Option A: The “Degrease and Flush” method (best for everyday funk)
- Run hot water for 30 seconds to warm the pipe.
- Squirt 1–2 teaspoons of dish soap into the drain.
- Slowly pour a kettle or pot of hot (not necessarily boiling) water down the drain.
Why it works: dish soap breaks up greasy residue; hot water helps move it along. It’s simple, pipe-friendly, and surprisingly effective for “my drain is just kind of gross.”
Option B: Baking soda + vinegar (use it like an adult, not like a volcano)
Baking soda and vinegar can help with light buildup and odor, but it’s not a magic wand for serious clogs. The fizz is satisfying; the real win is giving the solution time to contact the gunk and then flushing thoroughly.
- Pour 1/2 cup baking soda into the drain (use a spoon handle to nudge it down if it sits at the top).
- Pour 1/2 to 1 cup vinegar in after it.
- Cover the drain (a stopper or even a wet rag) and wait 10–20 minutes.
- Flush with hot water for 30–60 seconds.
Option C: Enzyme cleaner (for recurring gunk, not instant drama)
If your drain gets stinky regularly, an enzyme drain cleaner can help reduce organic buildup over time. This is a “use overnight and repeat weekly” kind of toolnot a “fix my Thanksgiving clog in 3 minutes” solution.
How to Clean a Garbage Disposal (Without Sacrificing a Spoon)
Disposals get smelly when food bits cling inside the grinding chamber or under the rubber splash guard (that floppy black ring). The ring is often the real villain, because it catches splatter and politely never mentions it.
Step 1: Clean the splash guard (this is where odors hide)
- Turn the disposal off. Unplug it under the sink if you can, or switch off the breaker if you’re going hands-on.
- Lift the rubber guard edges and scrub underneath with a soapy sponge or toothbrush.
- Rinse with warm water.
Step 2: Ice + salt scrub (the classic “de-gunk the chamber” move)
- Pour in a couple of cups of ice cubes.
- Add a handful of coarse salt (rock salt or kosher salt).
- Run cold water and turn on the disposal for 15–30 seconds.
Ice helps knock residue loose; salt adds gentle abrasion. Cold water keeps fats more solid so they’re less likely to melt, slide, and re-coat the pipes downstream.
Step 3: Freshen with citrus (optional, but delightful)
Toss in a few small citrus peels or wedges (lemon, lime, orange), run cold water, and grind briefly. It helps with odor and leaves your sink smelling less like “mystery casserole.” Don’t overdo peels if your disposal struggles with fibrous scraps.
What not to do: Don’t shove your hand into the disposal. Don’t pour bleach in and then “follow with vinegar for extra power.” Also: egg shells, pasta, potato peels, coffee grounds, and grease are frequent clog contributorsyour disposal isn’t a garbage can with blades; it’s a food-scrap assistant with boundaries.
How to Fix a Slow or Clogged Kitchen Sink Drain
If water drains slowly, you likely have a partial clogoften grease + food particles collecting in the trap or the pipe beyond it. Work from gentle to more mechanical methods. If at any point you feel unsure, stop and call a plumber. Confidence is great; flooding your cabinet is not.
Step 1: Try hot water + dish soap (especially for greasy clogs)
- Scoop out standing water (if needed) so your solution actually goes into the drain.
- Add a tablespoon of dish soap.
- Follow with a pot of hot water and wait a few minutes.
- Test the drain with running hot water.
Step 2: Plunge it (yes, even sinks need plunging)
- If it’s a double-bowl sink, plug the second drain with a wet rag or stopper.
- Add enough water to cover the plunger cup.
- Plunge vigorously for 15–20 seconds, then pull off quickly.
- Repeat a few rounds and test the drain.
Step 3: Clean the P-trap (the U-shaped pipe under the sink)
Many kitchen clogs collect in the P-trap because it’s literally designed to hold water (to block sewer gases) and it catches debris as a side hobby.
- Place a bucket under the P-trap and lay down a towel.
- Unscrew the slip nuts (usually hand-tight; pliers can help but go gentle).
- Remove the trap and dump the contents into the bucket (brace yourself).
- Clean the trap with a bottle brush or old toothbrush, then reinstall snugly.
- Run water and check for leaks.
Step 4: Use a drain snake/auger (when the clog is farther down)
- Feed the snake into the drain (or into the pipe after removing the P-trap for easier access).
- Turn the handle as you push forward until you feel resistance.
- Rotate to break up or hook the clog, then pull out slowly.
- Flush with hot water and repeat if needed.
This is often the most effective DIY step for stubborn clogs because it physically removes the blockage instead of hoping it dissolves.
What about chemical drain cleaners?
Chemical drain cleaners can work for minor organic clogs, but they’re not a routine maintenance tool. Use them exactly as directed, ensure ventilation, and never mix products. If you’ve used a chemical drain cleaner and the drain is still blocked, tell a plumber before they start workingsafety first. If clogs are frequent, mechanical removal plus prevention usually beats repeated chemical treatments.
How to Keep Your Sink and Drain Clean Longer (Low Effort, High Payoff)
Daily (takes under a minute)
- Rinse food bits away after doing dishes.
- Wipe the sink dry to reduce spots and mineral film.
- Run the disposal with cold water for a few seconds after use (if you have one).
Weekly (10 minutes, tops)
- Scrub the basin with baking soda and dish soap.
- Detail around the drain and faucet base.
- Deodorize the drain with hot water + dish soap, or a baking soda treatment.
Monthly (for disposal households)
- Scrub the splash guard underside.
- Run an ice + salt grind to knock buildup loose.
- Do a longer hot-water flush after cleaning.
Drain-clog “do not invite” list
- Grease and oil: Pour into a container and toss when cool.
- Coffee grounds: They clump and stick.
- Egg shells: Tiny fragments can add to sludge (and they’re not a disposal “sharpening” miracle).
- Starchy foods: Pasta, rice, potato peelshello, paste.
- Fibrous scraps: Celery, corn husks, onion skinsstringy troublemakers.
When to Call a Plumber
DIY is greatuntil it’s not. Call a pro if you notice any of the following:
- The clog returns quickly (especially within days).
- Multiple drains are slow at the same time (could be a larger line issue).
- You hear gurgling or smell sewer odors that persist after cleaning.
- There’s leaking under the sink after you reassembled plumbing.
- Your garbage disposal jams repeatedly, hums without spinning, or trips the breaker.
Real-World Experiences and “Oops” Moments (Extra )
If you’ve ever cleaned a kitchen sink and thought, “Why does it still smell… clean-adjacent?” you’re not alone. In real homes, the problem is rarely the shiny basin. It’s the parts you don’t look at while you’re admiring your reflection in stainless steel.
One of the most common experiences people report is this: they scrub the sink until it sparkles, run a little water, and thenbammystery odor returns. The culprit is often the rubber splash guard on a garbage disposal. Food particles splash up, cling underneath, and then dry into a fragrant little museum exhibit titled “Meals of the Past.” The first time someone flips up the rubber edges and scrubs underneath with soapy water, it’s a lightbulb moment… followed by a “why did I wait so long?” moment. It’s also why a sink can smell even if the drain is technically flowing just fine.
Another classic: the “baking soda and vinegar show.” People love it because it looks productive. It bubbles! It fizzes! It feels like you’re defeating grime with science. The real-life lesson is that the bubbles don’t automatically equal a cleared clog. For light odor and mild buildup, it can helpespecially if you cover the drain, give it time, and then flush thoroughly. But when the slowdown is caused by greasy sludge farther down the line, the fizz party often ends with the sink still draining like it’s taking a nap. That’s when hot water plus dish soap (boring but effective) or a plunger (surprisingly useful) tends to feel like the real hero.
Then there’s the “I plunged it and nothing happened” frustrationusually because of a double-bowl sink. If you plunge one side while the other side is open, the pressure escapes through the other drain like a shortcut. Blocking the second drain with a wet rag or stopper can turn a useless plunge into a satisfying whoosh of success. People are often shocked by how much better plunging works when the system is sealed and the pressure has nowhere to go except into the clog.
P-trap cleaning is another rite of passage. Many homeowners expect a dramatic, movie-style blockage and instead find… sludge. Greasy, gritty sludge that explains everything. The experience usually comes with two takeaways: (1) a bucket is not optional, and (2) recurring slow drains often improve dramatically after the trap is cleaned and the line is flushed with hot water. It also teaches a valuable lesson about preventionbecause once you’ve held a U-shaped pipe full of sink history, you become emotionally invested in using a sink strainer forever.
Finally, there’s the “I used a stronger cleaner and now I’m nervous” experience. A lot of people reach for harsh chemical drain cleaners out of desperation, then realize they’re not sure what that means for their pipes, septic system, or the plumber they might need to call next. The best real-world advice here is simple: choose one method at a time, avoid mixing products, and when in doubt, switch to mechanical removal (snake/auger) or call a pro. The win isn’t “strongest chemical.” The win is “clean, clear drain, no drama.”


