Table of Contents >> Show >> Hide
- What Does It Mean to Bisect a Line Segment?
- Tools You Need
- How to Bisect a Line With a Compass and Straightedge: 9 Steps
- Step 1: Draw Your Line Segment
- Step 2: Place the Compass Point on Endpoint A
- Step 3: Open the Compass Wider Than Half the Segment
- Step 4: Draw Arcs Above and Below the Segment From A
- Step 5: Without Changing the Compass Width, Move to Endpoint B
- Step 6: Draw Matching Arcs From B
- Step 7: Use the Straightedge to Connect the Arc Intersections
- Step 8: Mark the Midpoint
- Step 9: Check Your Construction
- Why This Construction Works
- Common Mistakes to Avoid
- Practical Uses for Bisecting a Line Segment
- Tips for Better Compass and Straightedge Accuracy
- Example: Bisecting Segment AB
- Experience Notes: What It Feels Like to Learn This Construction
- Conclusion
- SEO Tags
Bisecting a line segment with a compass and straightedge may sound like something a medieval architect would do while designing a castle, but it is still one of the cleanest, smartest, and most satisfying geometry constructions you can learn. No measuring tape. No ruler marks. No calculator blinking judgmentally at you. Just a line segment, a compass, a straightedge, and a little geometric logic.
To bisect a line with a compass and straightedge means to divide a line segment into two equal parts. The point where the split happens is called the midpoint. When done correctly, the construction also creates a perpendicular bisector, a line that crosses the original segment at a perfect 90-degree angle while cutting it exactly in half.
This guide walks you through the process in 9 clear steps. Whether you are doing homework, preparing for a geometry test, refreshing old math skills, or trying to draw something accurately without relying on measurements, this method is a classic for a reason: it works beautifully.
What Does It Mean to Bisect a Line Segment?
In geometry, the word bisect means “to cut into two equal parts.” So when you bisect a line segment, you are finding the exact center point between its two endpoints. If your segment is named AB, bisecting it creates a midpoint, often labeled M, where AM and MB are equal in length.
The important detail is that a construction is not the same as measuring. In a pure compass-and-straightedge construction, you do not use the numbers printed on a ruler. The straightedge is only for drawing straight lines. The compass is for copying distances and drawing arcs. Geometry likes to keep things dramatic and precise.
Tools You Need
Compass
A compass lets you draw arcs and circles at a fixed distance from a point. In this construction, it helps create two pairs of equal-radius arcs from the endpoints of the segment.
Straightedge
A straightedge helps you draw a clean line through two points. A ruler can work, but ignore the measurement marks. For this construction, the ruler is just a fancy straight stick.
Pencil and Paper
Use a sharp pencil so your arcs and lines stay accurate. A dull pencil can turn your beautiful midpoint into a suspicious blob.
How to Bisect a Line With a Compass and Straightedge: 9 Steps
Step 1: Draw Your Line Segment
Start by drawing a line segment and labeling its endpoints A and B. This is the segment you want to bisect. It does not matter whether the line segment is horizontal, vertical, or diagonal. The method works the same way.
Try to leave enough space above and below the segment because your compass arcs will need room to cross. If your paper looks cramped, your construction may feel like trying to park a school bus in a bicycle rack.
Step 2: Place the Compass Point on Endpoint A
Put the sharp point of your compass directly on endpoint A. This point becomes the center of your first arc. Keep your hand steady, and avoid sliding the compass point around because even a small shift can affect accuracy.
The goal is to create an arc that reaches beyond the middle of the segment. That matters because the arcs from both endpoints must intersect.
Step 3: Open the Compass Wider Than Half the Segment
Open your compass so the distance from the point to the pencil tip is more than half the length of segment AB. You do not need to measure half exactly. In fact, the whole point is not to measure. Just make sure the compass opening is clearly larger than half the segment but not so large that your arcs fly off the page.
If the compass opening is too small, the arcs from A and B will not meet. If it is too large, the construction still works, but your drawing may become unnecessarily huge. Geometry rewards confidence, not chaos.
Step 4: Draw Arcs Above and Below the Segment From A
With the compass point still on A, draw one arc above the line segment and another arc below it. You do not need to draw a full circle. Two clear arcs are enough.
These arcs show all the points that are the same distance from A. Later, when you draw matching arcs from B, the places where the arcs cross will be equally distant from both endpoints.
Step 5: Without Changing the Compass Width, Move to Endpoint B
This step is crucial: do not change the compass opening. Lift the compass carefully and place the point on endpoint B. The radius must stay exactly the same as it was when you drew the arcs from A.
If you accidentally bump the compass and change the width, reset it and start the arcs again. A consistent compass width is what makes the construction mathematically accurate.
Step 6: Draw Matching Arcs From B
With the compass point on B, draw arcs above and below the line segment so they cross the arcs you drew from A. You should now have two intersection points: one above the segment and one below it.
Label the top intersection point C and the bottom intersection point D. These two points are the magic ingredients. They are each the same distance from A and B because they were created by equal-radius arcs from both endpoints.
Step 7: Use the Straightedge to Connect the Arc Intersections
Place your straightedge through points C and D. Draw a straight line connecting them. This new line crosses segment AB somewhere near the center.
This line is the perpendicular bisector of AB. It does two jobs at once: it cuts AB into two equal parts and crosses it at a right angle.
Step 8: Mark the Midpoint
Where line CD crosses segment AB, mark the point and label it M. This point is the midpoint of AB. That means AM = MB.
You have now bisected the line segment. If this were a tiny geometry ceremony, this would be the part where someone hands you a miniature compass trophy.
Step 9: Check Your Construction
To check your work, look for two things. First, the crossing point should appear centered between A and B. Second, the bisecting line should meet AB at a right angle. If you are allowed to verify with a ruler or protractor after completing the construction, you can confirm that AM and MB are equal and that the angle is 90 degrees.
However, the construction itself does not depend on measuring. The equal arcs prove the result. Measurement is only a check, not the method.
Why This Construction Works
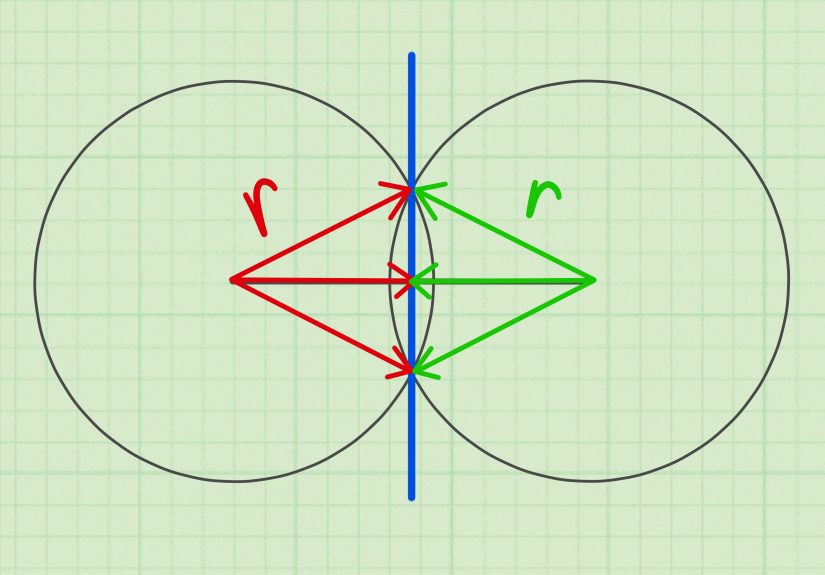
The reason this method works is based on a simple but powerful geometry idea: any point on the perpendicular bisector of a segment is equally distant from the segment’s endpoints.
When you draw arcs from A and B using the same compass width, the two arc intersection points are both equally distant from A and B. Since both intersection points share that equal-distance property, the line through them must be the perpendicular bisector of segment AB.
In plain English: the arcs force the geometry to behave. The two crossing points know exactly where the middle is, even if you never touch a ruler.
Common Mistakes to Avoid
Using a Compass Width That Is Too Small
The compass opening must be more than half the length of the segment. If it is less than half, the arcs from A and B will not intersect. No intersections means no perpendicular bisector, and your construction becomes a very artistic shrug.
Changing the Compass Width
After drawing arcs from A, keep the compass width exactly the same when drawing arcs from B. Changing the width ruins the equal-distance relationship that makes the construction work.
Drawing Arcs Too Lightly
If your arcs are too faint, you may not be able to see where they cross. Draw lightly enough to erase later, but clearly enough to locate the intersection points.
Rushing the Straightedge Line
Make sure your straightedge passes through both arc intersections. If the line misses one of them, the midpoint may be inaccurate.
Practical Uses for Bisecting a Line Segment
This construction is more than a classroom trick. It appears in drafting, design, architecture, woodworking, engineering, art, and mapmaking. Anytime you need to locate the exact center of a segment without relying on measurement, this method is useful.
For example, suppose you are designing a simple pattern and need a decorative element centered between two corners. Instead of measuring and hoping your ruler behaves, you can use a compass-and-straightedge construction to find the midpoint precisely. The same logic applies when laying out symmetrical shapes, constructing triangles, drawing circles through points, or finding centers in more advanced geometric diagrams.
Tips for Better Compass and Straightedge Accuracy
Use a Sharp Pencil
A sharp pencil creates cleaner arcs and more accurate intersections. Thick lines make it harder to identify the exact crossing point.
Hold the Compass From the Top
Most compasses have a small handle at the top. Hold and rotate from there. This helps prevent the compass width from shifting while you draw.
Draw Smooth, Confident Arcs
You do not need to press hard. A smooth arc is easier to read than a scratched, wobbly one.
Keep the Paper Still
If the paper slides while you draw, your arcs may not line up. Place your non-drawing hand gently on the paper to keep it steady.
Example: Bisecting Segment AB
Imagine segment AB is 8 inches long, although you will not use that measurement during the construction. You place the compass on A and open it to a distance that looks a little more than half the segment. You draw arcs above and below AB. Then, without changing the compass width, you place the compass on B and draw matching arcs that cross the first pair.
You connect the two arc intersections with a straightedge. The line crosses AB at point M. If you later check with a ruler, you should find that AM and MB are each 4 inches. But the construction itself found that midpoint without using numbers.
Experience Notes: What It Feels Like to Learn This Construction
The first time many students learn how to bisect a line with a compass and straightedge, they expect it to be more complicated than it is. There is something suspiciously simple about drawing two sets of arcs and connecting their intersections. It can feel like geometry is pulling a magic trick in slow motion.
One useful experience is to practice on several different line segments. Start with a long horizontal segment because it gives you plenty of room. Then try a shorter segment. After that, draw a diagonal segment and repeat the same construction. You will notice that the method does not care which way the segment points. The arcs still intersect, the straightedge still connects them, and the midpoint still appears exactly where it should.
Another helpful tip is to exaggerate the compass opening slightly when you are learning. Beginners often set the compass barely larger than half the segment, which causes the arc intersections to form very close to the line. That can make the perpendicular bisector harder to draw accurately. A wider opening places the intersections farther apart, giving you a longer guide line and a cleaner result.
It also helps to think of the compass as a distance-copying tool, not just a circle-making tool. When you keep the compass width unchanged, you are preserving a distance. That preserved distance is what creates symmetry. Once this idea clicks, many other geometry constructions become easier, including angle bisectors, perpendicular lines, equilateral triangles, and circumcenters.
If your first attempt looks messy, do not panic. Compass work has a small coordination learning curve. The point may slip. The pencil leg may wobble. The arcs may look like they were drawn during an earthquake. That is normal. Slow down, sharpen your pencil, reset the compass carefully, and try again. Accuracy improves quickly with repetition.
A good classroom or study habit is to leave the construction marks visible until the final answer is checked. Do not erase the arcs too soon. Those arcs are not mistakes; they are evidence. They show how the midpoint was found and why the bisecting line is valid. In geometry, clean reasoning matters just as much as a clean drawing.
For real-world drawing, this technique is especially satisfying because it avoids the tiny errors that can happen when measuring. If a ruler is slightly tilted or your mark lands between two tick marks, the midpoint may be off. A compass-and-straightedge construction relies on equal distances instead, which often produces a more elegant and dependable result.
After practicing a few times, the process becomes almost automatic: endpoint, arcs, same width, other endpoint, arcs, connect intersections, mark midpoint. It is simple, visual, and surprisingly fun. Geometry does not always get a reputation for being charming, but this construction deserves credit. It turns a plain line segment into a tiny demonstration of mathematical balance.
Conclusion
Learning how to bisect a line with a compass and straightedge is one of the most important basic geometry constructions. With only two tools, you can find the exact midpoint of a line segment and create a perpendicular bisector without measuring. The key is to use the same compass width from both endpoints and connect the two arc intersections with a straightedge.
This method is accurate, elegant, and useful far beyond the classroom. It teaches symmetry, equal distances, midpoint construction, and perpendicular relationships all in one neat process. Once you understand it, you have a foundation for many other geometric constructions. Not bad for a couple of arcs and a straight line.
SEO Tags
Note: This article is written for educational web publishing and is based on established compass-and-straightedge geometry construction methods.


