Table of Contents >> Show >> Hide
- What Makes a Bagel a Bagel (Not Just a Circle-Shaped Bread)?
- Kosher Notes (Quick and Practical)
- Homemade Kosher Bagels: The Recipe
- Equipment You’ll Want
- Step-by-Step Instructions
- Bagel Flavor Variations (Kosher-Friendly)
- Troubleshooting (So You Don’t End Up With Bagel-shaped Regrets)
- How to Store and Freeze Bagels (Without Crying Later)
- Serving Ideas (Kosher-Aware)
- FAQ
- Kitchen Experiences: What Making Homemade Kosher Bagels Is Really Like (500+ Words)
If you’ve ever paid good money for a bagel that turned out to be a bread roll wearing a donut costume, welcome home.
Today we’re making real bagels: chewy, glossy, and proudly “boiled first, baked second” like they mean it.
And because we’re doing kosher, we’ll keep everything straightforward, parve-friendly, and ingredient-awarewithout turning your kitchen into a courtroom drama.
This guide gives you the full “from scratch” method (mix → knead → shape → chill → boil → bake), plus a practical kosher checklist,
topping ideas, troubleshooting, storage tips, and a longer “kitchen experience” section at the end for anyone who likes recipes with
a side of real-life vibes.
What Makes a Bagel a Bagel (Not Just a Circle-Shaped Bread)?
Bagels earn their signature texture from three things:
(1) a stiff dough (lower hydration than many breads),
(2) strong gluten development (chewiness!), and
(3) a quick boil before baking (that glossy crust and tight crumb).
The boil sets the outer layer early, so the bagel bakes up with a shiny, chewy shell instead of expanding like a soft roll.
Kosher Notes (Quick and Practical)
Most classic bagels are naturally parve: flour, water, yeast, salt, and a bit of sweetener (often malt).
That’s great because parve bagels can be served with dairy (cream cheese) or a meat meal (depending on your household practice),
as long as you keep everything kosher in sourcing and handling.
Ingredient Checklist for Kosher Comfort
- Use kosher-certified ingredients when you keep kosher strictly (look for reliable hechsher marks on flour, yeast, malt, and toppings).
- Malt matters: barley malt syrup or non-diastatic malt powder adds classic flavor and helps browning.
- Egg wash is typically parve in kosher practicebut many people check eggs for blood spots before using.
- Dairy toppings change the status: add cheese and you’ve got a dairy bagel. Same bagel, different meal planning.
Homemade Kosher Bagels: The Recipe
Yield, Time, and Difficulty
- Yield: 8 medium bagels (or 10 smaller ones)
- Total time: about 3–4 hours active time, plus optional overnight chill
- Difficulty: Medium (mostly “follow steps carefully” energy, not “wrestle a sourdough dragon” energy)
Ingredients (Dough)
Tip: A kitchen scale makes bagels dramatically easier and more consistent.
- Bread flour or high-gluten flour: 500 g (about 4 cups, spooned and leveled)
- Water (cool to lukewarm): 270 g (about 1 1/8 cups)
- Instant yeast: 7 g (2 1/4 tsp) or active dry yeast: 7 g (proof it first)
- Fine salt: 10 g (about 1 3/4 tsp)
- Barley malt syrup or sugar: 20 g (about 1 Tbsp) (malt is more “classic bagel shop”)
- Optional: 1–2 tsp non-diastatic malt powder for extra bagel-shop flavor (if you have it)
Ingredients (Boiling Bath)
- Water: a wide pot filled with 3–4 inches of water
- Barley malt syrup or honey: 1–2 Tbsp
- Optional: 1 tsp baking soda (helps browning; too much can taste “pretzel-y”)
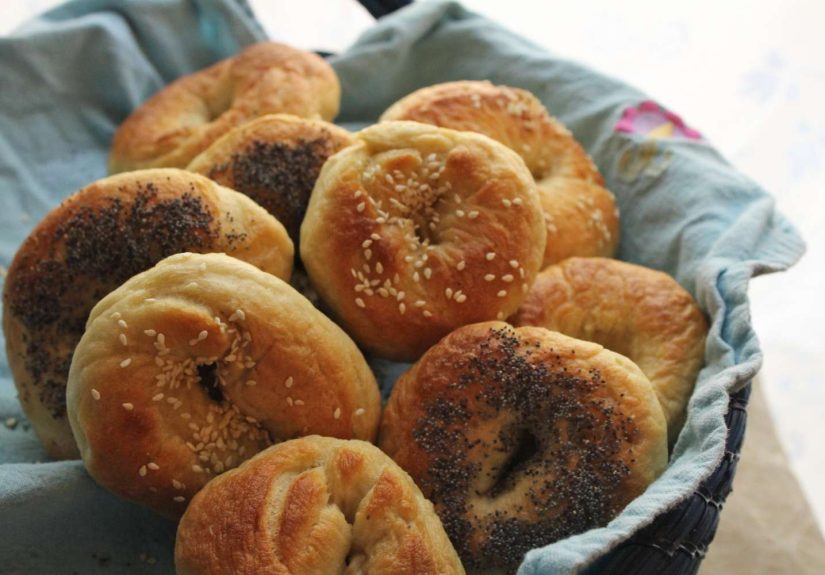
Toppings (Choose Your Adventure)
- Sesame seeds
- Poppy seeds
- Dried minced onion or garlic
- Everything seasoning (check kosher certification if needed)
- Coarse salt (a little goes a long way)
- Cinnamon sugar (for sweet bagels)
Optional Egg Wash (For Better Topping Grip)
- 1 egg + 1 tsp water, beaten
- Or skip it for a classic “lean” crusttoppings still work fine after boiling.
Equipment You’ll Want
- Stand mixer with dough hook or your two hands and a little determination
- Kitchen scale (recommended)
- Large mixing bowl
- Bench scraper (helpful, not required)
- Large wide pot + slotted spoon
- Baking sheet + parchment paper
- Wire rack (for cooling)
- Optional: baking stone/steel (for extra crisp bottom)
Step-by-Step Instructions
1) Mix the Dough
- In a bowl (or mixer bowl), combine flour, salt, and yeast.
- Add water and malt syrup (or sugar).
- Mix until a shaggy dough forms. Bagel dough should look stiff and feel a bit toughthis is normal and good.
2) Knead Until Smooth and Elastic
Knead by mixer 6–8 minutes on low/medium-low, or by hand 10–12 minutes.
You’re aiming for a smooth dough that resists stretching a bit (that resistance becomes chew later).
If the dough is too dry to come together, wet your hands and knead in a teaspoon of water at a time.
If it’s sticky, dust with a small amount of flour (don’t bury it; bagel dough should stay firm).
3) First Rise (Bulk Ferment)
- Place dough in a lightly oiled bowl, cover, and let rise until slightly puffy, about 60–90 minutes.
- Bagel dough won’t always “double” dramatically. Look for a noticeable lift and a smoother, relaxed feel.
4) Divide and Pre-Shape
- Turn dough onto a clean surface.
- Divide into 8 equal pieces (about 95–100 g each).
- Roll each piece into a tight ball. Cover and rest 10–15 minutes (this relaxes the gluten and prevents fighting later).
5) Shape the Bagels (Two Easy Methods)
Method A: Poke-a-Hole (Fast, Beginner-Friendly)
- Poke your thumb through the center of a dough ball.
- Gently stretch and rotate until the hole is about 1.5–2 inches wide.
Method B: Rope-and-Loop (More “Bagel Shop”)
- Roll a piece into a rope about 8–10 inches long.
- Wrap the ends around your hand, overlap by about 2 inches, then roll the seam to seal.
Pro tip: Make the hole bigger than you think you need. It will shrink back during proofing and baking.
6) Proof and (Highly Recommended) Overnight Chill
For great flavor and a better crust, chill the shaped bagels overnight.
This cold fermentation deepens taste and makes the dough easier to handle.
- Place shaped bagels on a parchment-lined sheet, cover well (plastic wrap or a lid).
- Refrigerate 8–24 hours.
Same-day option: Let shaped bagels rest at room temp 30–45 minutes, then proceed to boiling.
You’ll still get tasty bagelsovernight just levels them up.
7) The Float Test (Your “Are We Ready?” Moment)
Drop one bagel into a bowl of cold water. If it floats within about 10 seconds, you’re ready to boil.
If it sinks and stays gloomy, let the bagels proof a bit longer at room temperature (15–30 minutes), then test again.
8) Boil the Bagels
- Preheat oven to 425°F–450°F. (Hotter oven = deeper color, crispier crust.)
- Bring the pot of water to a steady boil, then reduce to a lively simmer.
- Add malt syrup (or honey). Optional: add baking soda.
- Boil 2–3 bagels at a time so you don’t crowd the pot.
- Boil 30–60 seconds per side. Shorter boil = lighter chew; longer boil = more chew and thicker crust.
- Lift out with a slotted spoon, drain briefly, and place back on the lined baking sheet.
9) Top and Bake
- If using egg wash, brush lightly now (optional).
- Dip tops into toppings or sprinkle generously.
- Bake 18–25 minutes, rotating the pan halfway, until deeply golden.
- Cool on a rack at least 20 minutes before slicing (hot bagels are still finishing their internal set).
Bagel Flavor Variations (Kosher-Friendly)
Everything Bagels
Mix your own blend (kosher-certified ingredients): sesame, poppy, dried garlic, dried onion, flaky salt.
Or use a store blend that matches your kosher standards.
Cinnamon Raisin
Knead in 1–2 tsp cinnamon and 100–120 g raisins after the dough has mostly come together.
Expect a slightly softer crumb (raisins add moisture).
Sesame or Poppy (Classic NYC Deli Energy)
Simple toppings, huge payoff. If you’re aiming for that “bagel shop window” look, go heavier than feels reasonable.
Seeds are dramatic. Let them be.
Troubleshooting (So You Don’t End Up With Bagel-shaped Regrets)
My bagels are flat
- They may be over-proofed. Shorten room-temp proofing, or reduce fridge time slightly.
- Your dough may be too wet. Bagel dough should be firmmeasure by weight for best consistency.
- Boiling too aggressively can deflate delicate dough. Keep it at a controlled boil/simmer.
My bagels are too bready, not chewy
- Use bread flour or high-gluten flour, not cake flour (bagels need protein).
- Knead longergluten development matters.
- Boil longer (closer to 60 seconds per side) for a chewier crust.
My bagels split or “burst” in the oven
- Under-proofing can cause tearing. Give them a bit more time to puff before boiling.
- Shaping seams may not be sealed. Pinch and roll the seam firmly.
My toppings fall off
- Top immediately after boiling while the surface is still tacky.
- Use a light egg wash for extra grip.
How to Store and Freeze Bagels (Without Crying Later)
- Day 1–2: Store in a paper bag inside a loosely closed plastic bag (balances crust + softness).
- Freeze: Slice first, then freeze in an airtight bag. Toast from frozen for best texture.
- Reheat: Toasting is king. For extra revival, mist lightly with water and warm in a 350°F oven for 5–8 minutes.
Serving Ideas (Kosher-Aware)
Parve-friendly spreads
- Hummus + sliced cucumbers + tomato + za’atar
- Avocado + lemon + flaky salt
- Egg salad (if you eat eggs) with dill and mustard
Dairy classics (if you’re serving dairy)
- Cream cheese + lox + red onion + capers
- Whipped cream cheese + chives + cracked pepper
Friendly kosher reminder: If you keep separate meat and dairy meals, plan your toppings accordingly.
The bagel can stay parve; what you put on it sets the tone for the meal.
FAQ
Do I need barley malt syrup?
You don’t need it, but it’s one of the easiest ways to get that classic bagel flavor and shine.
Brown sugar or honey will work; malt just tastes more “bagel shop.”
Can I skip the overnight refrigeration?
Yes. You’ll still make good bagels. But the overnight chill improves flavor, handling, and crust.
If you want “best bagels you’ve ever made” energy, chill them.
What’s the best oven temperature?
Somewhere in the 425°F–450°F range is ideal. If your oven runs cool, go higher.
If toppings brown too fast, lower a bit and bake slightly longer.
How do I keep bagels kosher?
Use kosher-certified ingredients per your standards, keep your kitchen’s meat/dairy practices consistent,
and treat add-ins (cheese, flavored toppings, spreads) as the “status changers.”
Kitchen Experiences: What Making Homemade Kosher Bagels Is Really Like (500+ Words)
The first time most home bakers tackle bagels, the dough is the moment of truthbecause it feels different.
You expect bread dough to be soft and pillowy, but bagel dough shows up like it has a gym membership and a plan.
It’s firm, a little stubborn, and it makes you wonder if you accidentally measured flour with a snow shovel.
That’s normal. In fact, that stiffness is the start of the chew you’re chasing.
A common “aha” moment happens somewhere between kneading and shaping. At first, the dough can look rough and tight,
but after consistent kneading it turns avoid-the-camera smooth. That’s when people realize bagels are less about
fancy ingredients and more about technique. You’re building structure on purpose. It’s oddly satisfyinglike organizing
a junk drawer and discovering you had room the whole time.
Shaping also has its own personality. The poke-a-hole method feels almost too easy, and then you watch the holes shrink
as the bagels rest and you learn the ancient bagel lesson: make the hole bigger than your feelings.
The rope-and-loop method can feel more “authentic,” but it’s also where seams try to pop open like they’re protesting.
A firm seal solves it, and after a batch or two you start shaping with confidence instead of bargaining.
Then comes the overnight chillarguably the most underrated step for home bakers. There’s something deeply reassuring
about opening the fridge the next day and seeing plump rings lined up like they’re ready for a performance. The dough is
colder, easier to handle, and less sticky. Many people also notice the flavor difference immediately: that subtle depth
that makes a plain bagel taste like it belongs next to a fancy spread instead of being merely “bread in a circle.”
The boil is the dramatic part. You are, quite literally, boiling bread on purposean act that sounds wrong until you see
it work. As soon as the bagels hit the water, they puff slightly and the surface tightens. It’s a quick transformation,
and it feels like you’ve unlocked a secret that bagel shops don’t want you to know. The smell of malt (or honey) rises
from the pot, and suddenly the kitchen feels like a Sunday morning you didn’t have to stand in line for.
After boiling, topping becomes a race against time: the surface is tacky and eager to grab sesame seeds, poppy seeds,
or everything seasoning, but it doesn’t stay that way forever. Home bakers often learn to set up toppings like an assembly
linebecause once you start, you don’t want to realize your seeds are on a high shelf while your bagels are drying out.
It’s the kind of small logistics lesson that turns “I tried a recipe” into “I have a system now.”
Baking is when the payoff arrives. The crust goes from pale to golden to deeply browned, and the shine from the boil
becomes obvious. When they cool, the crust makes that faint crackle when you press itespecially if you baked hot and
gave them room on the pan. And slicing the first one (after you’ve waited long enough for the crumb to set) is the best
kind of proof: tight, chewy interior, not airy sandwich bread. Even the “imperfect” ones taste impressive.
Kosher-wise, many people find homemade bagels feel empowering. You know exactly what went into them, you can choose
kosher-certified ingredients that match your standards, and you can keep the batch parve so it flexes with your meal plan.
Some kitchens make it a tradition: plain and sesame for the week, everything for Sunday brunch, and maybe cinnamon raisin
when someone wants “dessert but technically breakfast.” Bagels have a way of turning a regular morning into something
that feels cared forand once you’ve made them once, store-bought bagels start feeling a little… suspicious.