Table of Contents >> Show >> Hide
- Why Pineapples? A Quick Look at Their Popularity
- What You Need to Get Started
- Step-by-Step: How to Create Hand-Stenciled Pineapple Walls
- Creative Ways to Customize Your Pineapple Wall
- Where to Use Pineapple Stencil Walls
- Why Homeowners Love This DIY Trend
- Final Thoughts
- Experiences and Insights: What DIYers Learned from Stenciling Pineapples
If you’ve ever walked into a room and thought, “This space needs something… maybe a tropical vacation and a hug from a fruit,” then congratulationsyou are about to fall in love with hand-stenciled pineapple walls. Pineapples have long been the unofficial symbol of hospitality, joy, and “yes, I absolutely binge-watch DIY videos at 2 a.m.” So it’s no surprise that homeowners, renters, and design enthusiasts have revived pineapple wall stenciling as a charming, customizable, budget-friendly way to refresh a room without calling in a contractor… or maxing out a credit card.
In true Hometalk fashionwhere everyday creators become home-improvement heroeshand-stenciled pineapple walls blend personality, precision, and a bit of cheeky humor. Whether you’re looking to brighten a hallway, zhuzh up a powder room, or turn your kitchen into a tropical conversation starter, this decorative technique gives you the freedom to transform any blank wall into a warm, welcoming space.
Why Pineapples? A Quick Look at Their Popularity
The pineapple may be the most unexpectedly lovable fruit in interior design. Across home décor blogs such as Apartment Therapy, Better Homes & Gardens, Martha Stewart, HGTV, andof courseHometalk, pineapples show up everywhere: wallpaper, textiles, pottery, lighting, and now walls. Historically, the pineapple symbolized hospitality throughout colonial America, where hosts displayed them as centerpieces to tell guests, “Make yourself at home.” Today, the same spirit carries over to home décor, but in a more fun, modern, and Instagram-worthy way.
Hand stenciling offers the look of designer wallpaper without the commitment or price tag. Unlike traditional wallcoverings, stencils can be customized by size, spacing, color palettes, and artistic flair. Want pastel pineapples? Metallic pineapples? Oversized pineapples for a statement wall? Go wild. This flexibility is one of the biggest reasons pineapple stencil walls continue to trend across DIY communities.
What You Need to Get Started
Before you embark on your stencil journey, gather a few essentials. Thankfully, most items can be found at hardware stores, craft supply shops, or delivered straight to your doorstep:
- A pineapple stencil: Stencil companies like Cutting Edge Stencils, Royal Design Studio, and Etsy sellers offer a variety of pineapple shapes and sizes.
- Quality paint: Latex wall paint for the base layer, plus acrylic or specialty stencil paint for the pineapple design.
- Stencil brush or foam roller: Brushes offer more control; rollers speed things up.
- Painter’s tape: To secure your stencil and protect trim or edges.
- Level or laser level: Ensures your pineapples don’t accidentally lean like the Tower of Pisa.
- Drop cloths, gloves, and patience: Because creativity is messy, and no one wants a pineapple-shaped stain on their hardwood floor.
Once you have your tools ready, choose your wall. Pineapple stencil designs work particularly well in kitchens, entryways, laundry rooms, bathrooms, bars, and anywhere you want an uplifting and quirky visual moment.
Step-by-Step: How to Create Hand-Stenciled Pineapple Walls
1. Prep the Wall
Start with a smooth, clean surface. Wipe away dust, patch small holes, and apply a fresh coat of paint if necessary. Light, neutral backgroundswhite, cream, pale gray, or muted pastelshelp pineapple motifs pop. Allow the wall to dry completely before stenciling.
2. Position Your Stencil
Use painter’s tape to secure the stencil to the wall. A level or laser guide helps keep your pineapple rows straight and evenly spaced. If you’re working in a tight corner or around molding, bend the stencil slightly to conform to edges.
3. Apply the Paint
Dip your stencil brush or roller lightly into the paint, then offload excess paint onto a paper towel. Overloading is the number one cause of bleeding under the stencil. Using gentle, circular dabs or short rolling motions, fill in the pineapple pattern. For a crisp look, stick to one even color. For a more artistic flair, try shading the crown and fruit body with slightly different tones.
4. Continue the Pattern
Most stencils include registration markslittle guides that help you line up the next section. Work slowly and methodically across the wall. If you’re creating a scattered pineapple design instead of a grid, reposition the stencil creatively and use painter’s tape markers to maintain spacing.
5. Touch Up and Perfect
Once the paint is dry, step back and look for areas that need refining. Use a small artist brush to fix any uneven edges or to add dimension. The beauty of hand stenciling is that perfection isn’t requiredcharm often comes from slight variations.
Creative Ways to Customize Your Pineapple Wall
One of the perks of this DIY project is how personalized it can be. Whether your style leans coastal, minimalist, boho, maximalist, or farmhouse-chic, pineapple motifs adjust effortlessly. Here are some design ideas trending across U.S. home décor sites:
Use Metallic Accents
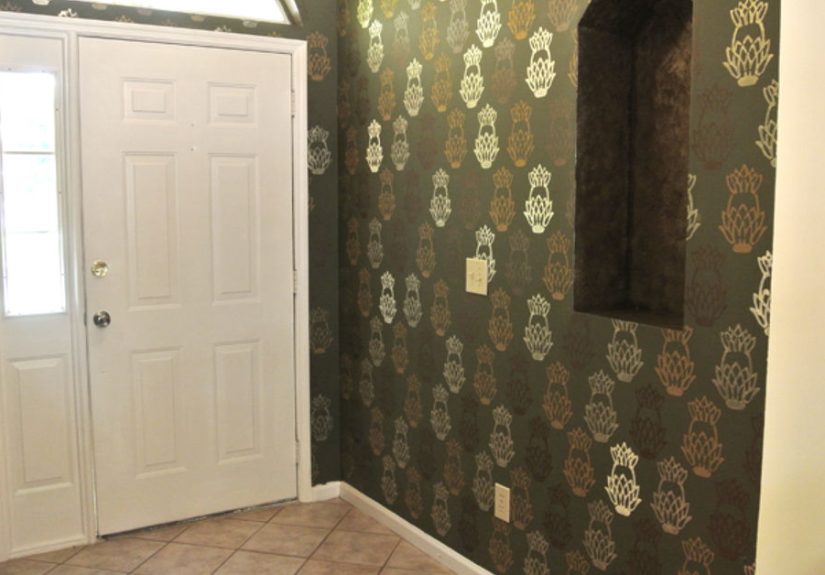
Gold pineapples have become a decorative staple, especially in glam or transitional interiors. Metallic stencil paint can instantly elevate your wall from playful to polished.
Try Oversized Pineapples
Instead of dozens of small pineapples, some homeowners opt for large-scale prints spaced widely across the wall. This modern approach looks especially striking in entryways or as a single accent wall.
Mix and Match Colors
If you’re feeling creative, experiment with color gradients, ombre effects, or alternating color rows. Tropical hues like coral, aqua, and lime can brighten a space, while muted gold, sage, and blush keep things sophisticated.
Create a Vintage or Weathered Look
Using a dry-brush technique or stippled paint application can mimic the appearance of antique wallpaper or botanical prints. Pair with rustic décor to complete the look.
Accent Only Part of the Wall
Stenciling the top third of a wall above a chair railor just the lower half of a nursery wallcan create a custom, architectural feel with minimal effort.
Where to Use Pineapple Stencil Walls
The pineapple’s whimsical charm makes it incredibly versatile. Some of the most popular placements include:
- Entryways: Offer guests a warm, symbolic welcome.
- Kitchens: Give breakfast a tropical twist.
- Dining rooms: Chic conversation starter during dinner parties.
- Bathrooms and powder rooms: Small spaces become instantly stylish and memorable.
- Laundry rooms: Turn a chore zone into something cheerful.
In Hometalk communities, pineapple stenciling is often showcased as a renter-friendly makeover. Because the paint is removable with sanding or a fresh coat over it, you can enjoy the pattern now without worrying about a landlord later.
Why Homeowners Love This DIY Trend
The appeal of hand-stenciled pineapple walls goes beyond aesthetics. Across DIY and décor platforms, homeowners mention several key benefits:
- Budget-friendly: High-end wallpaper can cost hundreds per roll. A stencil and small paint sample often cost under $40.
- Big visual impact: The pattern instantly gives personality to a room.
- User-friendly: Even beginners can achieve impressive results.
- No permanent commitment: Easy to repaint if your style changes.
- Conversation piece: Pineapples feel fun and welcomingperfect for gatherings.
Final Thoughts
Hand-stenciled pineapple walls are the perfect combination of creativity, symbolism, and DIY satisfaction. Whether you follow a crisp, uniform pattern or embrace a carefree scattered look, the result is uniquely yours. With just a few tools and a playful spirit, you can turn an ordinary room into a joyful, inviting space that reflects your personal style.
Experiences and Insights: What DIYers Learned from Stenciling Pineapples
Hand stenciling may look simple on Pinterest, but real DIYers know the journey from blank wall to pineapple paradise includes lessons, small victories, and the kind of mistakes you laugh about later. Here are 500 additional words of real-world experiences, best practices, and “I wish I knew this before I started” wisdom pulled from the collective insights of Hometalk creators and U.S. décor bloggers.
1. Start with a Test Board
Nearly every DIYer agrees: testing your stencil technique on scrap drywall, cardboard, or wood is a game-changer. It lets you practice paint load, pressure, and application style before going live on your wall. Several Hometalk users say they avoided drips, smudges, and inconsistent pineapples thanks to this step.
2. Less Paint = Cleaner Pineapples
Overloaded brushes are enemy number one. Multiple DIY bloggers swear by the “barely damp brush” methodyou should almost feel like there’s no paint on the bristles. This prevents bleeding under the stencil and gives you those crisp pineapple edges you’ll want to brag about.
3. Stencil Repetition Builds Confidence
The first pineapple might feel intimidating, the fifth feels doable, and by the twentieth you’ll be ready to stencil your neighbor’s house for fun. DIYers often report that their early pineapples looked slightly shaky but quickly became more consistent as muscle memory kicked in.
4. Secure the StencilTightly
A loose stencil shifts just enough to blur your design. Painter’s tape is often enough, but for textured walls or long projects, some DIYers prefer spray adhesive (repositionable). It keeps the stencil flat without leaving residue.
5. Take Breaks
Stenciling an entire wall can take hoursespecially if your pineapple has fine details. Most home decorators recommend working in sections and stepping back often. Not only does this preserve your arm muscles, but it ensures your layout looks right from a distance.
6. Don’t Skip Touch-Ups
Even experienced stenciling enthusiasts rely on a small artist brush for perfecting lines afterward. Small touch-ups elevate the finished wall from “good DIY project” to “designer-level feature wall.”
7. Customize Fearlessly
One surprising takeaway DIYers share is that pineapples spark creativity. Some added small shadows for depth, others stenciled their pineapple crowns in different greens, and a few brave decorators added tiny polka dots or patterns inside the pineapple itself. Once the stencil goes up, inspiration seems to follow naturally.
8. Expect Compliments
DIY stenciled pineapple walls have a way of becoming the star of the room. Homeowners report guests immediately commenting on how cheerful, inviting, and “Pinterest-y” the wall looks. One Hometalk user even said her pineapple wall became a Zoom meeting conversation starter during remote work season.
9. Be Ready to Expand
A surprising number of decorators start with one small wall andafter seeing the resultsgo on to stencil an adjoining hallway, the pantry, or even a ceiling accent. Pineapple patterns tend to be addictive.
In short, the experience of creating hand-stenciled pineapple walls is equal parts artistic, meditative, and joyfulexactly what DIY home décor should be. It’s a project that rewards creativity, experimentation, and your willingness to embrace the unexpected charm of a fruit with spiky hair.