Table of Contents >> Show >> Hide
- What Photogrammetry Software Really Wants
- Why the Donut Rig Works So Well
- Lighting: The Unofficial Boss Battle
- Backgrounds, Markers, and the Fine Art of Not Confusing the Robot
- How to Build a Practical Donut Photogrammetry Setup
- A Sample Donut-Rig Capture Workflow
- Common Mistakes and How the Donut Helps Avoid Them
- Where Better Photogrammetry Matters
- Experience Notes: What It Feels Like to Scan with a Donut Rig
- Conclusion
Photogrammetry sounds like one of those words invented by a committee wearing lab coats and very serious shoes. In reality, the idea is wonderfully simple: take lots of overlapping photos of an object, feed them into software, and let algorithms turn those flat images into a textured 3D model. The hard part is not understanding the concept. The hard part is getting clean, consistent, software-friendly photos without accidentally creating a digital potato.
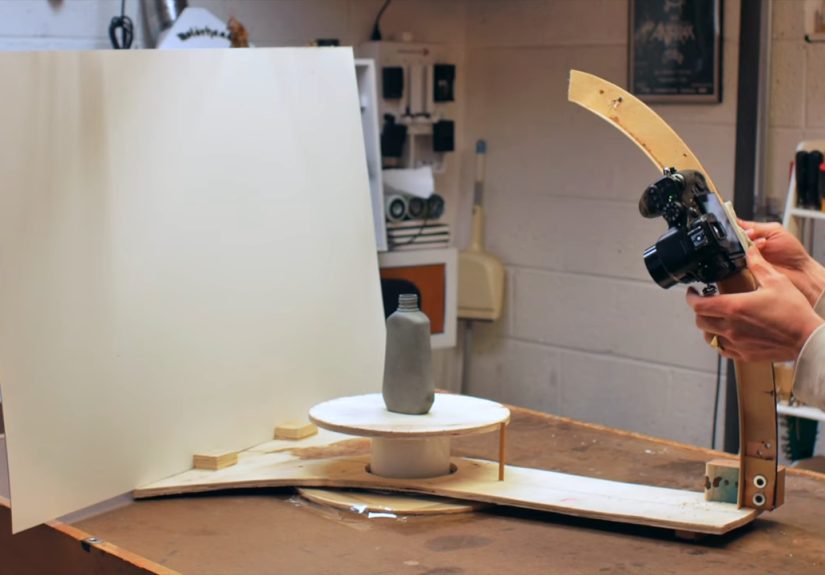
That is where the “donut” comes in. Not the glazed kind, though no one is stopping you from rewarding yourself after a successful scan. In this case, the donut is a ring-shaped camera rig designed to move around a stationary object. Instead of spinning the object on a turntable and hoping the software understands what happened, the camera travels around the subject in a controlled circular path. It is a clever maker-style solution to one of photogrammetry’s biggest headaches: consistency.
The original idea gained attention because it flips the usual turntable workflow. Many small-object scans rotate the object while the camera stays fixed. That can work, but it may confuse some photogrammetry programs because the background stays still while the object moves. A donut-shaped rig keeps the object and background stable while the camera changes position, more closely matching the way photogrammetry software expects a scene to behave. It is simple, mechanical, repeatable, and slightly ridiculous-looking in the best possible way.
What Photogrammetry Software Really Wants
Photogrammetry software is not magic, although it occasionally behaves like a wizard with a caffeine problem. It works by finding matching visual features across multiple images. If the same corner, scratch, label, bump, or surface detail appears in several photos, the software can estimate where the camera was and how the object is shaped. From those matches, it builds a point cloud, then a mesh, and finally projects texture back onto the model.
That means your photos matter more than your software brand. A premium application cannot rescue a capture set full of blur, glare, missing angles, and harsh shadows. Good photogrammetry begins before processing. It begins with lighting, overlap, background control, focus, and a patient capture path.
Overlap Is the Secret Handshake
Most failed scans suffer from one boring but deadly problem: not enough overlap. Adjacent photos need to share plenty of the same visual information. For small object scanning, a practical target is around 70% overlap between nearby shots. In a circular capture, that usually means taking many more photos than your impatient brain thinks are necessary. A mark every 10 degrees gives 36 positions around the object; tighter spacing gives even more data and can help with tricky surfaces.
A donut rig makes this easier because the camera path is repeatable. You can mark the ring or base with degree increments, move the camera in predictable steps, and capture the object from low, middle, and high angles. Instead of wandering around with a camera and silently bargaining with gravity, you create a controlled orbit.
Why the Donut Rig Works So Well
The beauty of the donut-shaped photogrammetry setup is that it solves several problems at once. First, it stabilizes the camera path. Second, it keeps the subject still. Third, it allows consistent camera-to-object distance. Fourth, it gives you a physical guide for repeatable angles. That may not sound glamorous, but in photogrammetry, boring consistency is the red carpet to better results.
Imagine scanning a small sculpture, product prototype, fossil replica, handmade toy, machine part, or miniature model. If you walk around it by hand, your distance changes, your height changes, your angle changes, and your lighting may shift. A little variation is fine, but too much variation turns the photo set into a puzzle with missing pieces. The donut rig turns the capture into a repeatable routine: move, shoot, move, shoot, adjust height, repeat.
Stationary Object, Moving Camera
Keeping the object stationary is especially useful when the background contains helpful reference texture or when the software expects camera motion rather than object motion. Traditional turntable scanning can work, especially with masking or clean backgrounds, but it requires more discipline. The donut approach creates a scene where the camera is clearly orbiting the subject, which is exactly the kind of relationship photogrammetry algorithms are built to interpret.
Better Z-Axis Coverage
Another smart part of the design is the ability to move the camera up and down along the arc or support structure. One circular pass at mid-height is rarely enough. Good object scans often need multiple rings: one looking slightly upward, one straight on, and one looking downward. For objects with cavities, overhangs, or detailed tops, you may need extra close-up passes. A donut rig makes these passes easier to plan instead of turning the session into interpretive dance with a tripod.
Lighting: The Unofficial Boss Battle
If overlap is the secret handshake, lighting is the final boss. Photogrammetry loves soft, even, diffused light. It dislikes glare, deep shadows, hot spots, flicker, and sudden changes in exposure. A bare bulb or direct sunlight can create shiny highlights that move across the object as the camera angle changes. The software may interpret those highlights as surface features, then become deeply confused when they vanish in the next image.
The best setup is usually simple: diffuse light from multiple directions, a matte background, and camera settings that stay consistent. Softboxes, LED panels with diffusion, bounce cards, or even a light tent can help. The goal is not dramatic product photography. You are not trying to make the object look like it is starring in a luxury watch commercial. You are trying to reveal surface detail evenly from every angle.
Matte Beats Shiny
Reflective, transparent, translucent, or glossy objects are notoriously difficult. Glass, chrome, polished metal, shiny plastic, and clear acrylic often fail because they do not provide stable visual features. Their reflections change as the camera moves, which is bad news for feature matching. When appropriate for non-valuable objects, temporary matte sprays, removable scanning sprays, chalky coatings, or careful surface preparation can help. For delicate, valuable, or museum objects, do not apply anything without expert approval.
Backgrounds, Markers, and the Fine Art of Not Confusing the Robot
A clean background helps the software focus on the subject. For small-object capture, a plain matte background or simple scanning box can reduce clutter. However, completely featureless scenes may also create alignment problems if the object itself lacks texture. This is where markers can help. High-contrast markers or coded targets placed around the scene can provide reliable reference points, especially when the object is smooth or repetitive.
Markers should be large enough to appear clearly in the photos, placed flat, and kept visible from multiple angles. Do not cover them, crop them awkwardly, or let them fall into shadow. Think of markers as breadcrumbs for the software. If you scatter the breadcrumbs carefully, the algorithm finds its way home. If you hide them under glare and motion blur, the algorithm wanders into the forest and starts making abstract art.
How to Build a Practical Donut Photogrammetry Setup
You do not need a Hollywood visual-effects budget to experiment with a donut rig. The basic concept can be built from plywood, melamine, acrylic, 3D printed parts, drawer slides, bearings, a lazy Susan mechanism, or other workshop-friendly materials. The essential features are a circular path, a stationary platform for the object, a camera mount, and a way to balance or support the camera as it moves.
Core Components
A basic version includes a stable base, a raised circular rail or ring, a central platform for the subject, and a camera arm that can travel around the ring. Degree marks around the circle help you take evenly spaced photos. A pointer or index mark makes positioning repeatable. A counterweight can reduce strain if the camera arm is heavy. For phones, a lightweight clamp may be enough. For DSLR or mirrorless cameras, the structure needs to be stronger and less wobbly.
Camera Settings That Help
Manual settings are your friend. Lock focus when possible. Keep ISO low to reduce noise. Use a narrow enough aperture to keep the object sharp, but avoid going so narrow that diffraction softens the image. Use a shutter speed fast enough to prevent blur, or use a remote trigger and a stable mount. Keep focal length, exposure, white balance, and focus consistent across the set. Photogrammetry does not enjoy surprises.
A Sample Donut-Rig Capture Workflow
Start by placing the object on the stationary center platform. Clean the object if appropriate, remove dust, and make sure the most important features are visible. Set up diffused lighting and check for harsh shadows or bright reflections. Take a few test shots and zoom in to confirm sharpness. If the object is dark, glossy, or low-texture, consider adding surrounding markers or using a more textured temporary base.
Next, capture your first 360-degree pass at mid-height. Take a photo every 5 to 10 degrees, depending on the size and complexity of the object. Then move the camera higher and angle it downward for a second pass. Add a lower pass looking slightly upward if the base, sides, or undercuts matter. Finally, take close-up detail shots of complex areas such as engravings, corners, seams, handles, cavities, or textured surfaces.
After capture, review the images before processing. Delete blurry photos, accidental duplicates, and shots where the object is cropped too aggressively. Import the photos into your photogrammetry software, align the images, inspect the point cloud, clean unwanted background points, build the mesh, and generate texture. If the first result fails, do not immediately blame the software. The answer is often hidden in the photo set.
Common Mistakes and How the Donut Helps Avoid Them
Mistake 1: Moving Too Randomly
Handheld capture often introduces inconsistent distance and angle changes. The donut rig turns the session into a measured orbit, reducing random motion and improving image relationships.
Mistake 2: Missing the Top or Bottom
Many scans look fine from the side but collapse near the top, bottom, or inside corners. A multi-height donut workflow reminds you to capture vertical coverage, not just a single beauty lap around the equator.
Mistake 3: Using Dramatic Lighting
Shadows may look artistic to humans, but they can be trouble for reconstruction. The donut rig encourages a studio-like setup where lighting stays fixed while the camera moves in a controlled path.
Mistake 4: Scanning Featureless Objects
Plain white, black, transparent, or shiny objects give the software very little to match. Add removable texture, surrounding markers, or choose a better-suited subject when possible.
Where Better Photogrammetry Matters
Cleaner photogrammetry is useful far beyond hobby experiments. Designers can capture product prototypes and handmade models. Artists can archive sculptures or convert physical pieces into digital assets. Educators can create interactive models for classrooms. Museums and researchers use photogrammetry for documentation and preservation. Game artists use it to build realistic props and environmental assets. Engineers and makers use scans as references for reverse engineering, repair, and fabrication.
The donut rig is especially appealing because it sits in the sweet spot between “hold your phone and hope” and “buy a professional 3D scanner that costs more than your car.” It is accessible, understandable, and customizable. You can make it manual or motorized. You can build it for a phone or a full camera. You can keep it simple or add automation with a stepper motor, shutter trigger, and capture script.
Experience Notes: What It Feels Like to Scan with a Donut Rig
The first thing you notice when using a donut-style photogrammetry setup is how much calmer the process feels. Without the rig, small-object scanning can become strangely chaotic. You circle the table, lean forward, step backward, bump the tripod, adjust the object, change the light by accident, and then wonder why the final model looks like it survived a minor earthquake. With the donut approach, the session becomes almost meditative: click, rotate, click, rotate, raise the camera, repeat. It is the closest photogrammetry gets to making tea.
One practical experience is that the degree marks matter more than expected. At first, it is tempting to eyeball the positions. That works until you reach processing and discover a weak patch where you accidentally took a 25-degree jump between photos. A simple ring with clear 5-degree or 10-degree marks removes that guesswork. Even if the rig is handmade and imperfect, the repeatability helps tremendously.
Another lesson is that the camera mount deserves attention. A flimsy mount creates tiny shifts, vibration, and blur. With a phone, the problem may be minor. With a heavier camera, the rig needs enough stiffness to hold position without sagging. A counterweight can make the movement smoother and protect the rail from twisting. The goal is not industrial perfection, but the camera should not wobble like a shopping cart with one dramatic wheel.
Lighting also becomes easier to diagnose. Because the object stays still, you can set up lights once and observe how the surface behaves as the camera moves. If glare appears at certain angles, you can adjust diffusion or reposition the lights before capturing the full set. This is much less frustrating than rotating the object and constantly changing which side catches the brightest reflection.
Processing results often reveal the biggest advantage: fewer alignment surprises. When photos are sharp, overlapping, and evenly spaced, the software has a cleaner story to follow. The point cloud tends to form with fewer gaps, the mesh needs less cleanup, and textures look more natural. You may still need masks, manual cleanup, or extra photos for difficult objects, but the baseline quality improves.
The donut rig is not perfect. Very tall objects may not fit easily. Large subjects need a bigger structure. Deep undercuts and hidden undersides still require special capture planning. Transparent and glossy objects remain difficult. But for small to medium objects, the rig teaches one of the most important lessons in photogrammetry: the scan is won during capture, not during processing. Good software helps, but good input wins.
Conclusion
“For Better Photogrammetry, Just Add A Donut” is more than a catchy maker headline. It is a practical reminder that better 3D scans often come from better control. A donut-shaped camera rig keeps the object still, guides the camera through repeatable angles, improves overlap, and encourages consistent lighting. It turns photogrammetry from a guessing game into a workflow.
You do not need to build the perfect rig on the first try. Start with a simple version. Mark your angles. Use soft lighting. Keep the camera steady. Capture multiple height passes. Review your photos before processing. Each improvement gives the software more reliable information, and reliable information is what turns a pile of pictures into a clean 3D model.
And yes, after the scan is finished, you may absolutely eat an actual donut. That part is not required for photogrammetry, but it is excellent for morale.


