Table of Contents >> Show >> Hide
- Before You Start: A Quick Note on Gifting Alcohol
- What You’ll Need (Pick Based on the Wrap Style)
- Step 1: Choose Your “Bottle Personality”
- Step 2: Prep the Bottle (So the Wrap Looks Crisp)
- Step 3: Build a Stable Base (Your Secret Weapon)
- Step 4: Measure Like You Mean It (No “Guess & Regret”)
- Step 5: Classic Wrapping Paper Wrap (The Clean, Store-Quality Look)
- Step 6: Kraft Paper Wrap (Rustic, Forgiving, and Always Cute)
- Step 7: Tissue Paper “Bouquet Top” (Fast, Fluffy, and Party-Ready)
- Step 8: Cellophane Wrap (The “Shiny Candy Wrapper” Effect)
- Step 9: Tea Towel Wrap (Two Gifts in One, Zero Waste Vibes)
- Step 10: Furoshiki Fabric Wrap (Elegant, Reusable, and Surprisingly Easy)
- Step 11: The Grocery Bag Glow-Up (Rustic “Sonoma Style”)
- Step 12: Make a DIY Bottle Bag (Paper or Fabric)
- Step 13: Add the “Wow” Details (The Part People Remember)
- Common Mistakes (So You Don’t Have to Learn the Hard Way)
- of Real-Life Wrapping Experiences (The Good, the Bad, and the Crinkly)
- Conclusion
A liquor bottle is the ultimate “easy” gift… right up until you try to wrap it. Suddenly you’re wrestling a slippery glass cylinder like it owes you money.
The good news: you don’t need fancy boxes, professional skills, or a gift bag that screams “I bought this in the checkout line.”
With the right method, you can wrap a whiskey, vodka, gin, tequila, or liqueur bottle so it looks intentionallike you planned aheadwithout actually
having planned ahead. (A holiday miracle.)
This step-by-step guide covers multiple bottle-wrapping stylesfrom classic wrapping paper to reusable fabric wrapsso you can match the vibe:
rustic, modern, festive, minimalist, or “I’m the friend who always shows up with a host gift and great hair.”
Before You Start: A Quick Note on Gifting Alcohol
Make sure your recipient is of legal drinking age and that gifting alcohol is allowed where you live. Also: keep the bottle sealed, upright when possible,
and cushioned if you’re traveling. A shattered bottle is… not a festive scent.
What You’ll Need (Pick Based on the Wrap Style)
- Basics: scissors, clear tape or double-sided tape, ribbon or twine, gift tag
- Paper options: wrapping paper, kraft paper, tissue paper, or a sturdy paper grocery bag
- Reusable options: tea towel/dish towel, scarf, or a square fabric (furoshiki-style)
- Finishing touches: mini ornament, evergreen sprig, dried citrus slice, wax seal, stickers
- Stability helpers: a small piece of cardboard for the base, or extra tissue/shredded paper to pad
Step 1: Choose Your “Bottle Personality”
Not all liquor bottles behave the same. A tall, skinny vodka bottle wraps differently than a squat, square whiskey bottle.
Before you cut anything, decide your approach:
- Sleek & classic: wrapping paper with a clean seam and crisp folds
- Rustic & cozy: kraft paper + twine + a tag
- Fast & pretty: tissue paper “bouquet” top
- Two-gifts-in-one: tea towel wrap
- Eco-chic: furoshiki-style fabric wrap
- “Wow, you’re fancy”: bottle in a wooden box with shredded paper
Step 2: Prep the Bottle (So the Wrap Looks Crisp)
Wipe the bottle dry (especially if it came from a cold display). Remove price stickers. If the bottle is sweating, paper will wrinkle and tape won’t stick.
Pro move: let it come to room temp for 10–15 minutes, or wipe it down well.
Step 3: Build a Stable Base (Your Secret Weapon)
Bottles topple. Paper tears. Your patience disappears. Prevent all three:
- If using thin wrapping paper, place the bottle on a small piece of cardboard (cut to the bottle base size). Wrap over it for strength.
- For gift bags (paper or fabric), tuck a little tissue or shredded paper at the bottom so the bottle sits upright and snug.
- If traveling, add a cushion layer under the wrap (tissue works; bulky bubble wrap makes the gift look like it’s in witness protection).
Step 4: Measure Like You Mean It (No “Guess & Regret”)
Lay your wrapping material flat. Place the bottle on its side and roll it once to measure the circumference, plus a little overlap for tape.
Also account for height: you want enough material to cover the base and gather at the neck (or fold neatly at the bottom).
Step 5: Classic Wrapping Paper Wrap (The Clean, Store-Quality Look)
Best for:
Most standard bottles; when you want it to look polished and “proper.”
- Place wrapping paper face down on a flat surface.
- Lay the bottle near one long edge and roll to confirm coverage.
- Tape one edge to the paper, then roll the bottle to wrap snugly. Use small pieces of tape for control.
- At the bottom: push the bottle upright and flatten the paper “skirt.” Fold it in like closing a paper lunch bagsmall folds first, then secure with tape.
- At the top: gather the paper near the neck, twist gently, and tie with ribbon or twine.
Make it look expensive: Use double-sided tape so you don’t see tape lines, and add a gift tag that matches the ribbon.
Step 6: Kraft Paper Wrap (Rustic, Forgiving, and Always Cute)
Best for:
Whiskey and bourbon bottles, host gifts, minimalist or farmhouse vibes.
- Cut a piece of kraft paper large enough to roll around the bottle on a diagonal.
- Roll the bottle diagonally and secure the seam with tape (double-sided if you have it).
- Fold the bottom edge inward and tape it down so it stands flat.
- Scrunch the top around the neck and tie with twine.
Extra credit: Add a wax seal, a sprig of rosemary, a tiny ornament, or a handwritten tag. Kraft paper is basically a blank canvas that
doesn’t judge your handwriting.
Step 7: Tissue Paper “Bouquet Top” (Fast, Fluffy, and Party-Ready)
Best for:
Last-minute gifts, bright and festive looks, bottles with pretty neck labels.
- Layer 2 sheets of tissue paper (offset them so corners peek out for fullness).
- Place the bottle in the center and roll the tissue around it.
- Gather the tissue at the neck like you’re making a bouquet wrap.
- Tie a ribbon around the neck to secure. Fluff the tissue above the knot.
Tip: Tissue hides awkward shapes beautifullyespecially square bottlesbecause it’s meant to look a little airy.
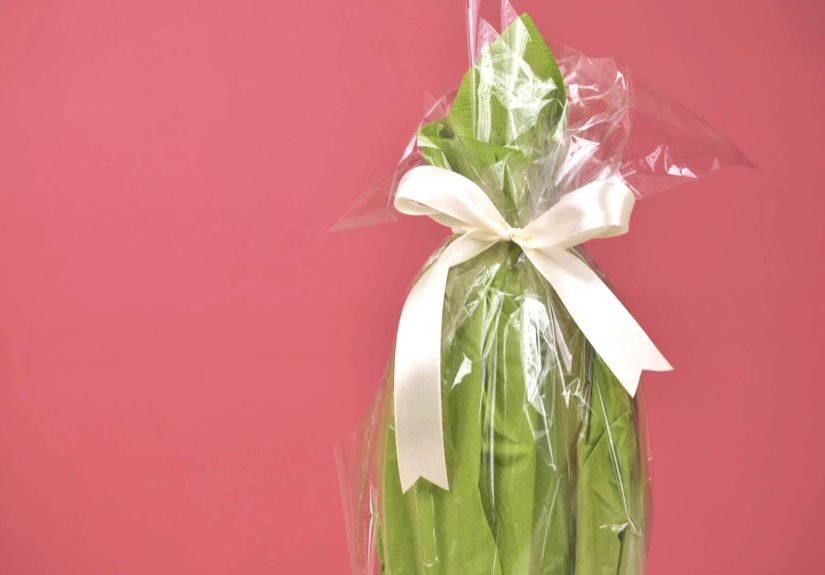
Step 8: Cellophane Wrap (The “Shiny Candy Wrapper” Effect)
Best for:
Showcasing a premium label, gift baskets, or when you want sparkle with minimal effort.
- Cut a large square of clear cellophane.
- Stand the bottle in the center and pull cellophane up around it.
- Gather at the neck, twist lightly, then tie with a ribbon (a big bow is your friend here).
- Add a tag, mini ornament, or a small greenery sprig tucked under the bow.
Small upgrade: Add a layer of tissue under the cellophane for color and structure.
Step 9: Tea Towel Wrap (Two Gifts in One, Zero Waste Vibes)
Best for:
Host gifts, holidays, housewarmingsespecially if you pair the towel with the bottle (cocktail towel + tequila, anyone?).
- Lay the towel flat (diagonal works best).
- Set the bottle near the bottom corner and fold the bottom corners up to create a base.
- Fold the sides inward around the bottle like you’re wrapping a snug burrito.
- Gather the top near the neck and tie with ribbon.
Bonus: You can tuck a citrus peeler, cocktail spoon, or mini recipe card under the ribbon.
Step 10: Furoshiki Fabric Wrap (Elegant, Reusable, and Surprisingly Easy)
Best for:
Eco-friendly gifting, elevated presentation, and anyone who appreciates “this is art” energy.
Use a square of fabric (a scarf works). Place it diagonally like a diamond and center the bottle.
Then choose one of these easy knots:
Option A: Simple bow wrap
- Bring the corner closest to you and the opposite corner up and tie a secure double knot near the bottle’s neck.
- Wrap the remaining corners (“wings”) around the bottle and tie them in front in a bow.
Option B: Twist-and-tuck style (super snug)
- After the first knot, twist the side fabric around the bottle’s “waist” to tighten.
- Rotate the bottle while keeping tension, then knot at the back of the neck and tuck extra fabric into the wrap.
Step 11: The Grocery Bag Glow-Up (Rustic “Sonoma Style”)
Best for:
When you want “thoughtful” with a side of “I recycle,” and you have a paper bag handy.
- Cut off the bag’s bottom and handles. Open it flat, then refold into a tube.
- Place the bottle about an inch from the bottom edge and roll into a cylinder.
- Fold the bottom edges inward under the bottle to form a base.
- Gather the paper at the neck and tie with baker’s twine.
- Add a gift tag and a seasonal sprig (real or faux).
Safety note: Some tutorials “distress” the top edge with fire. You can get a similar effect by tearing the edge gently or trimming it with scissors.
No gift is worth a smoke detector concert.
Step 12: Make a DIY Bottle Bag (Paper or Fabric)
Best for:
Awkwardly shaped bottles, gifting multiple times, or when you want a reusable “signature” style.
Paper version (quick)
- Use thicker wrapping paper or kraft paper.
- Fold it like a simple gift bag: create side gussets, fold up a bottom base, tape securely.
- Punch holes near the top and thread ribbon through as handles.
Fabric version (longer-lasting)
- Sew (or no-sew) a simple drawstring bag with non-stretch fabric.
- Add iron-on vinyl or a tag for personality.
- Use a drawstring to closeno tissue explosion required.
Step 13: Add the “Wow” Details (The Part People Remember)
Wrapping is nice. Styling is unforgettable. Try one:
- Mini garnish: tiny ornament, jingle bell, pine sprig, rosemary, dried orange slice
- Texture swap: velvet ribbon, baker’s twine, leather tag, wax seal
- Theme tie-in: a cocktail recipe card (e.g., “Old Fashioned Kit” for bourbon, “Paloma Night” for tequila)
- Two-second fix: a clean, handwritten tagshort and sweet beats a paragraph
Finally, do a quick “gift quality check”: stand it up, wiggle it gently, and make sure nothing slides. If it feels loose, tighten the neck tie or add a little
tissue padding inside the wrap.
Common Mistakes (So You Don’t Have to Learn the Hard Way)
- Too-thin paper: it tears on corners and seams. Use kraft paper or double up.
- Too much tape: it looks messy and can rip the paper when adjusted. Use small pieces strategically.
- No base support: bottles tip, the wrap collapses, and the bow ends up doing all the emotional labor.
- Wet bottle: condensation causes wrinkles and tape failure. Dry it first.
of Real-Life Wrapping Experiences (The Good, the Bad, and the Crinkly)
The first time I tried to gift-wrap a liquor bottle, I approached it with the confidence of someone who had successfully wrapped exactly three shoeboxes
in their lifetime. “How hard can it be?” I thoughtfamous last words. Five minutes later, my wrapping paper looked like it had been attacked by a raccoon,
the bottle was rolling off the counter like it had places to be, and I was negotiating with tape like it was a stubborn toddler.
What I learned fast is that bottles punish improvisation. With a box, you can hide sins under a ribbon. With a bottle, every bump and wrinkle is on full
display. The turning point was switching to kraft paper. It’s thicker, it folds without throwing a tantrum, and it somehow makes even “basic twine” look
like you curated a farmhouse holiday catalog. I started keeping a roll of kraft paper in the closet for those last-minute “host gift” momentsbecause
nothing says “I appreciate your cooking” like showing up with something that looks intentionally wrapped.
Then came the tea towel era. I brought a bottle of bourbon to a friend’s Friendsgiving and wrapped it in a plaid dish towel with a ribbon and a tiny tag
that said, “For after the dishes.” The laugh it got was worth the extra 30 seconds. Plus, the towel became part of the gift, which feels oddly satisfying
like your wrapping is pulling its weight and contributing to society.
The biggest crowd-pleaser, though, has been the fabric wrap (furoshiki-style). The first time I used a scarf, I worried it would look “too Pinterest,” but
it turned out to be the opposite: neat, practical, and shockingly classy. People like that it’s reusable, and they always ask, “How did you do that?”
(Translation: “Please teach me this wizardry so I never have to fight wrapping paper again.”) I’ve even used seasonal scarveslightweight ones for spring
celebrations, deeper colors for winter holidaysand it makes the gift feel tailored without buying anything extra.
Of course, there were failures. The worst was a cellophane wrap attempt where I underestimated how loud cellophane can be. I was trying to be stealthy
wrapping at midnight, and the crinkle sounded like I was breaking into my own kitchen. Another time, I didn’t dry a chilled bottle first, and the tape
peeled off in slow motion the second I picked it up. Nothing humbles you like watching your “finished gift” unravel while you’re still standing there
smiling.
Now I keep a tiny “bottle wrap kit” ready: ribbon, twine, tags, a couple sheets of tissue, and a spare dish towel. When someone invites me over last minute,
I can wrap a liquor bottle in minutes and still look like I planned my life. The secret isn’t perfectionit’s choosing a method that forgives you. And
honestly, a good bow covers a multitude of crimes.
Conclusion
Wrapping a liquor bottle doesn’t have to be a wrestling match. If you want clean and classic, go with traditional wrapping paper and a crisp seam.
If you want fast and festive, tissue paper and a bow get you there in under two minutes. For eco-friendly style, fabric wraps feel high-end and reusable.
And if you want “effortless host gift,” a tea towel wrap is basically a cheat code.
Pick one method you can repeat easily, keep a couple supplies on hand, and you’ll never be stuck handing over a bottle like, “Here you go… it’s naked.”
Your gift deserves better. So do you.


