Table of Contents >> Show >> Hide
- Why a DIY craft ironing table is worth making
- What a good DIY craft ironing table should include
- Popular DIY craft ironing table styles
- Best materials for a DIY craft ironing table
- How to make a DIY craft ironing table
- Common mistakes to avoid
- How to use your DIY craft ironing table like a pro
- Style ideas that make the table look custom
- Is a DIY craft ironing table cheaper than buying one?
- Final thoughts
- Real-Life Experience With a DIY Craft Ironing Table
- SEO Tags
If your craft room is the kind of place where fabric multiplies at night and your iron lives like a nomad, a DIY craft ironing table might be the upgrade you did not know you needed. It is one of those rare projects that feels both gloriously practical and mildly life-changing. Suddenly, you are not balancing fabric on a too-small board, dragging out a squeaky folding ironing board, or pressing quilt blocks on a surface that looks like it once hosted a science fair volcano. Instead, you get a pressing station that fits your space, matches your workflow, and looks like it belongs in your craft room instead of crashing there.
A DIY craft ironing table is exactly what it sounds like: a custom ironing or pressing surface built for crafting, sewing, quilting, appliqué, or any project that needs heat, steam, and a flat surface that does not wobble like a nervous flamingo. Some versions sit on a tabletop. Some are built on plywood and rest on a cabinet, dresser, or desk. Others use a folding TV tray, a rolling cart, or a removable cover so the setup can work hard and still behave nicely in a small home.
The beauty of this project is that it is flexible. You can build a full-size pressing station for a sewing studio, a small tabletop board for next-to-machine pressing, or a portable version you can fold away after craft time. Best of all, it can be made with basic materials, beginner-friendly construction, and enough style to make your workspace feel intentionally designed rather than “creative chaos with scorch marks.”
Why a DIY craft ironing table is worth making
The main reason people make a DIY craft ironing table is simple: standard ironing boards are often too narrow, too wobbly, too tall, too low, or too inconvenient for serious crafting. A custom table lets you choose the size, height, padding, mobility, and look. If you quilt, a wider surface makes pressing blocks, strips, and larger sections much easier. If you sew garments, having a board right beside your machine saves steps and keeps your process smooth. If your craft room is tiny, a tabletop version can turn a desk, counter, or cart into a temporary pressing station without permanently sacrificing floor space.
There is also a comfort factor. A sturdier surface feels better to use. It stays put. It gives cleaner results. It reduces that annoying “press, shuffle, reposition, mutter dramatically, press again” cycle. And because you are building it yourself, you can make it pretty. Yes, pretty matters. You are more likely to use your tools well when they feel like part of a space you enjoy.
What a good DIY craft ironing table should include
A good ironing table is more than wood plus fabric. The best versions usually combine five important elements: a flat and stable base, enough cushioning for smooth pressing, a heat-friendly top layer, secure fastening, and a layout that actually suits the way you work.
The base is often plywood, a wooden tray table, or a solid flat top on furniture you already own. Stability matters because pressing is not the same as casually waving an iron around and hoping for the best. You want a firm surface under the fabric so seams set properly and wrinkles do not bounce back out like they pay rent there.
The padding is what turns a plain board into a functional pressing surface. Batting is the usual hero here. Some makers use multiple layers of batting, while others combine cotton batting with reflective insulation. A few prefer wool pressing surfaces because wool can hold heat and steam well, making pressing feel more efficient. The top layer is often sturdy cotton, canvas, duck cloth, or home décor fabric. In other words, this is not the place for flimsy mystery fabric from the bottom of your stash bin.
Popular DIY craft ironing table styles
1. The simple plywood tabletop board
This is the classic option and a great place to start. You cut plywood to your desired size, wrap it in batting, cover it with sturdy fabric, and secure everything underneath. Then you place it on a desk, counter, cabinet, or worktable. It is simple, useful, and easy to customize. If your sewing room already has a table, this option gives you a pressing station without adding another large piece of furniture.
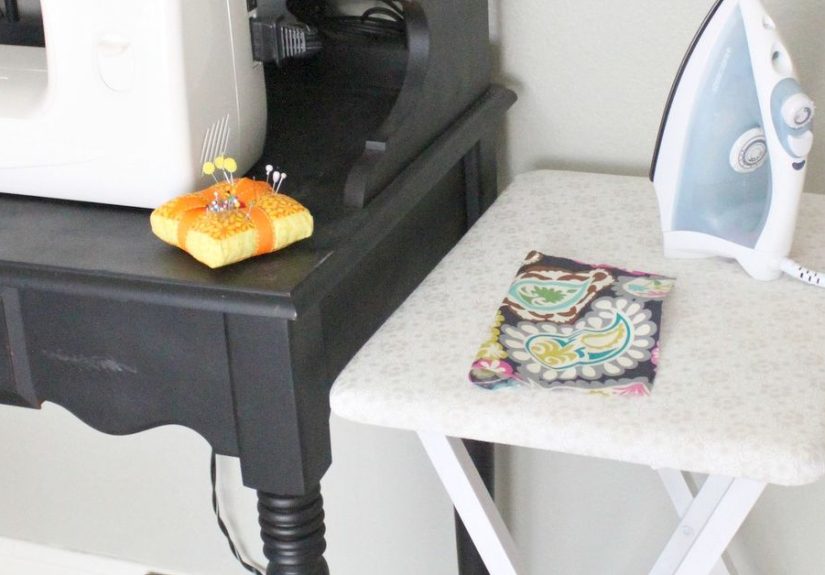
2. The portable TV tray pressing table
This version is brilliant for small rooms. A folding wooden TV tray becomes the stand, while the top gets padded and covered to create a dedicated pressing area. It can live beside your machine while you sew and fold flat when you are done. For apartment crafters and anyone with a room that must wear six different hats before lunch, this design is gold.
3. The rolling cart ironing station
If you love storage, a cart-top pressing station is your crafty soulmate. A small cart can hold starch, clips, pressing cloths, rulers, and extra notions while the top becomes your ironing surface. That means fewer trips across the room and fewer moments spent asking, “Where did I put the spray bottle this time?”
4. The permanent craft room pressing table
This is the “I am committed and I own a staple gun” version. It often uses a larger plywood top fitted over a cabinet, dresser, or built-in surface. Some makers add rubber feet. Some make removable covers with drawstrings or ribbon channels. Some go counter-height for comfort. It is the most polished option and often the most satisfying if you sew or quilt regularly.
Best materials for a DIY craft ironing table
Base material
Plywood is the usual favorite because it is flat, sturdy, and easy to cut to size. A thickness around half an inch to three-quarters of an inch is common for DIY pressing boards because it provides support without becoming absurdly heavy. If you are using a tray table or existing furniture, make sure the top is flat and solid.
Padding
Batting is where comfort and function meet. Multiple layers can create a smooth, cushioned pressing surface. Cotton batting is a strong choice for many sewists. Some makers add a reflective layer like insulated fleece beneath the top fabric to help bounce heat back upward. That said, reflective insulation is not magic armor. It may help reflect heat, but it should not replace basic heat safety and sensible materials.
Top fabric
Choose a tightly woven cotton, cotton canvas, duck cloth, or home décor weight fabric. You want something sturdy enough to handle repeated pressing and tight stretching across the board. Lightweight quilting cotton can work, especially for covers, but heavier fabric often lasts longer in high-use craft rooms. If you like a decorative look, this is where you can have fun with stripes, florals, polka dots, or a bold print that says, “Yes, I press seams with flair.”
Fasteners and finishing supplies
A staple gun is common for fixed boards. Ribbon, cording, or twill tape works well for removable covers with a casing. Safety pins, scissors, rubber feet, and a measuring tape also belong in the cast. Optional extras include pockets for tools, a removable cover, and a pressing cloth for delicate fabrics.
How to make a DIY craft ironing table
Step 1: Decide where it will live
Before you cut anything, decide how the board will be used. Will it sit on a sewing table? On top of a cart? On a tray table? Do you want it to stay put or travel from room to room? Let the space decide the shape. A quilting setup may benefit from a wider square or rectangle. A general craft station might need something narrower and easier to store.
Step 2: Cut the base
Measure your desired size and cut the plywood. Sand any rough edges if needed. No one wants a beautiful new pressing station that also behaves like a splinter delivery system.
Step 3: Add padding
Layer batting over the board. If you are using more than one type, place the cushioning layers first and the reflective layer closer to the top fabric. Trim the batting so it wraps neatly without creating bulky corners. You want enough softness to support pressing, but not so much puff that the surface turns into a fabric marshmallow.
Step 4: Cover it with fabric
Lay the fabric right side down, place the padded board on top, then pull the fabric tightly around the back. Start stapling at the center of one side, then move to the opposite side. Repeat on the remaining sides. This keeps tension even and helps avoid crookedness. Work toward the corners gradually.
Step 5: Tame the corners
Fold the corners as flat as possible before securing them. Bulky corners can make the board rock or look lumpy. A neat fold is not just prettier; it also helps the fabric wear better over time.
Step 6: Add optional upgrades
Now is the time for rubber feet, a pocket caddy, or a removable cover. A removable cover is especially smart if you use starch, fusible products, or heavy steam. Pressing surfaces eventually collect grime, and future you will appreciate a setup that is easier to refresh.
Step 7: Test before regular use
Before making this your daily pressing station, test it with your hottest usual fabric and normal steam settings. This is especially wise if you used new batting, insulated fleece, or repurposed materials. A quick test can reveal odors, discoloration, or heat issues before they become a permanent personality trait in your board.
Common mistakes to avoid
One mistake is choosing a top fabric that is too thin. It may look cute for a week, then start looking tired, scorched, or threadbare. Another mistake is using only decorative fabric with no real padding underneath. A pressing table should be firm yet cushioned, not basically a fabric skin stretched over wood.
Another common problem is confusion between pressing and ironing. In garment care, ironing often means moving the iron back and forth to smooth wrinkles. In sewing and quilting, pressing is more of an up-and-down action that helps avoid stretching fabric or distorting seams. Treat your new ironing table like a pressing station first and a wrinkle battlefield second.
Finally, do not ignore maintenance. Dirty covers can transfer residue. Built-up starch can scorch. A tired cover makes even a good board feel less effective. Refreshing the top fabric or replacing a removable cover can make an older DIY setup feel brand-new again.
How to use your DIY craft ironing table like a pro
Keep it near your sewing machine if possible. That little change often makes the biggest difference because you will press as you go instead of promising yourself you will “fix it later.” Spoiler: later is usually another word for never.
Use the correct heat setting for the fabric at hand. Cotton can tolerate more heat than synthetics, and delicate fabrics often benefit from a pressing cloth. A simple cotton pressing cloth can protect fabric from shine, scorching, and accidental drama. If you use starch, use it lightly and clean the surface regularly. A fresh, clean pressing area simply performs better.
If you work with quilt blocks, a wool mat or wool topper can help flatten seams efficiently. If you sew garments, a flat padded surface paired with a pressing cloth is often enough. If you make mixed-media or fusible crafts, keep a sacrificial pressing cloth nearby so adhesive does not migrate to your lovely new table and ruin the vibe.
Style ideas that make the table look custom
A DIY craft ironing table does not need to look homemade in the “bless your heart” sense. It can look smart and intentional. Try a striped fabric if you want a tailored studio look. Choose floral canvas for a cheerful craft room. Use black-and-white dots if you want something playful that still hides minor scorch paranoia. Add a matching hanging caddy, a trim edge, or a coordinated thread catcher nearby for a pulled-together setup.
If your craft room doubles as a guest room or office, pick a neutral home décor fabric and store the board on a cabinet or rolling cart. It will look less like equipment and more like a stylish accessory with a very useful secret life.
Is a DIY craft ironing table cheaper than buying one?
Usually, yes. Especially if you already have scraps of batting, leftover canvas, or a tray table that is currently doing nothing except collecting dust and passive judgment. A custom pressing board can cost far less than a specialty quilting ironing station, and it often works better because it is built for your actual space and habits.
But the real value is not only price. It is convenience. It is comfort. It is accuracy. It is being able to press seams, appliqué pieces, interfacing, and little crafty odds and ends on a surface that fits your work instead of fighting it.
Final thoughts
A DIY craft ironing table is one of those projects that quietly upgrades everything around it. Your sewing becomes smoother. Your pressing gets more consistent. Your workspace feels more intentional. And every time you use it, you get the tiny satisfaction of knowing you made a tool that genuinely improves your craft.
The best version is not necessarily the biggest or fanciest one. It is the one that fits your room, supports your projects, and encourages you to press properly instead of “sort of flattening things and hoping for the best.” Whether you build a compact tabletop board, a folding TV tray station, or a full pressing table worthy of its own fan club, you are creating something useful, affordable, and surprisingly stylish.
In other words, this is not just another DIY. It is a smarter way to craft.
Real-Life Experience With a DIY Craft Ironing Table
The first thing most people notice after making a DIY craft ironing table is not how pretty it looks, although that part is admittedly delightful. It is how much easier crafting feels when the pressing surface is exactly where it should be. There is a huge difference between walking across the room to a standard ironing board every few minutes and simply reaching to your side for a quick press. That small change makes sewing feel more fluid. You sew a seam, press it, keep going, and suddenly your project has momentum. It stops feeling like a stop-and-start chore and starts feeling like actual creative work.
Another very real experience is the satisfaction of using a board that fits the project. A narrow store-bought ironing board can make larger quilt pieces feel like you are trying to wrap a burrito on a bookmark. A wider DIY pressing table gives fabric room to relax. Small craft pieces stay flat. Fusible interfacing sits properly. Quilt blocks do not slide off the edge like they are making a dramatic exit. Even when the board is not giant, the fact that it is designed around your habits makes it feel more useful than a standard model that technically works but never quite cooperates.
Many crafters also discover that material choices matter more than expected. A sturdier top fabric feels better right away. A well-padded board gives cleaner results. A removable cover can feel like an unnecessary extra until the day starch overspray, fusible residue, or mystery craft grime shows up and you realize washable is not a luxury. It is a love language. And if you build the board yourself, fixing or recovering it later is not intimidating. You already know how it goes together, so maintenance feels doable instead of annoying.
There is also an emotional side to the experience that people do not always talk about. A custom ironing table can make a craft room feel complete. It signals that this is a real workspace, even if it lives in a corner of the dining room or next to a bookshelf in the guest room. It becomes one of those tools that quietly supports every project, from holiday ornaments to quilt tops to last-minute hemming. You may not post a dramatic social media tribute to it, but deep down, you know it earned one.
And yes, there is often a tiny moment of smug joy when someone sees it and says, “Wait, you made that?” Because you did. You made a practical tool that saves time, improves results, and looks good doing it. That is peak DIY energy right there.


