Table of Contents >> Show >> Hide
- What Is an Accordion Book Keepsake?
- Why Angela Liguori’s Style Fits This Project So Beautifully
- Best Uses for a DIY Accordion Book Keepsake
- Materials You Will Need
- Choosing the Right Paper
- Recommended Measurements for Beginners
- Step-by-Step: How to Make an Accordion Book Keepsake
- Design Ideas for a More Beautiful Accordion Book
- Archival Tips: How to Make Your Keepsake Last
- Common Mistakes and How to Avoid Them
- Creative Theme Ideas for Your Accordion Keepsake
- Experience Notes: What Making This Project Teaches You
- Conclusion
Some keepsakes sit in a drawer forever, gathering dust and making you feel vaguely guilty every time you go looking for tape. Others become tiny works of artpersonal, tactile, charming, and somehow able to make a grocery receipt look like evidence of a grand European romance. That is the magic behind a DIY accordion book keepsake inspired by Angela Liguori, the Rome-born bookmaker, designer, and founder of Studio Carta.
An accordion book is one of the most satisfying handmade book projects because it looks impressive without requiring a medieval apprenticeship, a printing press, or a suspiciously expensive machine from the craft store. The structure is simple: one long strip of paper folded back and forth like an accordion, then attached to covers. But inside that humble fold lives a whole little theater of memory. Photos, pressed flowers, handwritten notes, ticket stubs, poems, tiny drawings, travel scraps, wedding vows, baby milestones, holiday menus, or a miniature love letter to your dog can all find a home here.
This guide walks you through how to make an accordion book keepsake in a polished, practical way, while borrowing design wisdom from Angela Liguori’s world: fine paper, careful folds, beautiful materials, and an eye for details that whisper instead of shout. The result is a handmade book that feels thoughtful, personal, and gift-worthywithout needing to look like it was attacked by a glitter tornado.
What Is an Accordion Book Keepsake?
An accordion book, sometimes called a concertina or leporello book, is made from a continuous strip of paper folded into equal panels. Unlike a regular bound book, it can open page by page or stretch out dramatically across a table. That theatrical quality is exactly why it works so well as a keepsake. When opened, it becomes a timeline, a gallery, a story path, or a tiny exhibition of personal moments.
The format is popular in book arts because it is beginner-friendly, flexible, and visually striking. You do not need to sew signatures or build a complicated spine. Instead, you focus on clean measuring, crisp folding, smart materials, and thoughtful arrangement. Translation: fewer chances to panic, more chances to feel like a paper genius.
Why Angela Liguori’s Style Fits This Project So Beautifully
Angela Liguori is known for Studio Carta, a design studio specializing in fine stationery, Italian cotton ribbons, and carefully made objects. Her work reflects a love of craftsmanship, restraint, texture, and small details that feel luxurious without being loud. That sensibility is perfect for an accordion book keepsake because the project depends on subtle choices: the weight of the paper, the way a ribbon closure ties, the feel of the cover in your hand, the clean edge of a fold.
Instead of overdecorating every inch, think like a designer. Give each panel room to breathe. Let the paper do some of the talking. Use one beautiful ribbon instead of seven confused ones. Choose colors that support the memory rather than wrestling it to the ground. A handmade keepsake should feel intimate, not like it is auditioning for a craft competition judged by caffeinated raccoons.
Best Uses for a DIY Accordion Book Keepsake
Accordion books are wonderfully adaptable. A small version can become a pocket-size photo album. A larger one can serve as a wedding guest message book, anniversary timeline, baby’s first-year memory book, travel journal, graduation gift, family recipe mini-book, or memorial keepsake. For events, you can print a menu, ceremony program, or party story across the panels. For personal gifts, you can mix photographs with handwritten notes and small paper ephemera.
The best accordion book projects usually have a clear theme. “Our weekend in Maine,” “Grandma’s garden,” “First year together,” “Ten reasons you are my favorite human,” or “Receipts from meals we claimed were casual but absolutely were not” will feel stronger than a random pile of pretty scraps. A theme gives your book rhythm, and rhythm matters in a format that unfolds panel by panel.
Materials You Will Need
Basic Supplies
- Acid-free text-weight paper for the folded interior pages
- Book board or heavy chipboard for hardcover versions
- Decorative cover paper, handmade paper, or sturdy art paper
- Acid-free glue, PVA glue, or archival double-sided tape
- Bone folder for crisp folds
- Metal ruler
- Craft knife or paper trimmer
- Cutting mat
- Pencil for light measuring marks
- Scrap paper for protecting your work surface while gluing
- Ribbon, cord, or cotton tape for closure
Optional Decorative Additions
- Photo corners
- Small printed photos
- Pressed flowers or leaves
- Labels, stamps, or calligraphy
- Thin envelopes or pockets
- Watercolor washes
- Letterpress-style tags
- Ticket stubs, maps, or travel scraps
If your keepsake will hold photographs or important paper memories, choose archival materials whenever possible. Acid-free and lignin-free paper, photo-safe storage, and non-damaging attachment methods help preserve the book longer. Avoid rubber cement, regular office tape, rubber bands, paper clips, and mystery glue from the back of the junk drawer. If the label says “permanent” but smells like regret, step away.
Choosing the Right Paper
Paper choice can make or break an accordion book. For the inside strip, use paper that folds cleanly but is strong enough to support whatever you attach. Text-weight paper works well for writing, printing, light collage, and small photographs. If you plan to add watercolor, ink, or heavier collage, choose a heavier mixed-media paper, but test the fold first. Thick paper can crack when folded unless it is scored properly.
For covers, book board creates a polished hardcover feel. If you want an easier version, use heavy cardstock slightly larger than the folded pages. The softcover version is great for kids, party favors, quick gifts, or first attempts. The hardcover version feels more refined and durable, especially if you are making a wedding keepsake, anniversary book, or heirloom-style photo album.
Recommended Measurements for Beginners
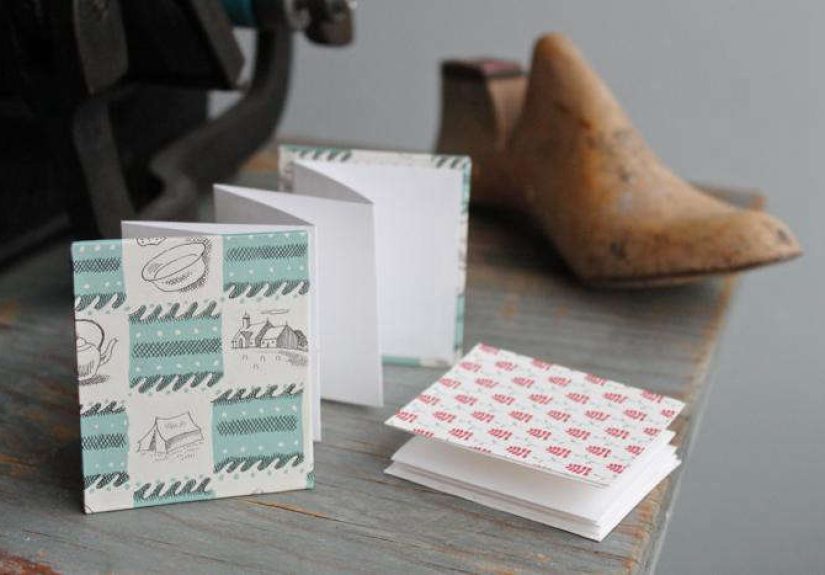
For a small keepsake, try covers measuring 3 inches by 3 inches. Cut your interior paper strip slightly smaller in height, around 2.75 inches tall, so the pages sit neatly inside the cover with a small border. A strip around 18 inches long can be folded into eight panels. This size is friendly for beginners, easy to display, and adorable without becoming dollhouse furniture.
Want something larger? Use 5-by-7-inch covers and a paper strip slightly smaller in height. Just remember: the longer the strip, the more precise your folds need to be. Tiny errors can multiply across panels like gossip in a group chat.
Step-by-Step: How to Make an Accordion Book Keepsake
Step 1: Plan Your Story Before Cutting
Before you touch the paper, decide what the book will hold. Lay out your photos, notes, or decorative pieces in order. Count how many panels you need. An eight-panel book gives you room for a beginning, middle, and end without becoming a paper marathon. Sketch a quick layout on scrap paper so you know which panel gets what.
Step 2: Cut the Interior Strip
Measure and cut a long strip of acid-free paper. For a 3-inch cover, cut the strip about 2.75 inches high. Keep your edges straight using a metal ruler and craft knife or a paper trimmer. Clean edges make the entire book look more professional, even if your desk currently looks like a confetti factory.
Step 3: Fold the Accordion Pages
Fold the strip in half and crease it firmly with a bone folder. Then fold each half back toward the center to create four equal sections. Continue folding back and forth until you have eight equal panels. The goal is a neat mountain-valley pattern, like paper doing tiny yoga poses.
Use the bone folder on every crease. Crisp folds help the book close properly and stand open beautifully. If your paper is thick, score the fold lines lightly before folding to prevent cracking.
Step 4: Cut the Cover Boards
Cut two pieces of book board to your chosen cover size. For a beginner-friendly mini book, 3 inches by 3 inches works beautifully. Make sure both boards match exactly. Uneven covers are not a tragedy, but they do give the book a “made during a mild earthquake” personality.
Step 5: Cover the Boards with Decorative Paper
Cut two pieces of decorative paper larger than the book boards, leaving enough margin to wrap around the edges. Brush a thin layer of acid-free glue from the center outward. Too much glue can warp the paper, so apply it lightly and evenly. Place the board in the center, press it down, and smooth carefully.
Trim the corners diagonally, leaving a tiny gap between the cut and the board corner. Fold each edge around the board, smoothing with the bone folder. Tuck the corners neatly, like wrapping a very small, very square present for someone with excellent taste.
Step 6: Attach the Accordion Pages to the Covers
Place scrap paper under the first end panel so glue does not smear onto your table. Apply a thin, even layer of glue or archival tape to the outside of the end panel. Center it on the inside of the front cover and press firmly. Repeat with the final panel and back cover, making sure both covers face the correct direction.
This is the moment to slow down. If one cover is upside down, your book will still function, but it may quietly judge you forever.
Step 7: Add a Ribbon Closure
A ribbon closure gives the book a finished, gift-like quality. You can glue a ribbon between the cover board and cover paper during construction, wrap ribbon around the finished book, or tie it separately like a package. Angela Liguori’s design world reminds us that ribbon is not just decoration; it is a small gesture of ceremony. It tells the recipient, “This was made with care,” and also, “Please admire this knot. I worked hard on it.”
Step 8: Fill the Pages
Now comes the personal part. Add photos with archival photo corners instead of glue when possible. Write captions by hand, stamp dates, add tiny envelopes, or paste in lightweight paper souvenirs. Leave some negative space so the book does not feel crowded. A keepsake should invite the eye to wander, not file a noise complaint.
Design Ideas for a More Beautiful Accordion Book
Create a Visual Rhythm
Alternate photo panels with text panels. Use a repeated border, color, or label style. Place one strong image at the beginning and one at the end. This gives the book a sense of movement, which is especially important because accordion books are experienced in sequence.
Use a Limited Color Palette
Choose two or three main colors. For example, cream paper, olive ribbon, and warm brown ink feel timeless. Blush paper, ivory ribbon, and soft gray captions feel romantic. Navy covers, white pages, and gold accents feel formal. Limiting colors makes the book look intentional instead of like it lost a fight with the craft aisle.
Add Pockets for Hidden Memories
A small pocket can hold a note, lock of ribbon, tiny map, recipe card, or extra photo. Keep pockets thin so the book still closes. If you add bulky items, place them near alternating folds to distribute thickness evenly.
Let Handwriting Be Part of the Charm
Your handwriting does not need to look like a wedding invitation. Personal writing gives the book warmth. Use pencil guidelines if you want straight lines, then erase gently after the ink dries. A slightly imperfect handwritten note often feels more meaningful than perfect printed text.
Archival Tips: How to Make Your Keepsake Last
If this accordion book will preserve meaningful photos or family memories, think about longevity. Use acid-free and lignin-free papers. Choose photo-safe corners or sleeves. Avoid sticky photo album pages, pressure-sensitive tape, and rubber cement. Store the finished book flat in a cool, dry, dark place, ideally inside an archival box or protective sleeve.
Do not store important paper keepsakes in attics, basements, damp closets, or sunny windowsills. Those places are where memories go to become crispy, faded, or mysteriously wavy. Light, heat, humidity, and unstable materials can damage photos and paper over time.
Common Mistakes and How to Avoid Them
Using Too Much Glue
Excess glue can wrinkle paper and warp covers. Use a thin layer and brush from the center outward. Always protect your work surface with scrap paper.
Skipping the Bone Folder
A bone folder gives folds a sharp, professional finish. If you do not have one, use the back of a spoon or a smooth craft stick, but a real bone folder is worth it if you plan to make more handmade books.
Making the Pages Too Bulky
Accordion books need flexibility. Thick embellishments can prevent the book from closing. Use lightweight paper pieces, small photos, and thin pockets.
Forgetting the Cover Direction
Before gluing, open the book in your hands and check the orientation. Then check again. This is one of those tiny steps that saves big sighs.
Creative Theme Ideas for Your Accordion Keepsake
For a travel keepsake, use map fragments, ticket stubs, small photos, and handwritten place names. For a wedding or anniversary book, add vows, dates, pressed flowers, and favorite lines from speeches. For a baby keepsake, create monthly panels with photos and tiny notes. For a recipe memory book, include family dishes, kitchen snapshots, and little stories about who always burned the rolls.
You can also make an accordion gratitude book. Give each panel to a different friend or family member to write a message. Fold it up, tie it with ribbon, and you have a gift that is inexpensive but emotionally dangerous in the best way. Tissues may be required.
Experience Notes: What Making This Project Teaches You
Making a DIY accordion book keepsake sounds simple, and structurally it is. But the experience has a lovely way of slowing you down. You begin by measuring paper, and suddenly you are making decisions about memory: what matters enough to include, what order the story should unfold in, and how much empty space a moment needs. That is the quiet beauty of handmade books. They ask you to pay attention.
The first thing you notice is that accuracy matters, but perfection is not the point. Your first fold may be slightly off. Your glue may dry faster than expected. One corner may look more “rustic farmhouse” than “Italian design studio.” That is okay. The project teaches patience through your hands. You learn to test the paper before committing, to use less glue than your enthusiastic heart wants, and to trust a bone folder like it is a tiny magic wand.
The second lesson is that materials change the emotional tone. A book made with cream paper and cotton ribbon feels soft and nostalgic. A book with black covers and white ink feels dramatic and modern. Handmade paper adds texture and romance. Smooth cardstock feels clean and graphic. Even before you add photos or words, the book has a mood. That is why Angela Liguori’s design sensibility is such a good reference point: simple materials, chosen well, can carry more feeling than a pile of decorations.
The third experience is the joy of sequencing. Because an accordion book opens panel by panel, it behaves almost like a short film. The first panel introduces the story. The middle panels build it. The final panel gives closure. When making a travel book, you might begin with a map, move through meals and street scenes, and end with a quiet photo from the trip home. For a family keepsake, you might begin with an old portrait and end with a handwritten note from the present. The format naturally invites storytelling.
There is also a surprisingly social side to this project. People love picking up accordion books. They open them gently, then stretch them wider, then smile when they realize the book keeps going. It feels interactive without requiring batteries, passwords, or a software update. At a dinner party, wedding shower, classroom, or family gathering, an accordion keepsake becomes a conversation object. It says, “Come look closer.” That is a rare thing in a world where most photos live behind a glass screen.
One practical experience worth mentioning: make a test version first. Use plain copy paper and scrap cardboard to understand the folds, panel count, and cover attachment. The test book may look like it was assembled by a raccoon with ambition, but it will save your good paper from heroic mistakes. Once you understand the structure, the final version feels much easier.
Another helpful habit is to prepare all content before gluing. Print photos at the right size, trim captions, choose ribbons, and arrange every panel. Then walk away for ten minutes. When you return, you will usually spot one crowded panel or one color that feels bossy. Editing is part of the craft. A beautiful keepsake is not made by adding everything; it is made by choosing the right things.
Most of all, making an accordion book reminds you that keepsakes do not have to be grand to be meaningful. A tiny book with eight panels can hold a whole season of life. It can preserve a friendship, celebrate a trip, honor a loved one, or turn ordinary paper scraps into something worth keeping. And when it is tied shut with ribbon, it becomes more than a craft project. It becomes a small ceremony of memory.
Conclusion
A DIY accordion book keepsake with Angela Liguori-inspired elegance is the perfect project for anyone who loves paper, memory, and handmade details. It is simple enough for beginners but refined enough to become a meaningful gift. With acid-free paper, crisp folds, beautiful covers, and a thoughtful ribbon closure, you can create a keepsake that opens like a story and stores like a treasure.
The best part is that no two accordion books are ever exactly alike. Your paper choices, handwriting, photos, colors, and tiny imperfections make the finished piece personal. Whether you create a travel album, wedding favor, family memory book, or miniature art journal, the accordion format turns small moments into something display-worthy. It is proof that a few folds, a little glue, and a good ribbon can do more emotional heavy lifting than a whole cloud folder of forgotten photos.


