Table of Contents >> Show >> Hide
- Table of Contents
- What Jordan Almonds Are (and Why They’re Tricky)
- Before You Start: Almond Prep + Tools
- Method 1: Hand-Panned Sugar Shell (Bowl Method)
- Method 2: Stand-Mixer “DIY Panning” (Smoother, Faster)
- Method 3: Chocolate-Cored Jordan Almonds (Pro Vibes at Home)
- Troubleshooting: When Sugar Gets Opinionated
- Storage, Gifting, and Party-Ready Tips
- of “What It’s Like” (Real-World Kitchen Experience)
Jordan almonds are the candy world’s tiny overachievers: a crunchy almond core wrapped in a smooth, hard sugar shell that looks like a pastel pebble
you’d find in a fancy candy dish (and then immediately eat, because you have priorities).
They’re classic at weddings, showers, and celebrationssweet on the outside, slightly bitter on the inside, and somehow always gone faster than the
last cupcake.
Here’s the honest truth: real Jordan almonds are made with a process called panning, where you build a shell in thin layers while the centers tumble.
Big candy companies use specialized rotating drums with controlled heat and airflow. But you can absolutely make a satisfying, giftable, “yepthat’s a Jordan
almond” version at home if you’re willing to trade a little perfection for a lot of fun (and a small amount of sugar-related drama).
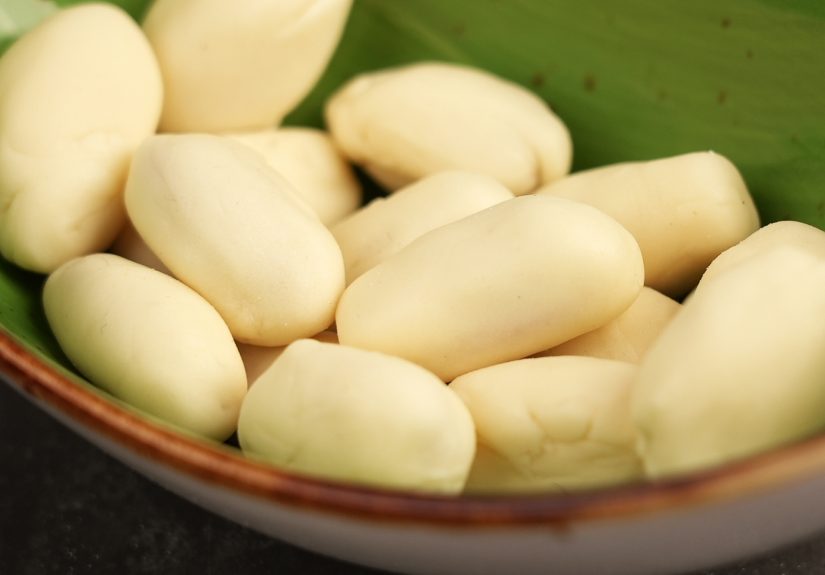
What Jordan Almonds Are (and Why They’re Tricky)
Jordan almonds (also called dragées or sugared almonds) are typically almonds coated in multiple thin layers of sugar syrup and sugar that harden into a
crunchy shell. The classic finish is smooth, opaque, and often shinylike a tiny candy egg that went to finishing school. Traditionally, this happens in a rotating
pan or drum where the almonds keep moving so the coating builds evenly.
If you’re making them at home, the challenge is getting that shell to:
(1) build in layers instead of forming one sticky sugar boulder,
(2) dry between coats without melting back into sadness,
and (3) stay crisp in humidity (because sugar loves moisture the way cats love knocking things off counters).
The good news: there are home-friendly ways to approximate professional panning. The better news: even “rustic” Jordan almonds still taste like
sweet, crunchy victory.
Before You Start: Almond Prep + Tools
Pick the right almonds
- Shape matters: Whole, fairly uniform almonds coat more evenly. Flat or very wrinkly almonds take more layers to look smooth.
- Flavor matters: A fresh almond is mildly sweet with a hint of bitternessperfect for the classic “bitter and sweet” vibe.
Optional but helpful: blanch (remove skins)
Many traditional Jordan almonds use blanched almonds for a cleaner look under the shell. Blanching is simple: briefly steep almonds in boiling water,
drain, cool, and slip off the skins by squeezing each almond. It’s a little tedious, but it makes your final candies look more “wedding favor” and less “forest acorn.”
Toast and dry (don’t skip the dry part)
Whether you blanch or not, gently toast your almonds (think light golden and fragrant) and let them cool fully. Dry centers help sugar shells set crisp.
If your almonds are warm and damp, your coating can turn tacky and streaky.
Tools that make life easier
- Candy thermometer: You’ll be cooking sugar syrup to specific temperature ranges for consistency.
- Heavy saucepan: Sugar syrup behaves best in sturdy cookware.
- Large stainless-steel mixing bowl: For hand-panning; metal helps cool and set layers.
- Silicone spatula + whisk: For syrup and quick stirring.
- Parchment-lined tray: For resting/drying your coated almonds.
- Optional airflow: A small fan can speed drying between coats.
Safety note (quick and non-dramatic)
Hot sugar syrup can be extremely hot. Work carefully, keep kids/pets away from the stove, and use long-handled tools. This is candy, not a competitive sport.
Method 1: Hand-Panned Sugar Shell (Bowl Method)
Best for: small batches, no fancy equipment, classic crunch.
Result: a traditional-style sugar shell that’s slightly more “handmade pebble” than factory-perfectstill totally party-worthy.
Ingredients (makes about 2 to 2½ cups finished candies)
- 2 cups whole almonds (blanched optional), toasted and fully cooled
- 1½ cups granulated sugar (plus extra if needed)
- ½ cup water
- 1 to 2 tablespoons light corn syrup (helps manage crystallization)
- Pinch of salt
- Optional: ½ teaspoon vanilla extract (add off heat)
- Optional: gel food coloring (tiny amounts)
Step-by-step
-
Make a panning syrup.
Combine sugar, water, corn syrup, and salt in a saucepan. Heat over medium, stirring until dissolved.
Then stop stirring and let it boil until it reaches 235–245°F (soft-ball to firm-ball range). This gives you a syrup that’s sticky enough
to grab the almond, but not so hot it instantly becomes hard candy the second it touches air. -
Set up your “panning station.”
Put almonds in a large stainless-steel bowl. Have a parchment-lined tray ready. If you’re using food coloring, add it to the syrup off heat in tiny dabs
(you can always add more; you can’t un-Pepto-Bismol your candy). -
Coat in micro-layers (the whole secret).
Drizzle about 1 to 2 teaspoons of hot syrup over the almonds while constantly swirling and tossing the bowl.
Keep the almonds moving so they don’t glue themselves into a single mega-almond. -
Dry that layer.
Keep tossing until the shine turns to a slightly matte, “set” look. If things stay tacky, sprinkle in a teaspoon of granulated sugar and keep tossing
it helps the surface crystallize and dry. -
Repeat… patiently.
Repeat the tiny syrup additions and tossing until you build the shell thickness you want. Expect 15–25 rounds for a noticeable shell.
Yes, it’s repetitive. That’s why candy makers also invent podcast playlists. -
Let them cure.
Spread on parchment and let them dry at room temp for a few hours (or overnight). The shell will firm up and crisp as moisture equalizes.
Flavor ideas (without reinventing the candy wheel)
- Classic vanilla: add vanilla off heat once syrup hits temp (don’t boil it aggressively).
- Lemon: add a tiny bit of lemon extract off heat and keep colors pale yellow.
- Cinnamon: add a pinch of cinnamon to the sugar “drying sprinkle” for subtle warmth.
Why this works
Panning is basically “build layers + dry between layers.” Even manual bowl panning follows that logic: small syrup additions, constant motion, and time
for each coat to set.
Method 2: Stand-Mixer “DIY Panning” (Smoother, Faster)
Best for: more even coating, less arm workout, slightly more polished look.
Result: smoother shell than pure hand-tossing, especially if you keep additions small and drying consistent.
What you’ll need
- Same ingredients as Method 1
- Stand mixer with a large bowl (stainless steel is ideal)
- Paddle attachment (gentler than whisk for this job)
- Optional: a small fan aimed across (not into) the bowl to help drying
Step-by-step
-
Cook the syrup to the same range.
Aim for 235–245°F for a manageable panning syrup. Keep it warm over very low heat so it stays fluid. -
Start the tumble.
Put almonds in the mixer bowl and run on the lowest speed. You’re creating gentle movement, not a tornado. -
Drizzle in tiny amounts.
Add 1 teaspoon at a time down the side of the bowl (not directly onto one spot of almonds), letting it distribute as the almonds move. -
Dry between coats.
Let the almonds rotate until the surface looks less glossy and more “set.” If needed, sprinkle a teaspoon of sugar to help dry the coat, then let it tumble. -
Build the shell.
Continue with many thin layers until you like the thickness. This method can feel faster because the mixer does the movement for you,
but the shell still needs time to build. -
Final cure.
Spread on parchment and let dry for several hours or overnight.
Pro tip: aim for consistency, not speed
The biggest improvement in homemade Jordan almonds comes from restraint: smaller syrup additions, longer drying time, and a cool, low-humidity room.
If you rush, you’ll get tacky shells that clump, crack, or turn dull.
Method 3: Chocolate-Cored Jordan Almonds (Pro Vibes at Home)
Best for: a smoother shape, a more “luxury candy shop” bite, and easier shell-building.
Result: almonds first rounded with chocolate, then finished with a sugar shell. This is the method that makes people say, “Wait… you made these?”
Ingredients
- 2 cups almonds, toasted and cooled
- 10–12 oz chocolate (dark, milk, or white) OR quality melting wafers
- Panning syrup from Method 1 (sugar + water + corn syrup + pinch salt)
- Gel food coloring (optional)
- Optional finishing: a very small amount of gum arabic solution for shine (see note below)
Step-by-step
-
Coat almonds in chocolate.
Melt and cool chocolate appropriately (tempering is ideal but not mandatory if you use wafers). Toss almonds until coated, then spread to set.
The goal is a thin, even chocolate layer that slightly rounds the almond’s angles. -
Let them fully set and dry.
Chocolate that’s still soft will smear under sugar layers. Give it time until it feels firm and dry to the touch. -
Pan with sugar the same way (tiny layers).
Use either the bowl method or stand-mixer method to add thin layers of syrup and dry between coats.
The chocolate underlayer helps the shell look smoother sooner. -
Optional shine finish.
Commercial dragées are often polished. At home, you can gently “finish” by tumbling the fully dried candies for a few minutes in a clean bowl
to smooth tiny rough spots. For extra shine, some confectioners use a gum arabic-based glaze in very small amounts, but it’s optional.
About gum arabic (optional, advanced)
Gum arabic (acacia) is a common food-safe ingredient used to stabilize or thicken syrups and can be used in confectionery finishing work.
If you try it, keep the application extremely lightthink “mist,” not “marinade.” The easiest win is still: dry layers + patient cure time.
Troubleshooting: When Sugar Gets Opinionated
Problem: My almonds clumped into a sticky candy meteor
- Cause: Too much syrup added at once, or not enough movement.
- Fix: Add smaller syrup amounts (1–2 teaspoons max), keep constant motion, and sprinkle a teaspoon of sugar to help dry the surface.
Problem: The shell looks rough or dusty
- Cause: Layers drying too fast, or using sugar that’s too coarse for finishing.
- Fix: Keep coats thinner. If you can, use superfine sugar for a smoother look. Let candies tumble longer between coats to even out.
Problem: My syrup crystallized in the pot
- Cause: Sugar crystals on the pan sides or too much agitation after boiling starts.
- Fix: Dissolve sugar first, then avoid stirring once it boils. A small amount of corn syrup helps manage crystallization.
Problem: The coating turned sticky after it cooled
- Cause: Humidity or under-dried layers.
- Fix: Dry longer between coats, cure overnight, and store airtight with a moisture-absorbing option (even a dry environment helps a lot).
Problem: I want a harder shell
Shell hardness is about sugar concentration and moisture. Candy temperature stages exist because higher temps mean less water left in the syrup.
For reference, hard-crack territory is around 300°F, which produces brittle, hard candy textures.
You don’t generally pour hard-crack syrup directly onto almonds for panning (it sets too fast), but understanding the temperature ladder helps you control outcomes.
Storage, Gifting, and Party-Ready Tips
How to store homemade Jordan almonds
- Airtight container at cool room temperature is best.
- Keep away from heat (warmth can soften shells and make them tacky).
- Keep away from moisture (humidity is the natural predator of crunchy sugar).
How to gift them like you bought them
- Let them cure overnight, then portion into small boxes or organza bags.
- Use pastel colors for weddings, white for classic, bold colors for birthdays.
- Include five almonds if you’re leaning into traditionmany wedding customs associate five almonds with wishes like health, wealth, happiness, fertility, and longevity.
of “What It’s Like” (Real-World Kitchen Experience)
Making Jordan almonds at home is a little like learning to parallel park: the first attempt is awkward, the second attempt is slightly less awkward,
and by the third you’re wondering why you ever thought this was impossible. The process feels simple on paperadd syrup, toss, dry, repeatbut in the kitchen,
you quickly discover that sugar has a personality and it would like to be consulted before you make plans.
The first “experience moment” usually happens when you add too much syrup. One second you’re confidently drizzling like a pastry chef in a movie montage,
and the next second you’re holding a bowl full of almonds that have decided to become a single, socially committed cluster. This is where you learn the core rule:
Jordan almonds are built in micro-layers. Once you accept that you’re making 20-ish thin coats instead of 3 thick ones, everything gets easier.
It stops feeling like a mistake and starts feeling like a method.
The second big moment is the “shine-to-matte” transformation. Fresh syrup looks glossy and wet. Then, as you toss and the sugar begins to set, the surface shifts
toward a softer, more matte finish. That visual cue becomes your best friend. It’s the candy-making equivalent of knowing when a steak has rested:
you don’t need to poke it constantlyyou just need to respect the timing.
Somewhere in the middle, you’ll also notice how much the room affects your results. In a cool, dry space, coats set faster and stay crisp. In a warm or humid room,
the same coats can stay tacky and slightly sticky, and you’ll feel like you’re negotiating with the weather. This is why experienced candy makers obsess over airflow
and drying. At home, even gentle air movement can change the game. It’s not cheating; it’s teamwork.
Then comes the oddly satisfying part: the shell starts to feel real. Early coats are so thin they seem pointless, like you’re politely whispering “sugar” at an almond.
But after enough rounds, you can actually hear the difference when you shake the trayeach candy has a firmer tap against parchment, a slightly heavier feel,
and a more “finished” look. That’s the moment people get hooked, because you can see the craft building in your hands.
Finally, there’s the “cure time” lesson. Freshly coated Jordan almonds may look done, but the best texture often shows up after they rest.
Letting them dry for hours (or overnight) helps the shell stabilize and crisp. It’s the unglamorous part of candy makingno swirling, no color, no action
but it’s what turns “pretty good” into “wow, these crunch.”
In the end, homemade Jordan almonds aren’t just candythey’re a small edible flex. You learn patience, temperature control, and the power of tiny repeated actions.
And you get a bowl of pastel, crunchy, sweet treats that taste like celebrationwhether you’re throwing a wedding, wrapping favors, or just treating yourself
because you successfully did something that looks like it should require a factory.


